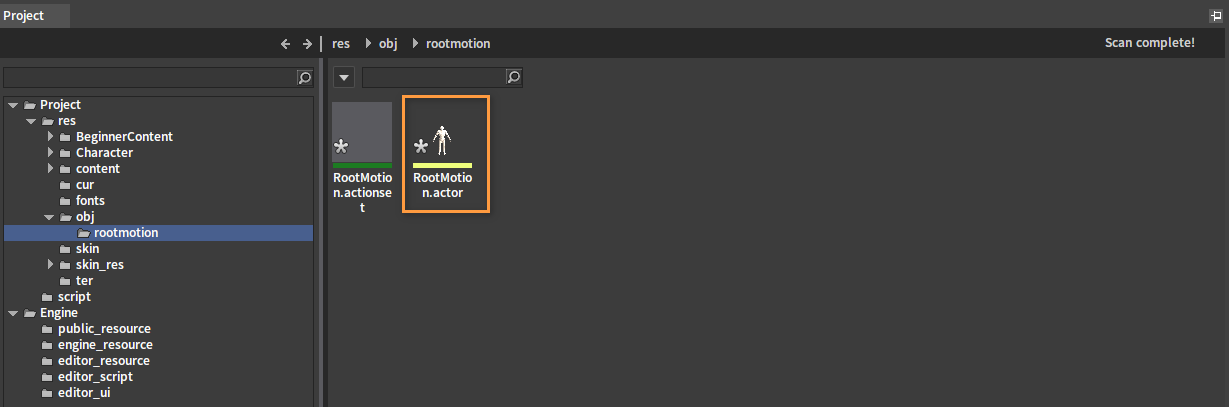
Root Motion
Overview
Root Motion is a feature equipped in the Animation Editor. It can extract the Root Motion data from the animation sequence and use that data to drive the movement of the character's capsule.
Root Motion supports extracting the Delta Transform of the Root Bone animation after multiple actions are blended, and erasing the Root Bone animation in the animation. Based on this feature, the logic layer can produce animation-driven displacement.
Enabling Root Motion
If Root Motion is disabled, the skeletal mesh will be detached from the capsule. It passes through the static mesh directly and snaps back to the start position at the end of the animation, with the origin of the character's action always in situ.
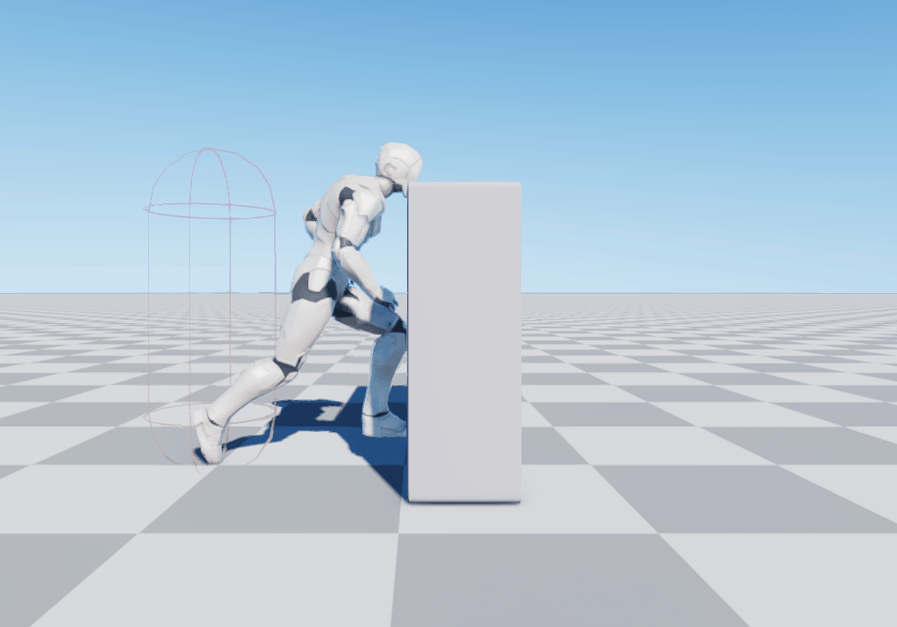
If Root Motion is enabled, the capsule will stay in sync with the skeletal mesh, and physics collision still works. The Root Motion data from the animation sequence is extracted to drive the movement of the character's capsule, causing the character to interact with the static mesh, with the origin of the action coordinates always moving with the character. The character stops moving when colliding with the static mesh. At this time, the origin of the action coordinates changes to the position where the character moved.
 Root Motion Disabled | 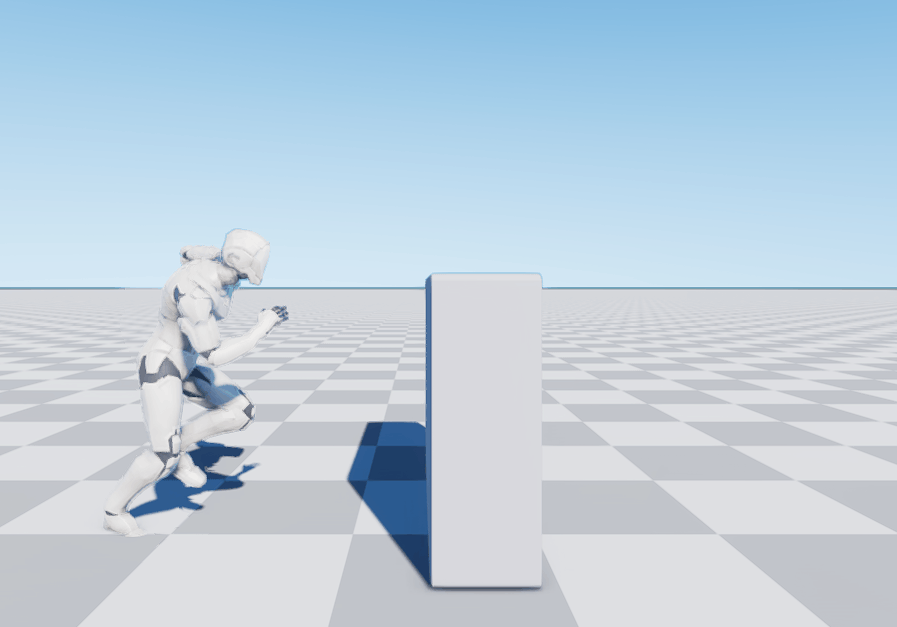 Root Motion Enabled |
Root Bones
The character animation is driven by the bones of its skeletal mesh. Of all the bones, the Root Bone is the foundational one of the entire skeleton. In the animation, the Root Bone without animation data remains stationary, and the character itself does not have any displacement in the world coordinate while the animation continues to play.
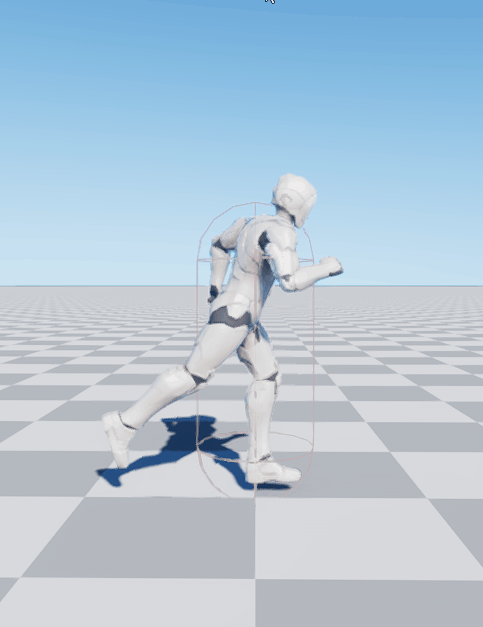
There are also some animations whose Root Bone is stationary, with other motions assigning actions to it. The Root Bone moves, while the character itself does not move with it. For the character to move, the Root Motion needs to be enabled. Once it's enabled, lock the Root Bone animation data first, then extract it to apply to the character.
Using Root Motion
Prerequisite
To use the Root Motion feature, you need a skeleton containing the Root Bone (.actor file), and also, the Actor needs to contain an animation sequence for adding animations to the Root Bone.
Animation Sequences
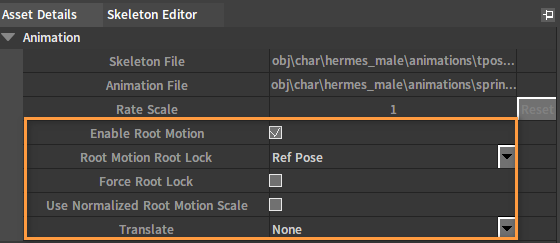
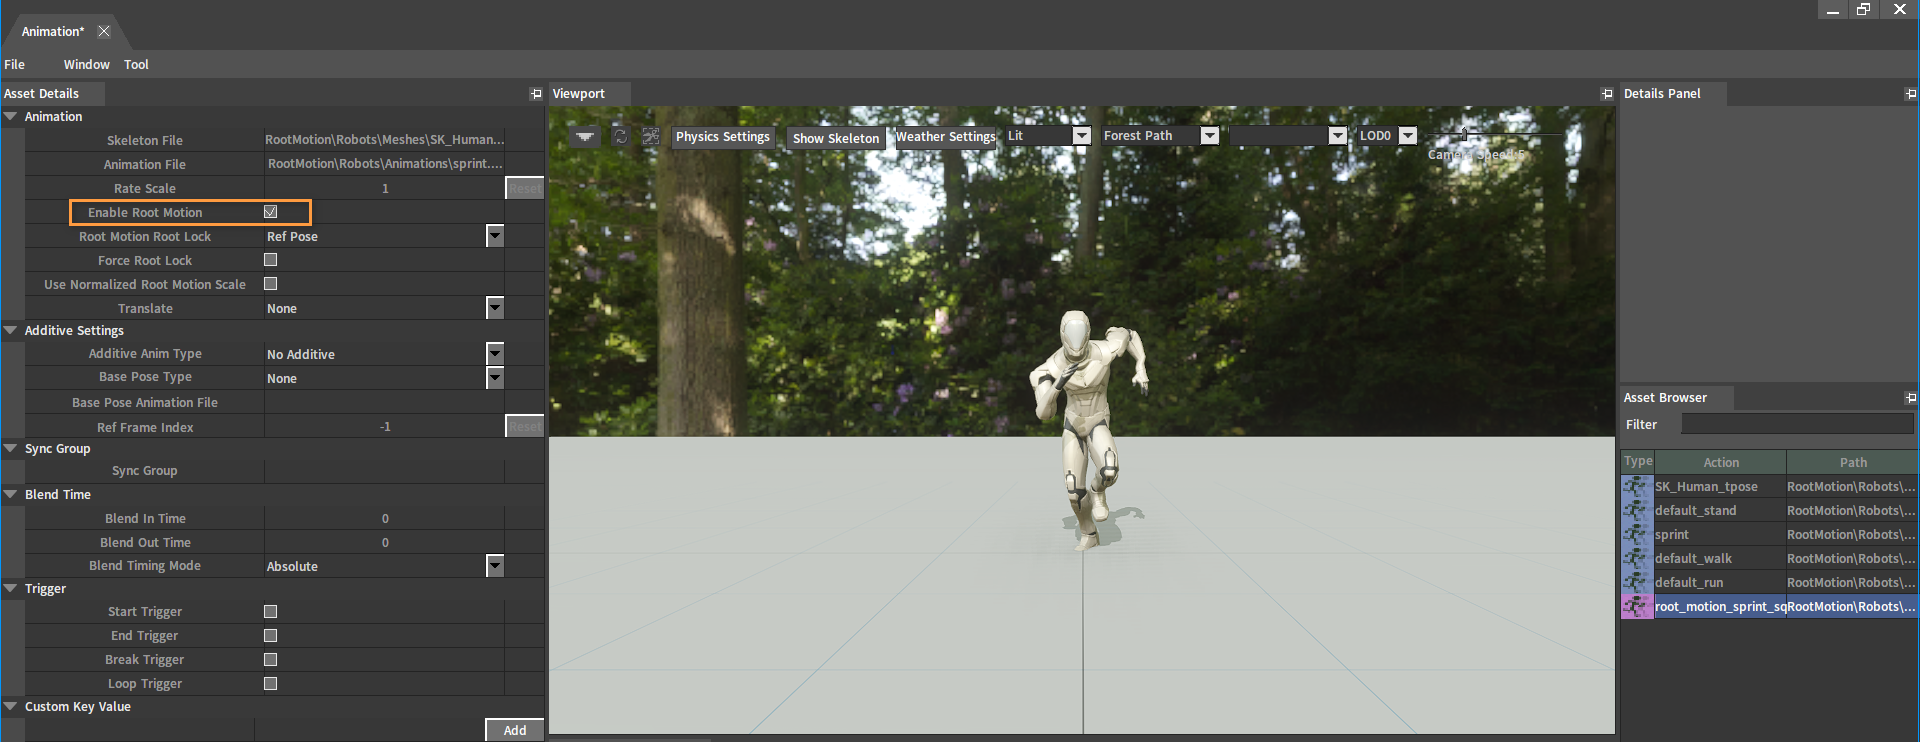
To use the Root Motion feature, the Root Motion of each animation sequence needs to be enabled. Check Enable Root Motion in the Asset Details panel of the animation sequence, and modify the Root Motion related properties as needed.
| Property | Description |
|---|---|
| Enable Root Motion | Whether to enable Root Motion. |
| Root Motion Root Lock | Ways to lock the Root Bone after extracting the Root Motion.
|
| Force Root Lock | Force to lock the Root Bone, regardless of whether Root Motion has been extracted. |
| Use Normalized Root Motion Scale | Use normalized root motion scale (to avoid non-normalized scaling affecting Root Motion results). |
| Translate | Legacy root motion related extraction settings. Clear Z-Axis and Clear X,Z Axes can be chosen. |
Animation Trees
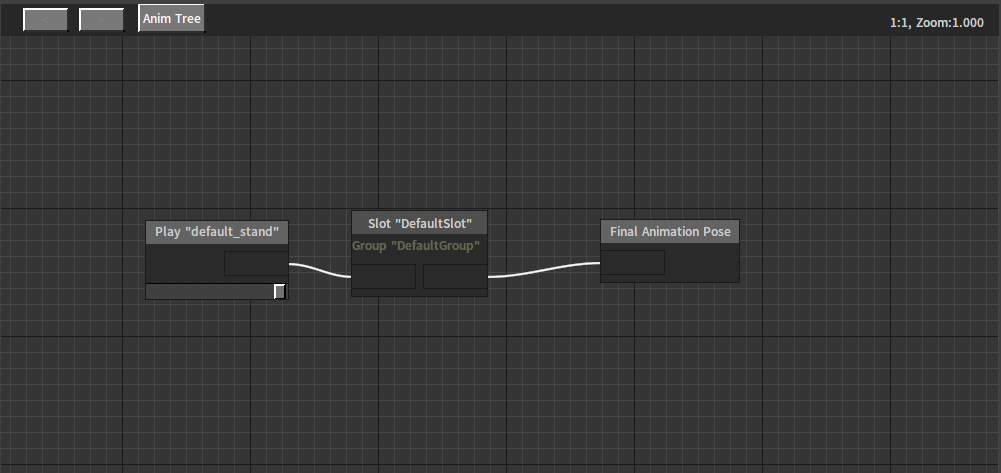
After the Root Motion in the animation sequence is enabled, you also need to use nodes in the Anim Tree Editor to control and manage the animation. You can put the animation that will use the Root Motion in a slot of the Animation Tree.
Root Motion Modes
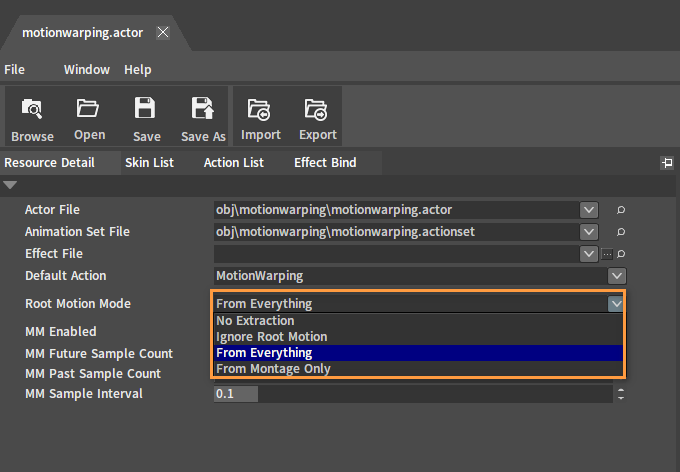
In the Actor that will use the Root Motion feature, different Root Motion Modes can be selected.
| Name | Description |
|---|---|
| No Extraction | Do not extract the Root Bone motion data from the animation and keep it in the animation pose. |
| Ignore Root Motion | Extract the Root Motion from the animation and lock the root transformation of the animation pose. However, the extracted Root Motion data will not be cached for use by the upper-layer logic. |
| From Everything | Extract Root Motion data from any animation with Root Motion enabled and lock the root transformation of the animation pose. It will blend and cache the results based on the respective weights from animations for use by the upper-layer logic. |
| From Montage Only | Extract the Root Motion data from Montages only and lock the root transformation of the animation pose. It will cache data for use by the upper-layer logic. |
Script Call Playback
actor:BlendAction("Select the animation sequence to play", false, false, true, 1.0, true, "Select the slot to play", true), the last true means stop playing other Montages of the same slot group.
Example
The following is an example of a character running into a wall with Root Motion enabled.
Creating Actors
Please refer to Assembling Actors to create an Actor containing skin and skeleton assets.
Editing Animation Assets
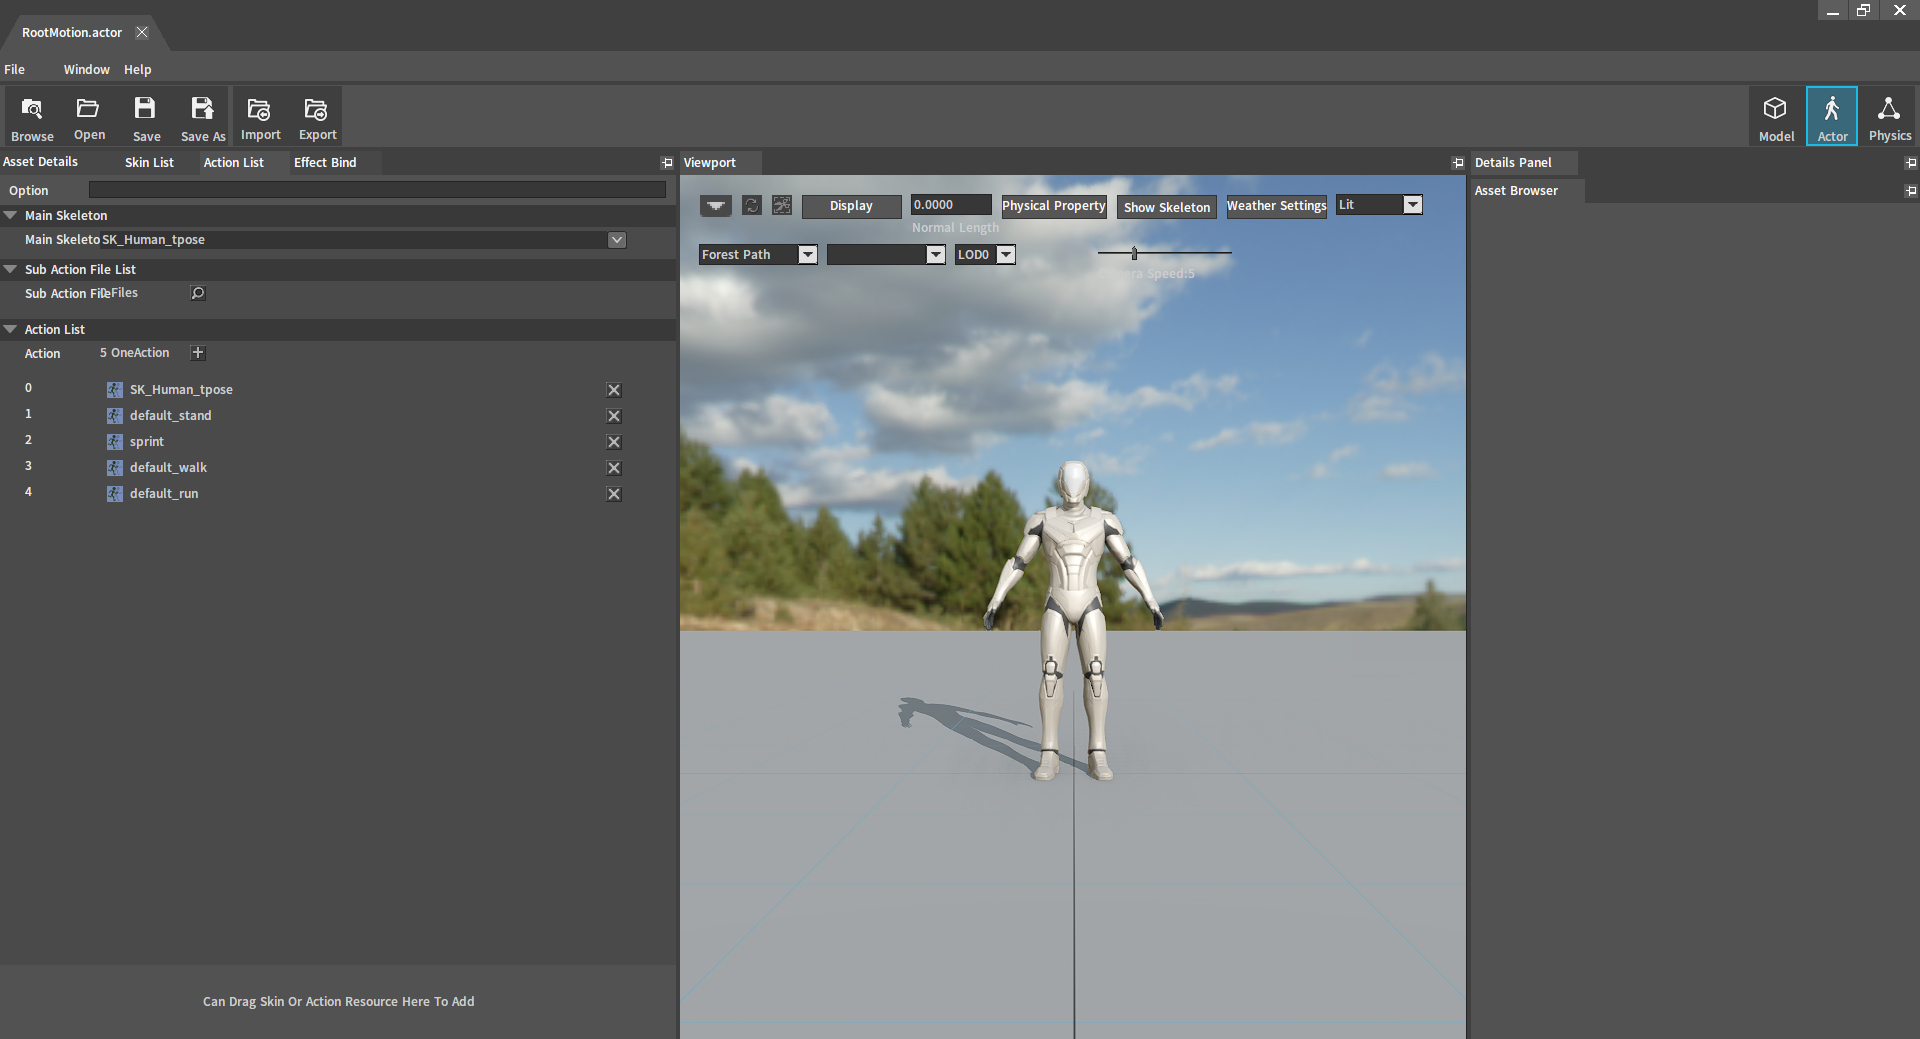
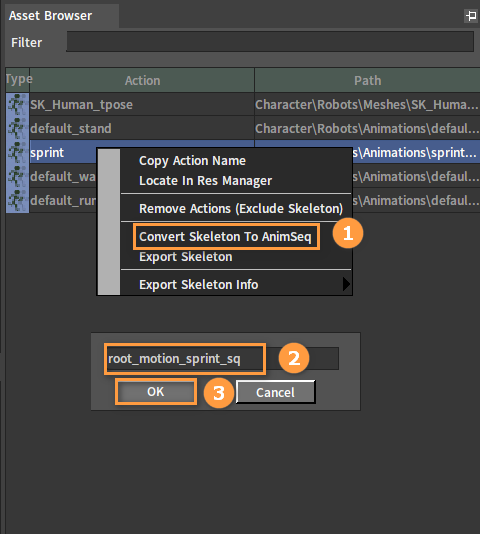
Select the skeleton asset sprint in the Animation Editor and right-click it, then select Convert Skeleton To AnimSeq in the pop-up Shortcut Menu to convert the skeleton asset to an animation sequence asset. After that, enter the name in the pop-up window and click the OK button to complete the conversion.
Check Enable Root Motion in the Asset Details panel of the animation sequence.
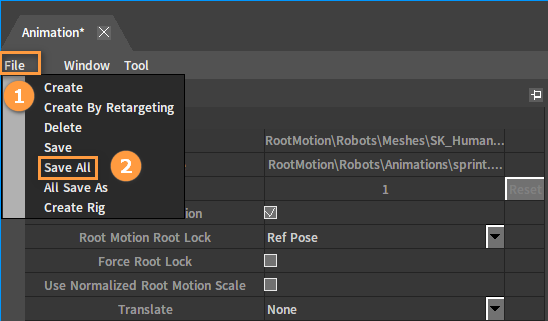
After editing, click File (Menu Bar) -> Save All to save.
Configuring Animation Trees
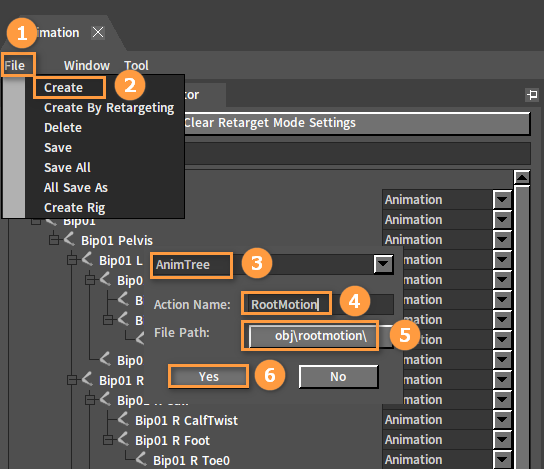
Click File (Menu Bar) -> Create in the Animation Editor. Select Anim Tree from the drop-down box in the pop-up window, then enter the name and select the path. Click the OK button to complete the creation and enter the Anim Tree Editor.
Add a Sequence Playback node. Right-click in the blank space of the Animation Tree to open the Node Selection panel, expand the Animation option, and select the Play "default_stand" node.
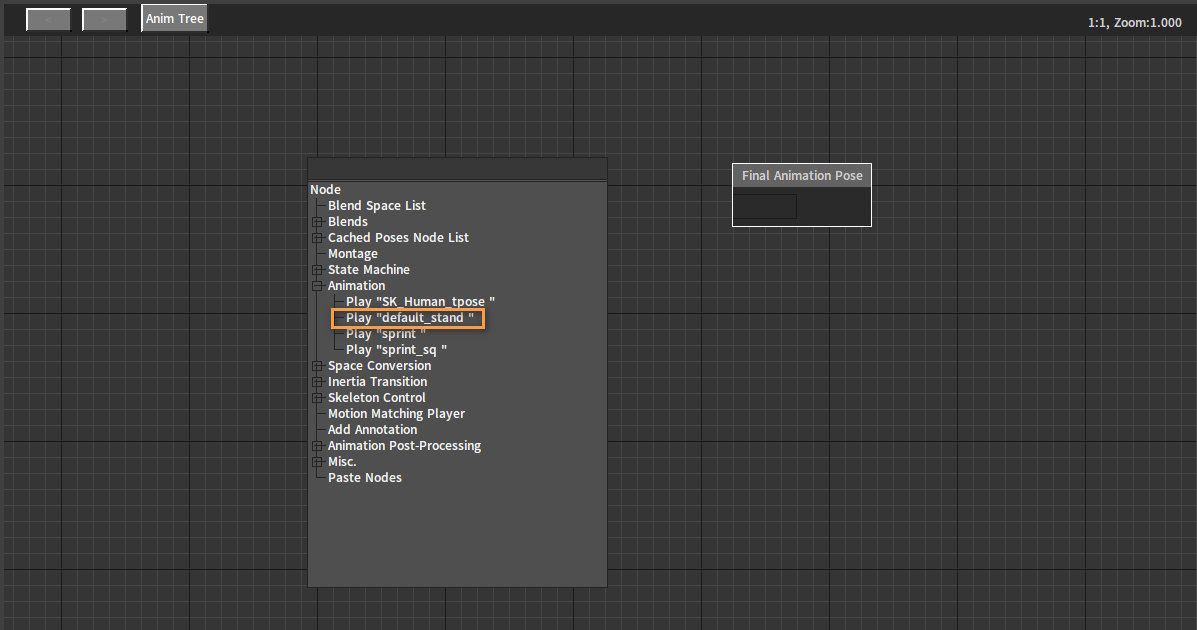
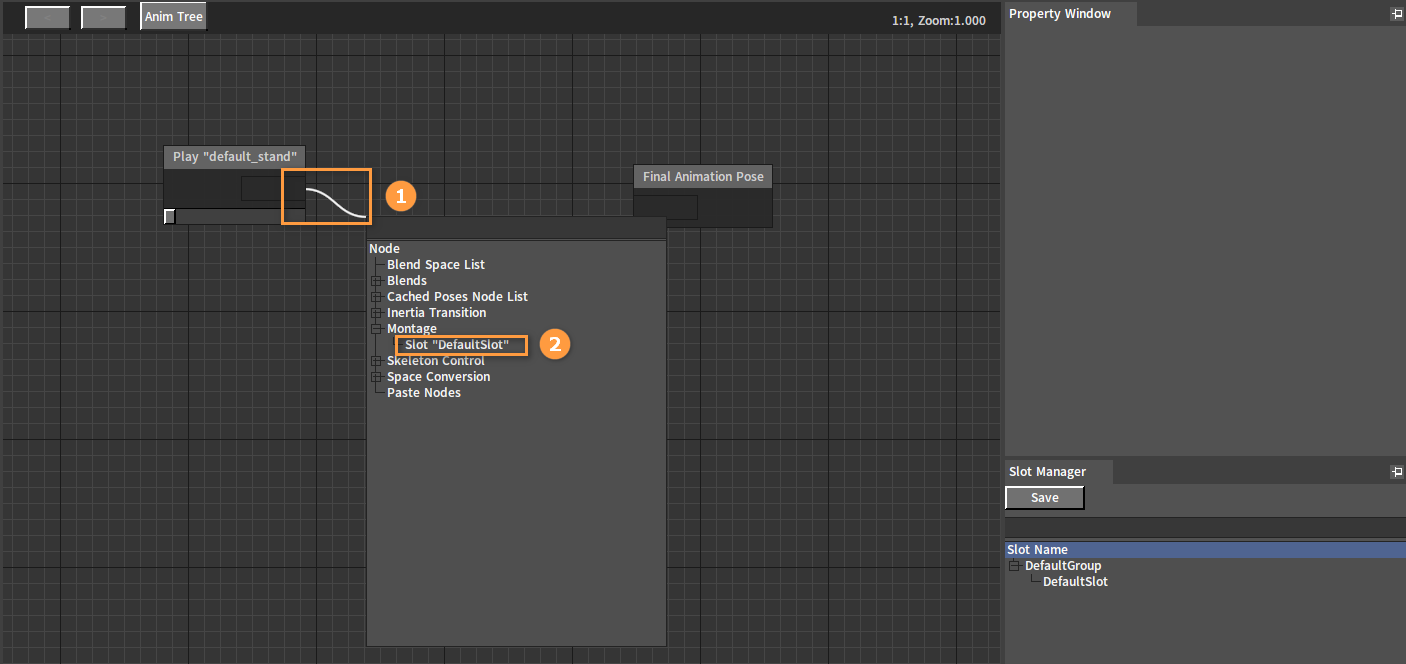
Create a DefaultSlot in the Slot Manager of the Anim Tree Editor. Please refer to Animation Slot for details.

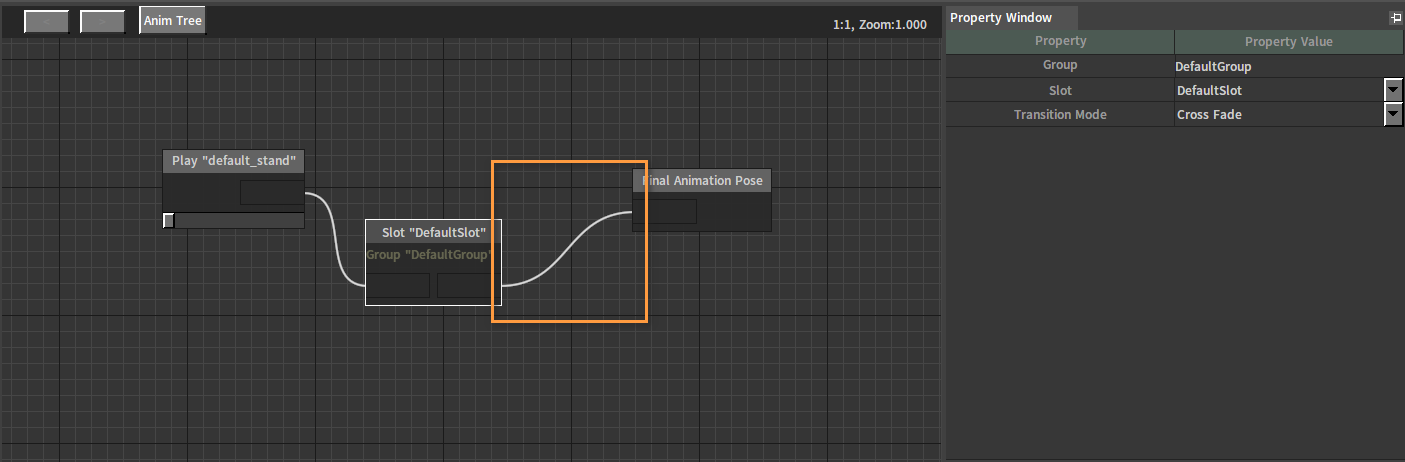
Connect a Slot node from the pin of the Animation Playback node, and select the Slot node you just created under the Montage option in the pop-up Node Selection panel.
Connect the Slot node to the Final Animation Pose node.
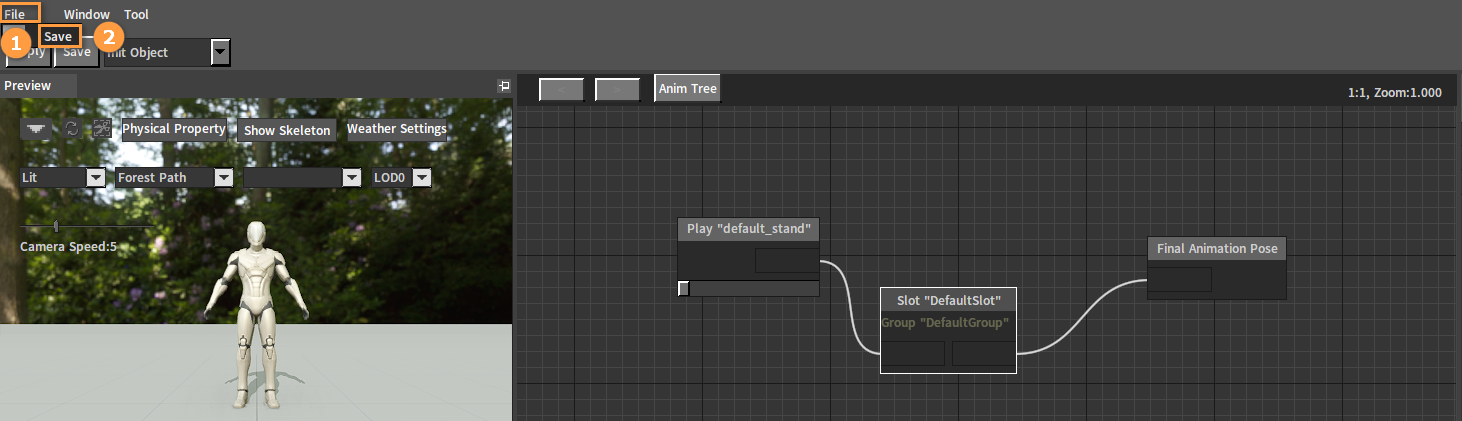
After editing, click File (Menu Bar) -> Save in the Anim Tree Editor.
Configuring Actors
In the Project panel, double-click the .actor file to open the Actor Editor.
In the Actor Editor, click Asset Details, then set Default Action to the created Root Motion Animation Tree asset, and set [Root Motion Mode](#Root Motion Modes) to From Montage Only.
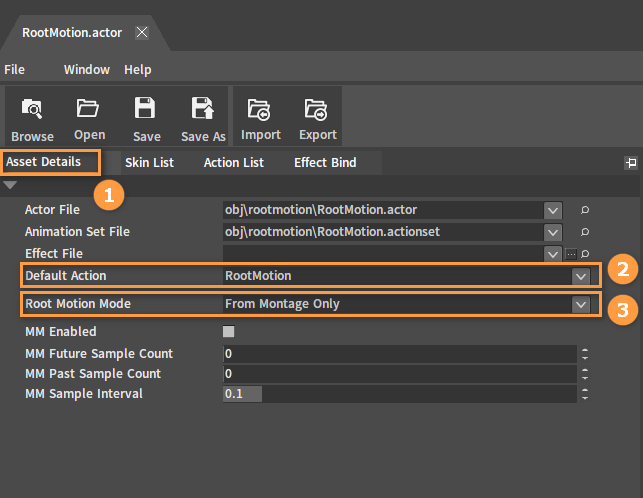
After editing, click File (Menu Bar) -> Save in the Actor Editor.

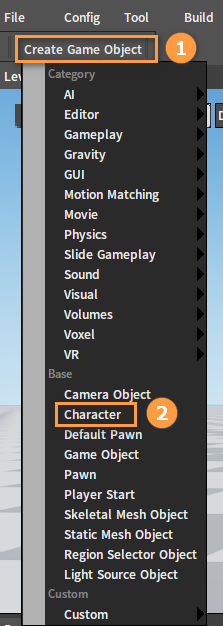
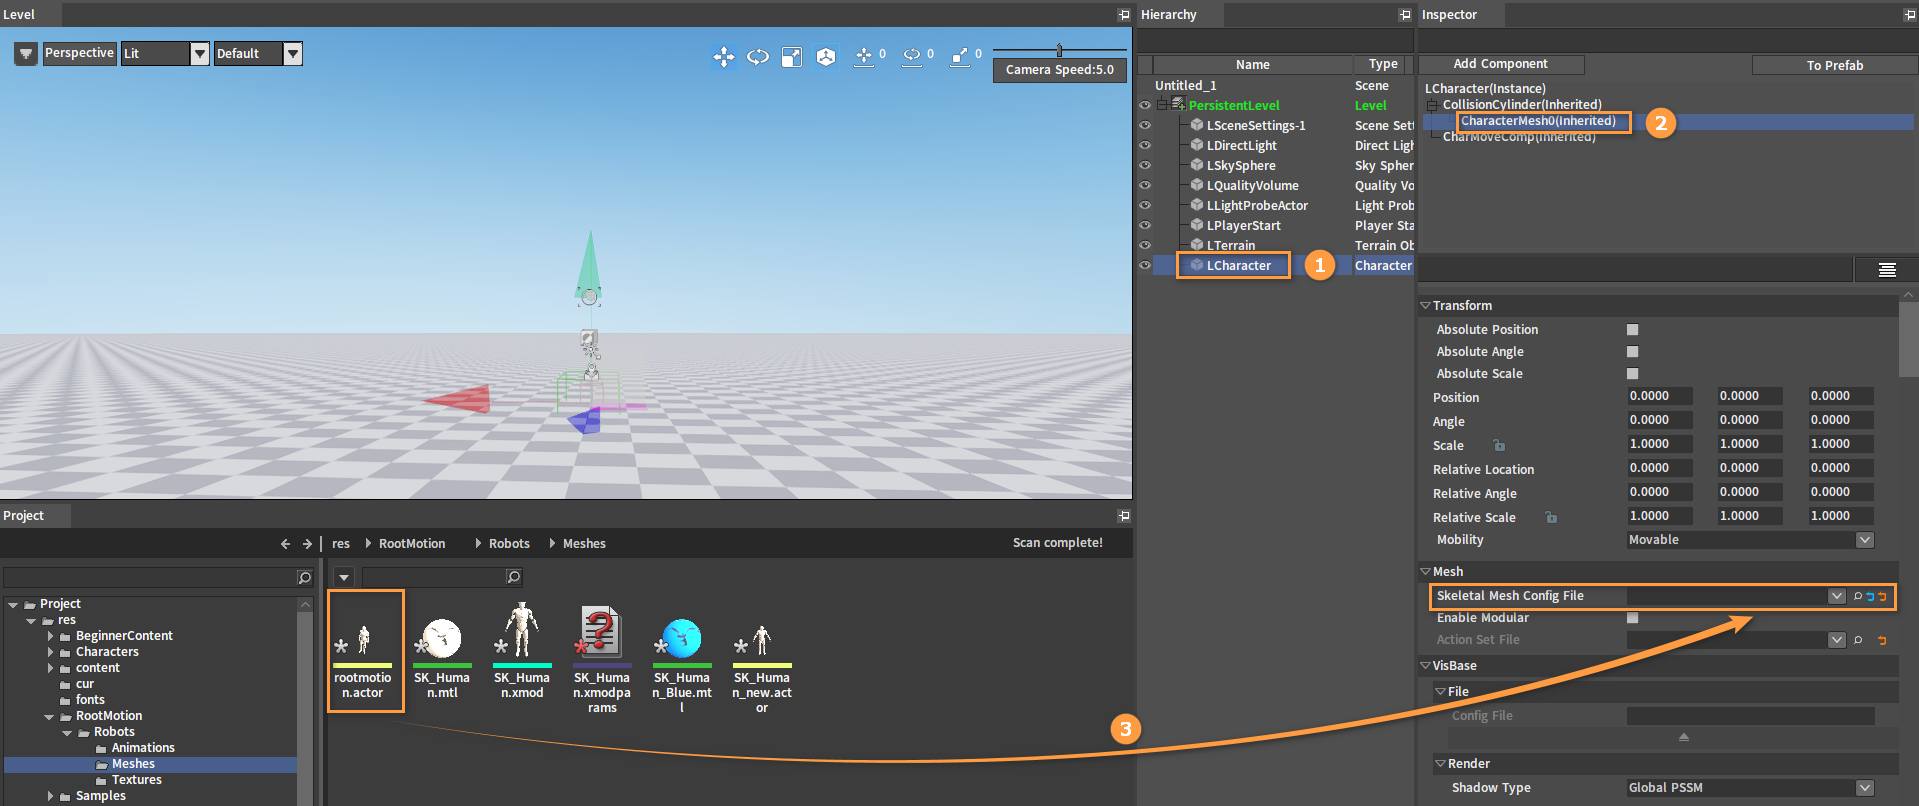
Creating Characters
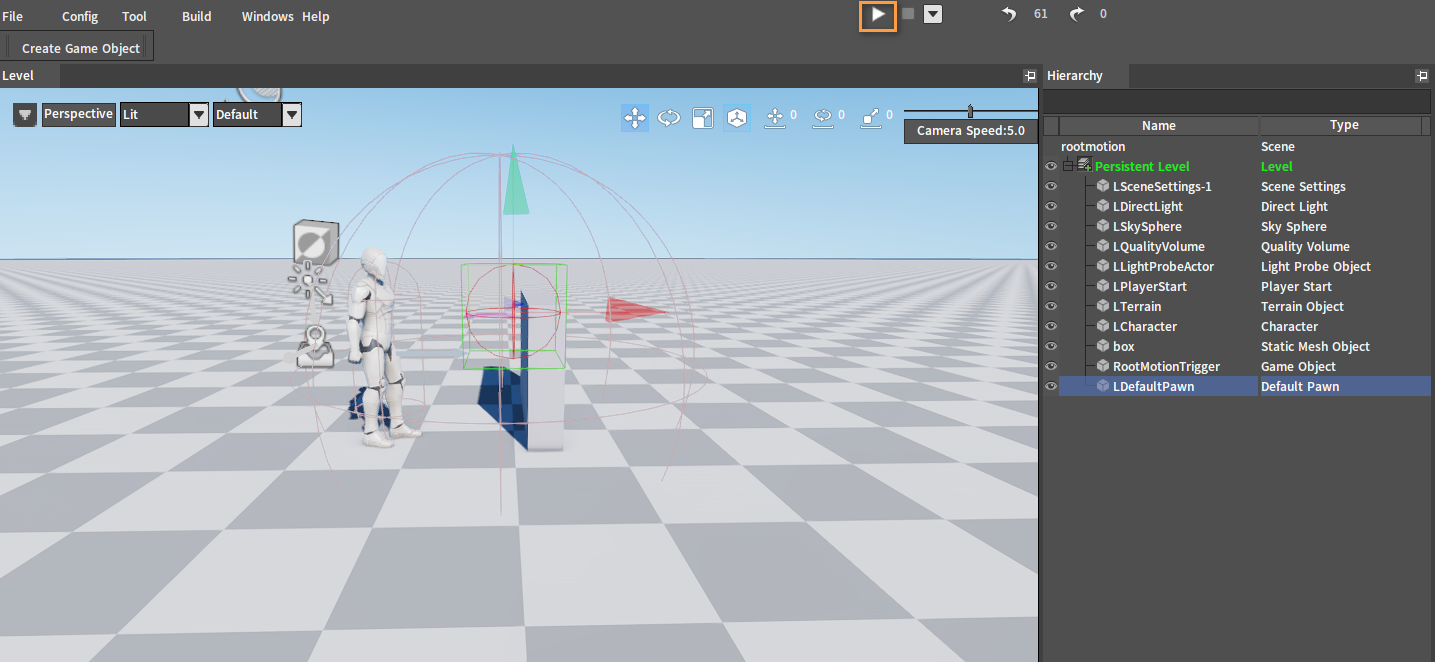
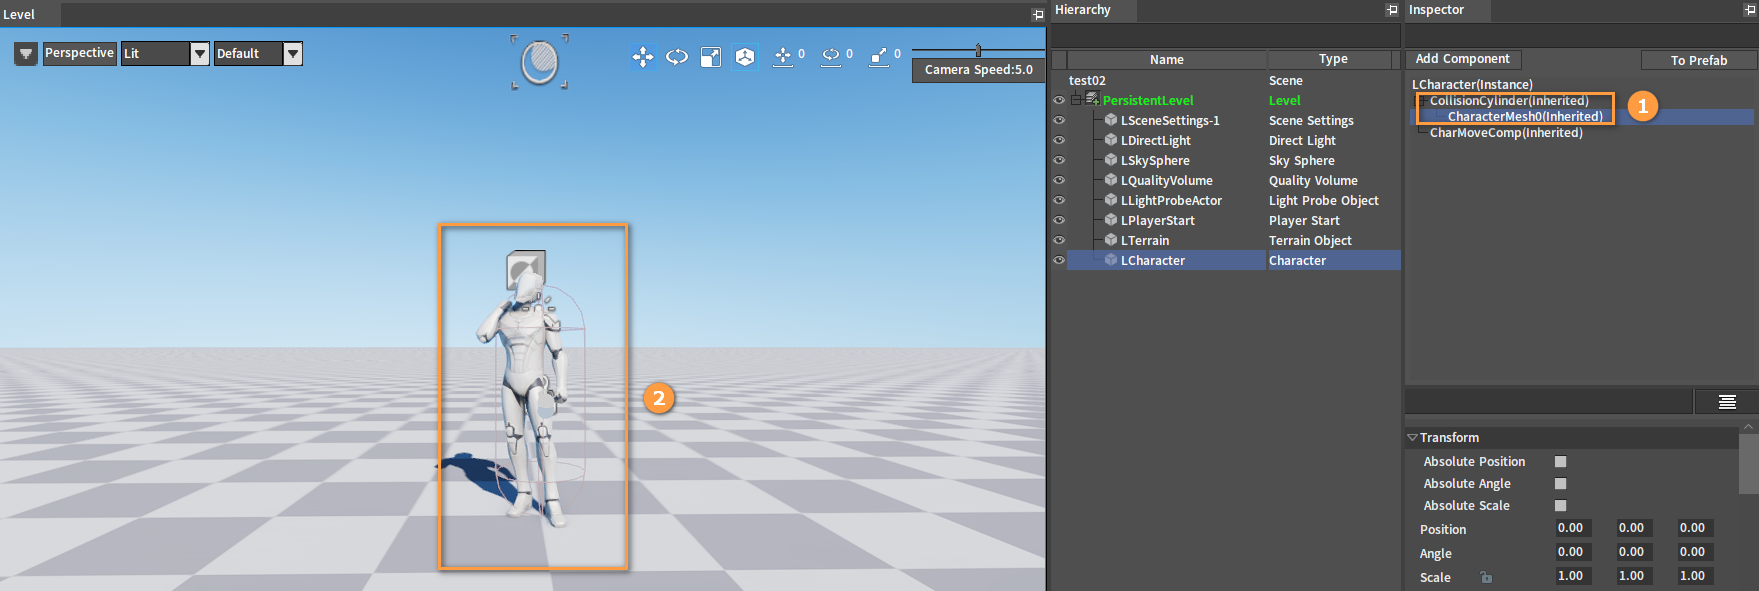
Create a Level in the Component Editor and click Create Game Object -> Character.
Select the character object in the Hierarchy panel, then select CharacterMesh0(Inherited) in the Inspector panel. Drag the created Actor into the slot of the Skeletal Mesh Config File.
After dragging:

Select CollisionCylinder(Inherited) and CharacterMesh0(Inherited) in the Inspector panel to adjust the positions of the character's capsule and mesh respectively, so that the feet of the skinned character touch the ground in the premise that the capsule wraps the character as much as possible with the capsule above the ground.
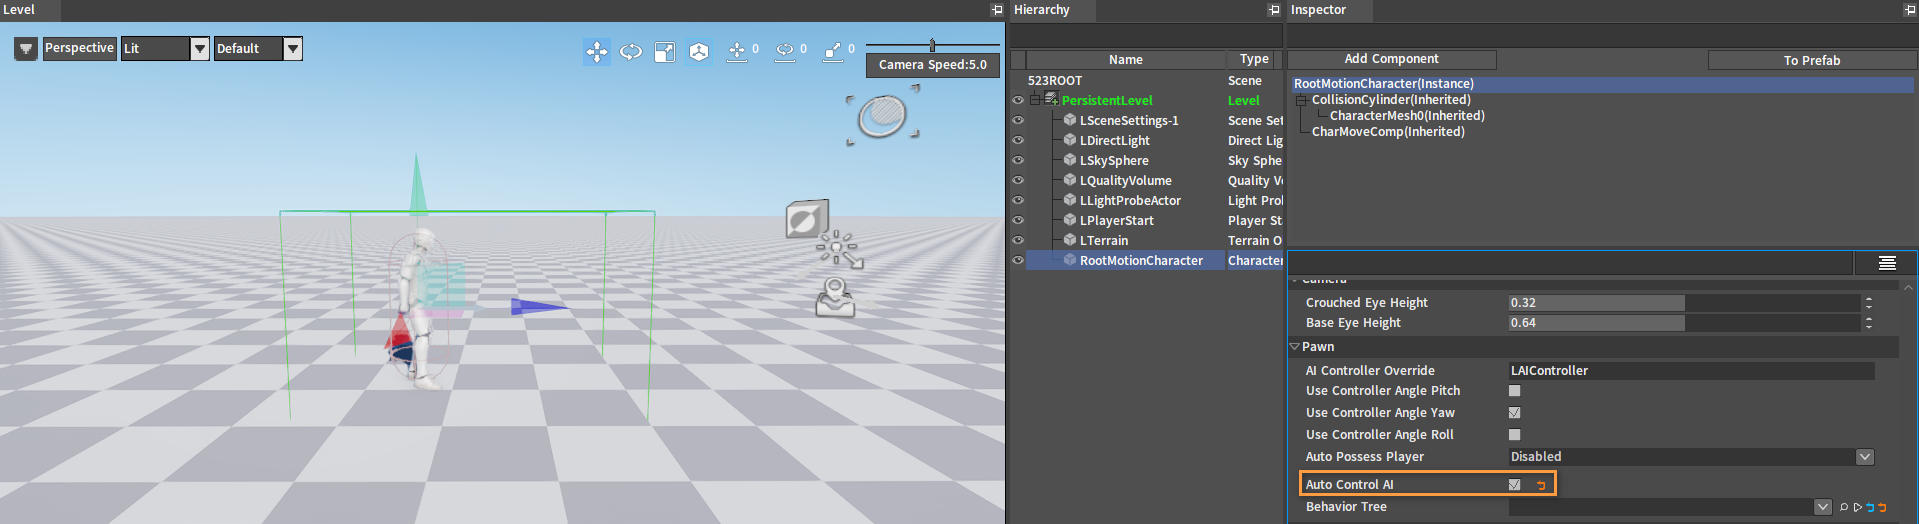
Check the Auto Control AI property of the character in the Inspector panel to adjust the angle of the character.
Creating Walls
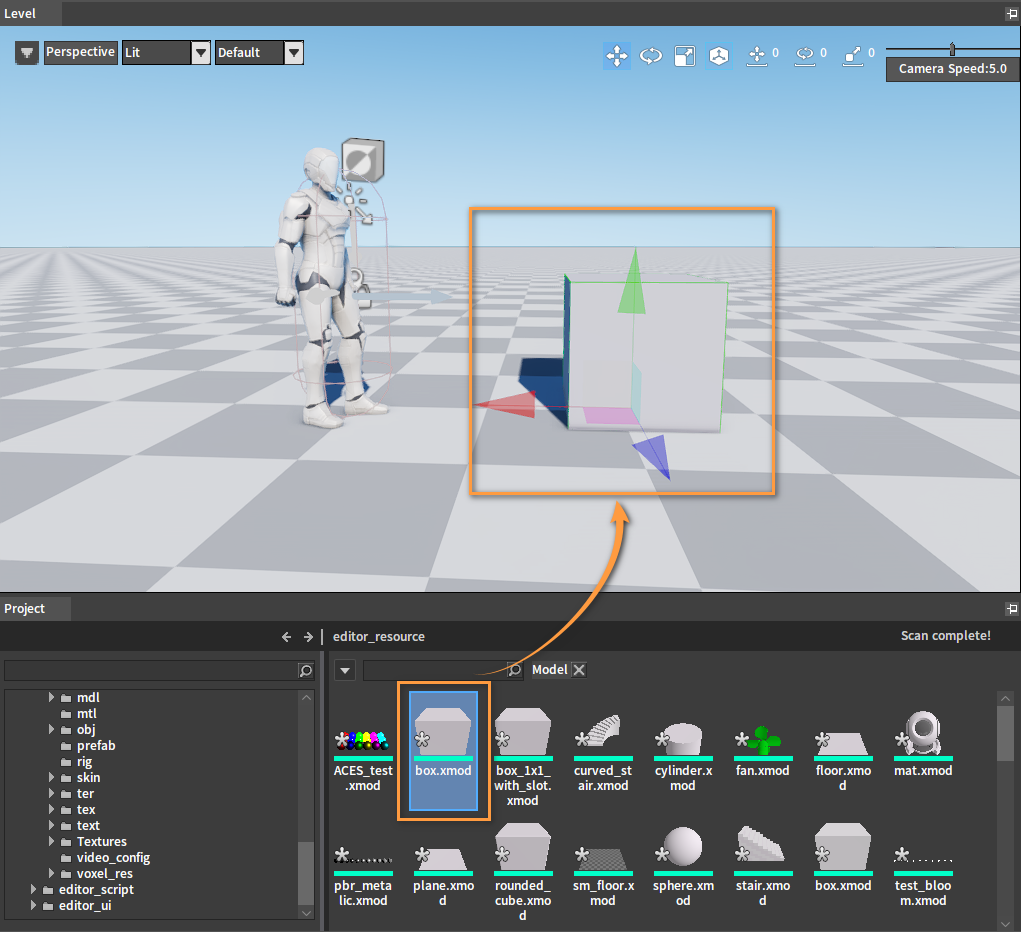
Add a wall (static mesh) to the Level. Drag the .xmod file from the Resource Preview window of the Project panel into the Level.
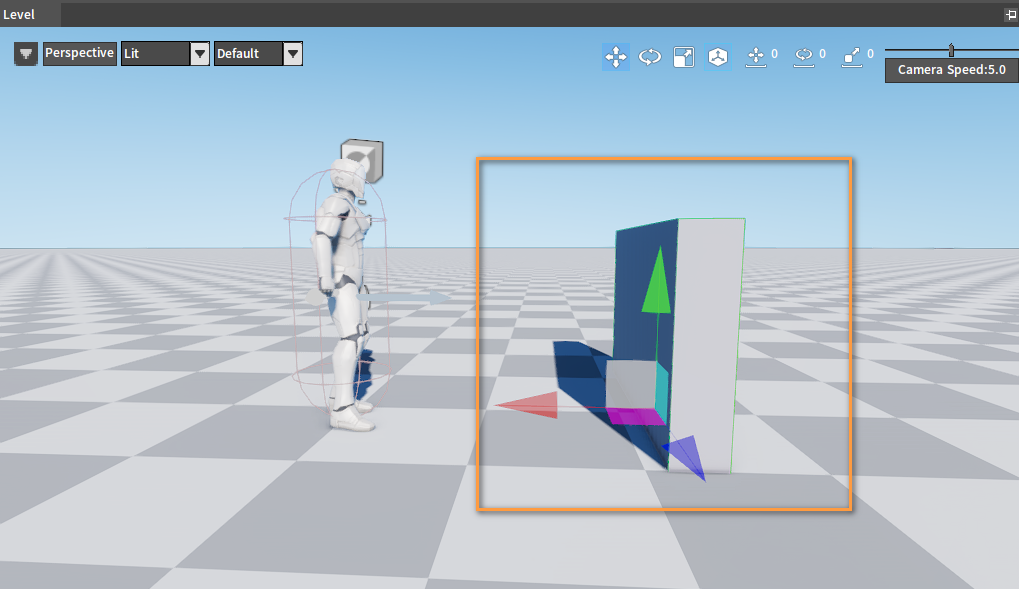
Adjust the position and size of the static mesh as needed.
Creating Triggers
Add an object to the Level as the trigger. Click Create Game Object -> Game Object in order and rename the object to RootMotionTrigger.
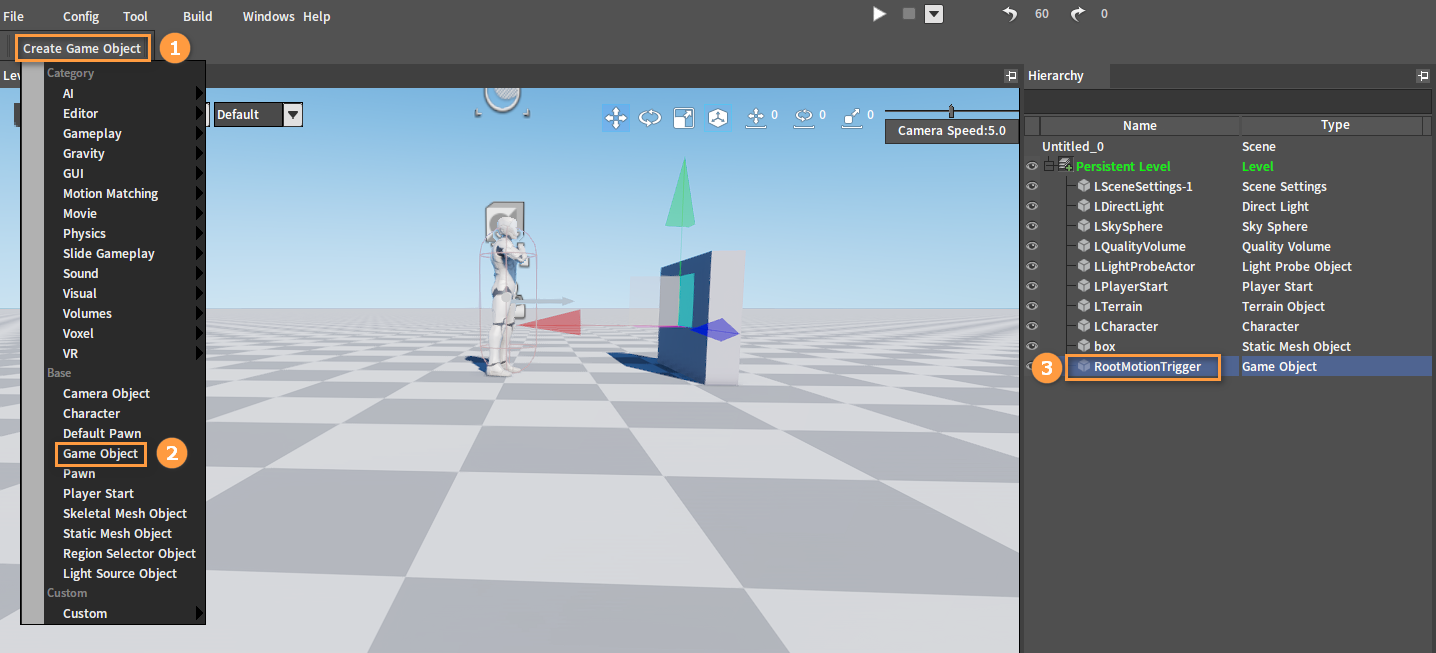
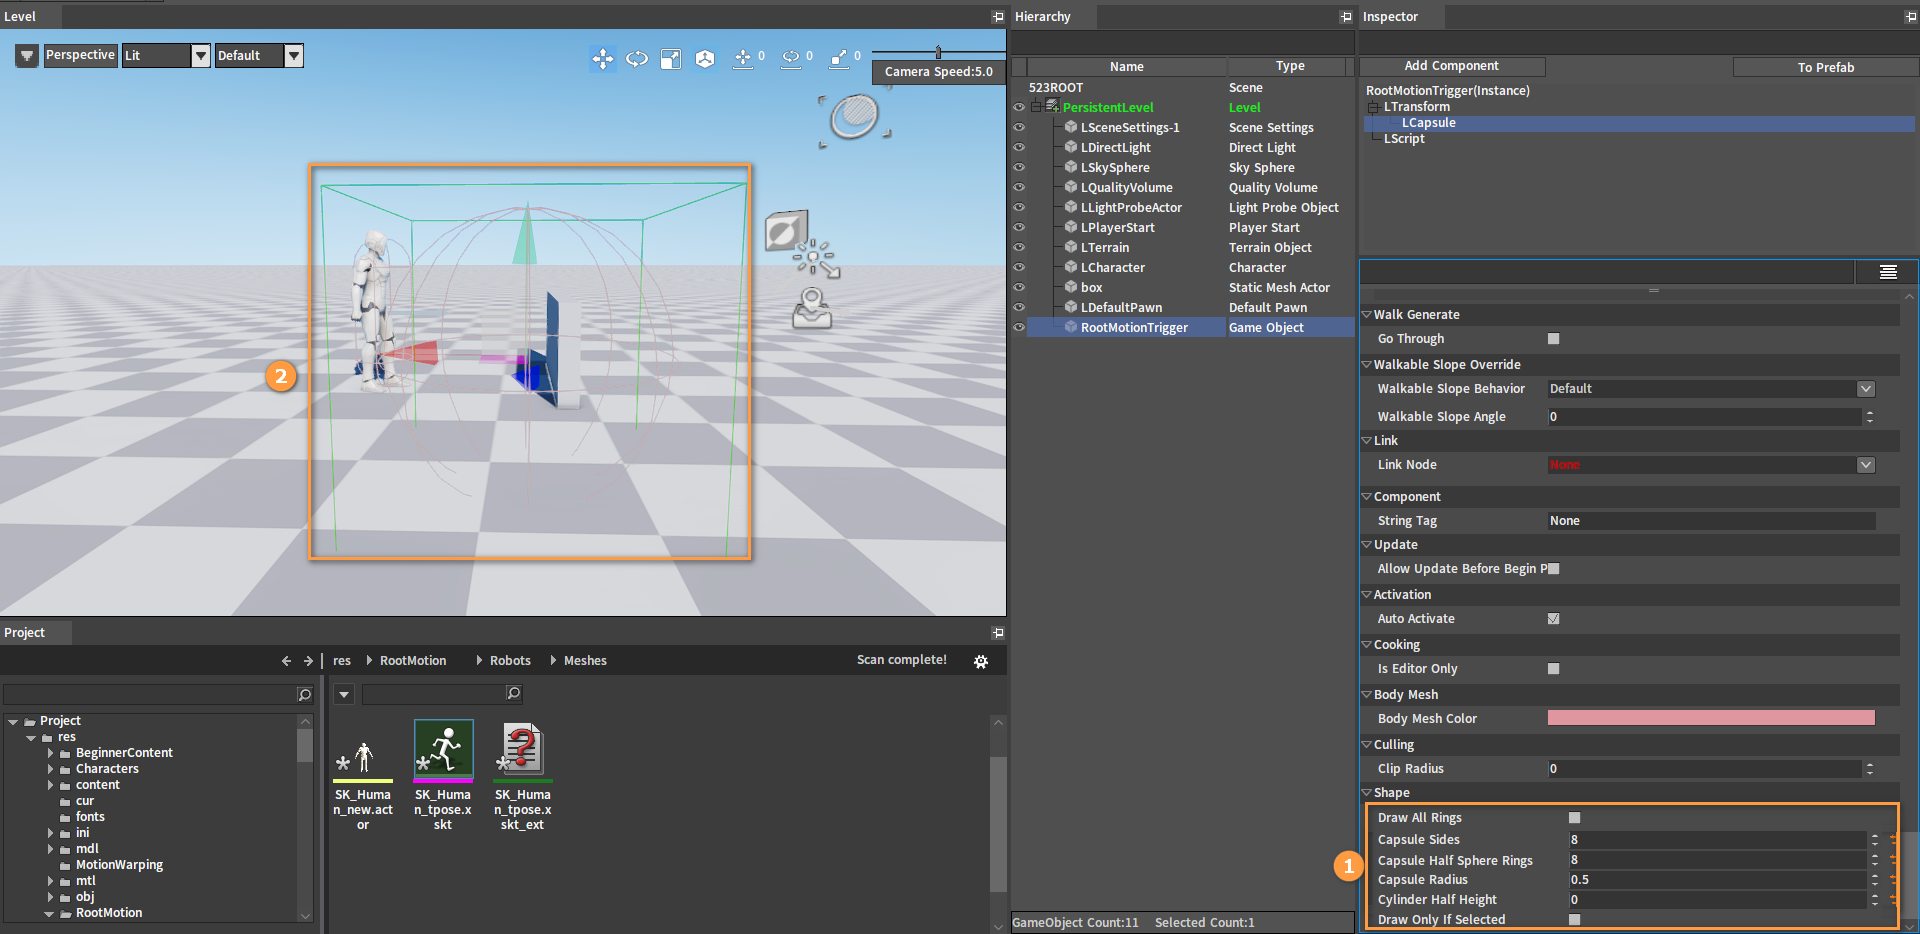
Select the object RootMotionTrigger in the Hierarchy panel, then click the Add Component button in the Inspector panel and select the Capsule Component.
Some related properties of the capsule can be adjusted in the Shape option including Capsule Sides, Capsule Half Sphere Rings, Capsule Radius and Cylinder Half Height. Adjust the position of the capsule in the Level to avoid overlapping with the character.
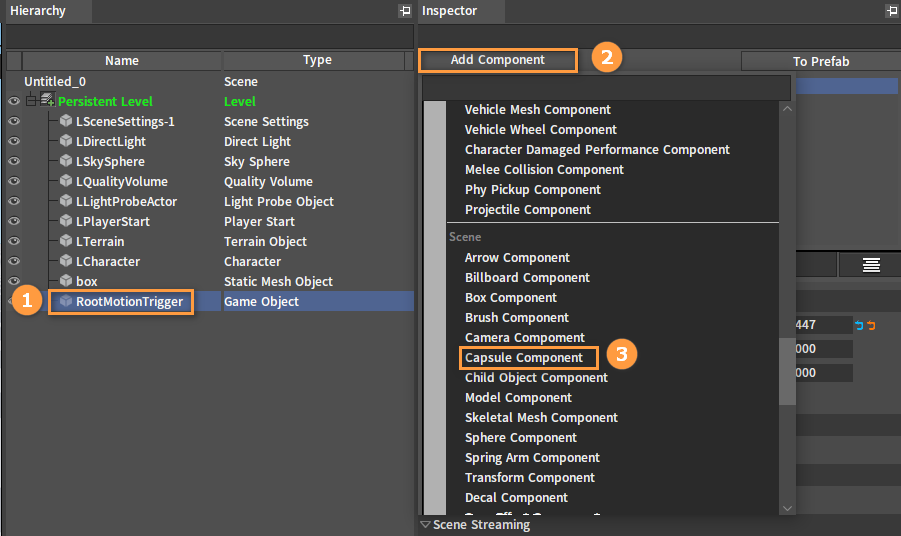
Binding Scripts to Triggers
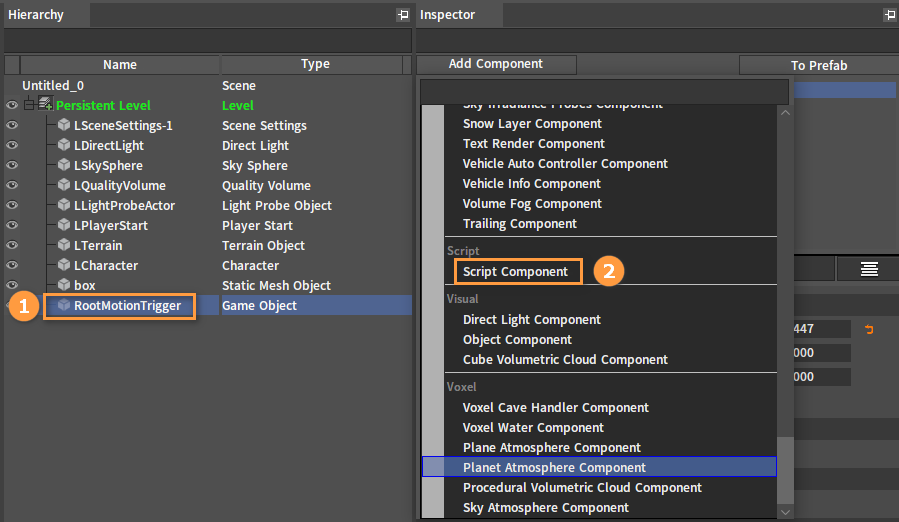
Add another Script component to RootMotionTrigger. Select the object in the Hierarchy panel, then click the Add Component button in the Inspector panel and select the Script Component.
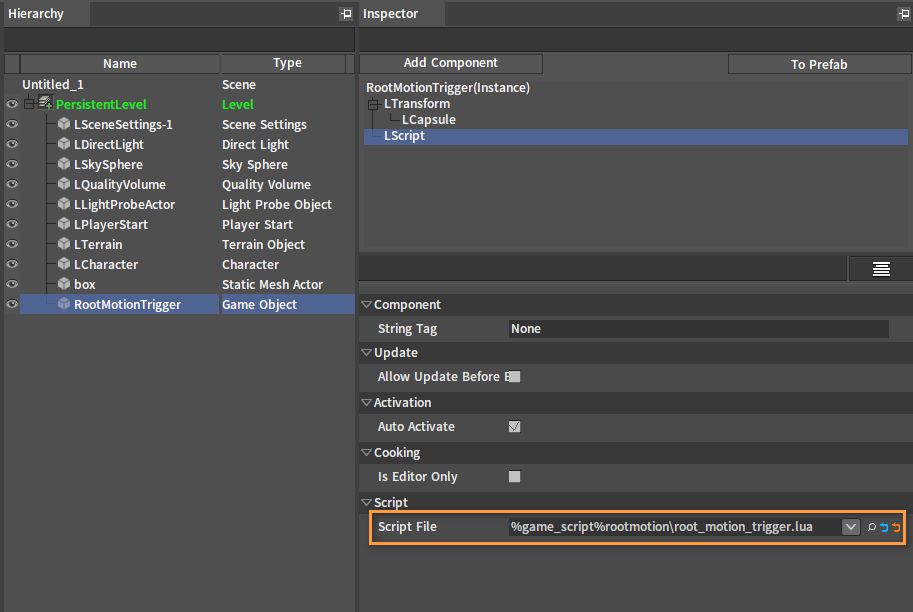
Bind a script to the trigger object. Write a script and save it in the script folder of the project resources. Drag a Script from the Resource Preview window into the Script File slot of the object's script component.
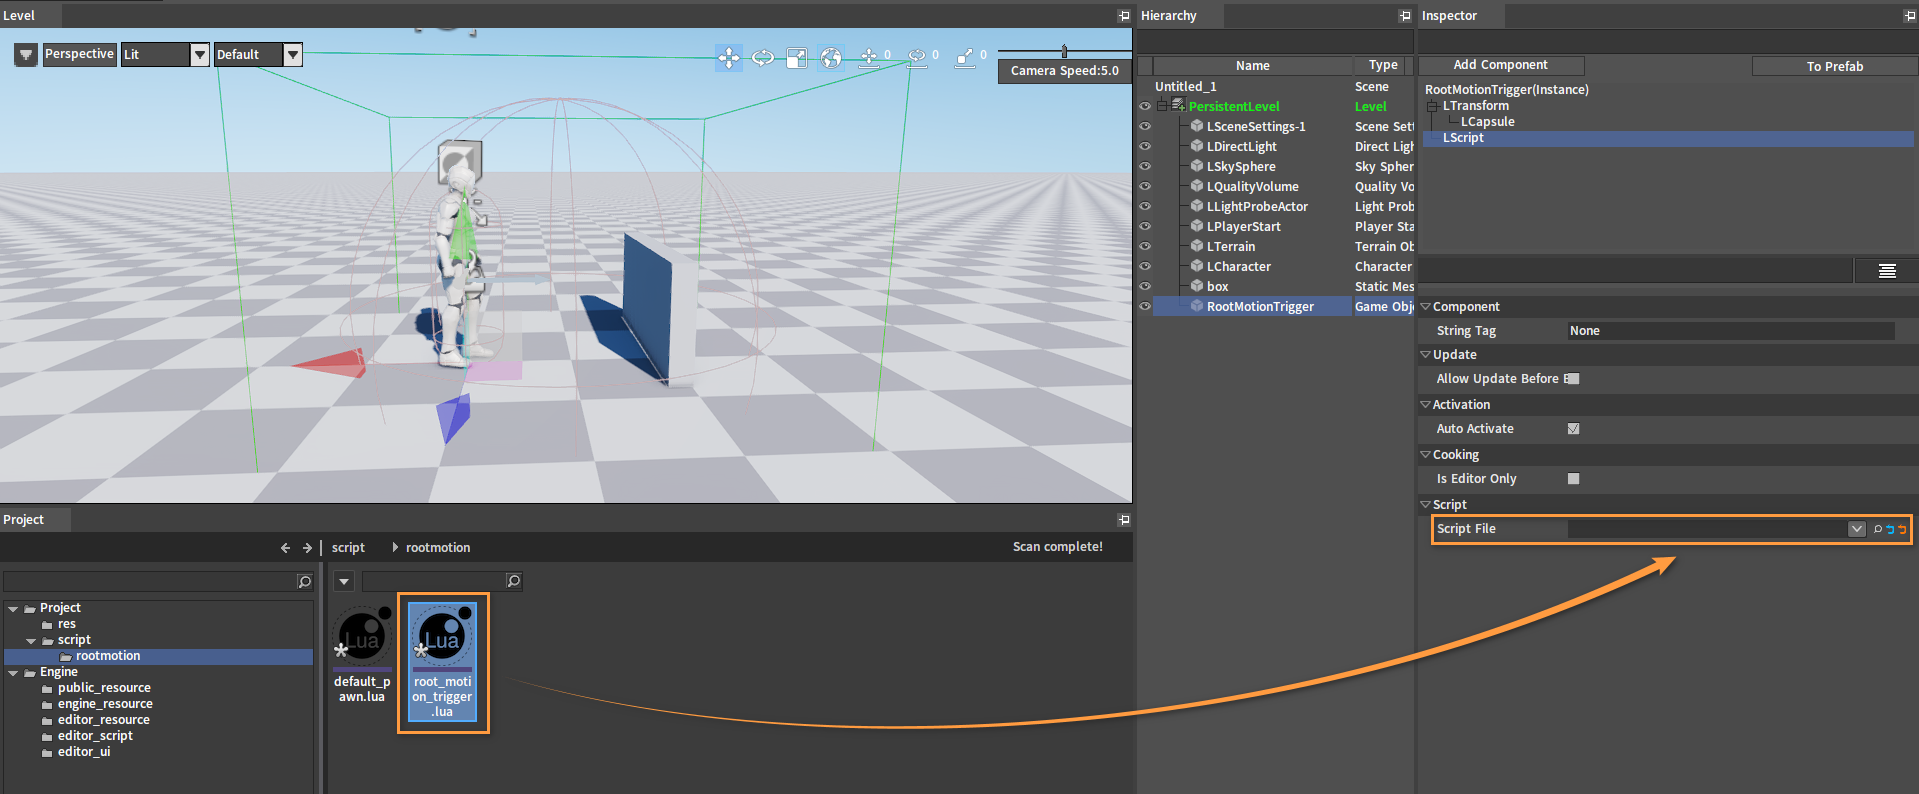
After dragging:
Scripts
local target_actor_name = "LCharacter"

function on_begin_play(component)
    local owner = component.GameObjectOwner

    nx_bind_script(owner, nx_current())
    nx_callback(owner, "on_begin_overlap", "on_begin_overlap")

    return 1
end

function on_end_play(component)
end

function on_begin_overlap(pawn, other_actor)
    local lscene = nx_value("lscene")
    local level = lscene.PersistentLevel
    local target_actor = nx_function("ext_find_object", nx_null(), level, target_actor_name)

    if not nx_is_valid(target_actor) then
        return 0
    end

    local target_character_mesh_component

    for i = 1, target_actor.ComponentCount do
        local component = target_actor:GetComponentByIndex(i - 1)

        if nx_name(component) == "LSkeletalMeshComponent" then
            target_character_mesh_component = component
            break
        end
    end

    if not nx_is_valid(target_character_mesh_component) then
        return 0
    end

    local actor = target_character_mesh_component.VisBase

    if not nx_is_valid(actor) then
        return 0
    end

    actor:BlendAction("root_motion_sprint_sq", false, false, true, 1.0, true, "DefaultSlot", true)

    return 1
end
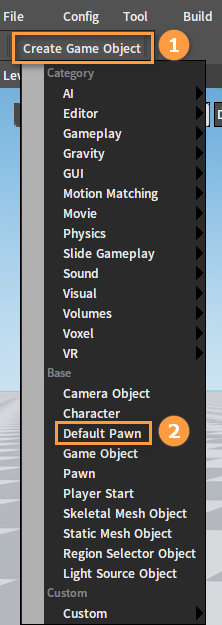
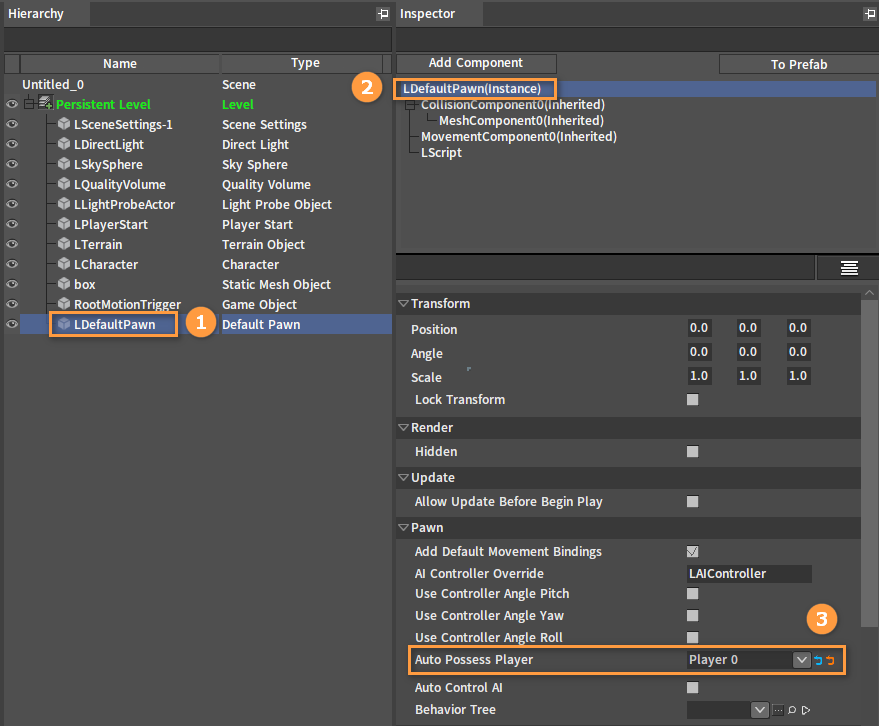
Creating Default Pawns
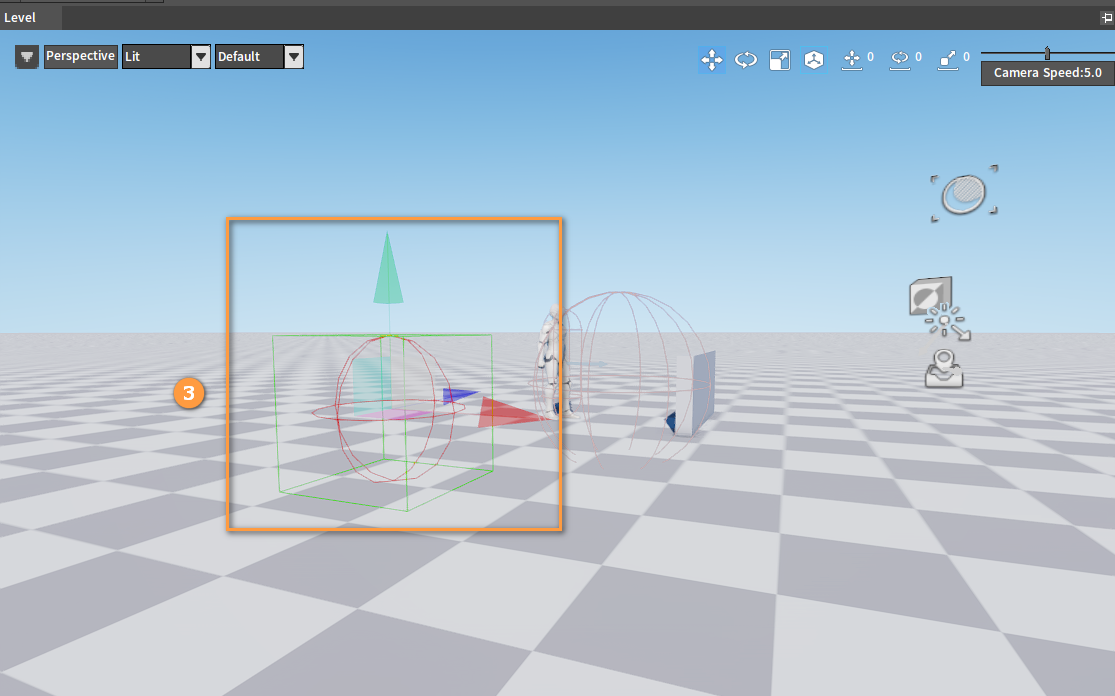
Click Create Game Object -> Default Pawn. Adjust its orientation and move it to the appropriate position.
Select LDefaultPawn in the Hierarchy panel, then select LDefaultPawn(Instance) in the Inspector panel. Set Auto Possess Player to Player 0.
PIE
Click the Play In Editor button to view the effect.