Animation State Machine
Overview
Adding a State Machine in the Anim Tree Editor and exposing the interface enables the state-switching at the logic layer, thereby achieving data-driven state management.
The State Machine node contains multiple states and transitions between states. Each state contains an Anim Tree, and each transition contains a set of transition rules. Driven by external logic, the State Machine switches between different states based on the transition rules. The State Machine blends the output animation of the Activated state and passes it as its own output pose to the Anim Tree it is in for further processing.
State Machine Nodes
Creating State Machine Nodes
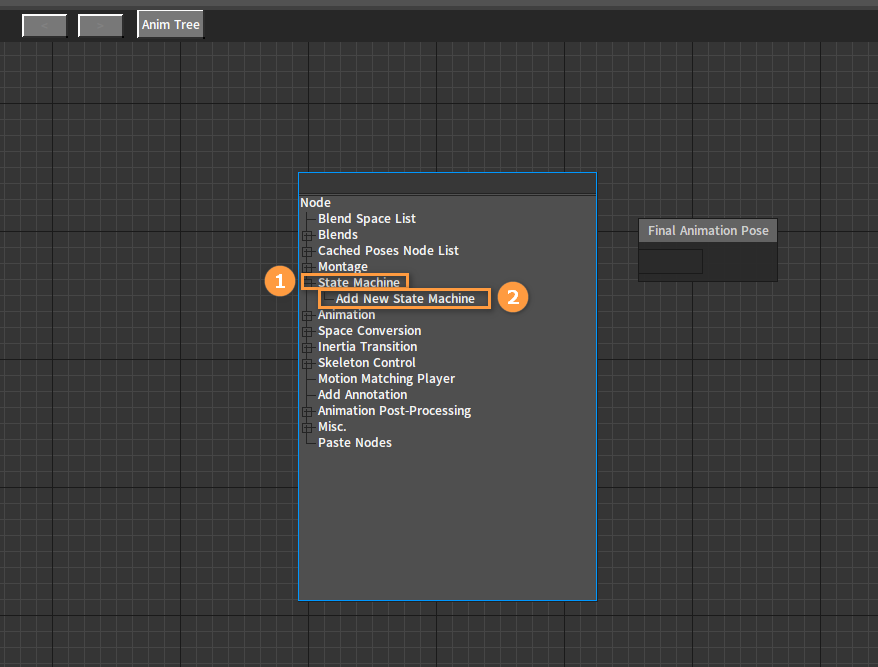
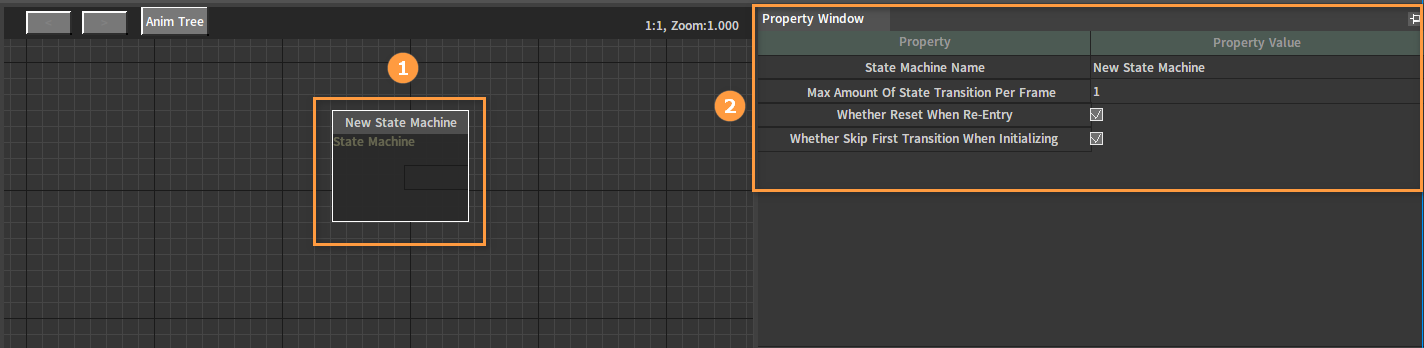
Right-click in the blank area of the Anim Tree to open the Node Selection panel. Expand the State Machine category and select Add New State Machine.
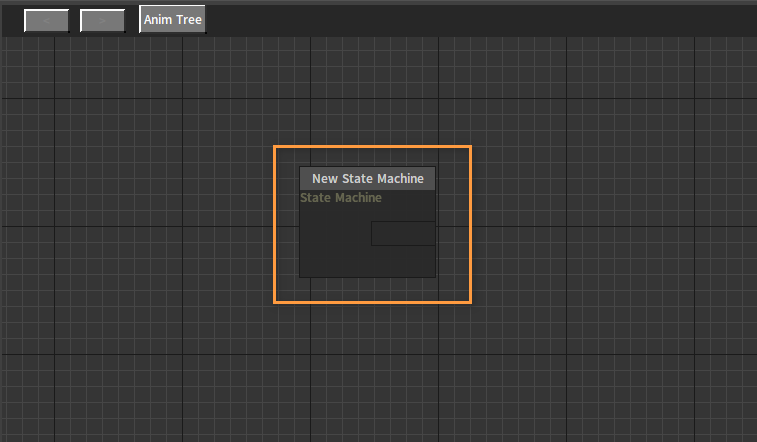
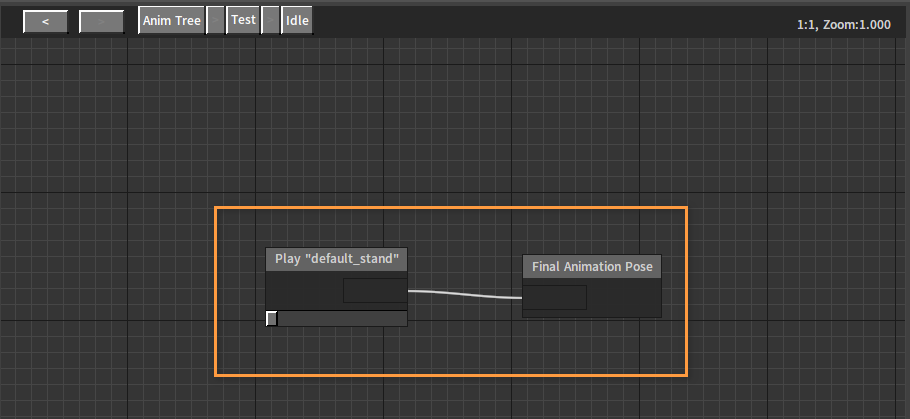
After creation:
Editing State Machine Nodes
Select the State Machine node and click its title area to modify the name.
Double-click the node to enter the state graph of the State Machine. Then you can create states and organize structures here.
State Machine Node Properties
Select the State Machine node in the Anim Tree to set its properties in the Property Window.
| Property | Description |
|---|---|
| State Machine Name | Edit the name of the State Machine. |
| Max Amount Of State Transition Per Frame | The maximum number of state transitions that can be executed in a single frame. |
| Whether Reset When Re-Entry | Whether to reset when re-entering. If not, it will be updated from the state when leaving. |
| Whether Skip First Transition When Initializing | If checked, it will directly enter the state that meets the conditions with full weight; otherwise, it will transit from the entry state to the state that meets the conditions. |
State Nodes
Creating State Nodes
Right-click in the blank space of the state graph to open the Node Selection panel, and select Add State.
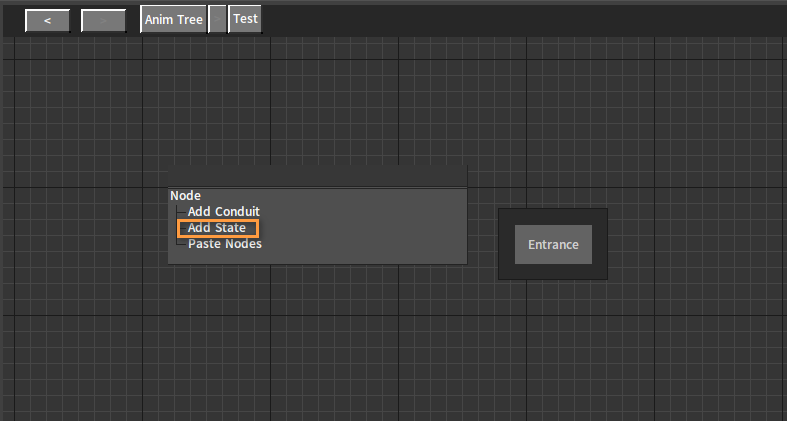
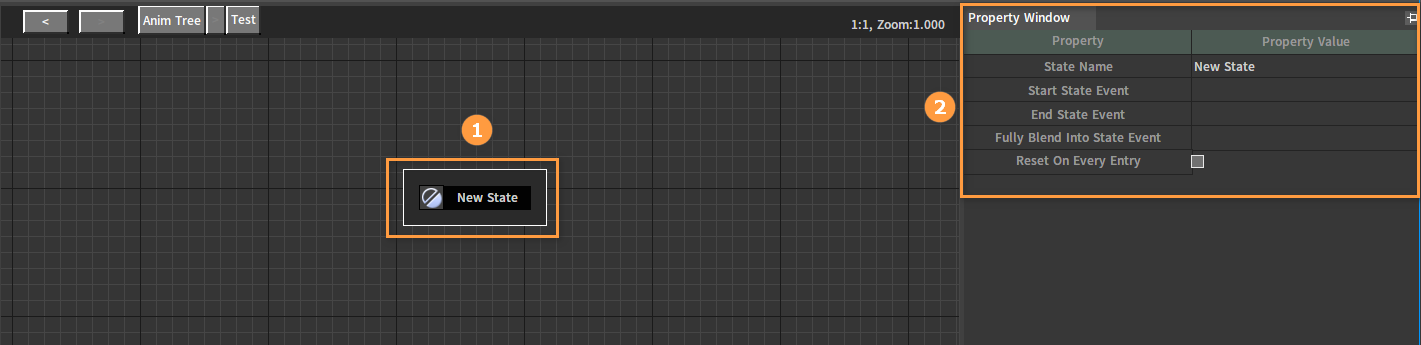
After creation:

Editing State Nodes
Select the State node and click its title area to modify the name.

Double-click the Idle State node to enter its Anim Tree editing interface.
Configure the Anim Tree for this state as needed.
State Node Properties
Select the State node in the state graph to set its properties in the Property Window.
| Property | Description |
|---|---|
| State Name | Edit the name of the State. |
| Start State Event | The callback function name of the Start State Event. |
| End State Event | The callback function name of the End State Event. |
| Fully Blend Into State Event | The callback function name of the Fully Blend Into State Event. |
| Reset On Every Entry | Whether to reset the child nodes of the associated Anim Tree every time entering the state. |
Creating Transitions
By holding down the left mouse button at the outer edge of a State node and dragging it outwards, an arrow for transition will be pulled out. After releasing the mouse at the appropriate position, a Node Selection panel will pop up, allowing the selection of the desired target node to be created. At this point, a transition and a target state are created simultaneously.
You can create another transition from the target state back to the original state.
There can be multiple transitions from one state to another state.
Transition Properties
Click the transition between two states to set its properties in the Property Window.

| Property | Description |
|---|---|
| Transition Mode | The transition mode for the two states animation playback connected.
|
| Duration | The duration applied to the fade-in and fade-out effects. |
| Blend Mode | The blend mode applied to the fade-in and fade-out effects. |
| Priority | The transition priority in the Anim Editor. |
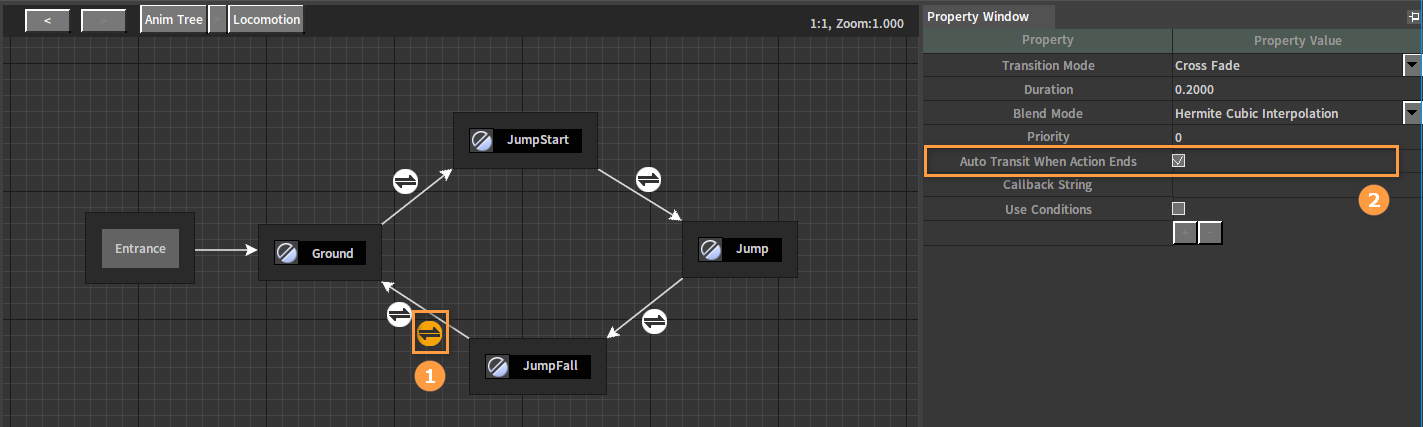
| Auto Transit When Action Ends | Whether to automatically transit to the target state after the action in the previous state ends. |
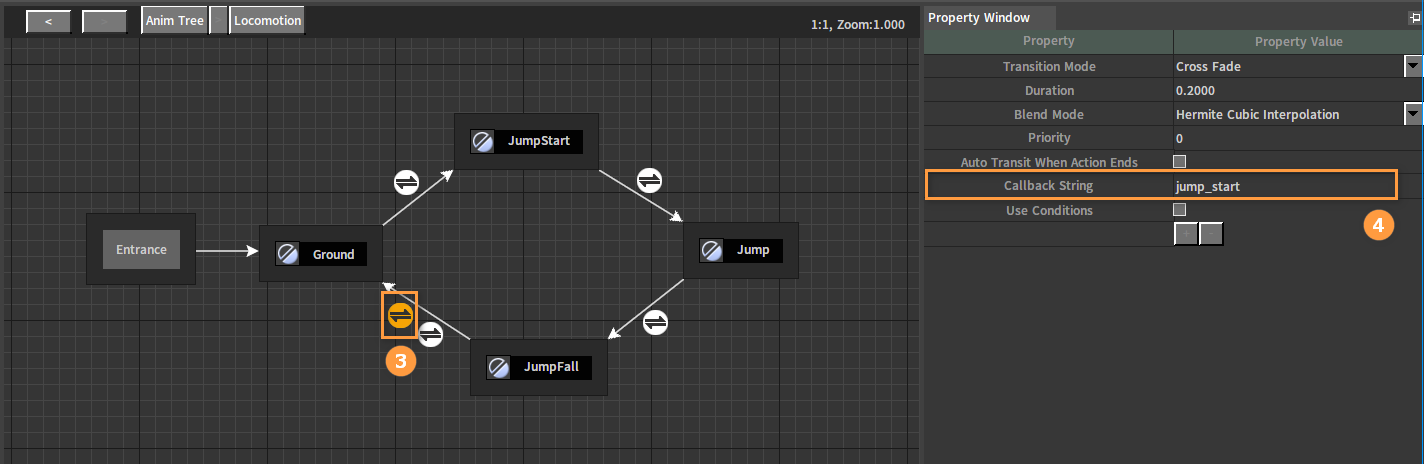
| Callback String | Configure the callback function, and decide whether to transit according to the return value. |
| Use Conditions | After checking, parameters (except string parameters and vector parameters) can be selected for conditional expressions, and the final results can be used to control State Transitions. |
Deleting Transitions
Right-click the transition between two states and select Delete Transition to delete it.

State Machine Creation Steps
In actual operation, the overall design can be carried out in the state graph according to the action requirements of the characters, and then implemented step by step for each state and each transition.

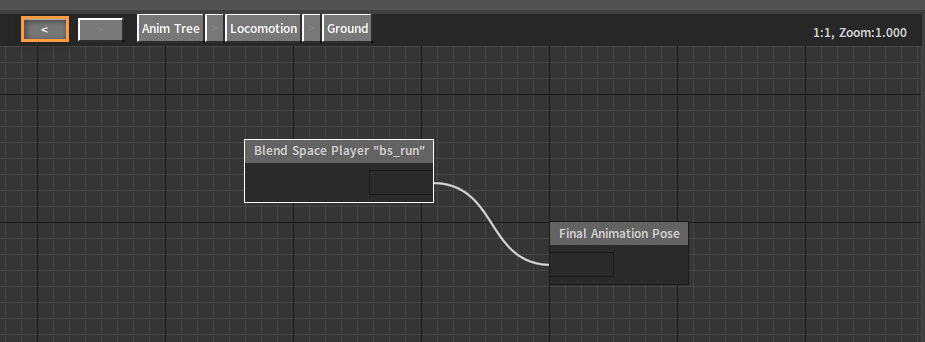
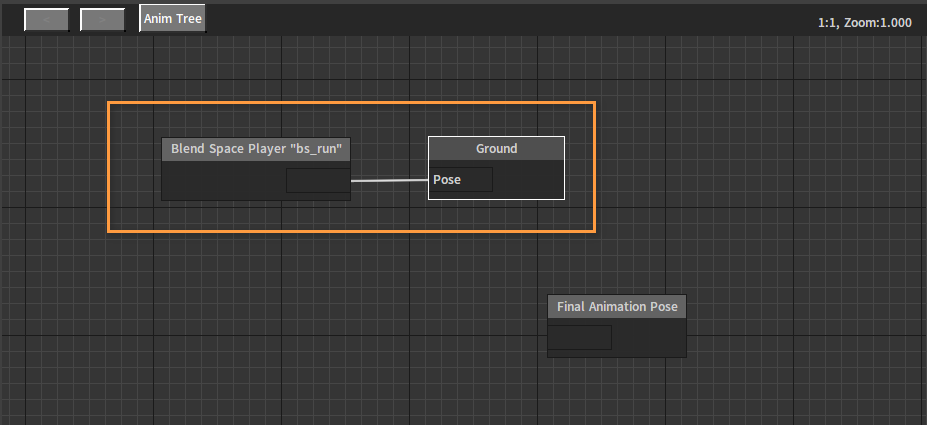
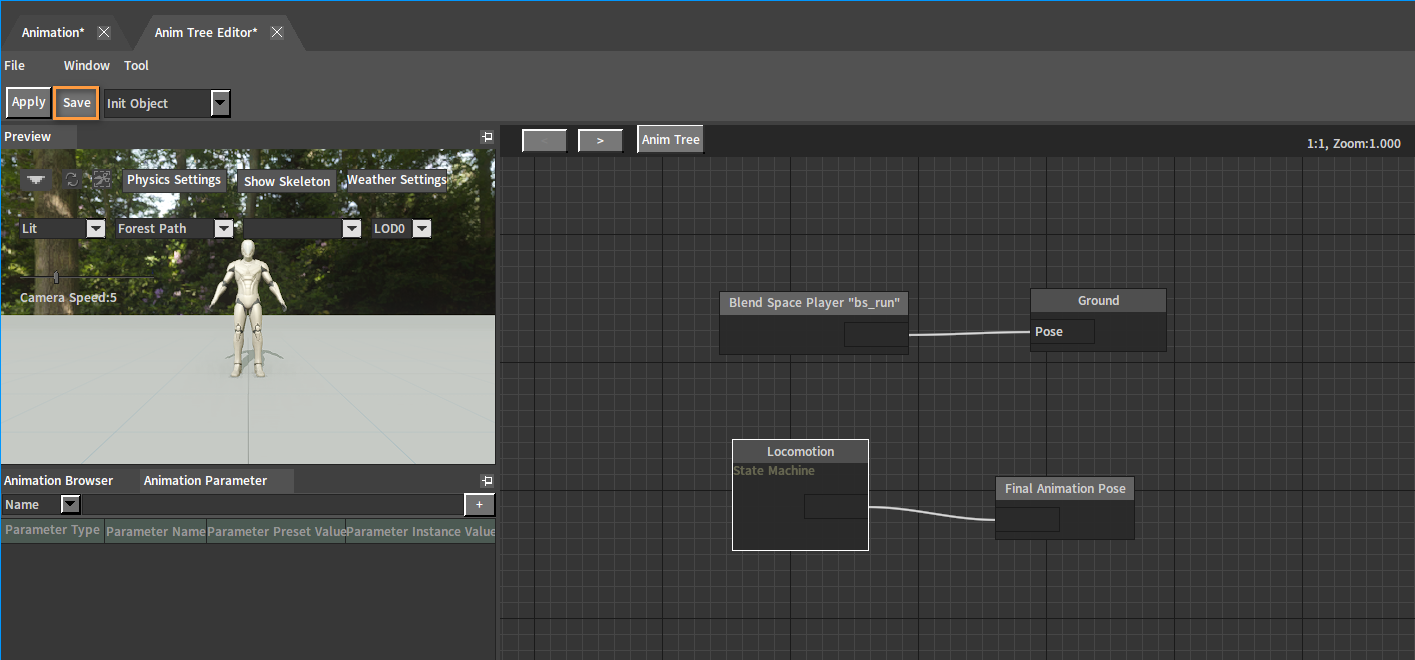
Double-click the Ground state node to enter the associated Anim Tree where various Anim Tree nodes can be added to achieve the expected ground action requirements. For example, a Blend Space Player node is used here.
After completing the setup for this state, you can use the Navigation Bar to jump out of the editing of this hierarchy and return to the previous state graph.
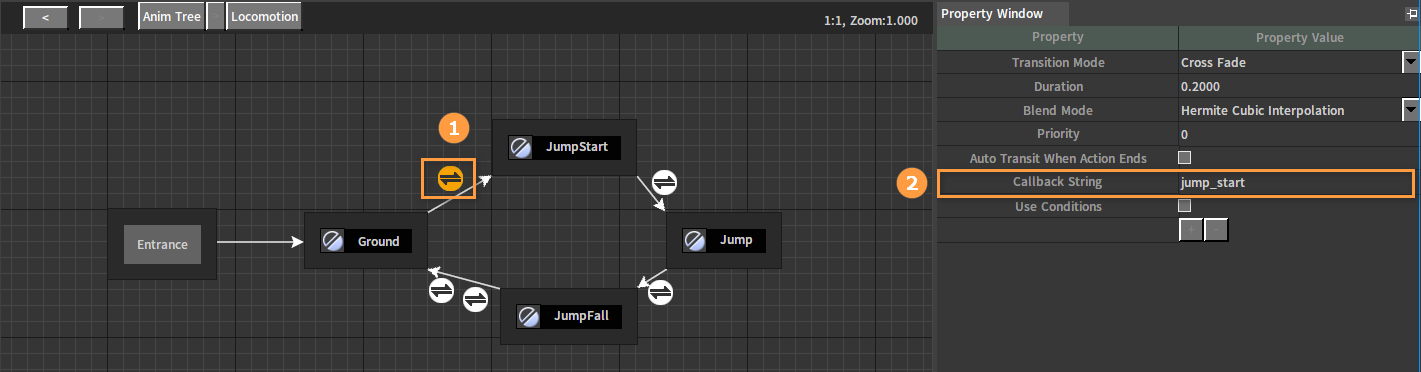
Next, you can edit other states and transitions. For example, select the transition from the JumpStart state to the Jump state and edit its properties in the Property Window to configure the transition rules.

Conduit Nodes
The Conduit can be seen as a special type of state. Unlike the above States, it does not contain an Anim Tree. In addition to switching states through transition control, the State Machine also provides a node called Conduit, which is used for one-to-many, many-to-one, or many-to-many State Transition requirements. The Conduit is similar to a State without an Anim Tree. It has an internal rule of "whether to allow entry into transition". By configuring this rule, it can determine whether further transitions can be made through the Conduit when a state attempts to transition through it.
Creating Conduit Nodes
Right-click in the blank space of the state graph to open the Node Selection panel and select Add Conduit.
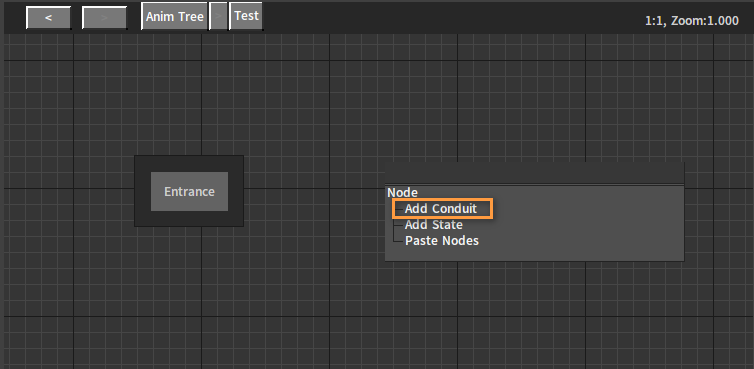
After creation:

Select the Conduit node and click its title area to modify the name.

Conduit Node Properties
Select the Conduit node in the state graph to set its properties in the Property Window.
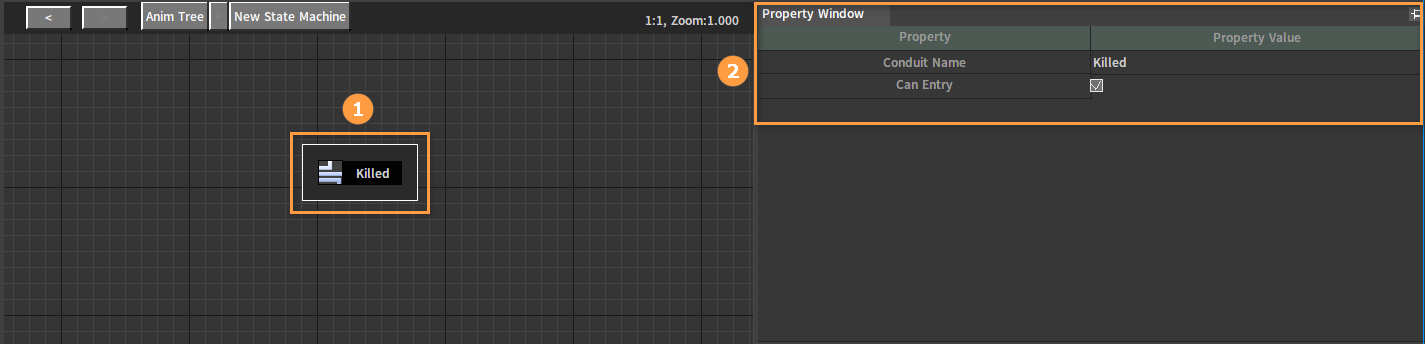
| Property | Description |
|---|---|
| Conduit Name | Edit the name of the Conduit. |
| Can Entry | Whether to enter the node. |
Conduit Node Examples
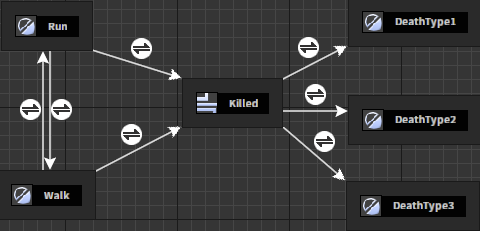
The Killed node in the figure below is the Conduit node. When the character is in the motion state of Walk or Run, if the character is attacked and the health point is lower than the death threshold, the logic will control the state to transit to the Killed Conduit node, and the state finally switches to is determined by the specific transition rules.
Transition Rules
Three types of transition rules for State Transition:
Automatically switching to the next state after the state animation is played
Using callback functions to set transition rules for State Transition
Setting Use Conditions to transit.
Compared to using callback functions, the latter one Use Conditions is recommended.
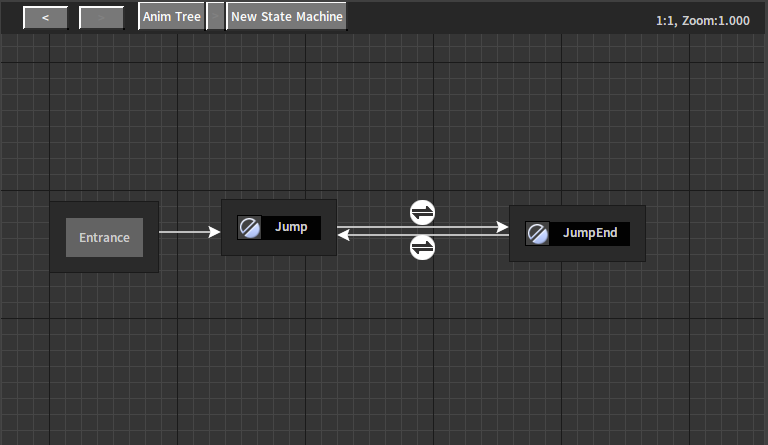
Automatically Transiting After the Animation is Played
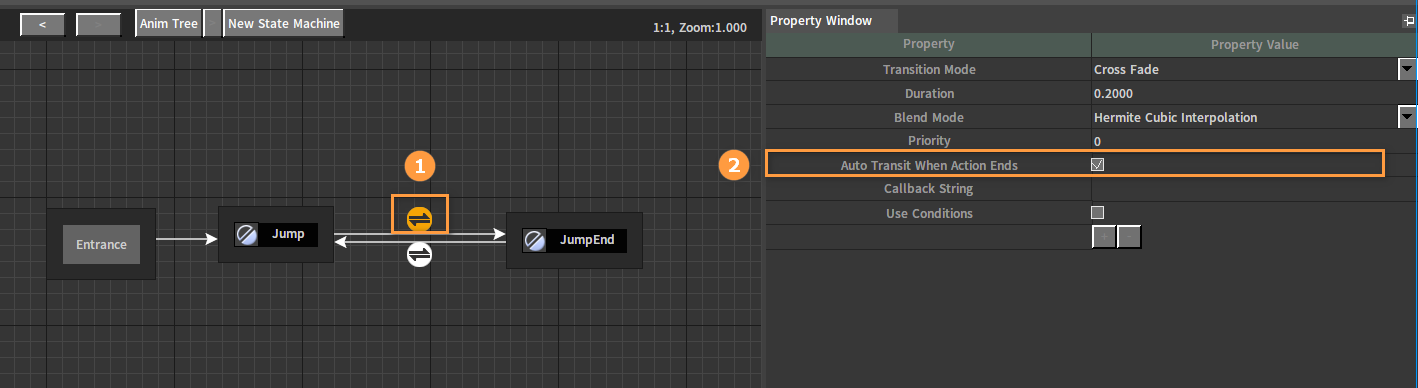
Design a state graph as shown below to complete the State Transition from Jump to JumpEnd.
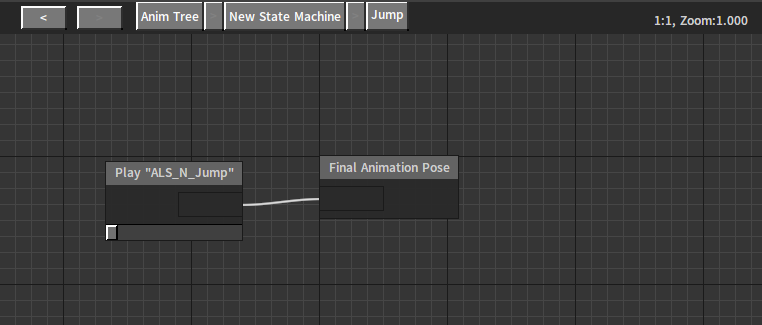
The Anim Tree associated with the Jump state:
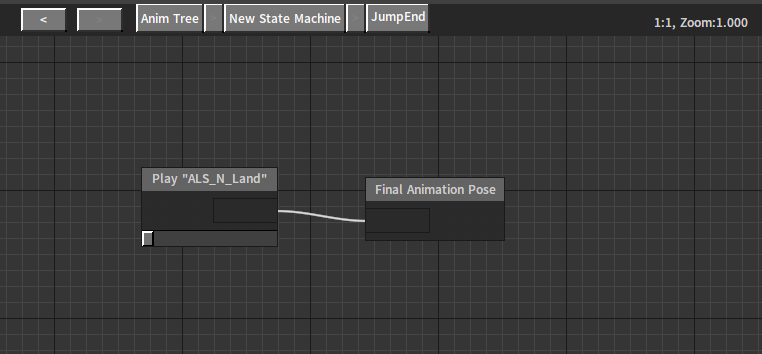
The Anim Tree associated with the JumpEnd state:
Select the transition from the Jump state to the JumpEnd state, and check Auto Transit When Action Ends in its Property Window.
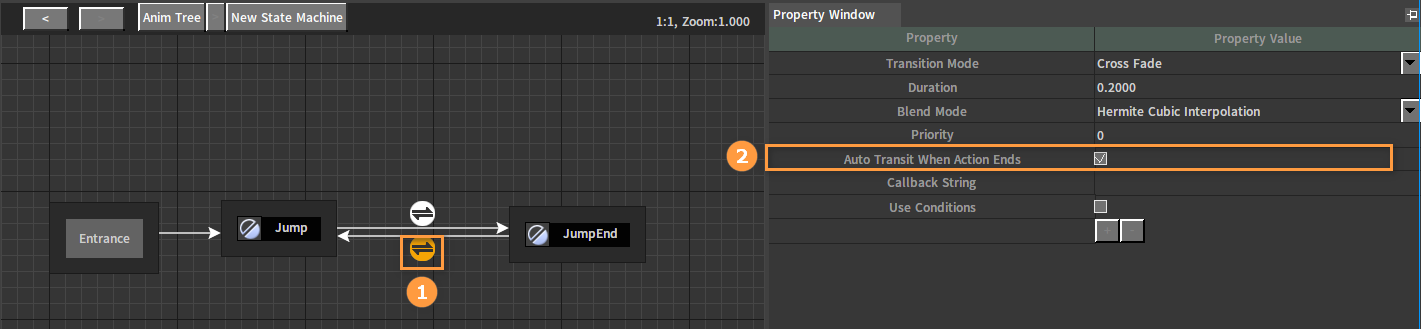
Set the transition from the JumpEnd state to the Jump state as described above.
Click the Apply button to view the effect. After the Jump state animation is played, it automatically transits to the target JumpEnd state animation, after which it automatically transits back to the Jump state animation, and so on.
Callback Strings
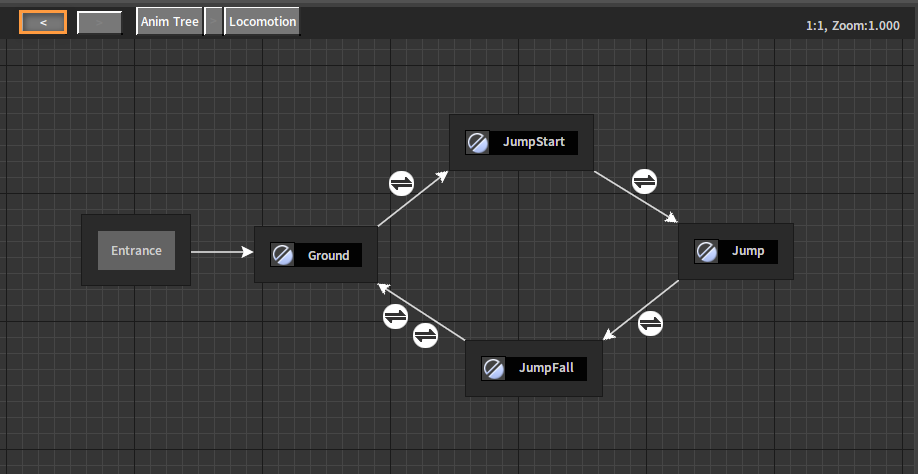
State Transition can be done by setting Callback Strings. Design a state graph as shown below and then set the transitions between states respectively. For example, select the transition from the Ground state to the JumpStart state, and enter jump_start in the Callback String of the Property Window.
Callbacks of State Transitions
on_transition_event(callee, role, action_index, machine_index, prev_state, next_state, callback_name)
Parameter 1: AnimCallee entity
Parameter 2: Target character entity
Parameter 3: Action index
Parameter 4: State Machine index
Parameter 5: Pre-transition state index
Parameter 6: Post-transition state index
Parameter 7: Callback event name string
Use Conditions
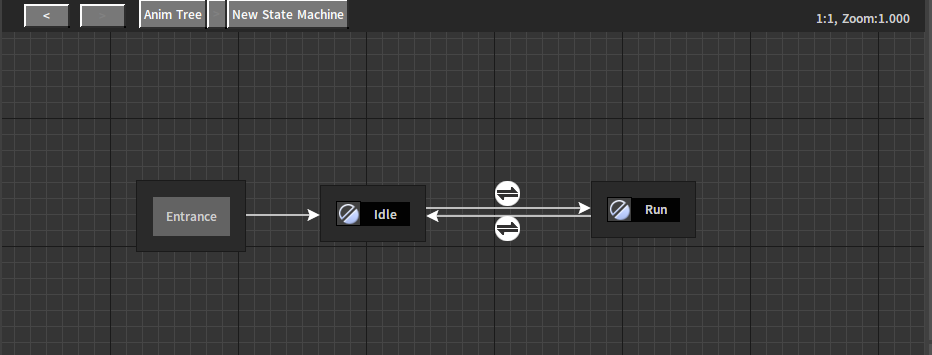
Design a state graph as shown below to complete the transition between Idle and Run states.
The Anim Tree associated with the Idle state:

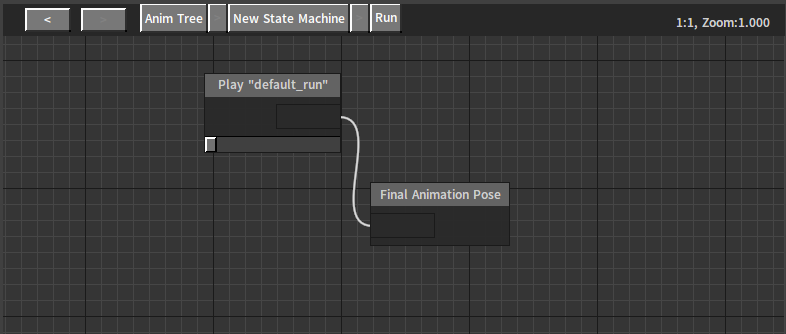
The Anim Tree associated with the Run state:
Click the ![]() button in Animation Parameter to add a parameter. Here select the Float parameter.
button in Animation Parameter to add a parameter. Here select the Float parameter.
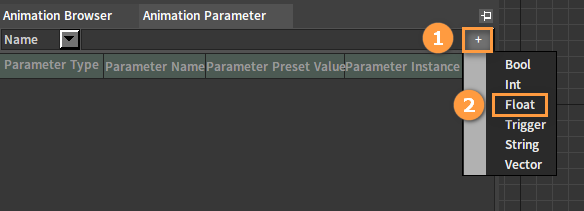
Modify the Parameter Name to Speed after adding.

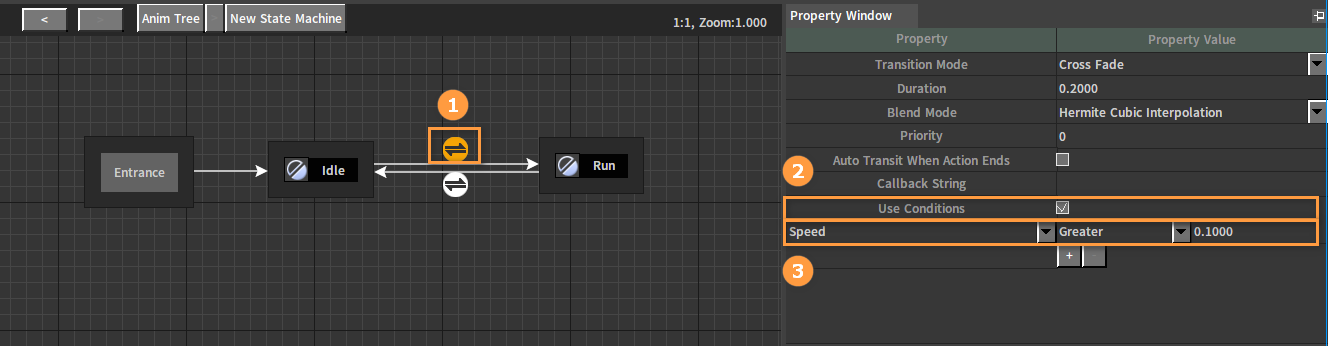
Select the transition from the Idle state to the Run state to show its Property Window. Check Use Conditions, select the parameter created earlier in the first drop-down box, and set specific conditions like this: when the Speed parameter is greater than 0.1, it will transit from the Idle state to the Run state.
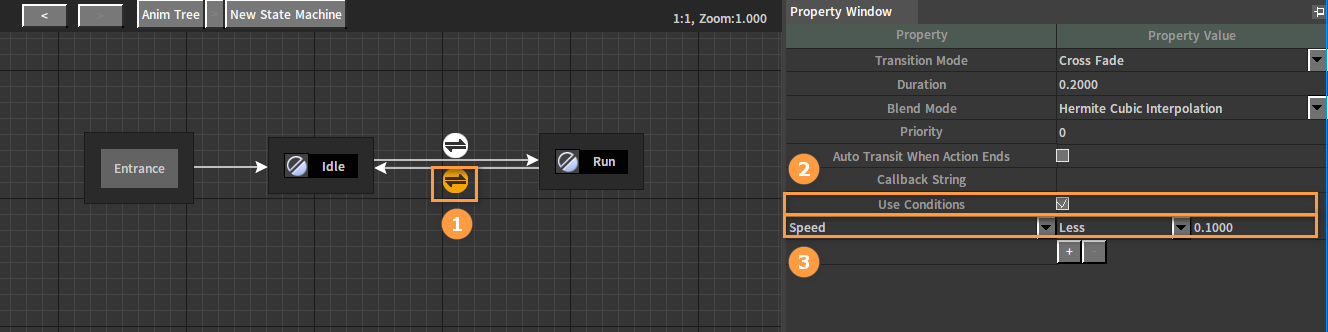
Select the transition from the Run state to the Idle state. Check Use Conditions, and select the Speed parameter for the conditional expression. When its value is less than 0.1, it will transit from the Run state to the Idle state.
Select Preview Object from the drop-down box below the Menu Bar, and click the Apply button to view the effect in the Anim Tree Editor.
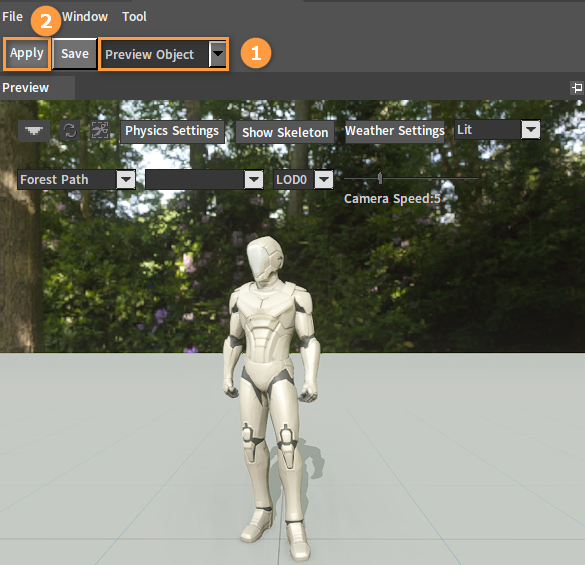
Modify the Speed parameter to switch the state.
Please refer to Character Quick Start for specific applications of using State Machines and setting transition rules by using conditions.
Example
The following is an example of applying the State Machine to control the character's actions. The transition rule uses Auto Transit When Action Ends and Callback String.
Creating Actors
Refer to Assembling Actors to create an Actor which contains a series of animation assets.
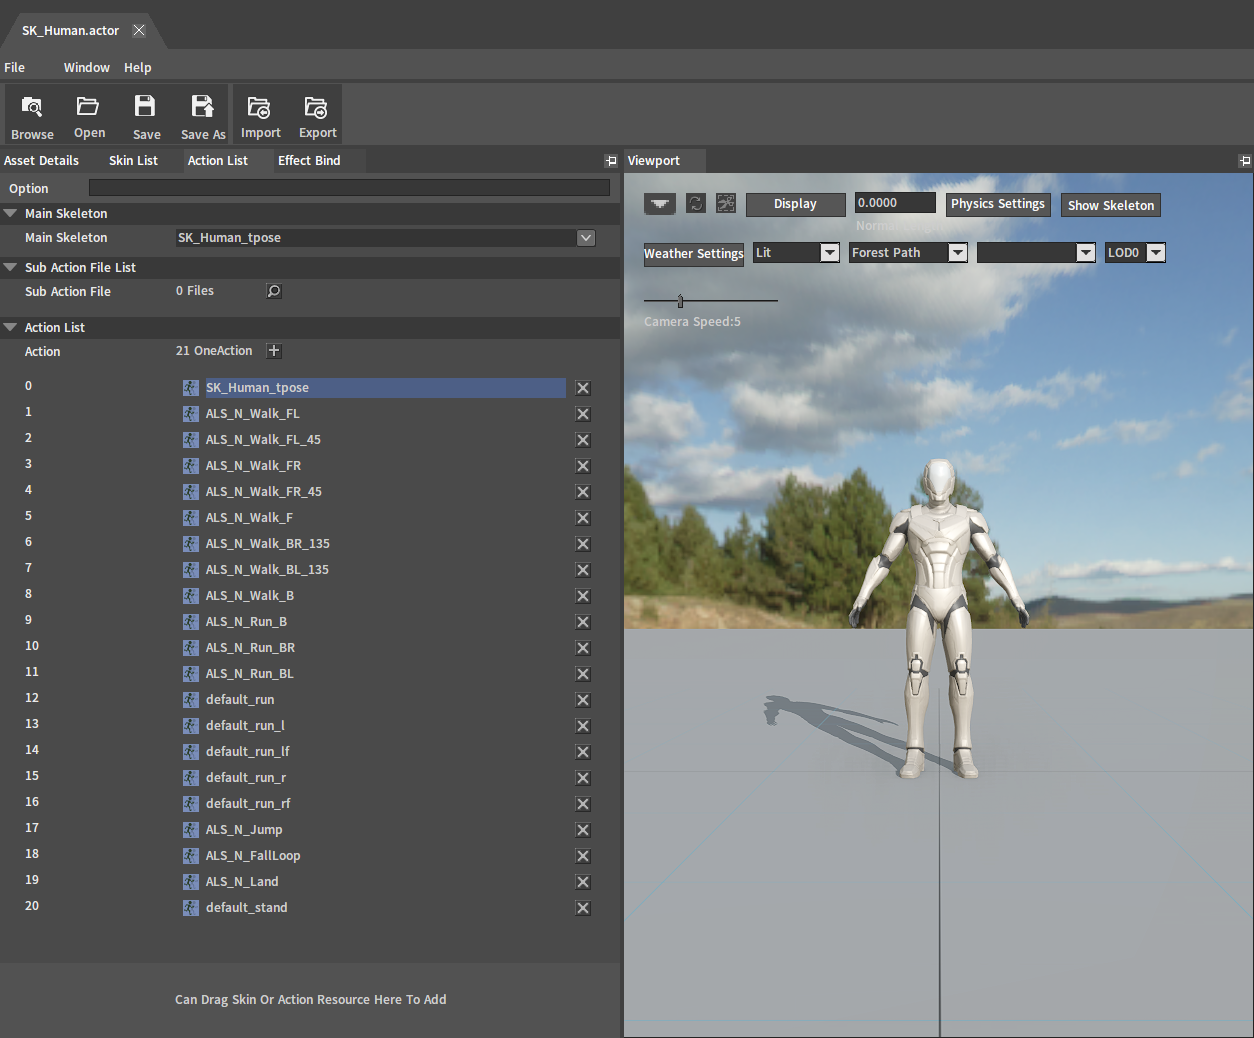
Creating Animation Sequences
In the Component Editor, double-click any Skeleton asset to open the Animation Editor.

Select the Skeleton asset to be converted in the Asset Browser of the Animation Editor. Right-click to open the Shortcut Menu, and select Convert Skeleton To AnimSeq. Enter the name of the Animation Sequence in the pop-up window, and click the OK button to complete the creation.
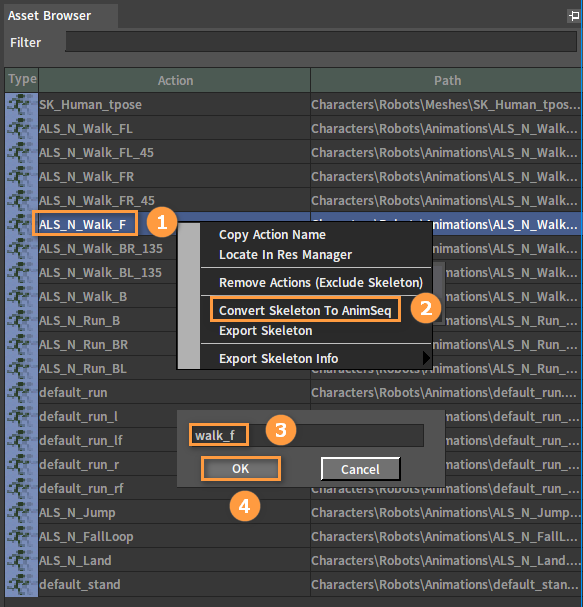
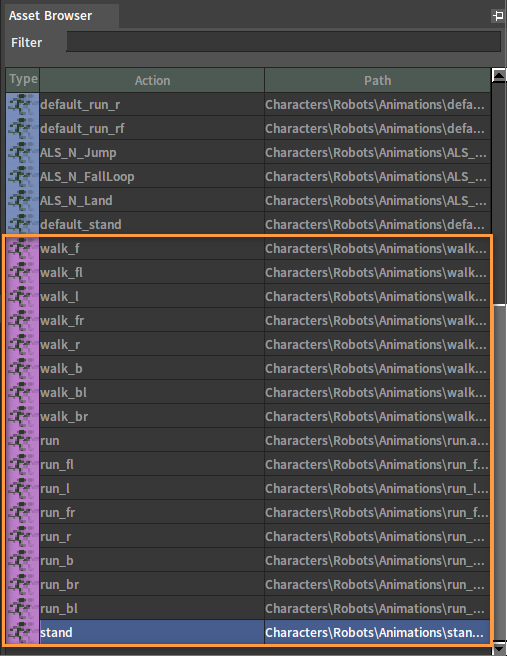
Convert all walk, run, and stand related Bone assets into Animation Sequence assets as described above which will be used as sampling points in the Blend Space later.
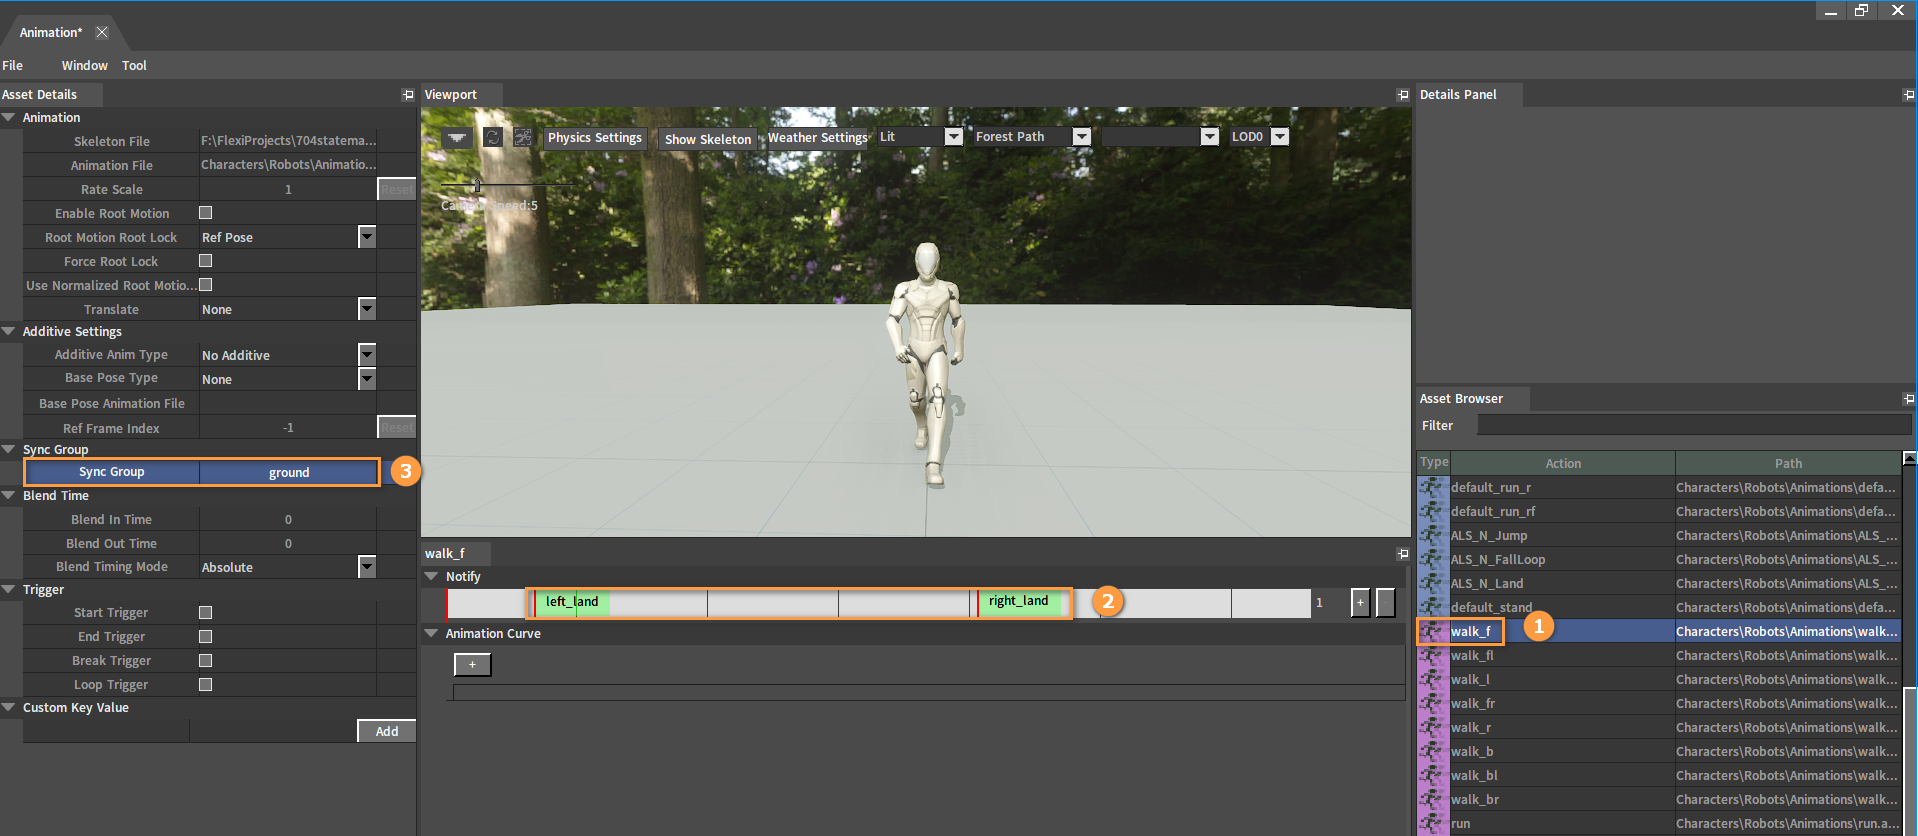
Double-click a walk or run Animation Sequence in the Asset Browser to add Sync Marker and Sync Group to it which will synchronize the footsteps when blending different animations. Similarly, add Sync Markers and Sync Groups to other walk and run Animation Sequences. Please refer to the Animation Syncing documentation for details on Sync Markers and Sync Groups.
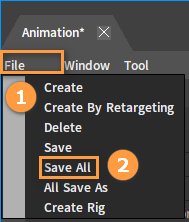
Click File (Menu Bar) -> Save All to save after editing.
Creating Blend Spaces
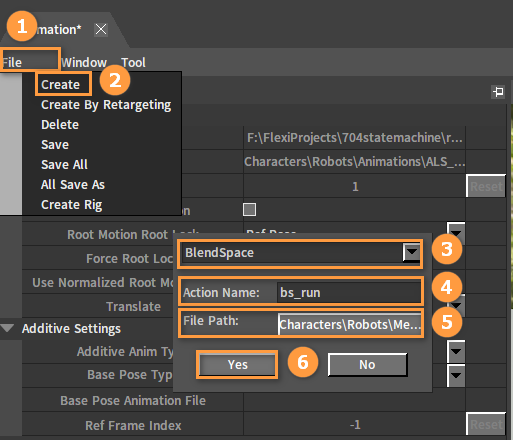
Click File (Menu Bar) -> Create in the Animation Editor. Select BlendSpace in the drop-down box of the pop-up window, and set the name and path here. Click Yes to complete the creation.
Please refer to the Blend Spaces documentation to create a Blend Space asset as shown below.
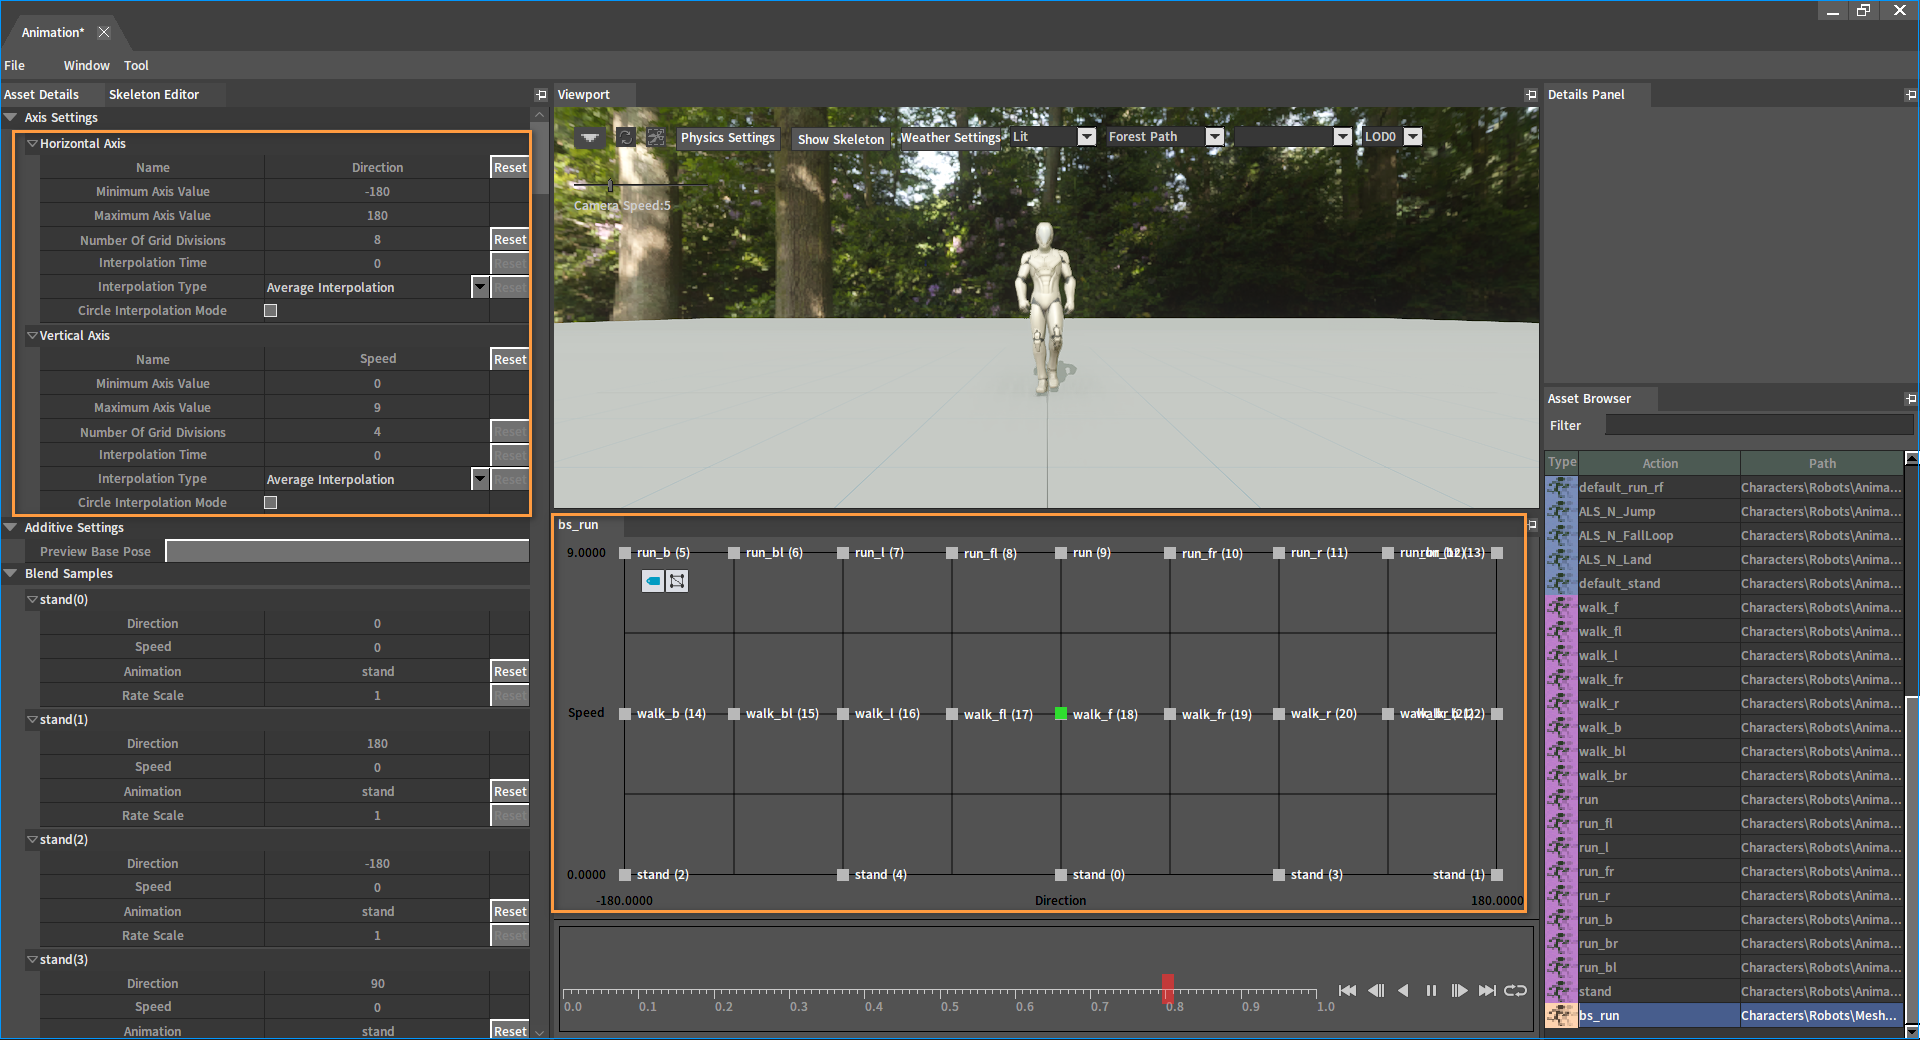
Save it after editing.
Creating Anim Trees
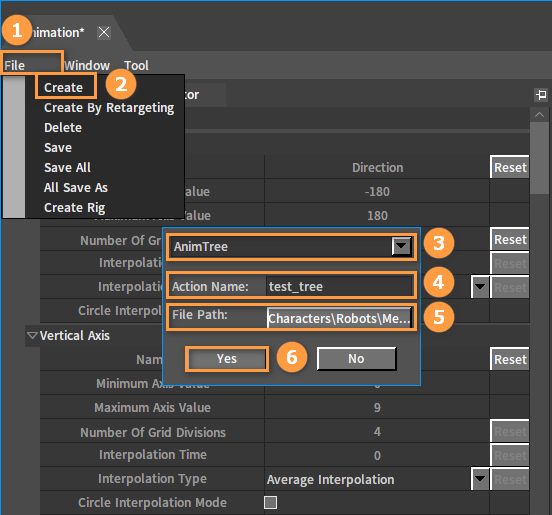
Click File (Menu Bar) -> Create in the Animation Editor. Select AnimTree in the drop-down box of the pop-up window, and set the name and path here. Click Yes to complete the creation.
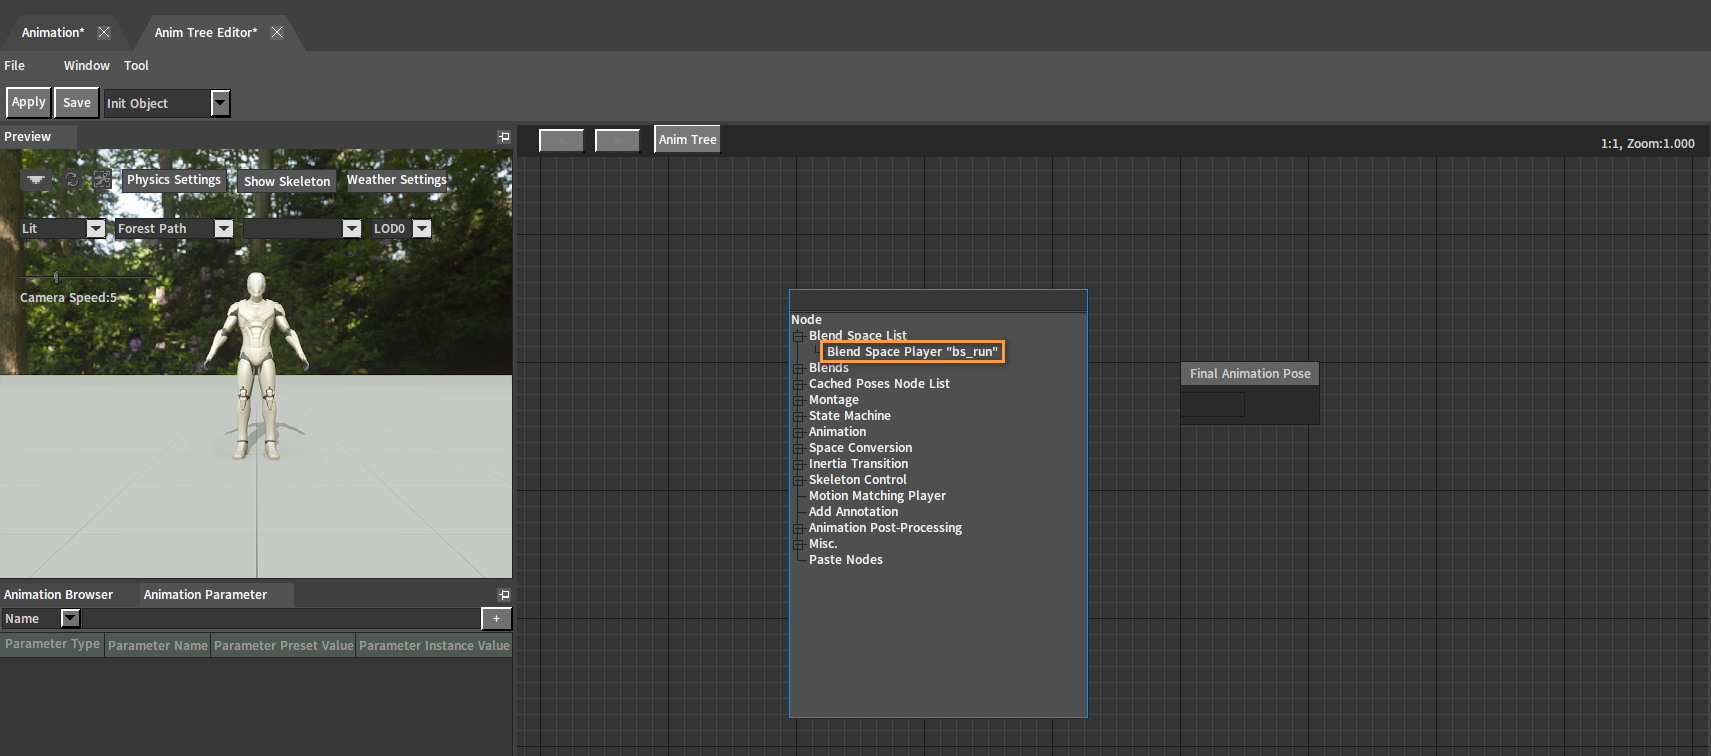
Right-click the blank space to open the Node Selection panel in the opened Anim Tree Editor. Expand Blend Space List, and select the Blend Space Player "bs_run" node.
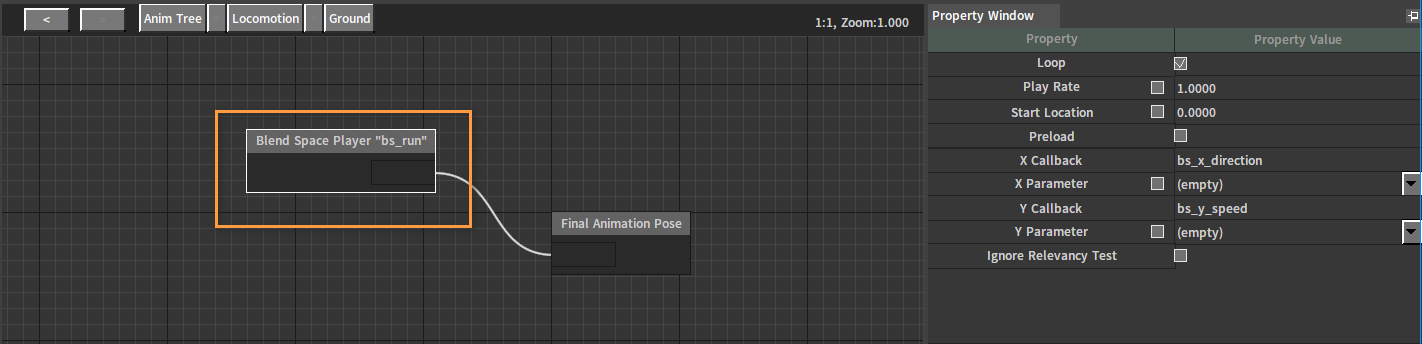
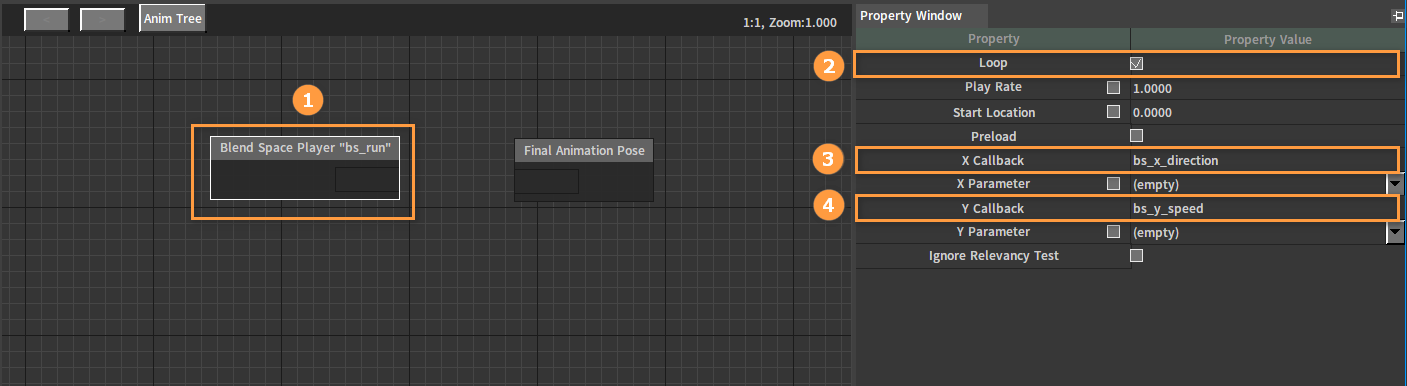
Select the created Blend Space Player node. Check Loop in Property Window, and configure the callback string in the script. (Please refer to Blend Space Player for details on this node.)
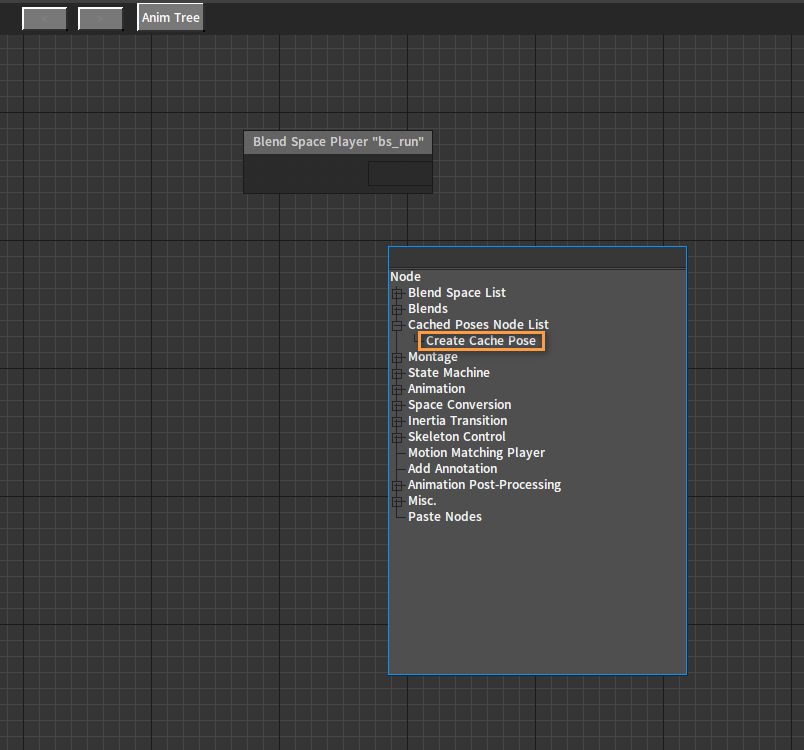
Right-click in the blank area of the Anim Tree to open the Node Selection panel. Expand Cached Poses Node List, and select Create Cache Pose.
Select the created Cache Pose node. Click its title area and change its name to Ground.
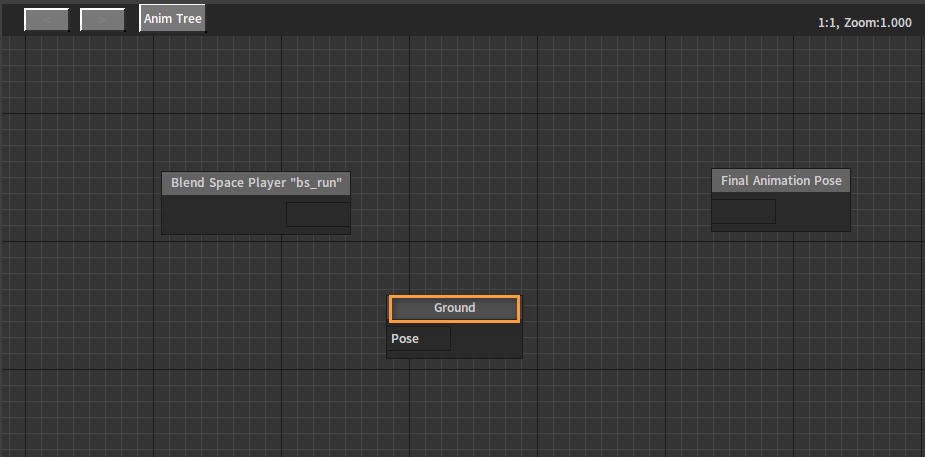
Link the Blend Space Player node to the Ground Cache Pose node.
Creating State Machines
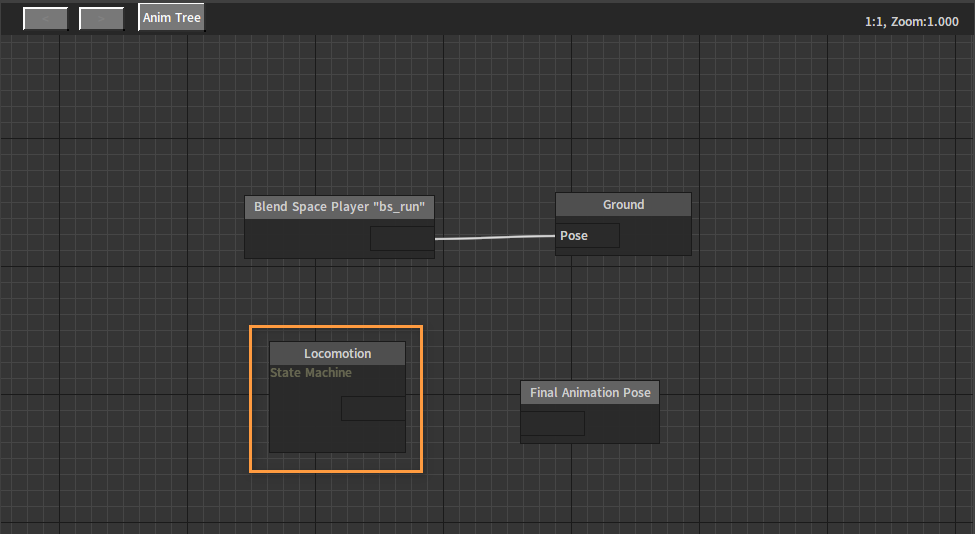
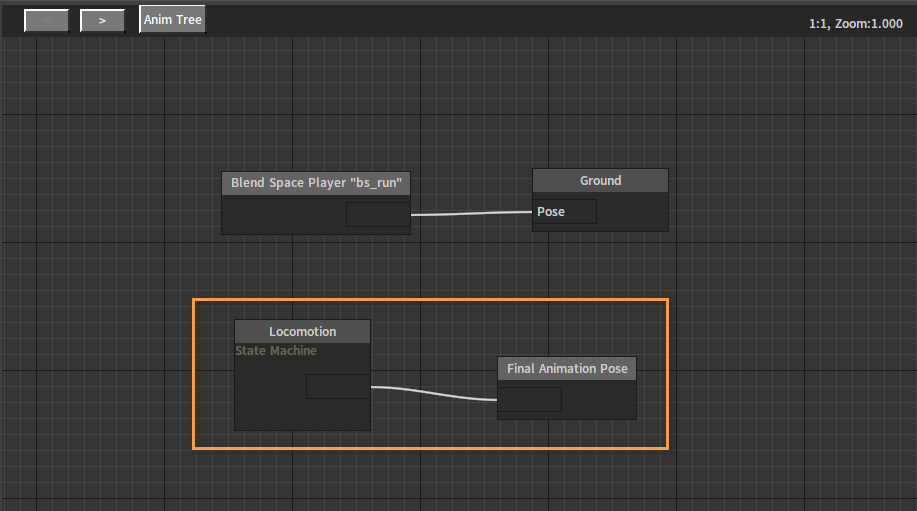
Create a State Machine node and change its name to Locomotion.
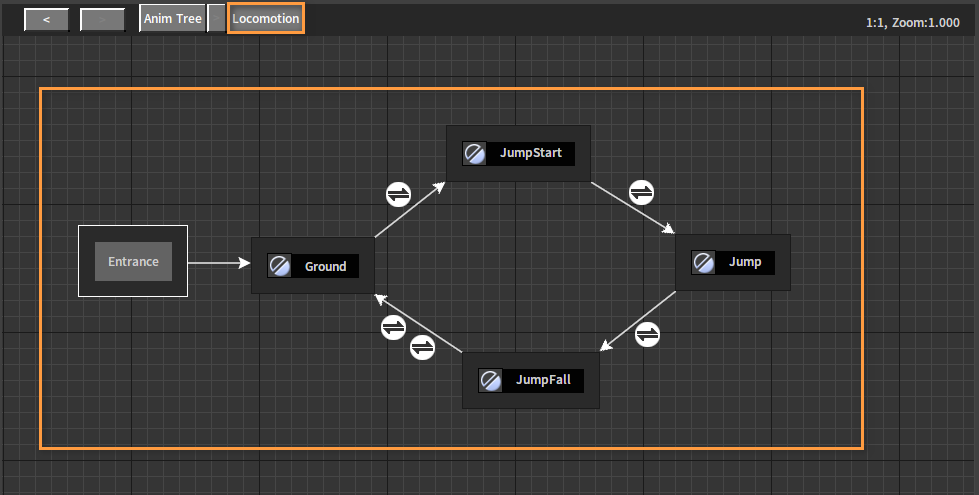
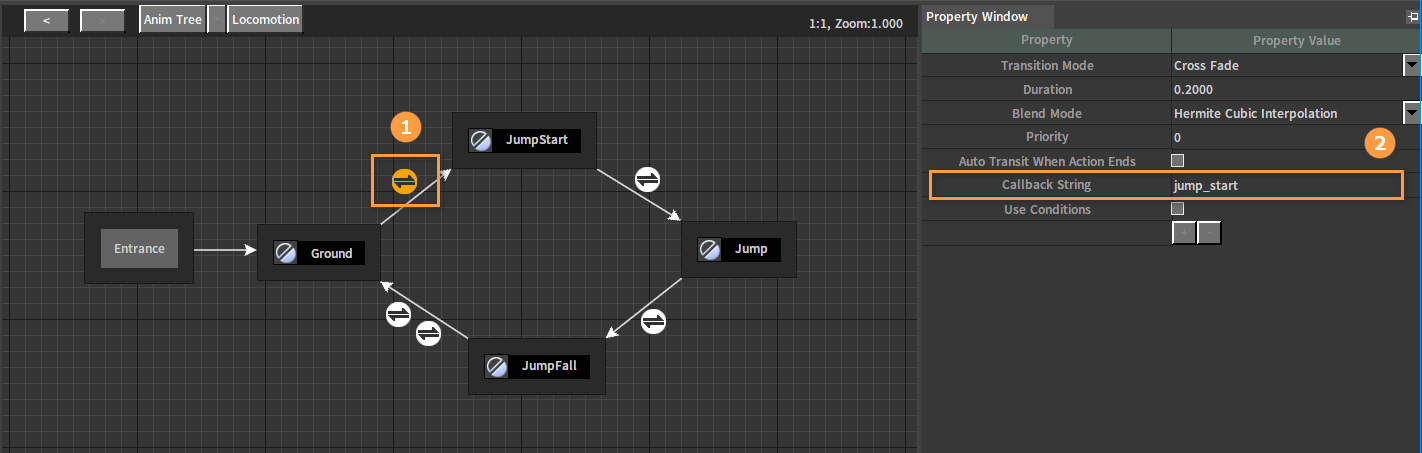
Double-click the State Machine node to enter the editing interface of the state graph, and design one as shown below.
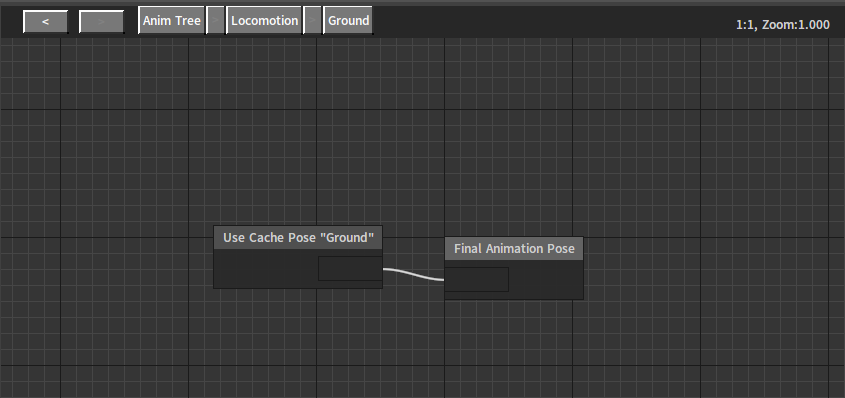
The Anim Tree associated with the Ground state:
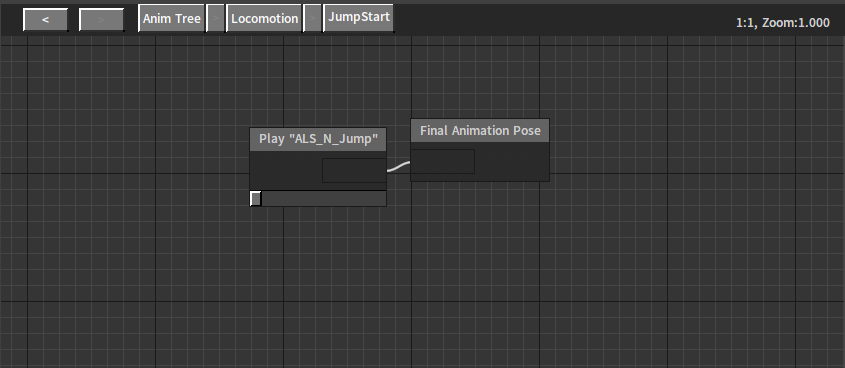
The Anim Tree associated with the JumpStart state:
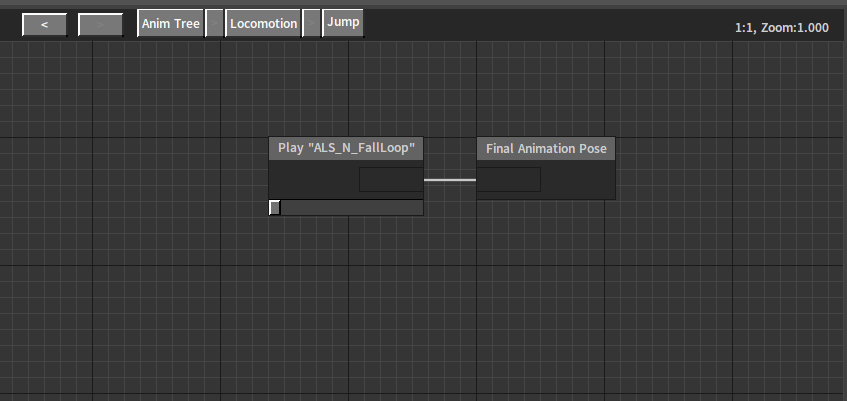
The Anim Tree associated with the Jump state:
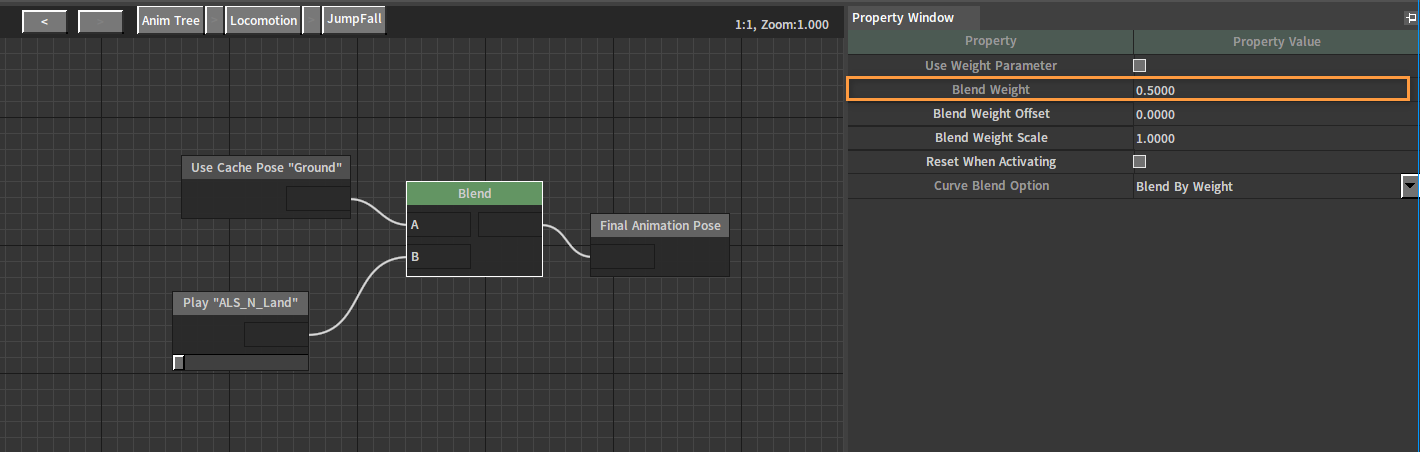
The Anim Tree associated with the JumpFall state, where the Blend Weight of the Blend node is set to 0.5, allowing for a smoother pose transition from landing to the ground.
Setting State Transitions
Select the transition from the Ground state to the JumpStart state, and set its Callback String to jump_start in the Property Window.
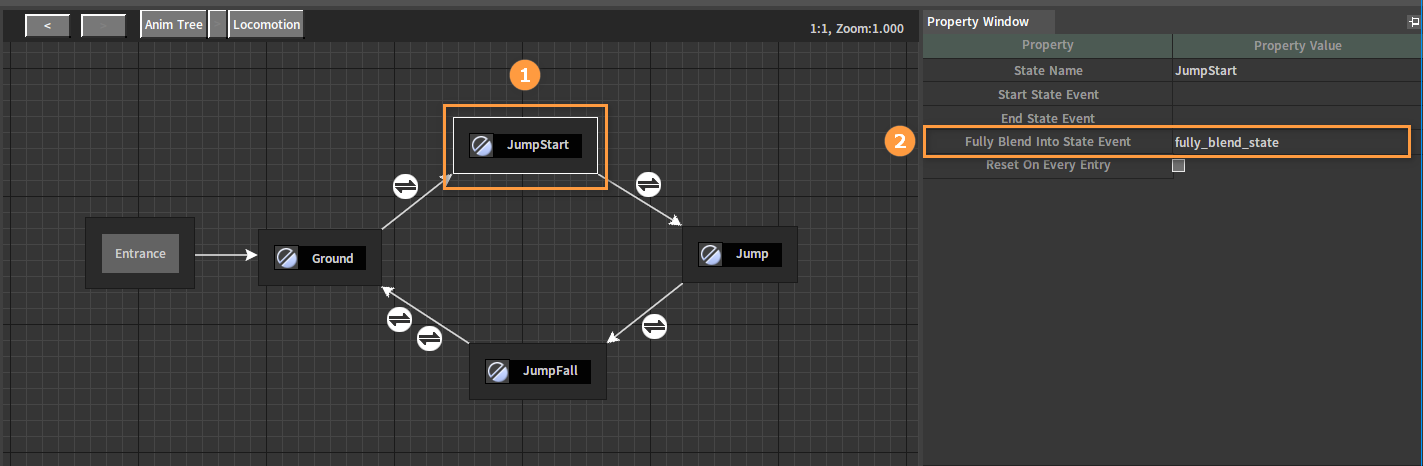
Select the JumpStart state, and set the Fully Blend Into State Event callback function name to fully_blend_state in the Property Window.
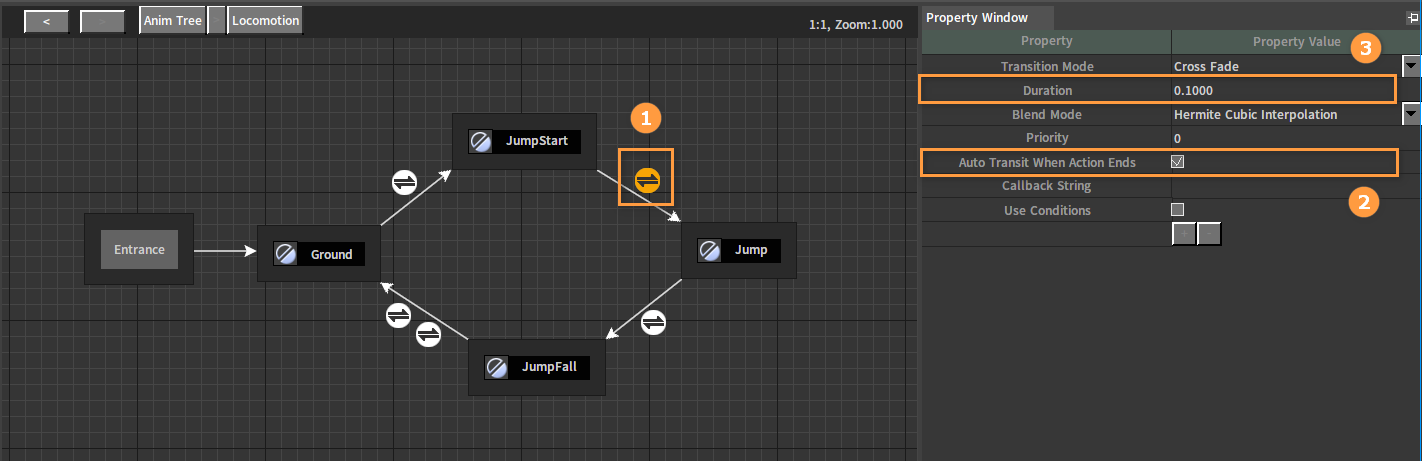
Select the transition from the JumpStart state to the Jump state. Check Auto Transit When Action Ends, and set Duration to 0.1 in Property Window.
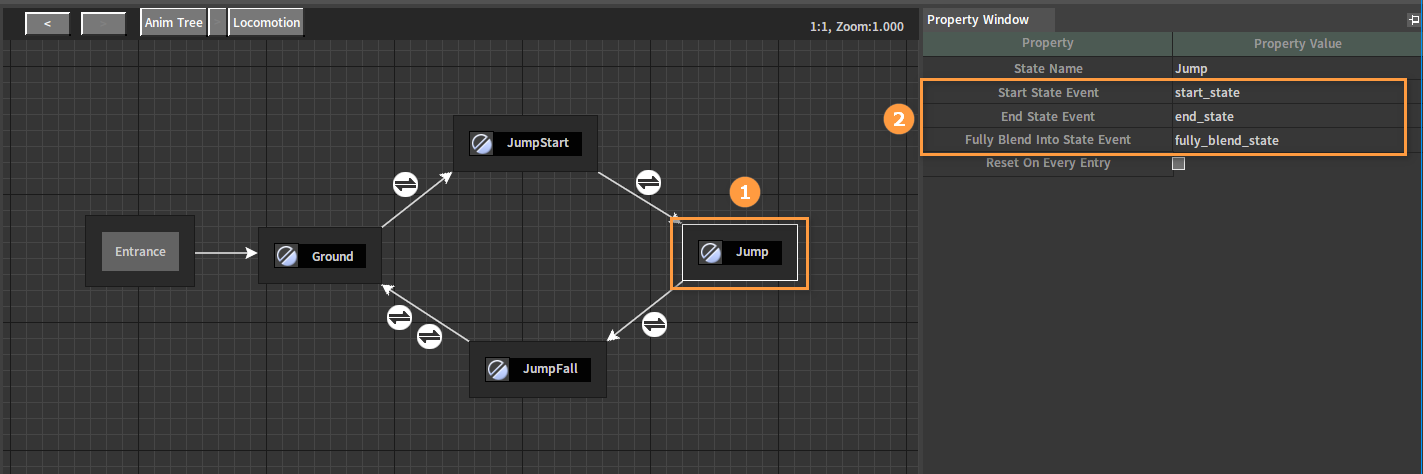
Select the Jump state, and set the callback function names of Start State Event, End State Event and Fully Blend Into State Event to start_state, end_state and fully_blend_state respectively in the Property Window.
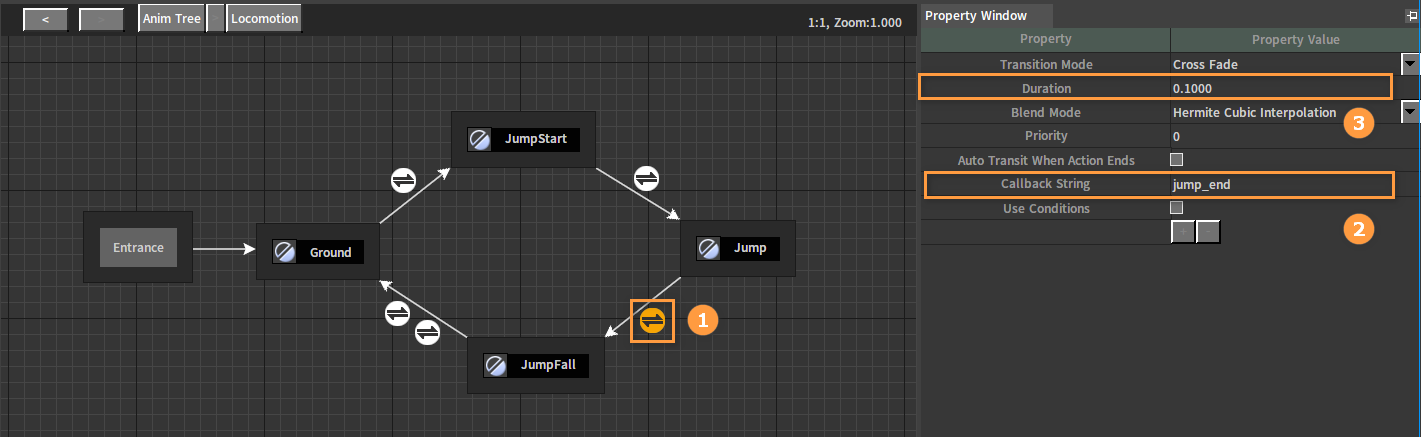
Select the transition from the Jump state to the JumpFall state. Set state transition Callback String to jump_end, and Duration to 0.1 in the Property Window.
Set the two transitions from the JumpFall state to the Ground state respectively. In the Property Window, one checks to enable Auto Transit When Action Ends, and the other uses Callback String jump_start.
Return to the previous Anim Tree after editing the state graph.
Link the State Machine node to the Final Animation Pose node.
Click the Save button to complete the creation of the whole Anim Tree.
Configuring Actors
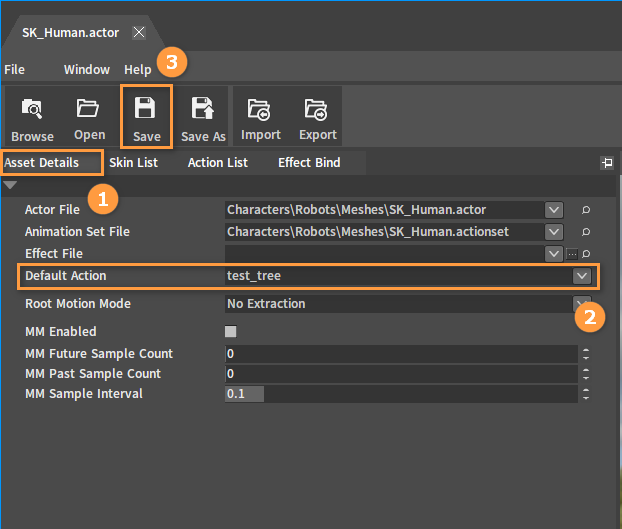
Click Asset Details in the Actor Editor. Set the Default Action of the Actor to the Anim Tree test_tree, and then click Save.
Creating Characters
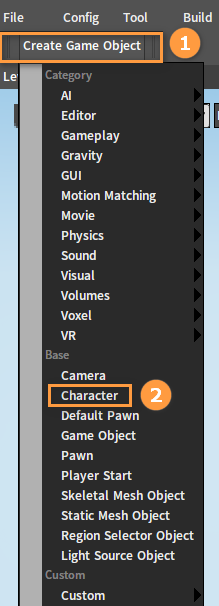
Create a new default Level, and click Create Game Object (Toolbar) -> Character to create a character.
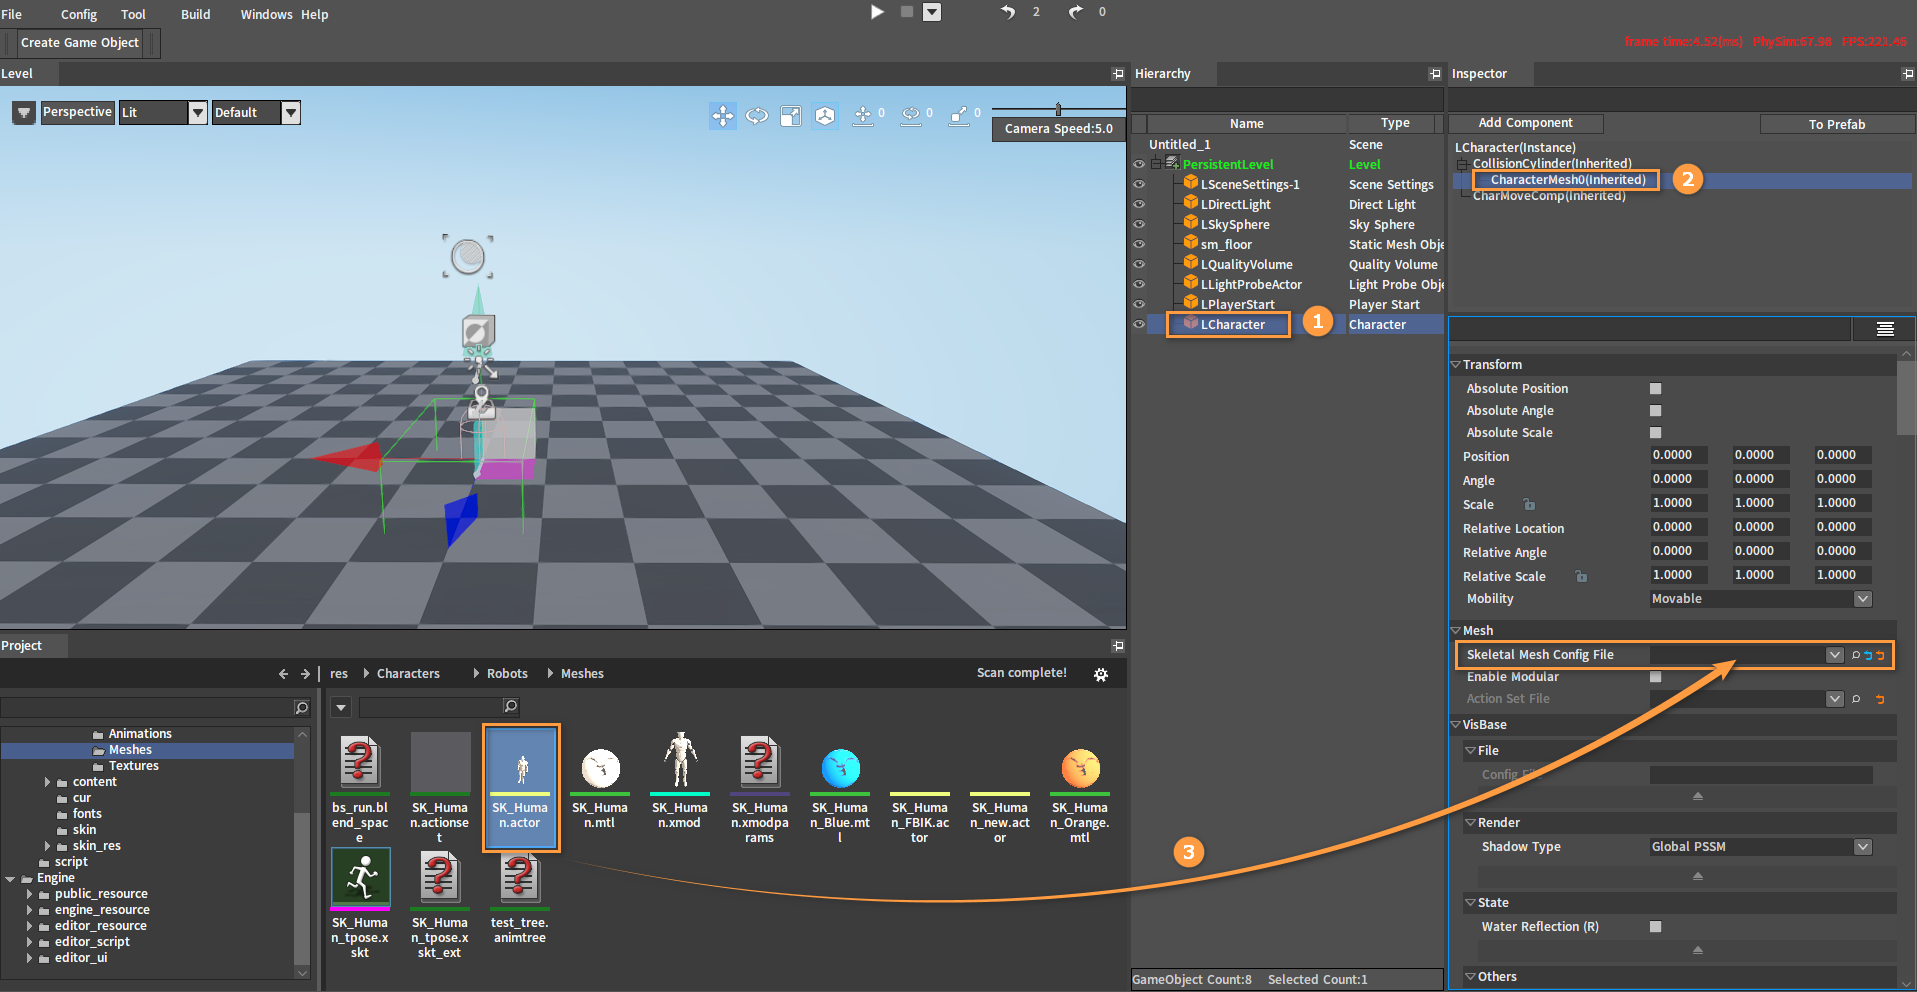
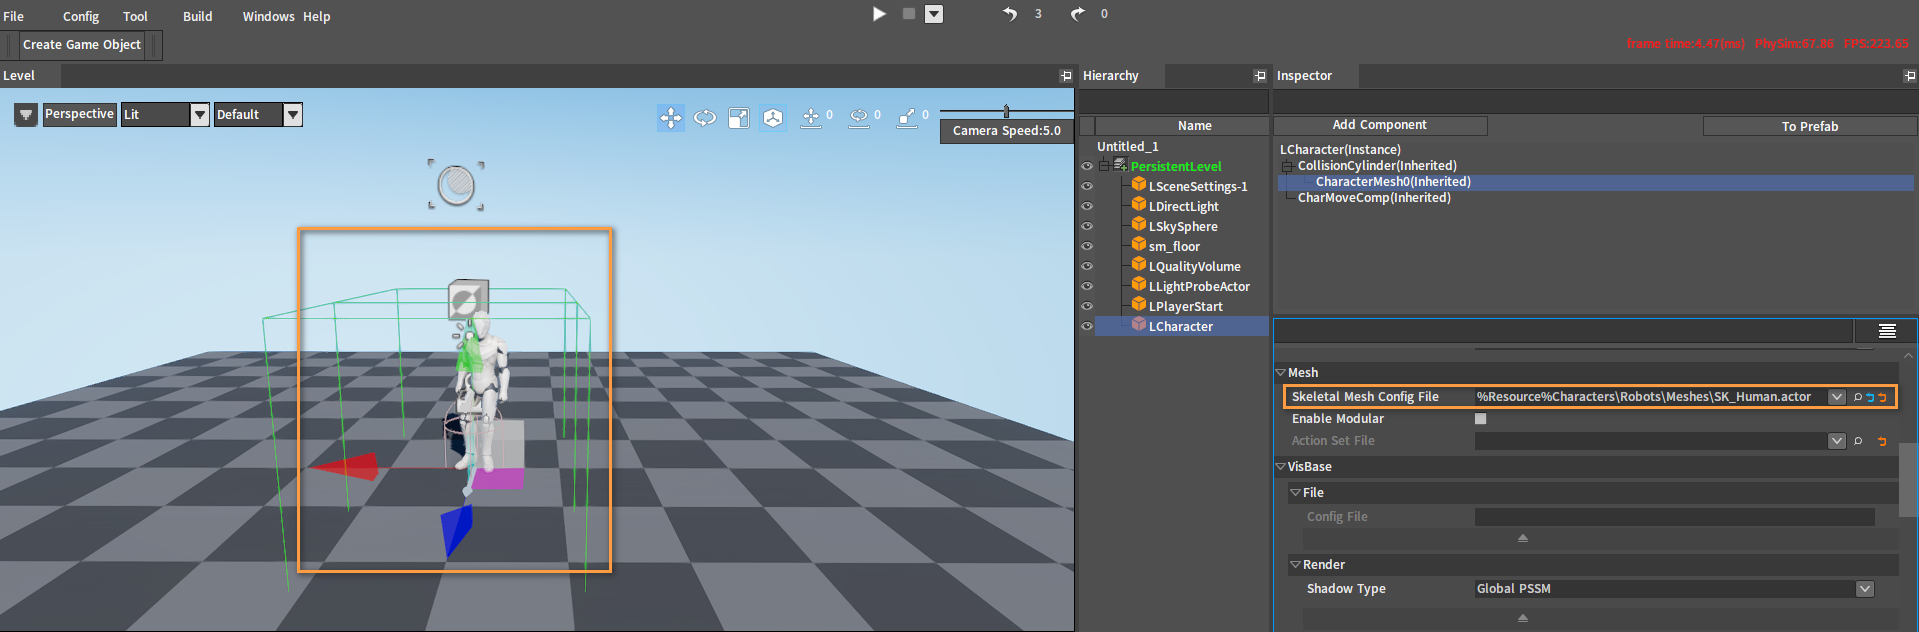
Select the created character in the Hierarchy panel and CharacterMesh0(Inherited) in the Inspector panel respectively. Drag the created Actor into the Skeletal Mesh Config File slot.
After dragging:
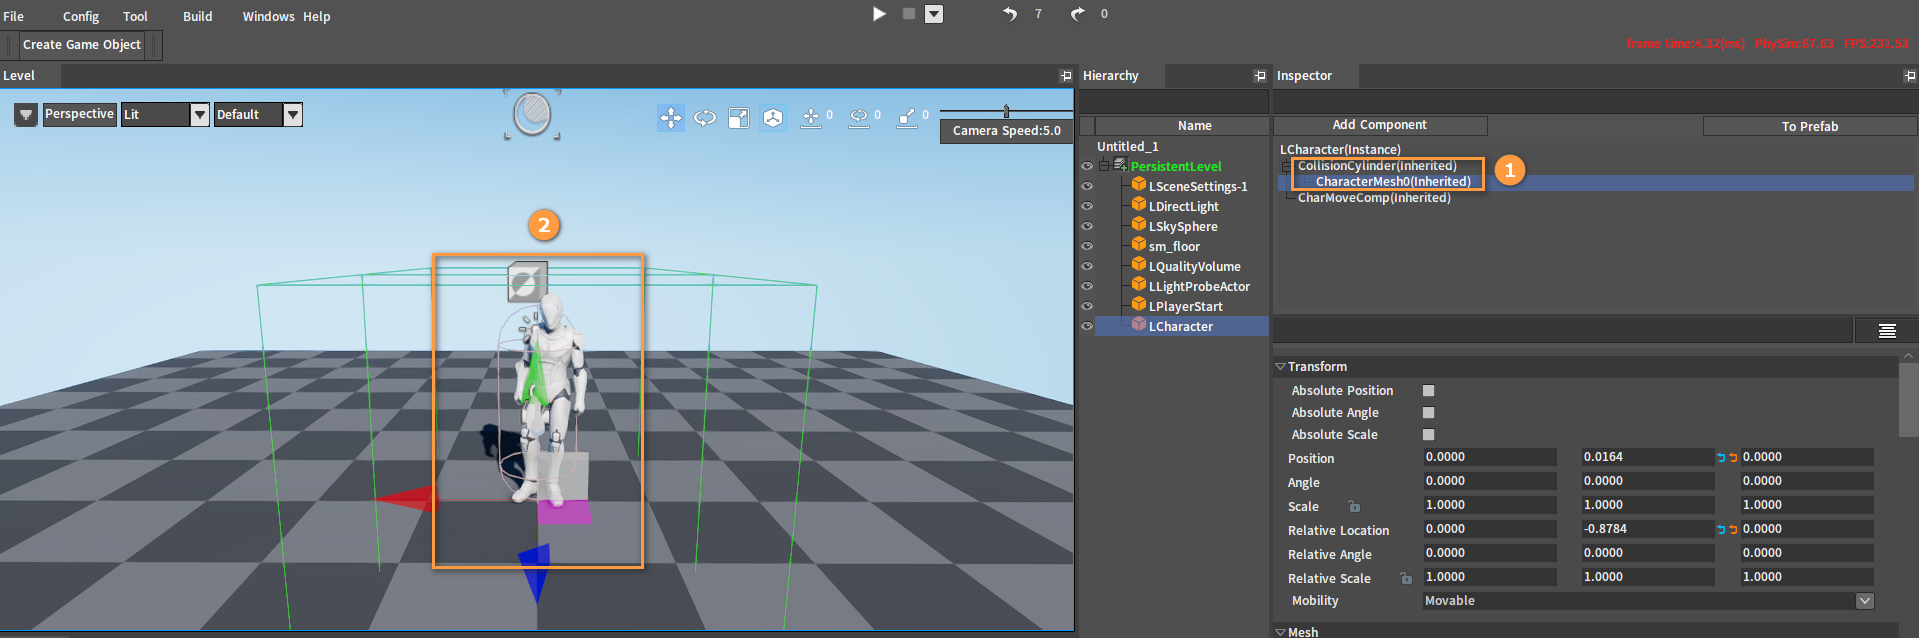
Select CollisionCylinder(Inherited) and CharacterMesh0(Inherited) in the Inspector panel, then adjust the position of the character's capsule and mesh respectively, so that the feet of the character skin are on the ground and the capsule is above the ground in the premise that the capsule wraps the character as much as possible.
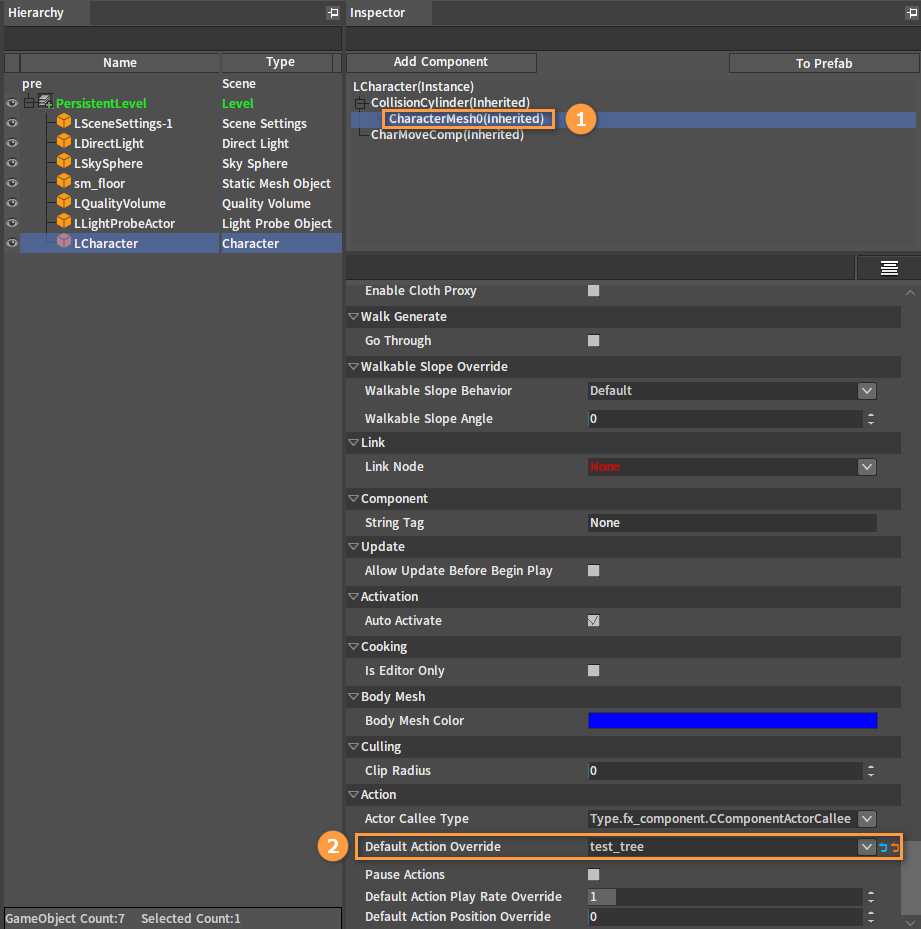
Select the character object in the Hierarchy panel and CharacterMesh0(Inherited) in the Inspector panel respectively. Set the Default Action Override to the created Anim Tree test_tree.
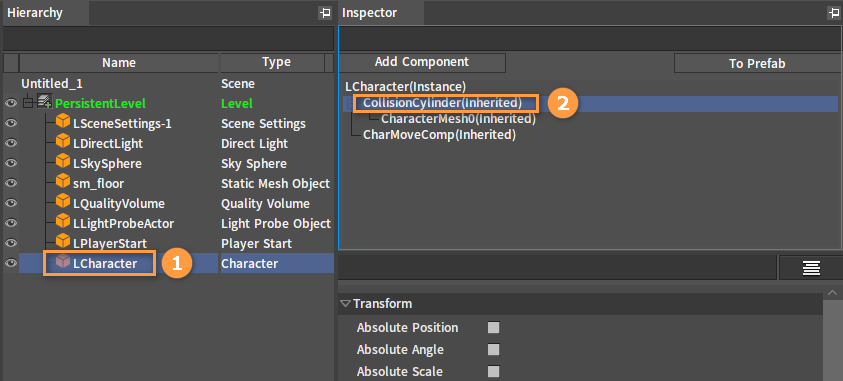
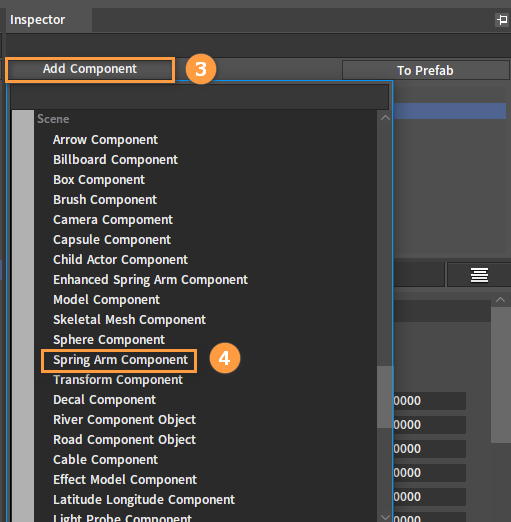
Select CollisionCylinder(Inherited), then click the Add Component button to add a Spring Arm Component.
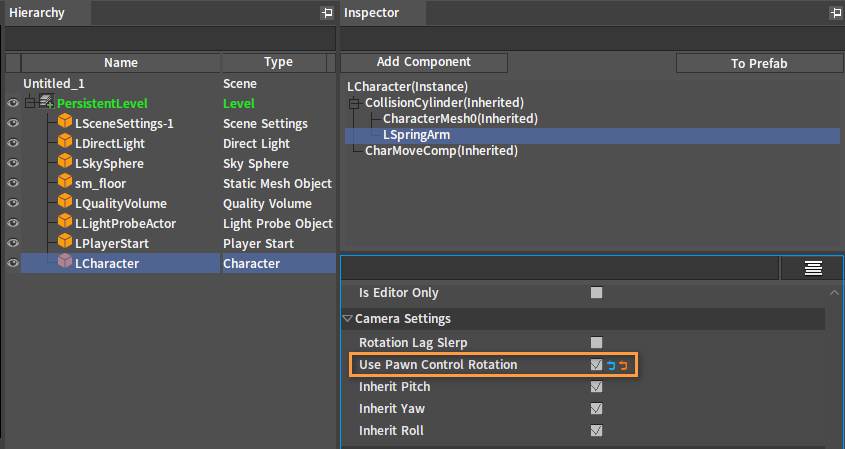
Check the Use Pawn Control Rotation property of the LSpringArm Component.
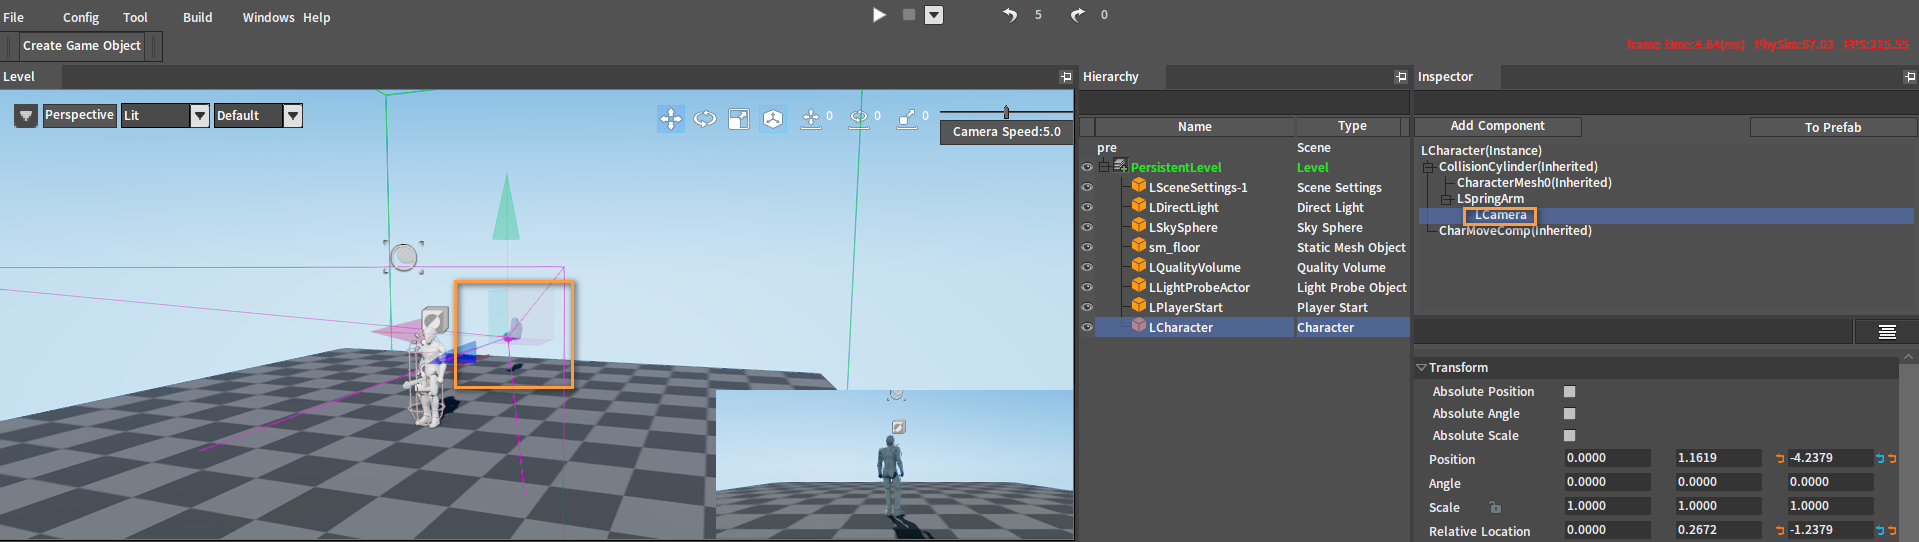
Add a Camera Component as a subset of the Spring Arm Component, and adjust the camera to the appropriate position.
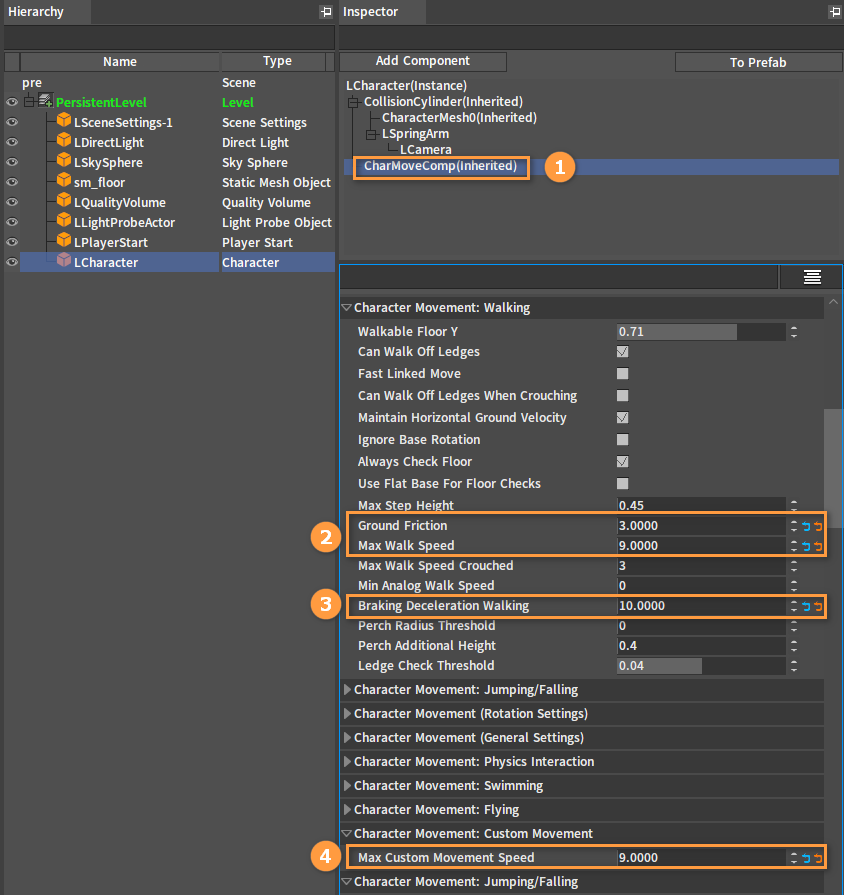
Select the CharMoveComp(Inherited) component, and set Ground Friction to 3, Max Walk Speed, Braking Deceleration Walking, and Max Custom Movement Speed to 9 respectively.
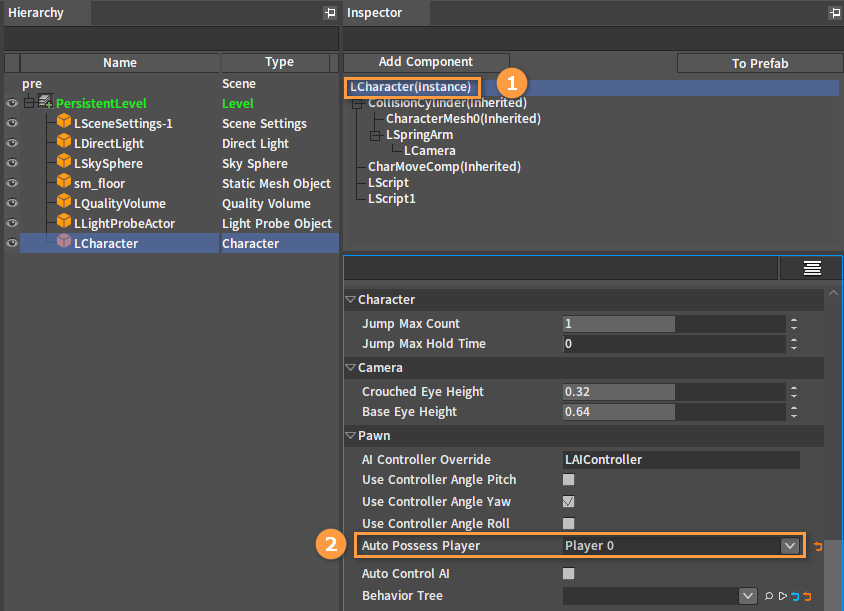
Select LCharacter(Instance) in the Inspector panel, and set Auto Possess Player to Player 0.
Binding Scripts
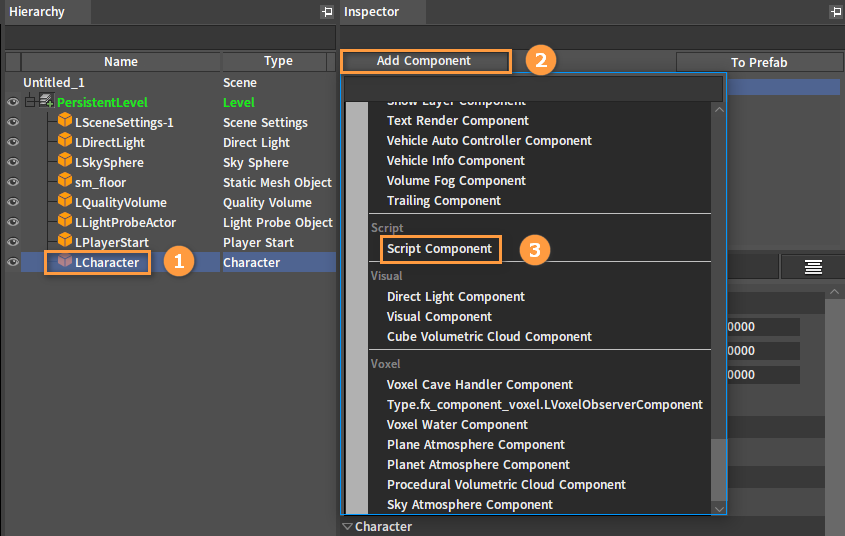
Add two Script Components. Select the character, then click the Add Component button in the Inspector panel and select Script Component.
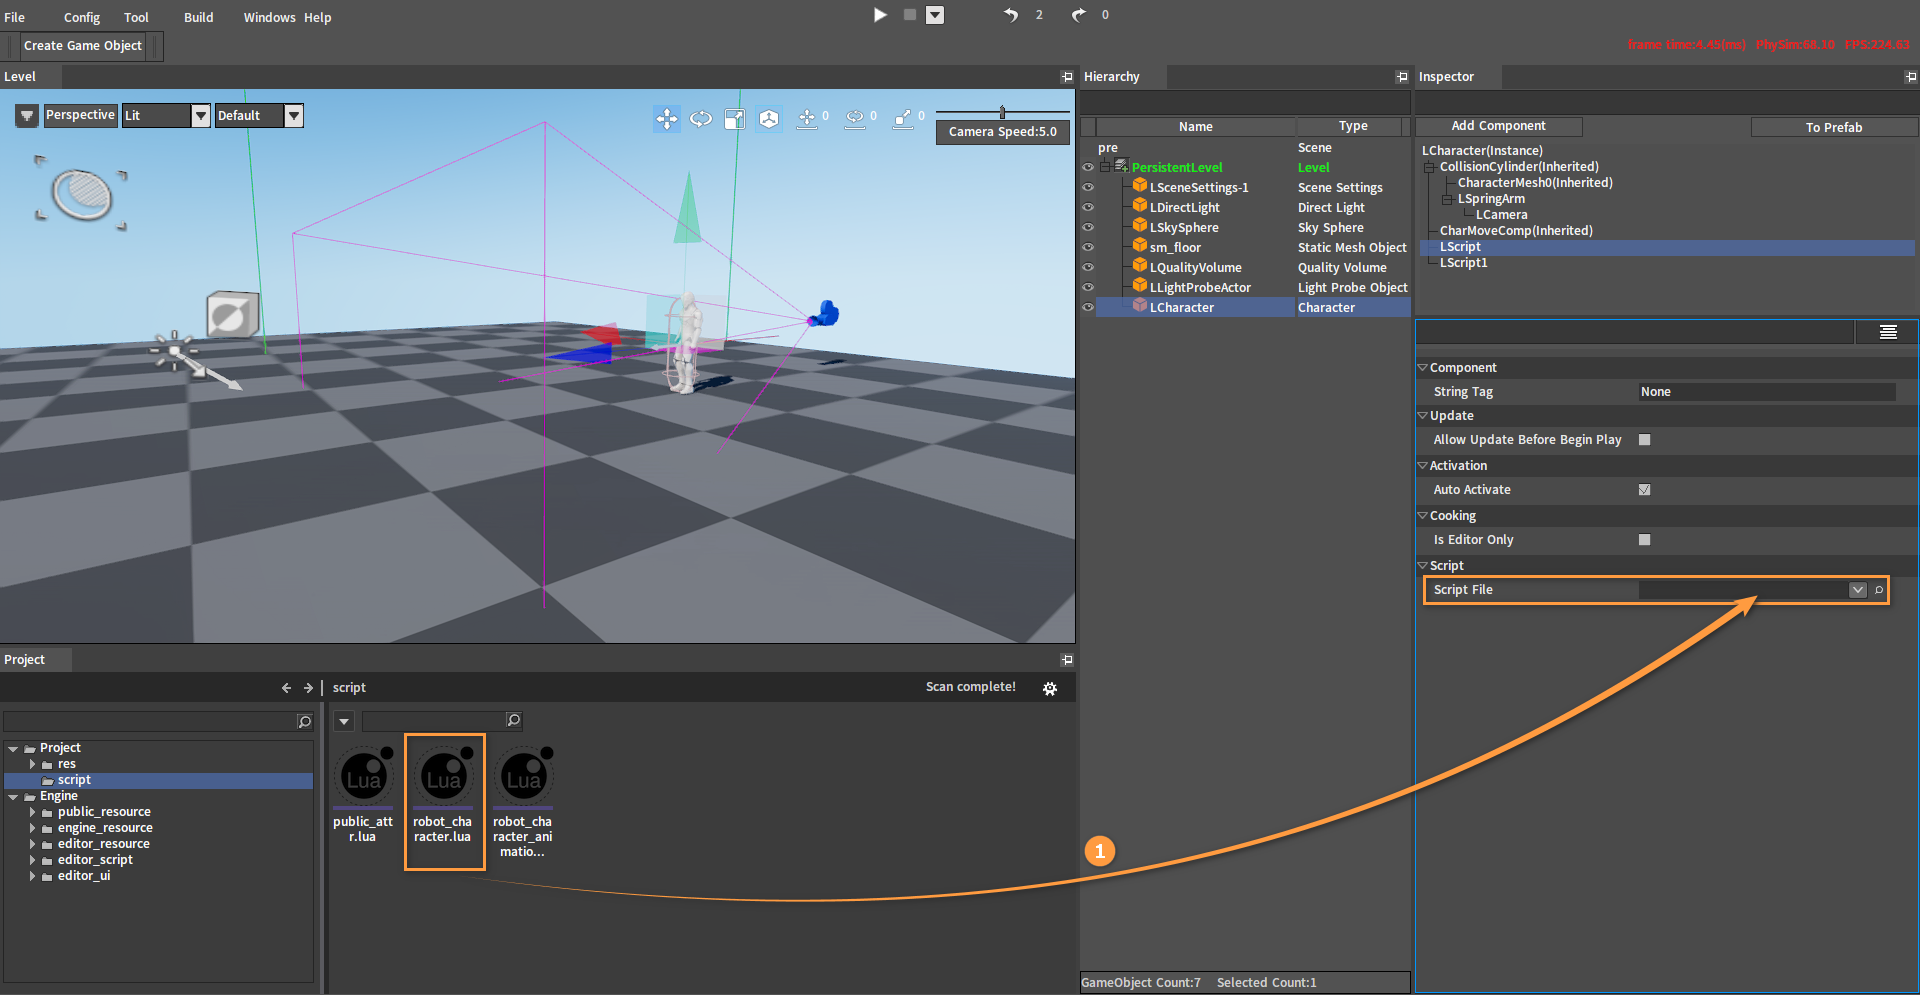
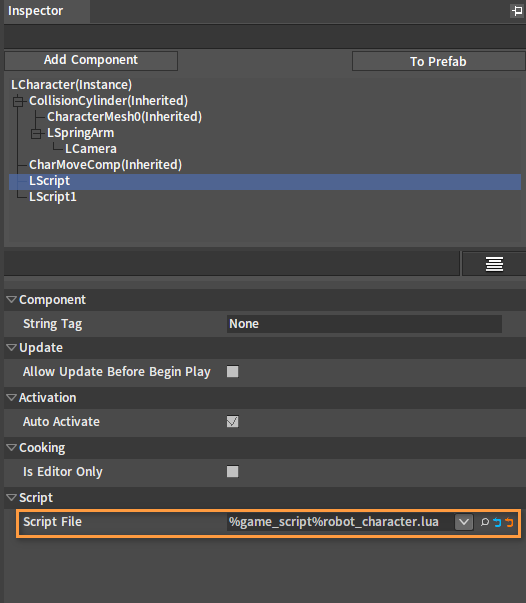
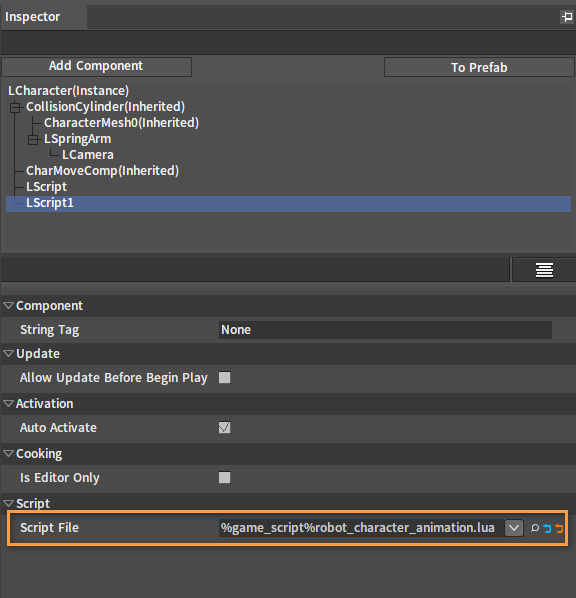
Configure the script file in the Property panel of the LScript Component. Drag the written Scripts from the Resource Preview window into the Script File slot of the character Script Component.

After dragging:
Scripts
The following is the reference scripts:
robot_character.lua
--script template

local IE_Pressed        = 0     --Press the key
local IE_Released       = 1     --Release the key
local IE_Repeat         = 2
local IE_DoubleClick    = 3
local IE_Axis           = 4
local IE_MAX            = 5

local CAMERA_DISTANCE_CHANGE_SPEED = 0.5
local CAMERA_DISTANCE_MIN = -1
local CAMERA_DISTANCE_MAX = 50

--Get actor
function character_get_actor(character)
    if nx_is_valid(character) then
        local mesh_component = character.MeshComponent

        if nx_is_valid(mesh_component) then
            local vis_base = mesh_component.VisBase

            if nx_is_valid(vis_base) and nx_is_kind(vis_base, "Actor") then
                return vis_base
            end
        end
    end

    return nx_null()
end

--Move forward callback
function on_moveforward(owner, axis_value)
    if not nx_is_valid(owner) then
        return 0
    end

    --Get controller Y-axis angle
    local controller = owner.Controller

    if nx_is_valid(controller) then
        local yaw = controller.AngleY
        --Get forward direction
        local x, y, z = nx_function("ext_angle_get_forward_vector", 0.0, yaw, 0.0)

        --Add movement

        owner:AddMovementInput(x, y, z, axis_value)
    end

    return 1
end

--Move right callback
function on_moveright(owner, axis_value)
    if not nx_is_valid(owner) then
        return 0
    end

    --Get controller Y-axis angle
    local controller = owner.Controller

    if nx_is_valid(controller) then
        local yaw = controller.AngleY
        --Get right direction
        local x, y, z = nx_function("ext_angle_get_right_vector", 0.0, yaw, 0.0)

        --Add movement
        owner:AddMovementInput(x, y, z, axis_value)
    end
    return 1
end

--Rotate left and right (around Y-axis) callback
function on_turn(owner, axis_value)
    if not nx_is_valid(owner) then
        return 0
    end

    owner:AddControllerYawInput(axis_value)

    return 1
end

--Rotate up and down (around X-axis) callback
function on_lookup(owner, axis_value)
    if not nx_is_valid(owner) then
        return 0
    end

    owner:AddControllerPitchInput(-axis_value)

    return 1
end

--Press jump key callback
function on_jump_pressed(owner)
    if nx_find_custom(owner, "JumpAgainLock") and owner.JumpAgainLock then
        return 1
    end

    --Character jumping
    owner:Jump()

    return 1
end


function input_comp_init_bind(component)
    local owner = component.GameObjectOwner

    if nx_is_valid(owner) then
        local input_comp = owner.InputComponent

        if nx_is_valid(input_comp) then
            nx_bind_script(owner, nx_current())

            input_comp:AddAxisBinding("MoveForward", true, false, true, "InputAxisEvent_MoveForward")
            input_comp:AddAxisBinding("MoveRight", true, false, true, "InputAxisEvent_MoveRight")
            input_comp:AddAxisBinding("Turn", true, false, true, "InputAxisEvent_Turn")
            input_comp:AddAxisBinding("LookUp", true, false, true, "InputAxisEvent_LookUp")

            input_comp:AddCombinationBinding("Jump", IE_Pressed, true, false, true, "InputActionEvent_Jump_Pressed")

            nx_callback(owner, "InputAxisEvent_MoveForward", "on_moveforward")
            nx_callback(owner, "InputAxisEvent_MoveRight", "on_moveright")
            nx_callback(owner, "InputAxisEvent_Turn", "on_turn")
            nx_callback(owner, "InputAxisEvent_LookUp", "on_lookup")

            nx_callback(owner, "InputActionEvent_Jump_Pressed", "on_jump_pressed")
        end
    end
end

--Use this for initialization
function on_begin_play(component)
    input_comp_init_bind(component)
    nx_callback(component, "on_tick", "tick")
end
robot_character_animation.lua
--script template

--------------------------
--local utility function--
--------------------------


local radian = 57.2958
local foot_rel_height = 0.14


local function get_movement_component(pawn)
    if nx_is_valid(pawn) then
        return pawn:GetMovementComponentID()
    end

    return nx_null()
end

local function get_speed(pawn)
    if nx_is_valid(pawn) then
        local movement = get_movement_component(pawn)

        if nx_is_valid(movement) then
            local speed = nx_function("ext_vector_length", pawn.VelocityX, pawn.VelocityY, pawn.VelocityZ)
            return speed
        end
    end

    return 0.0
end

local function is_jumping(pawn)
    if nx_is_valid(pawn) then
        local movement = get_movement_component(pawn)

        if nx_is_valid(movement) then
            if movement:IsFalling() then
                return true
            end
        end
    end

    return false
end

local function is_flying(pawn)
    if nx_is_valid(pawn) then
        local movement = get_movement_component(pawn)

        if nx_is_valid(movement) then
            if movement:IsFlying() then
                return true
            end
        end
    end

    return false
end

function transition_callback_jump_start(pawn, role, action_index, machine_index, prev_state, next_state)
    if is_jumping(pawn) then
        return true
    else
        return false
    end
end

function transition_callback_jump_end(pawn, role, action_index, machine_index, prev_state, next_state)
    if not is_jumping(pawn) then
        return true
    else
        return false
    end
end

transition_event_callback =
{
    ["jump_start"] = transition_callback_jump_start,
    ["jump_end"] = transition_callback_jump_end,
}

function on_transition_event(mesh_comp, action_index, machine_index, prev_state, next_state, callback_name)

    local pawn = mesh_comp.GameObjectOwner
    local role = mesh_comp.VisBase

    if not nx_is_valid(pawn) or not nx_is_valid(role) then
        return false
    end

    local callback = transition_event_callback[callback_name]
    if callback then
        return callback(pawn, role, action_index, machine_index, prev_state, next_state)
    end

    return false
end

function state_machine_state_callback_EnterState(pawn, role, action_index, machine_index, state_index)
    -- do something
    nx_log("state machine state enter jump")
end

function state_machine_state_callback_LeaveState(pawn, role, action_index, machine_index, state_index)
    -- do something
    nx_log("state machine state leave jump")
end

function state_machine_state_callback_FullyBlendState(pawn, role, action_index, machine_index, state_index)
    -- do something
    nx_log("state machine state fully blend jump")
end

state_machine_state_event_callback =
{
    ["start_state"] = state_machine_state_callback_EnterState,
    ["end_state"] = state_machine_state_callback_LeaveState,
    ["fully_blend_state"] = state_machine_state_callback_FullyBlendState,
}

function on_state_machine_state_event(mesh_comp, action_index, machine_index, state_index, callback_name)

    local pawn = mesh_comp.GameObjectOwner
    local role = mesh_comp.VisBase

    if not nx_is_valid(pawn) or not nx_is_valid(role) then
        return
    end

    local callback = state_machine_state_event_callback[callback_name]
    if callback then
        callback(pawn, role, action_index, machine_index, state_index)
    end
end

function animtree_callback_bs_x_direction(pawn, role)
    return pawn.direction
end

function animtree_callback_bs_y_speed(pawn, role)
    return get_speed(pawn)
end

local function get_anim_tree_index(role)
    if role:GetBlendActionCount() > 0 then
        local action_name = role:GetBlendActionName(0)
        local action_type = role:GetActionType(action_name)
        if action_type == AT_ANIMTREE then
            return role:GetActionIndex(action_name)
        end
    end

    return -1
end


animtree_event_callback =
{
    ["bs_x_direction"] = animtree_callback_bs_x_direction,
    ["bs_y_speed"] = animtree_callback_bs_y_speed,
}

function on_animtree_event(mesh_comp, action_index, callback_name)

    local pawn = mesh_comp.GameObjectOwner
    local role = mesh_comp.VisBase

    if not nx_is_valid(pawn) or not nx_is_valid(role) then
        return
    end

    local callback = animtree_event_callback[callback_name]
    if callback then
        return callback(pawn, role)
    end

    return false
end

function anim_callee_init(mesh_comp)
    nx_callback(mesh_comp, "on_transition_event", "on_transition_event")
    nx_callback(mesh_comp, "on_animtree_event", "on_animtree_event")
    nx_callback(mesh_comp, "on_state_machine_state_event", "on_state_machine_state_event")
    nx_callback(mesh_comp, "on_state_action_event_begin", "on_state_action_event_begin")
    nx_callback(mesh_comp, "on_state_action_event_update", "on_state_action_event_update")
    nx_callback(mesh_comp, "on_state_action_event_end", "on_state_action_event_end")
end

--use this for initialization
function on_begin_play(component)
    local owner = component.GameObjectOwner

    if nx_is_valid(owner) then
        local mesh_comp = owner.MeshComponent

        if nx_is_valid(mesh_comp) then

            owner.meshcomp_init_relative_posy = owner.MeshComponent.RelativePositionY
            mesh_comp.ActorCalleeType = "CComponentActorCalleeScript"
            nx_bind_script(mesh_comp, nx_current(), "anim_callee_init")
        end
    end
    nx_callback(component, "on_tick", "tick")
end

function tick(component, delta_time)
    local owner = component.GameObjectOwner

    local move_comp = get_movement_component(owner)
    local speedx = move_comp.VelocityX
    local speedz = move_comp.VelocityZ
    local rate = speedx / speedz
    local tan = math.atan(rate)
    local velocity_angle = radian * tan

    if speedx == 0 and speedz == 0 then
        velocity_angle = 0
    elseif speedx > 0 and speedz == 0 then
        velocity_angle = 90
    elseif speedx == 0 and speedz < 0 then
        velocity_angle = 180
    elseif speedx < 0 and speedz == 0 then
        velocity_angle = 270
    elseif speedx > 0 and speedz < 0 then
        velocity_angle = 180 - math.abs(velocity_angle)
    elseif speedx <= 0 and speedz < 0 then
        velocity_angle = velocity_angle + 180
    elseif speedx < 0 and speedz > 0 then
        velocity_angle = 360 - math.abs(velocity_angle)
    end

    local cap_comp = owner.CapsuleComponent
    local foward_angle = cap_comp.AngleY * radian
    local relative_angle = velocity_angle - foward_angle

    if relative_angle > 180 then
        relative_angle = relative_angle - 360
    elseif relative_angle < -180 then
        relative_angle = relative_angle + 360
    end
    owner.direction = relative_angle

end
PIE
After clicking PIE in the Editor, you can control the action of the character through WASD and SpaceBar.