Character Quick Start
Last Updated Time: 09/18/2023
Overview
This documentation describes how to create a controllable player character.
Creating New Projects
Create a new empty project. See Project for details.
Creating Levels
Create a new default level. See Levels for details.
Importing Art Assets
Import skeletal meshes and animations. See Resources Workflow for details.
Skeletal meshes:
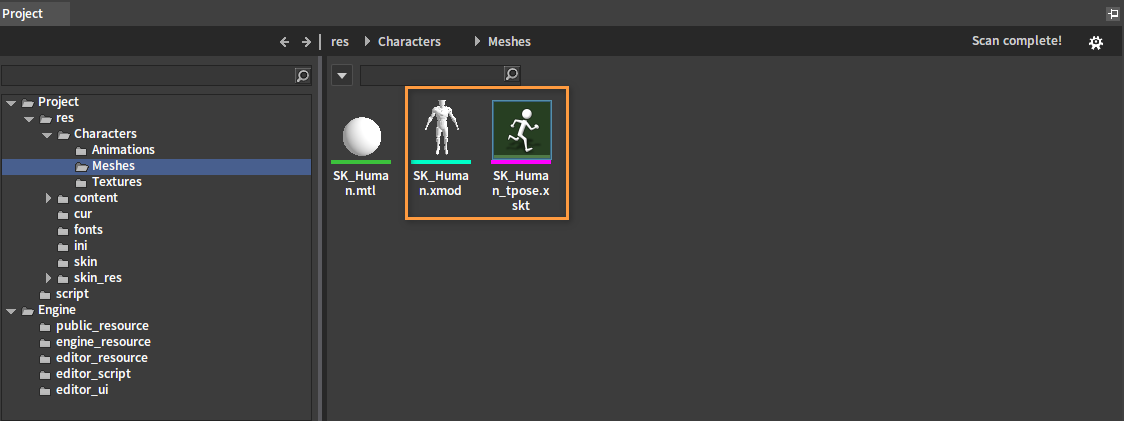
See Material Editor on how to set materials for models (.xmod).
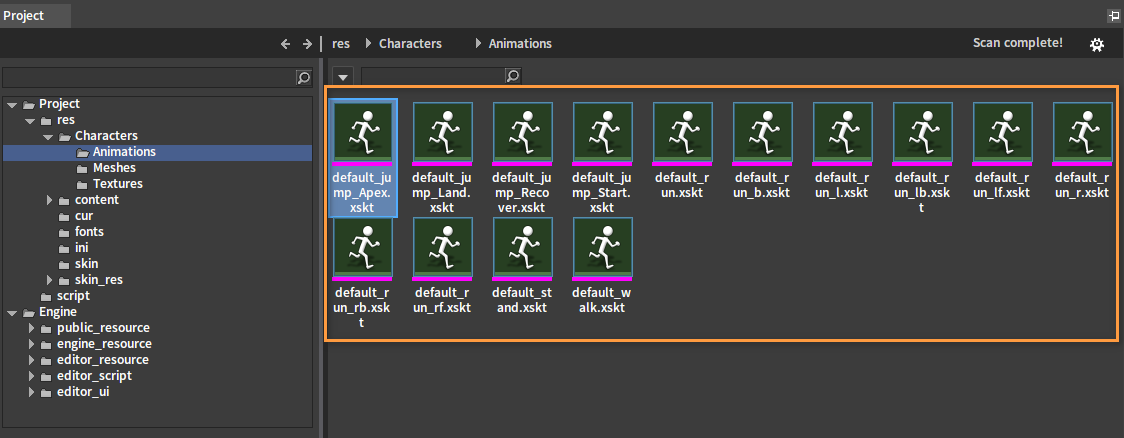
Animations:
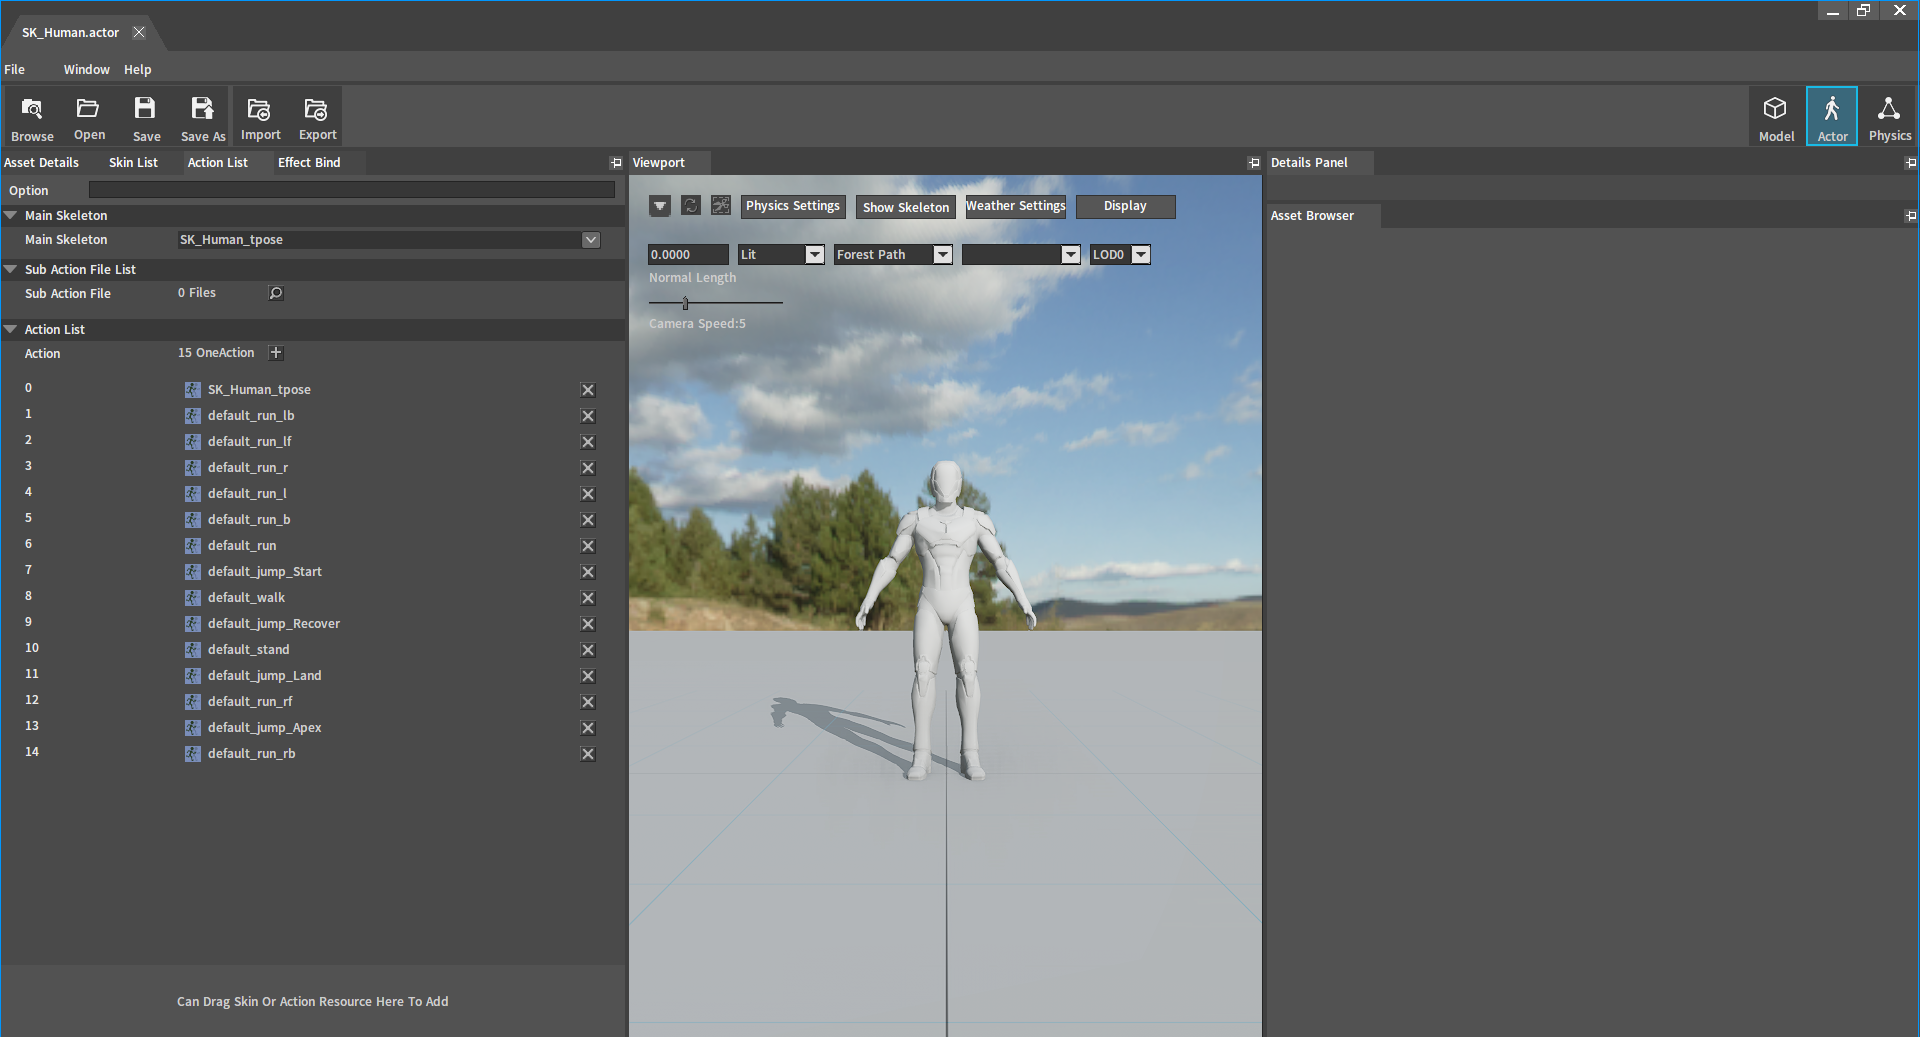
Assembling Actors
Creates an Actor that contains the needed animation assets. See Assembling Actors for details.
Configuring Animation Trees
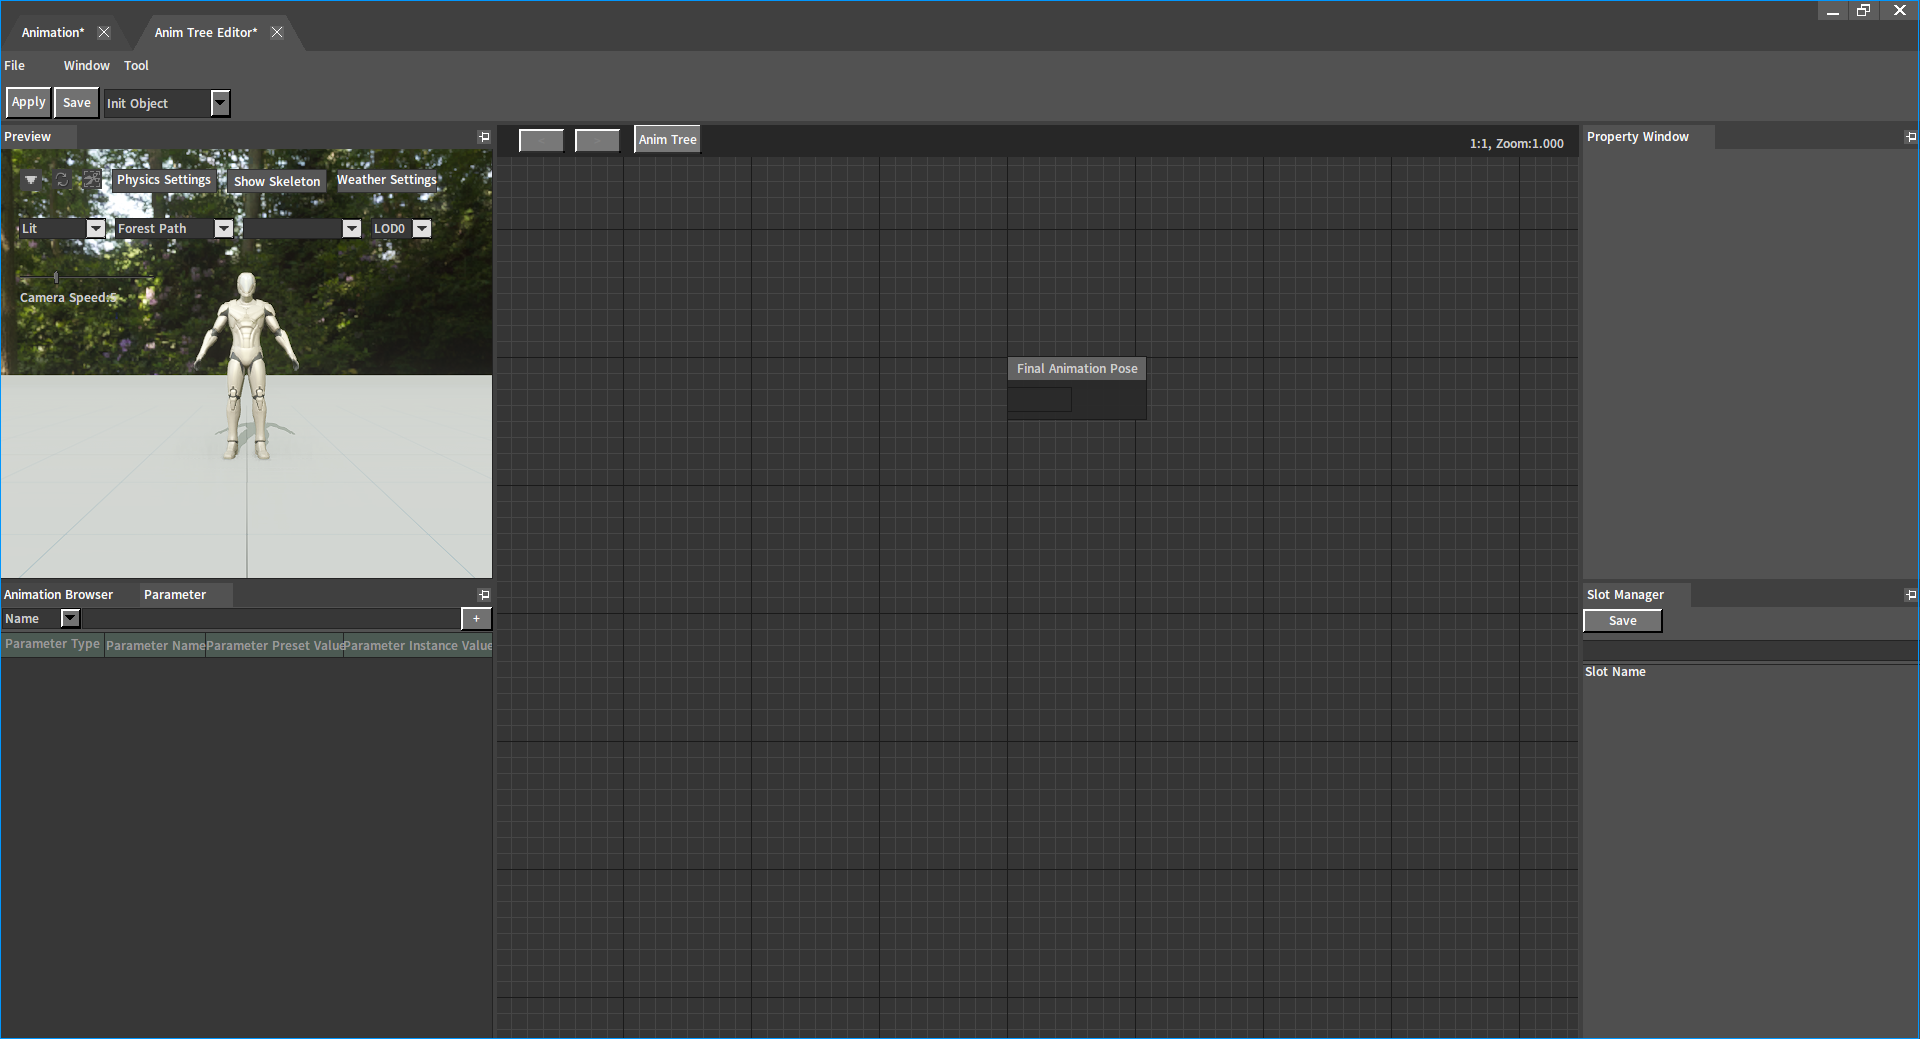
Creating Animation Trees
After opening the Animation Editor, create an Animation Tree.
Adding State Machine Nodes
Refer to Animation State Machine first to learn about the State Machine node.
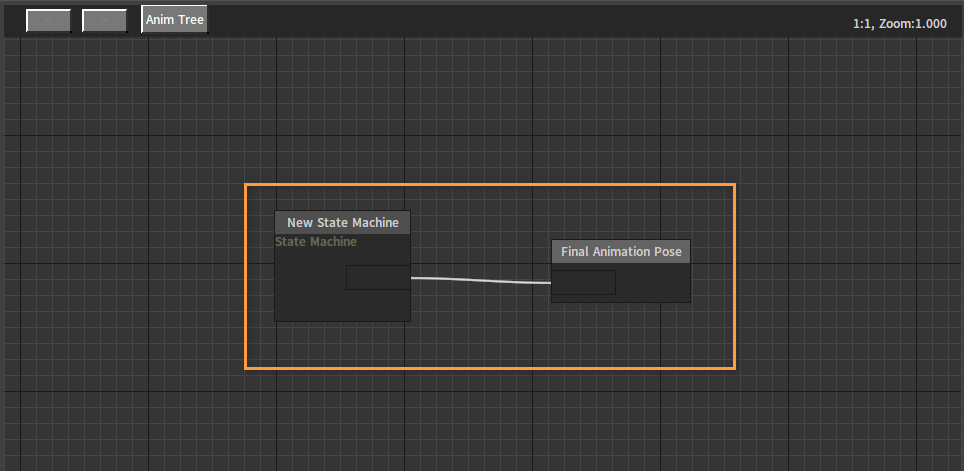
Add a State Machine node and connect it to Final Animation Pose.
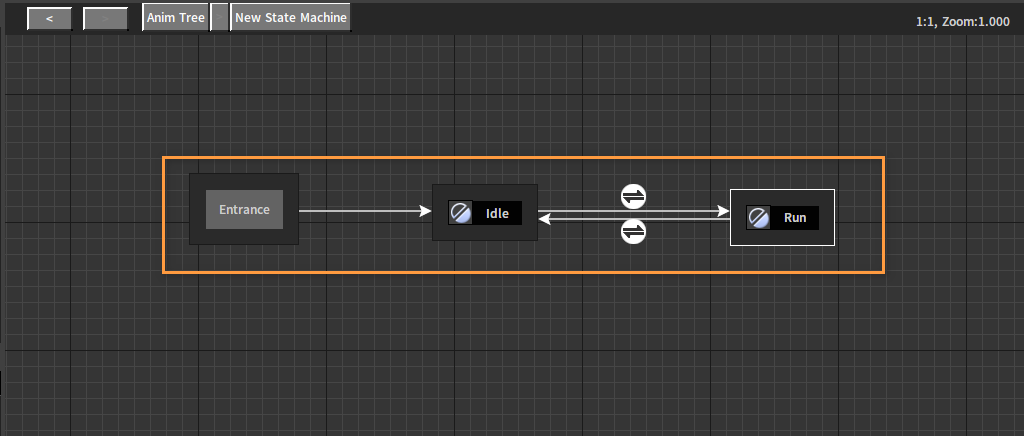
Double-click the State Machine node to enter the state graph editing interface, then add two state nodes, Idle and Run, and connect them to form a cycle.
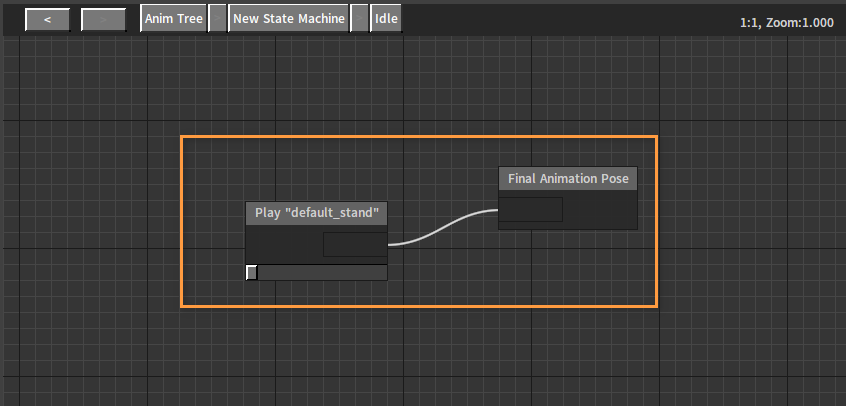
Double-click the Idle state node and add a standing animation to it. Then add a Sequence Playback node and connect it to Final Animation Pose.
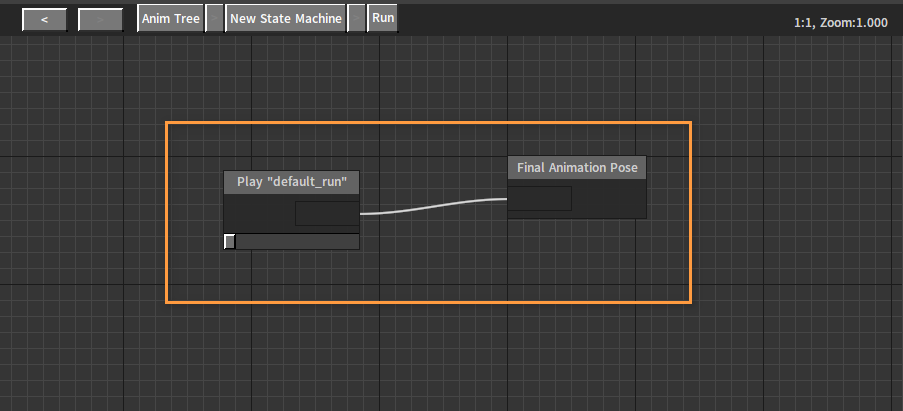
Similarly, add a running animation to the Run state, and connect it to Final Animation Pose.
In the Parameter window of the Animation Editor, click the ![]() button and select Float to add a float type parameter.
button and select Float to add a float type parameter.
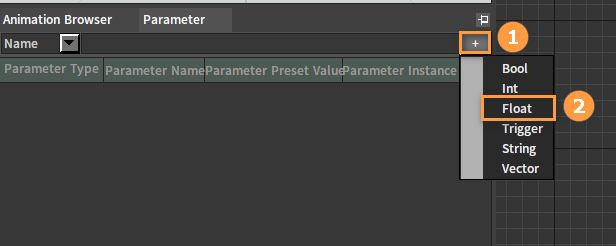
Change the Parameter Name of the added parameter to Speed.

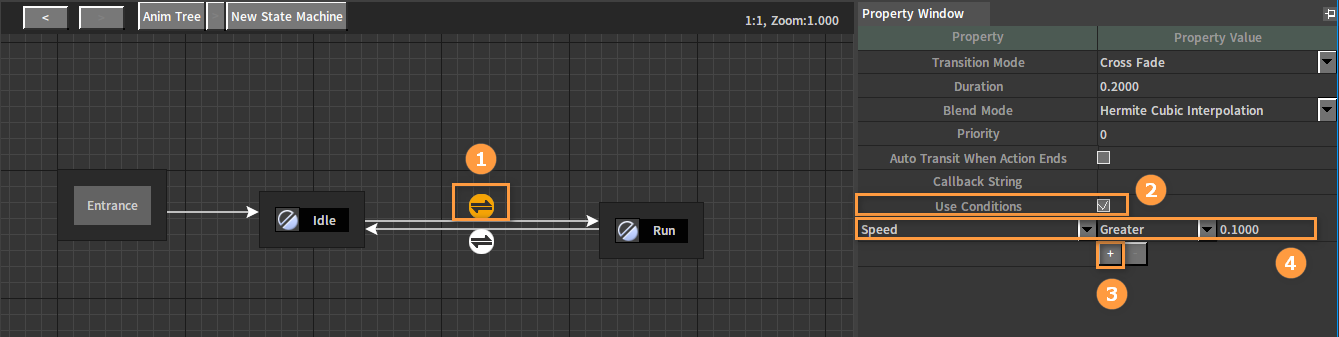
Select the state transition Idle -> Run, check Use Condition in the Property window, then click the ![]() button to add a condition, and set the condition to Speed is Greater than 0.1.
button to add a condition, and set the condition to Speed is Greater than 0.1.
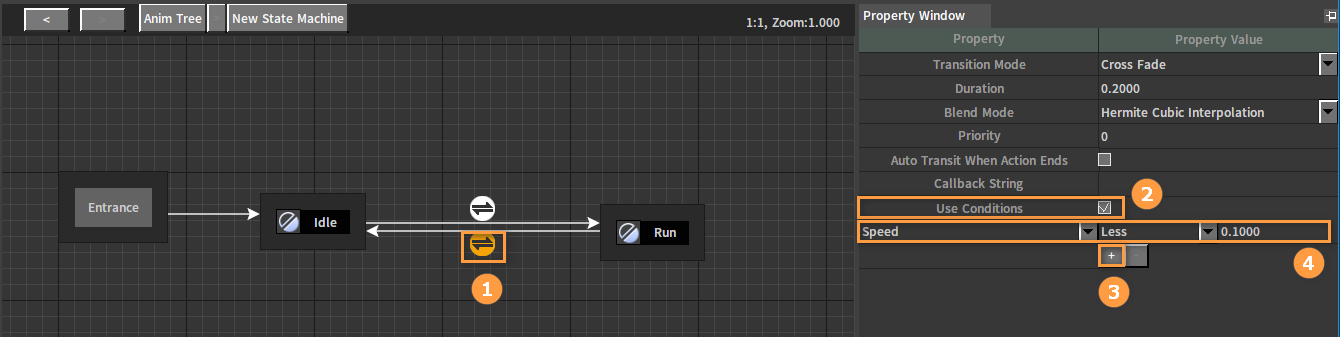
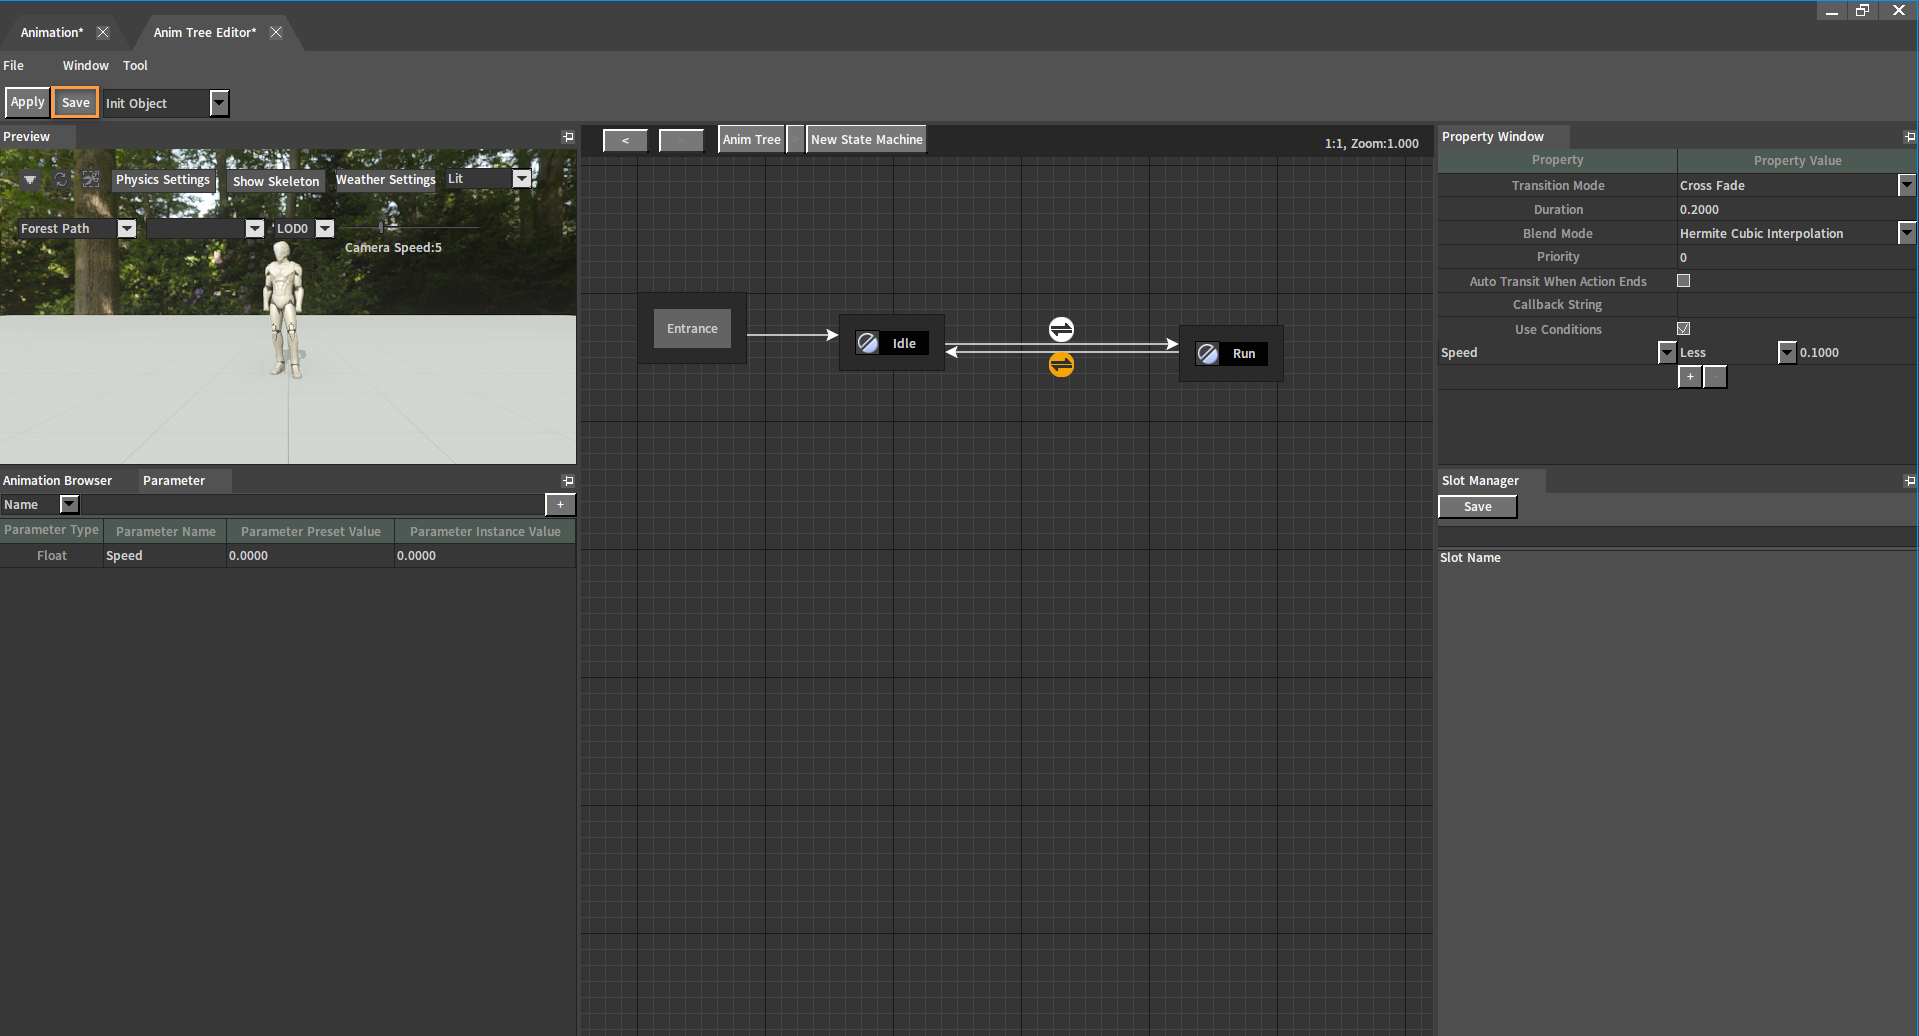
Set the state transition condition of Run -> Idle to Speed is Less than 0.1.
Click the Save button to save the Animation Tree.
Input Settings
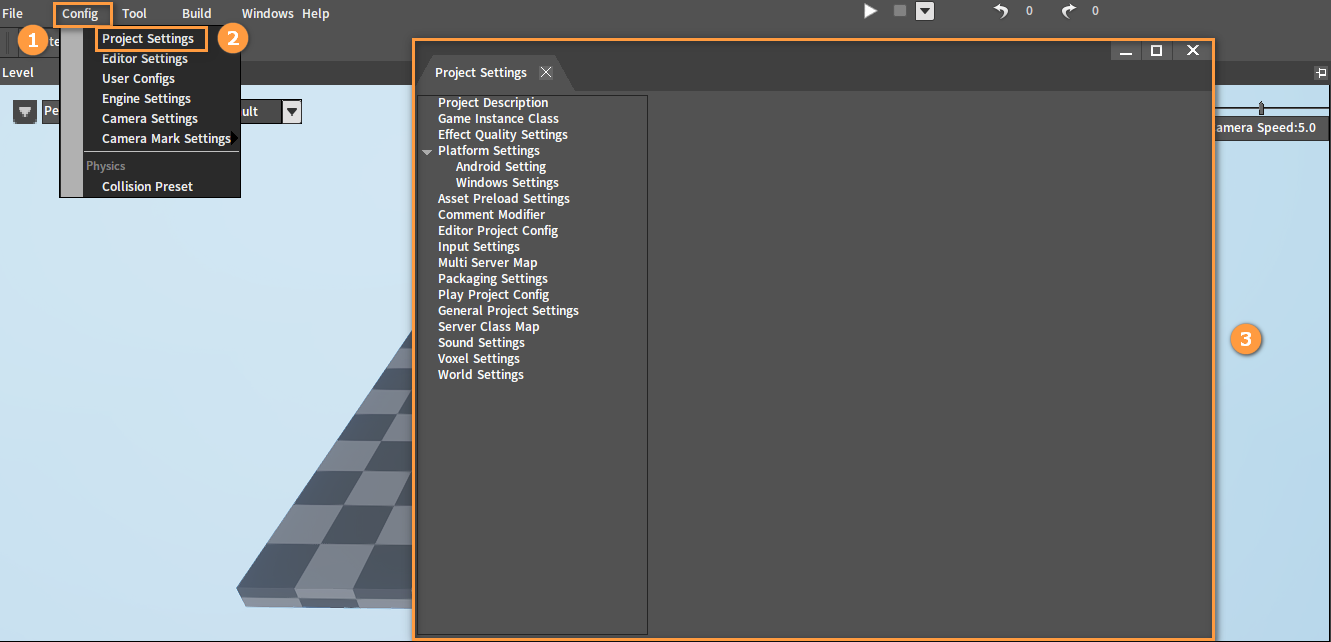
In the Component Editor, click Config (Menu Bar) -> Project Settings to open the Project Settings window.
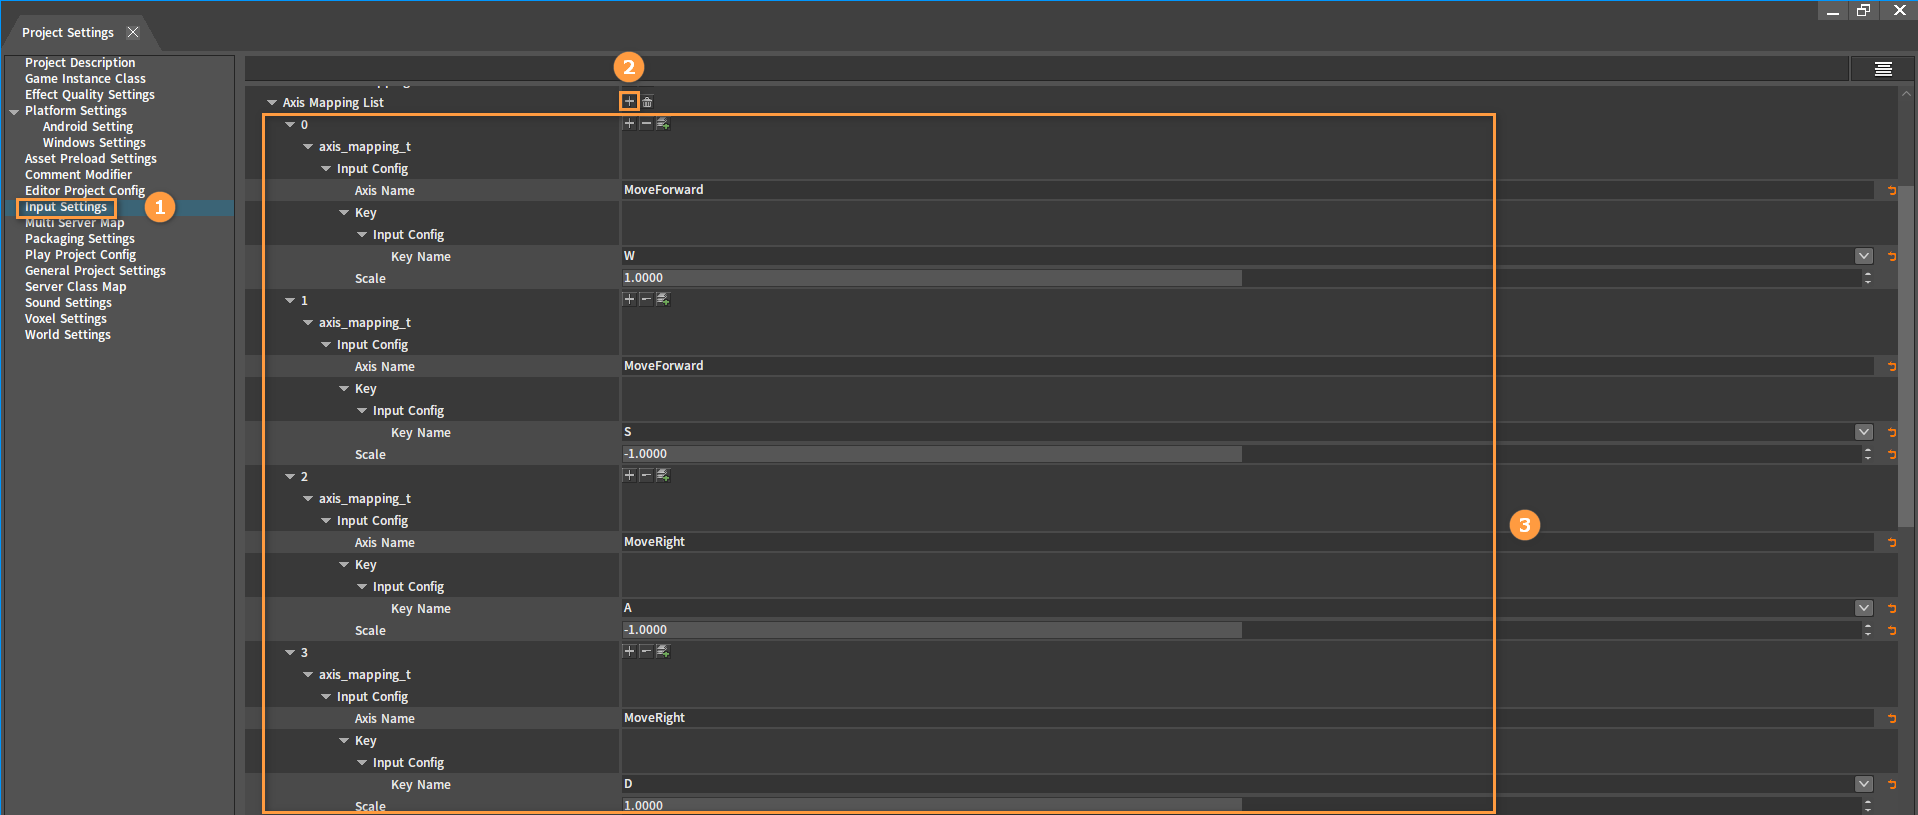
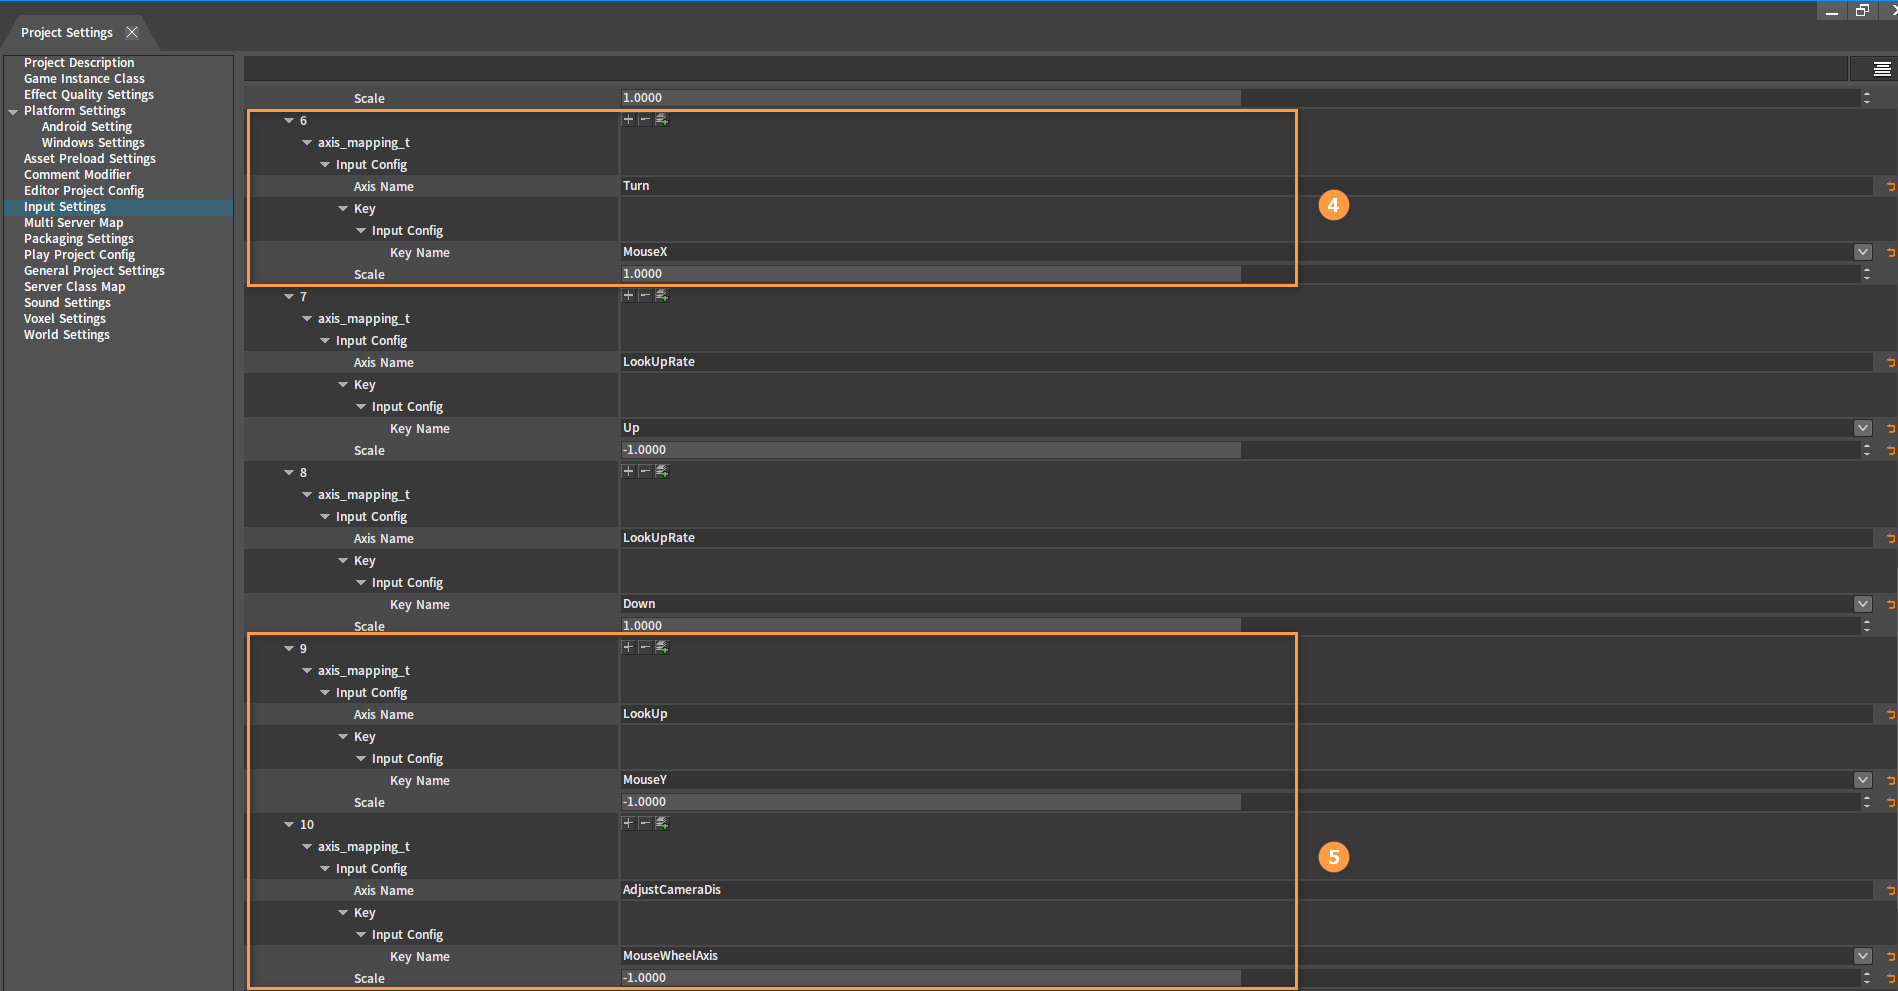
In the Project Settings window, click Input Settings to switch to its interface, and click ![]() next to Axis Mapping List to add a new Axis Mapping. Add the 7 Axis Mappings shown below.
next to Axis Mapping List to add a new Axis Mapping. Add the 7 Axis Mappings shown below.
Creating Characters
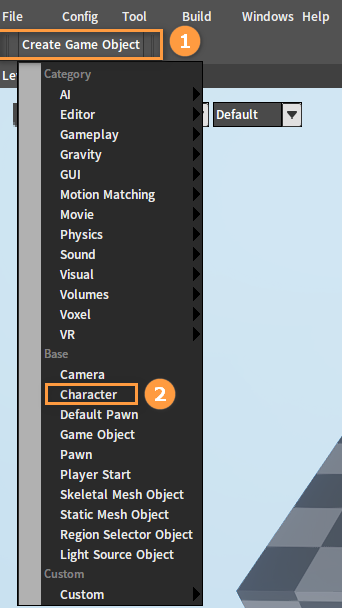
Click Create Game Object (Toolbar) -> Character to create a player Character.
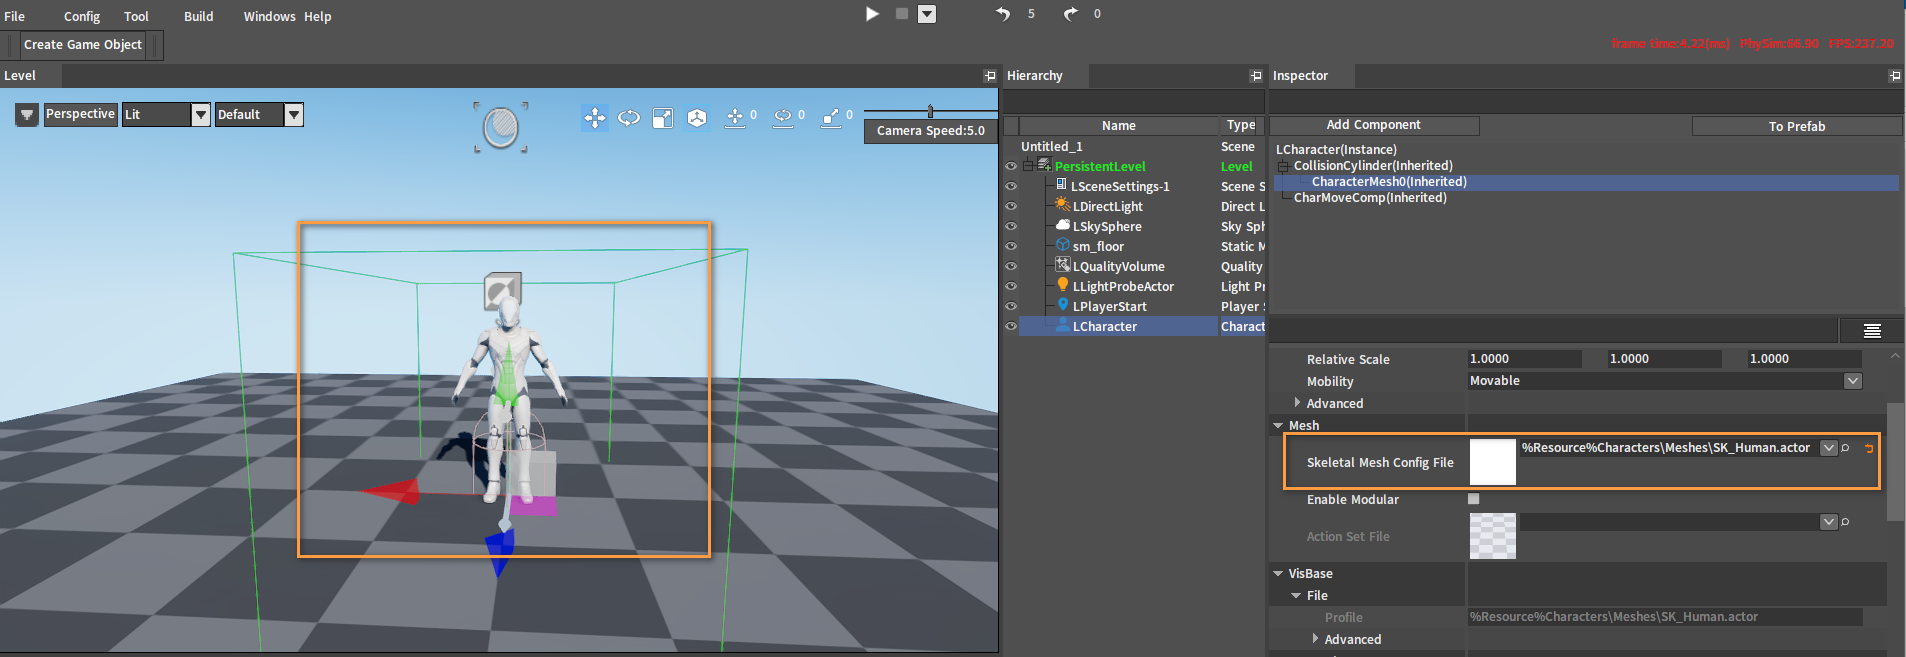
Select CharacterMesh0(Inherited) in the Inspector panel, and drag the previously created actor file (.actor) from the Project panel into Skeletal Mesh Config File.
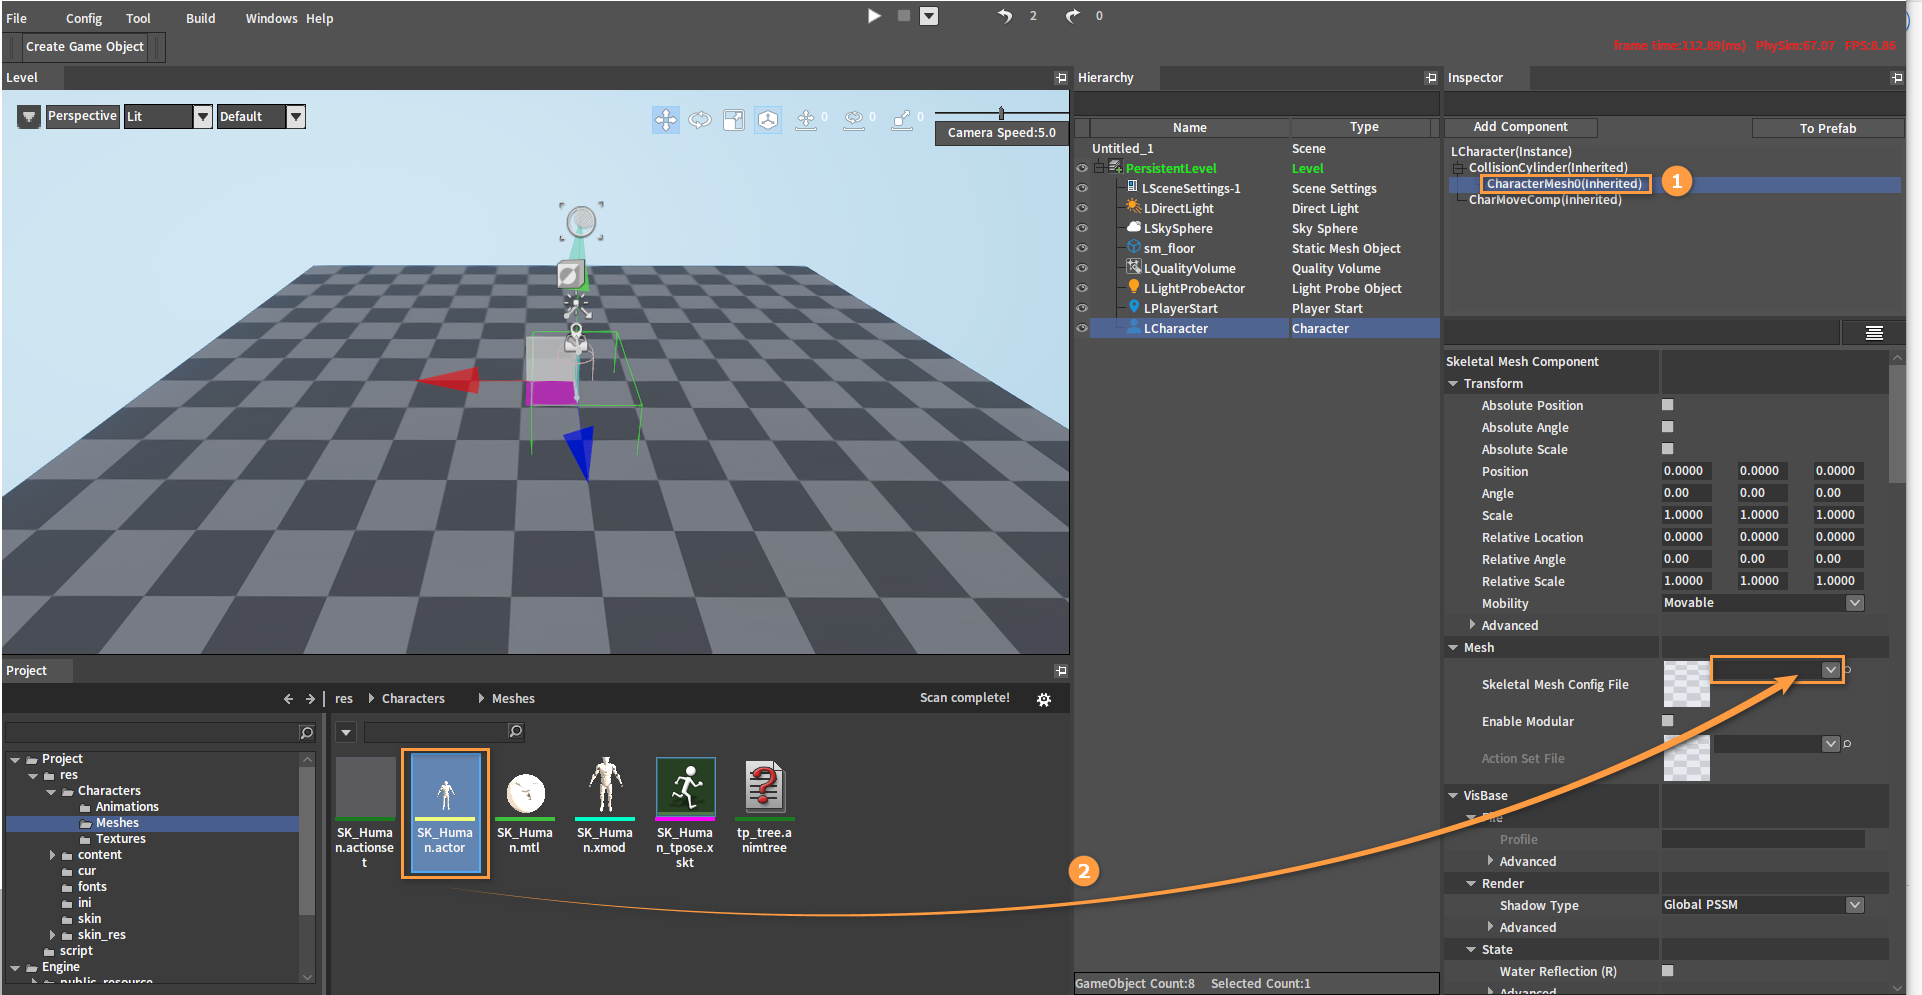
After dragging:
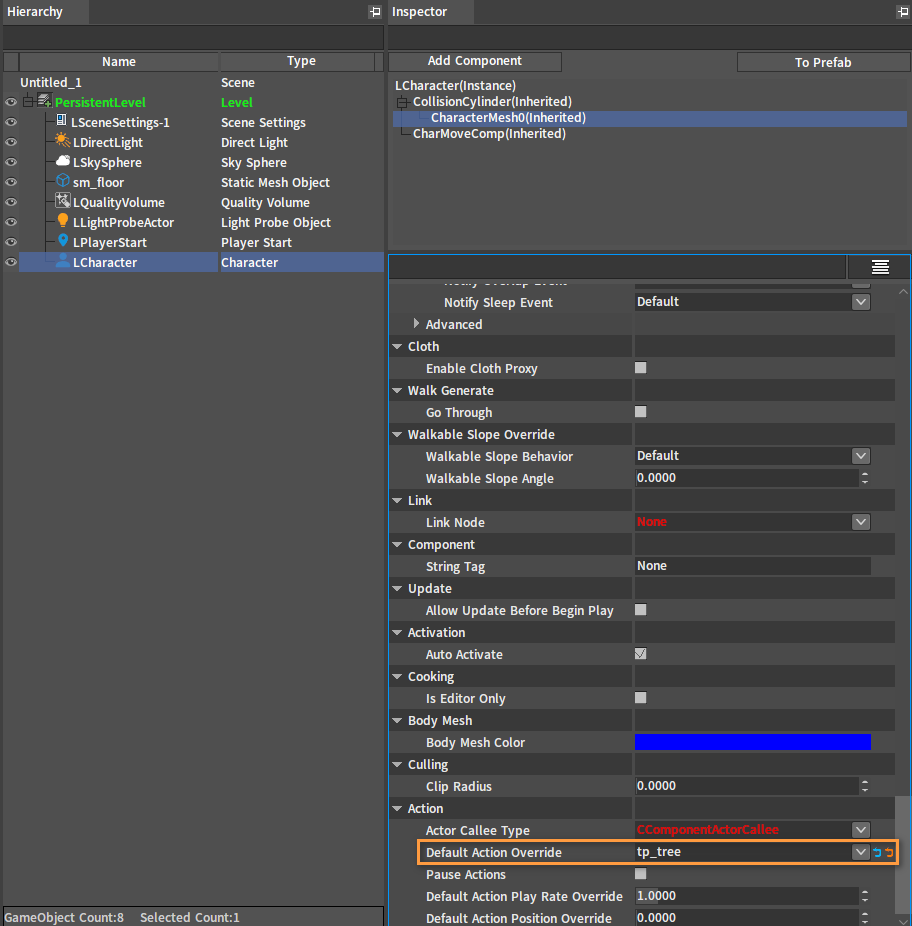
Modify the Default Action Override property to the previously created Animation Tree tp_tree.
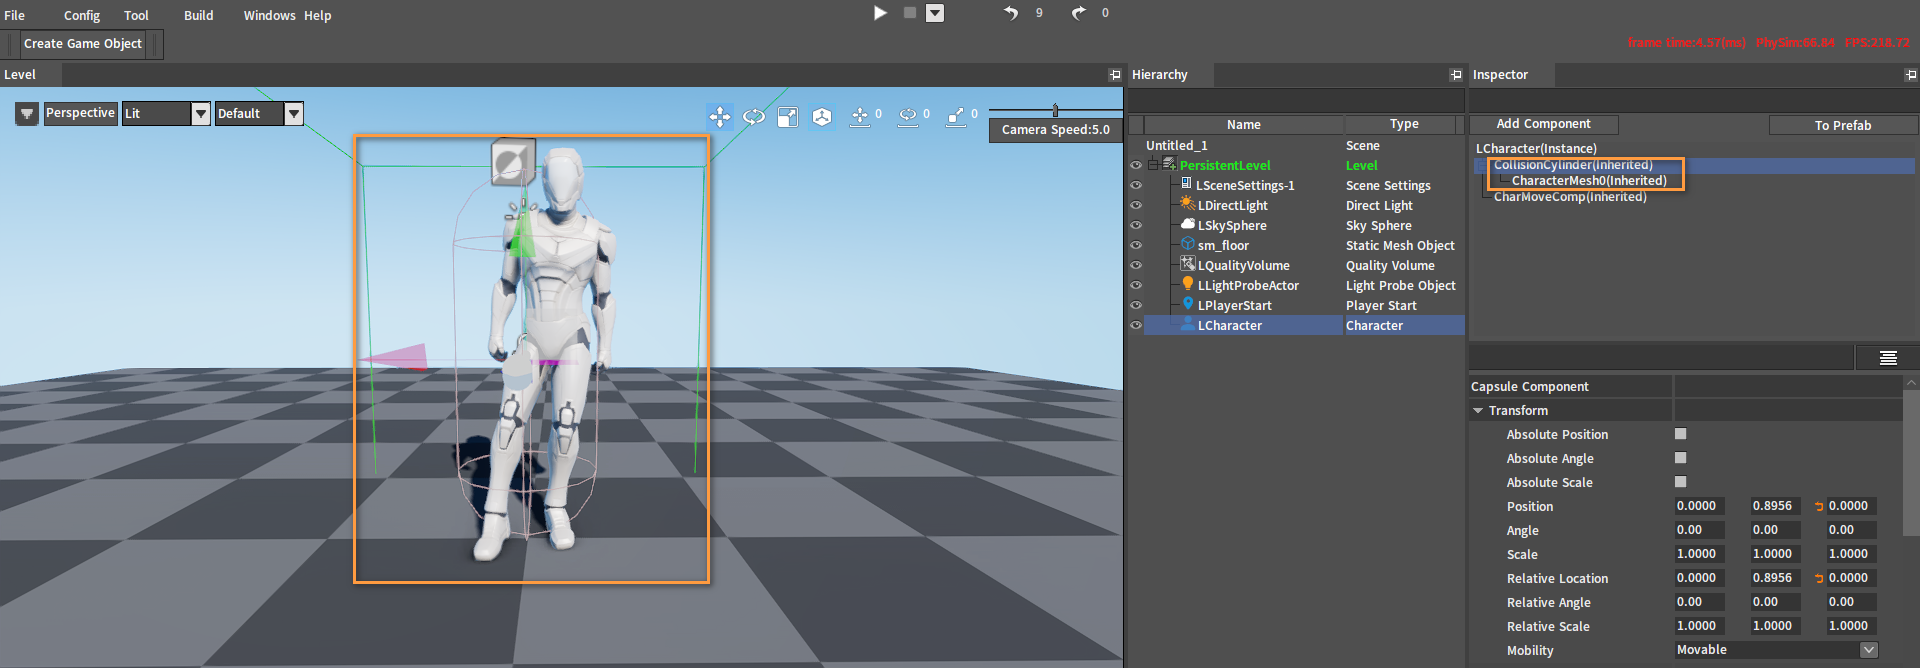
In the Inspector panel, select CollisionCylinder(Inherited) and CharacterMesh0(Inherited) to adjust the position of the character capsule and the character mesh respectively, so that the feet of the skinned character are close to the ground and the capsule is above the ground in the premise that the capsule wraps the character as much as possible.
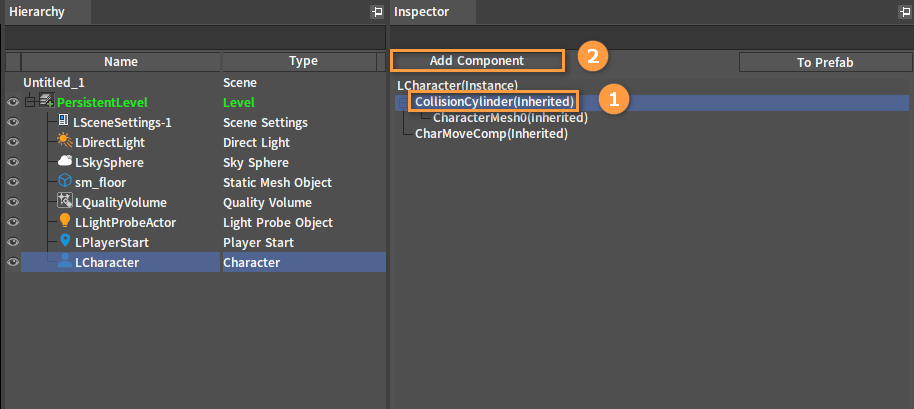
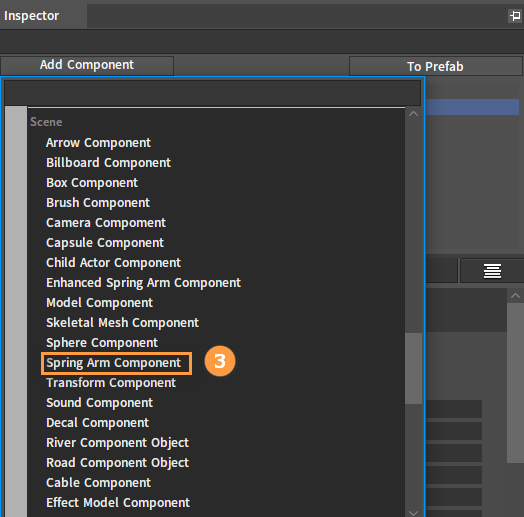
Add a Spring Arm Component as a subcomponent to the component CollisionCylinder(Inherited). Select CollisionCylinder(Inherited), click Add Component, and select Spring Arm Component.
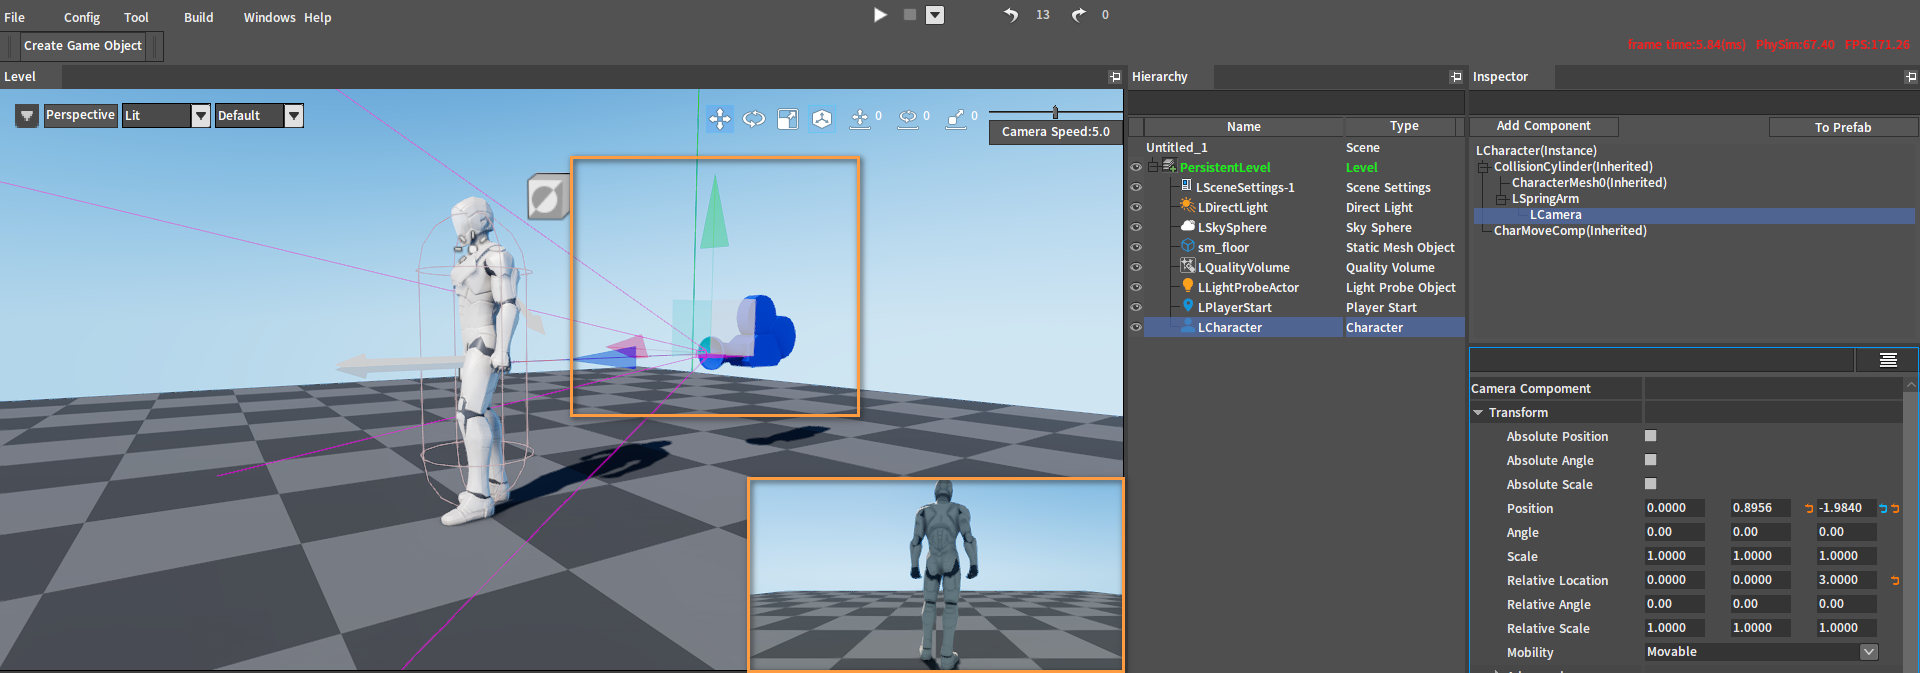
Add a Camera Component to LSpringArm as its subcomponent.
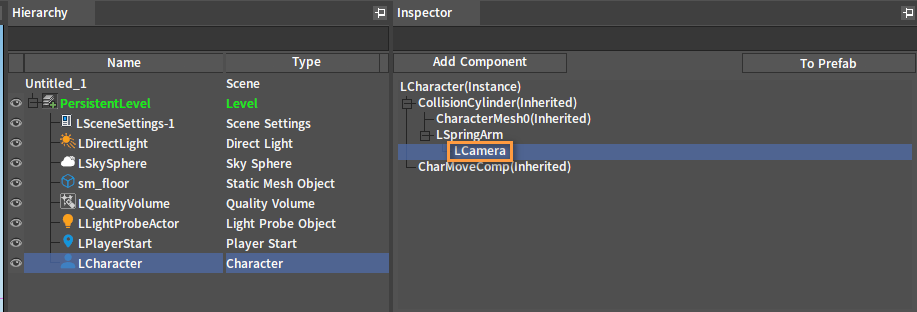
Adjust the camera component to the appropriate position.
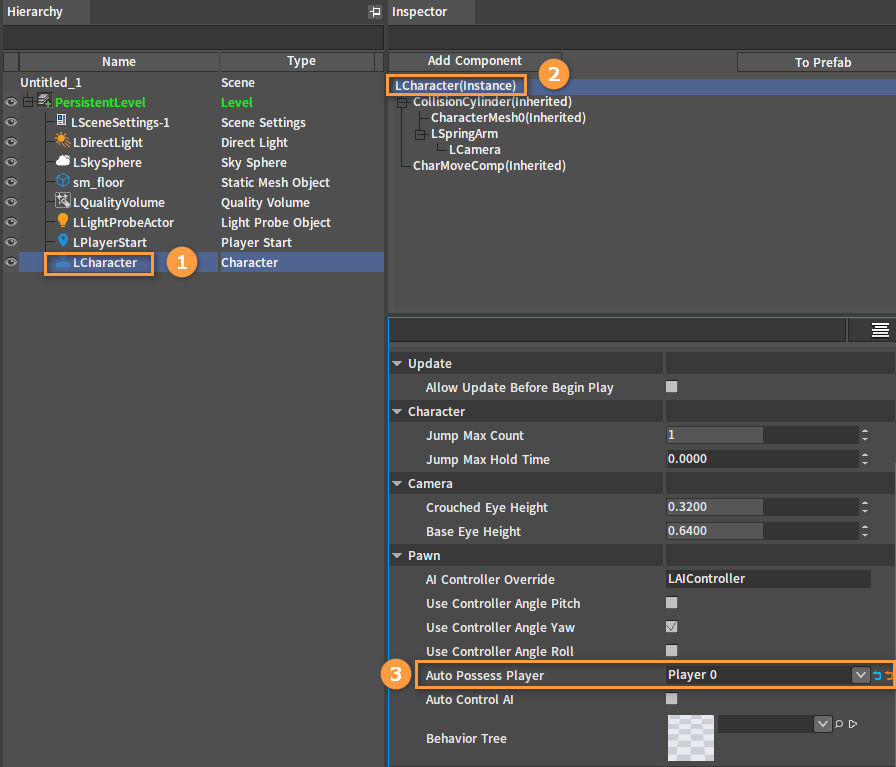
Select the Character object, then select LCharacter(Instance) in the Inspector panel, and then set Auto Possess Player at the bottom to Player 0. At this point, click the PIE button and it will automatically use the camera on the Character.
Uncheck Use Controller Angle Yaw.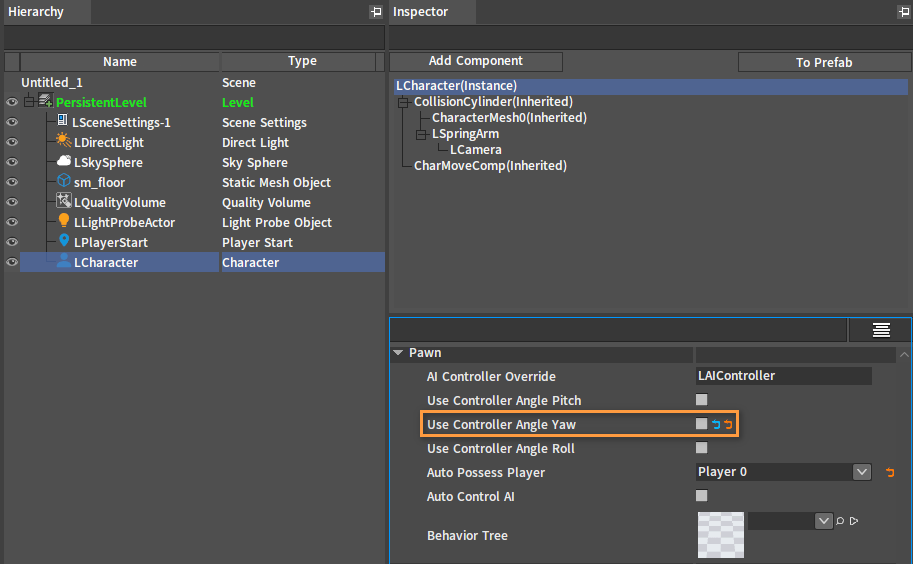
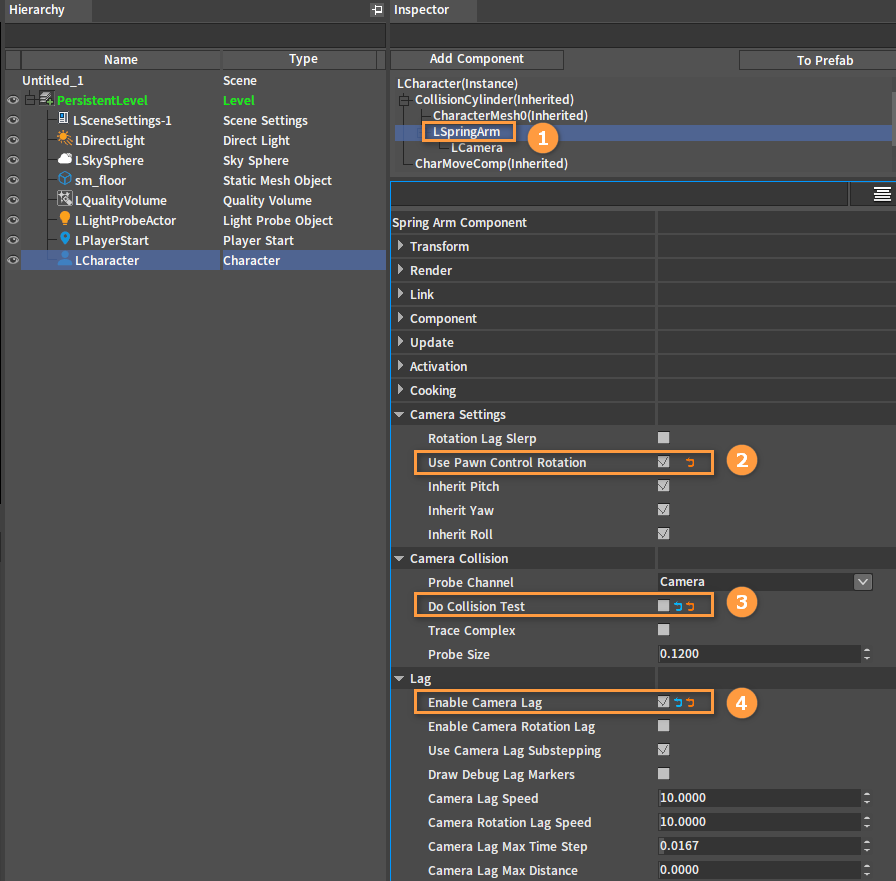
Select LSpringArm component, check Use Pawn Control Rotation and Enable Camera Lag, and uncheck Do Collision Test.
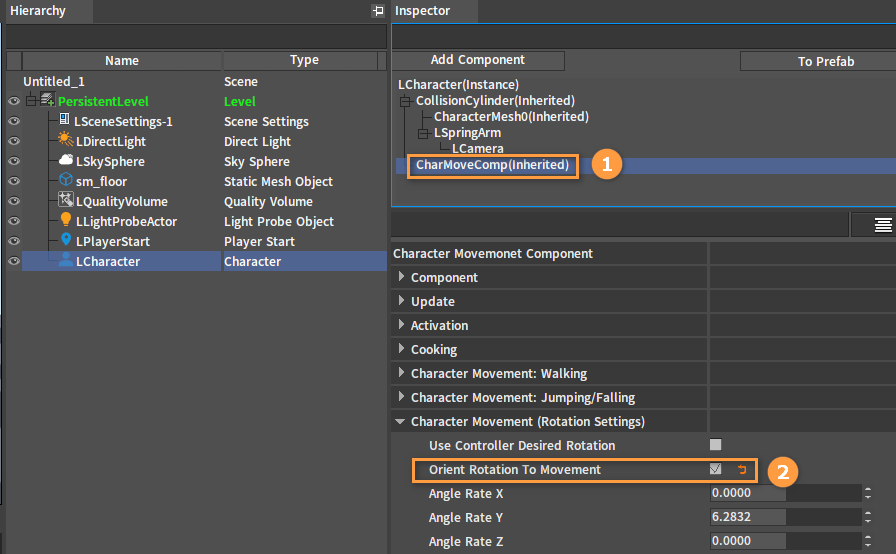
Select CharMoveComp(Inherited) and check Orient Rotation To Movement.
Scripting Character Control
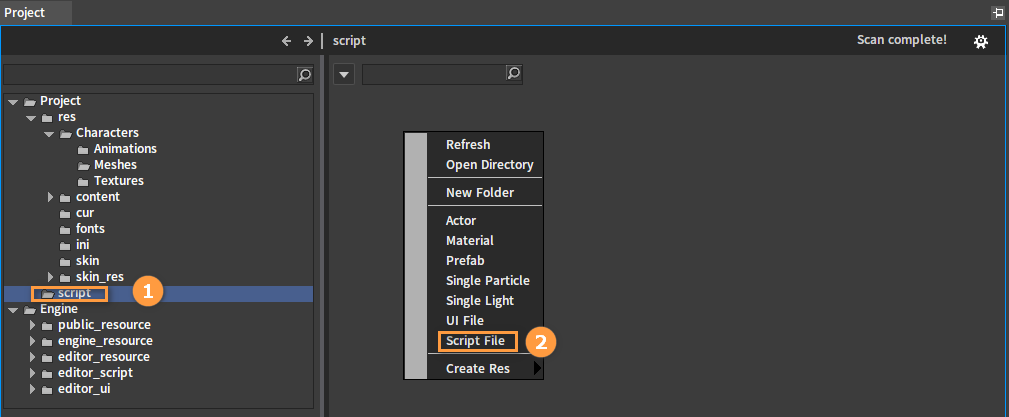
Select the script folder in the Project panel, then right-click in the Resource Preview window to open the Shortcut Menu, and select Script File to create a script file controller.lua.
Double-click the created script file to open the scripting interface.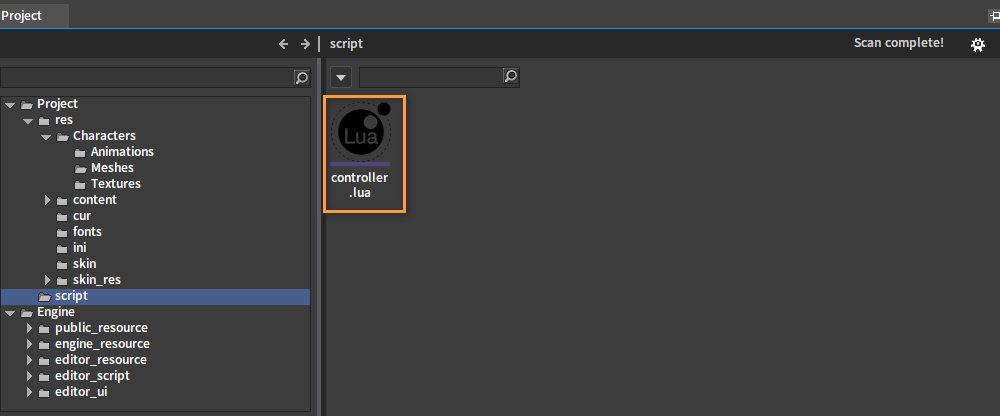
Write the following script code:
--Animation Resource Type
AT_UNKNOWN = 0
AT_SKELETON = 1
AT_SKELETON_AS_ANIMSEQUENCE = 2
AT_ANIMSEQUENCE = 3
AT_MONTAGE = 4
AT_BLENDSPACE = 5
AT_BLENDSPACE1D = 6
AT_AIMOFFSETBLENDSPACE = 7
AT_ANIMTREE = 8

local IE_Pressed        = 0     --Key pressed
local IE_Released       = 1     --Key released
local IE_Repeat         = 2
local IE_DoubleClick    = 3
local IE_Axis           = 4
local IE_MAX            = 5

local CAMERA_DISTANCE_CHANGE_SPEED = 0.5
local CAMERA_DISTANCE_MIN = -1
local CAMERA_DISTANCE_MAX = 50


--use this for initialization
function on_begin_play(component)
    local owner = component.ActorOwner

    if nx_is_valid(owner) then
        local input_comp = owner.InputComponent

        if nx_is_valid(input_comp) then
            nx_bind_script(owner, nx_current())

            --The first parameter corresponds to the Axis Name in Input Settings
            --The last parameter is the custom event name
            input_comp:AddAxisBinding("MoveForward", true, false, true, "InputAxisEvent_MoveForward")
            input_comp:AddAxisBinding("MoveRight", true, false, true, "InputAxisEvent_MoveRight")
            input_comp:AddAxisBinding("Turn", true, false, true, "InputAxisEvent_Turn")
            input_comp:AddAxisBinding("LookUp", true, false, true, "InputAxisEvent_LookUp")
            input_comp:AddAxisBinding("AdjustCameraDis", true, false, true, "InputAxisEvent_AdjustCameraDis")

            --The second parameter is the last parameter in AddAxisBinding, which represents the function name in the script
            nx_callback(owner, "InputAxisEvent_MoveForward", "on_moveforward")
            nx_callback(owner, "InputAxisEvent_MoveRight", "on_moveright")
            nx_callback(owner, "InputAxisEvent_Turn", "on_turn")
            nx_callback(owner, "InputAxisEvent_LookUp", "on_lookup")
            nx_callback(owner, "InputAxisEvent_AdjustCameraDis", "on_adjust_camera_dis")

            nx_callback(owner, "on_velocity_changed", "on_velocity_changed")

        end
    end

    nx_callback(component, "on_tick", "tick")
end

--use this for release
function on_end_play(component)
end

--Get actor
function character_get_actor(character)
    if nx_is_valid(character) then
        local mesh_component = character.MeshComponent

        if nx_is_valid(mesh_component) then
            local vis_base = mesh_component.VisBase

            if nx_is_valid(vis_base) and nx_is_kind(vis_base, "Actor") then
                return vis_base
            end
        end
    end

    return nx_null()
end

--Get spring_arm
function character_get_spring_arm(character)
    if nx_is_valid(character) then
        local spring_arm_component = character:FindComponentByClassName("LSpringArmComponent")

        return spring_arm_component
    end

    return nx_null()
end

--Move forward callback
function on_moveforward(owner, axis_value)
    if not nx_is_valid(owner) then
        return 0
    end

    --Get controller Y-axis angle
    local controller = owner.Controller

    if nx_is_valid(controller) then
        local yaw = controller.AngleY
        --Get forward direction
        local x, y, z = nx_function("ext_angle_get_forward_vector", 0.0, yaw, 0.0)

        --Add movement input

        owner:AddMovementInput(x, y, z, axis_value)
    end

    return 1
end

--Move right callback
function on_moveright(owner, axis_value)
    if not nx_is_valid(owner) then
        return 0
    end

    --Get controller Y-axis angle
    local controller = owner.Controller

    if nx_is_valid(controller) then
        local yaw = controller.AngleY
        --Get right direction
        local x, y, z = nx_function("ext_angle_get_right_vector", 0.0, yaw, 0.0)

        --Add movement input
        owner:AddMovementInput(x, y, z, axis_value)
    end
    return 1
end

--Rotate left and right (along Y-axis) callback
function on_turn(owner, axis_value)
    if not nx_is_valid(owner) then
        return 0
    end

    owner:AddControllerYawInput(axis_value)

    return 1
end

--Rotate up and down (along X-axis) callback
function on_lookup(owner, axis_value)
    if not nx_is_valid(owner) then
        return 0
    end

    owner:AddControllerPitchInput(-axis_value)

    return 1
end

--Mouse wheel callback
function on_adjust_camera_dis(owner, axis_value)
    if not nx_is_valid(owner) then
        return 0
    end

    local spring_arm_component = character_get_spring_arm(owner)

    if nx_is_valid(spring_arm_component) then
        local delta = axis_value * CAMERA_DISTANCE_CHANGE_SPEED

        local cur_value = spring_arm_component.TargetArmLength
        local new_value =  cur_value + delta

        if delta > 0 then
            if new_value > CAMERA_DISTANCE_MAX then
                new_value = CAMERA_DISTANCE_MAX
            end

            spring_arm_component.TargetArmLength = new_value
        else
            if new_value < CAMERA_DISTANCE_MIN then
                new_value = CAMERA_DISTANCE_MIN
            end
            spring_arm_component.TargetArmLength = new_value
        end
    end

    return 1
end


--Velocity change callback
function on_velocity_changed(owner, component_id, new_x, new_y, new_z, old_x, old_y, old_z)
    local actor = character_get_actor(owner)

    if nx_is_valid(actor) then
        if actor:GetBlendActionCount() > 0 then
            local action_name = actor:GetBlendActionName(0)
            local action_type = actor:GetActionType(action_name)
            local action_index = actor:GetActionIndex(action_name)

            if action_type == AT_ANIMTREE then
                local speed = math.sqrt(new_x * new_x + new_y * new_y + new_z * new_z)
                actor:SetAnimTreeValue(action_index, "Speed", speed)

                nx_set_custom(actor,"CurSpeed",speed);
            end
        end
    end

    return 1
end
Binding the Character Control Script
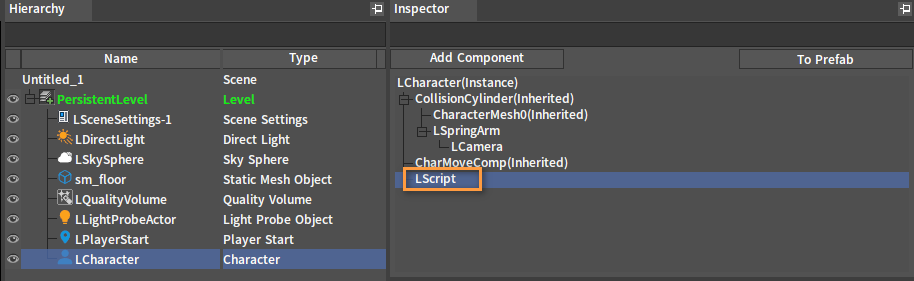
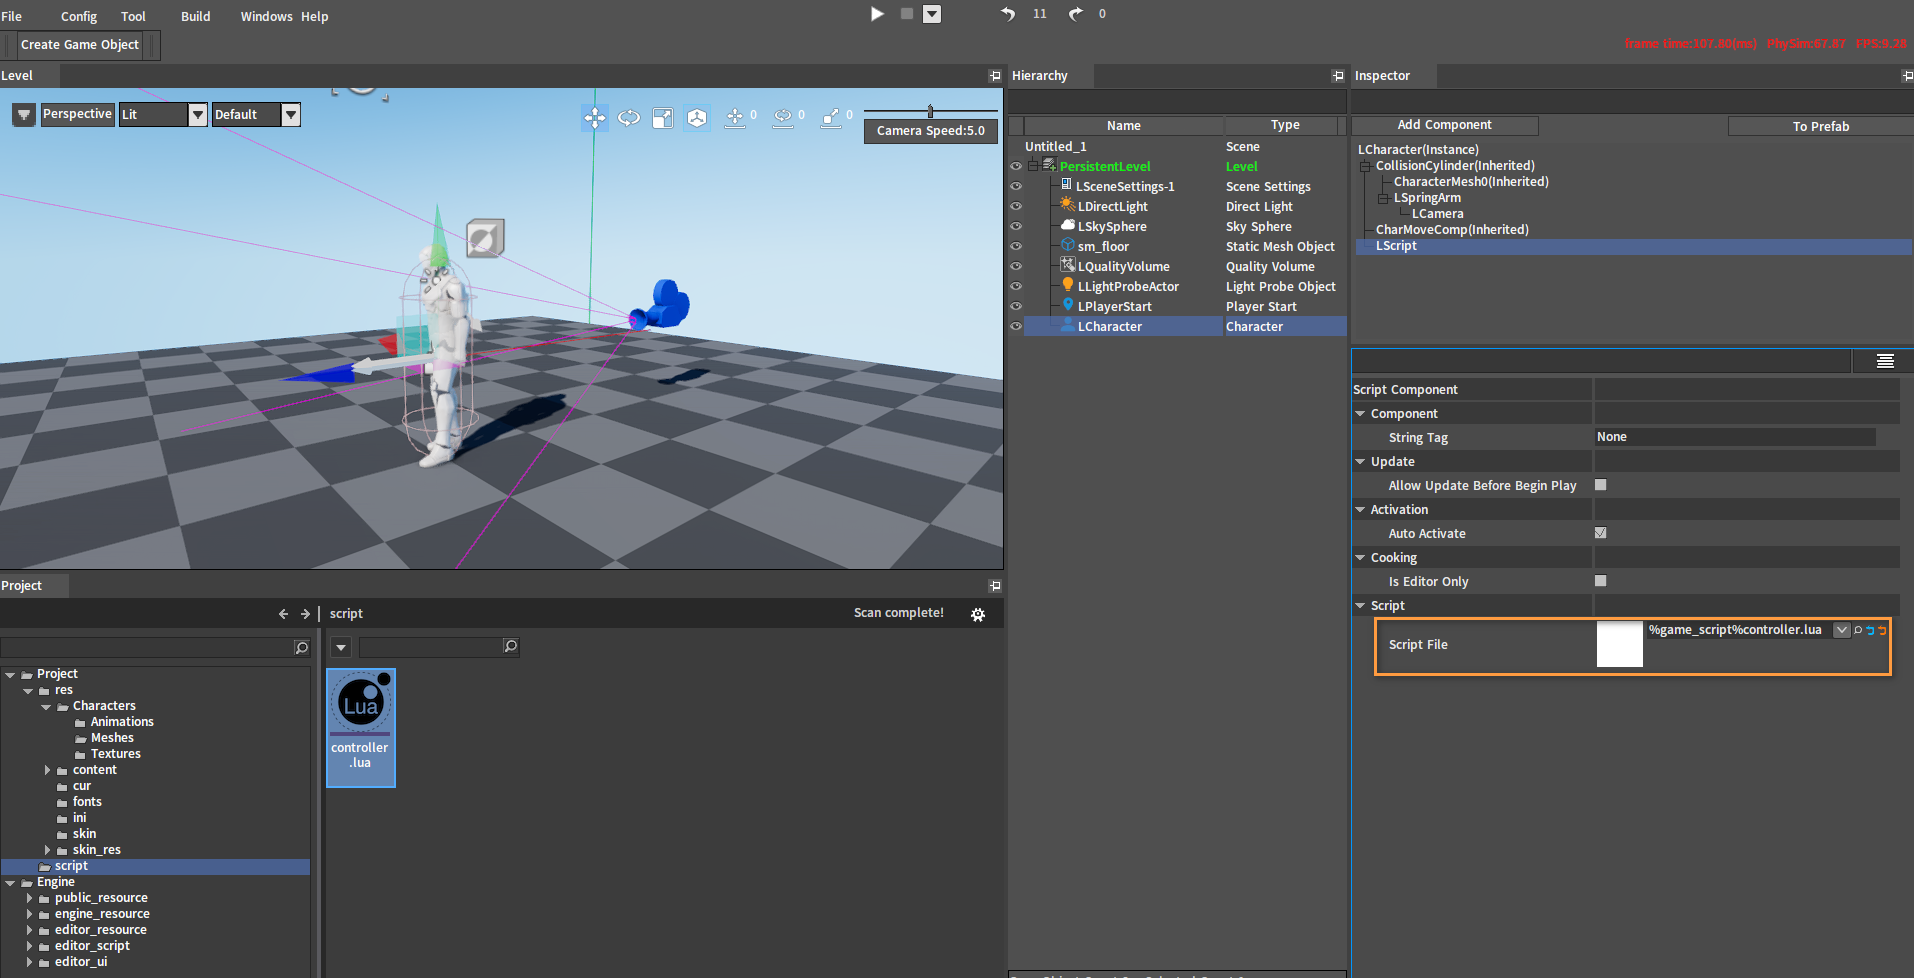
Select LCharacter(Instance) and add a Script Component.
Drag the controller.lua script file from the Project panel into Script File of the Script component.
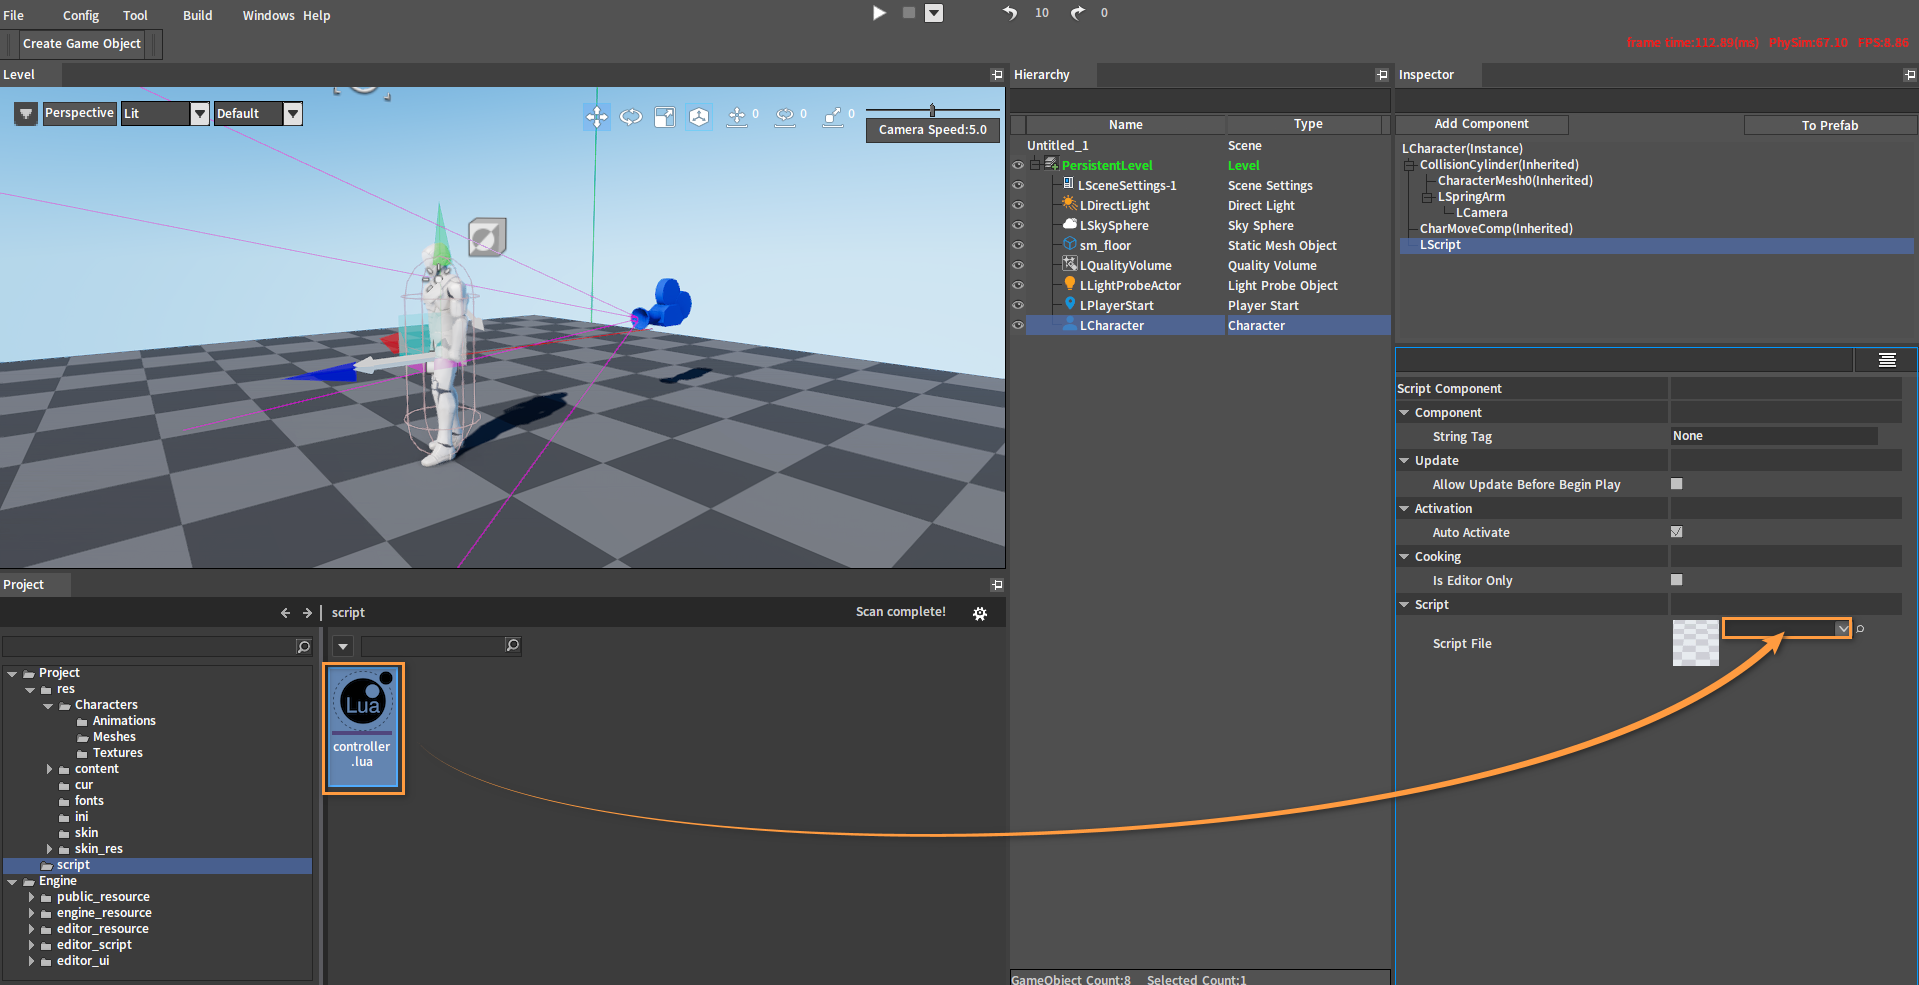
After dragging:
PIE
After clicking the PIE button, you can control the movement of the character with the WASD keys. Hold down the right mouse button to rotate the perspective, and use the mouse wheel to zoom in and out the camera.
