Voxel Resource Generator
Last Updated Time: 12/08/2023
Overview
The Voxel Resource Generator is to edit the planet's mineral (ore) resources and read relevant configurations to generate the corresponding ores on different ecology ore spots of the planet for players to explore and mine.
Configuration Files
Configuring Resource File Paths(Prerequisites)
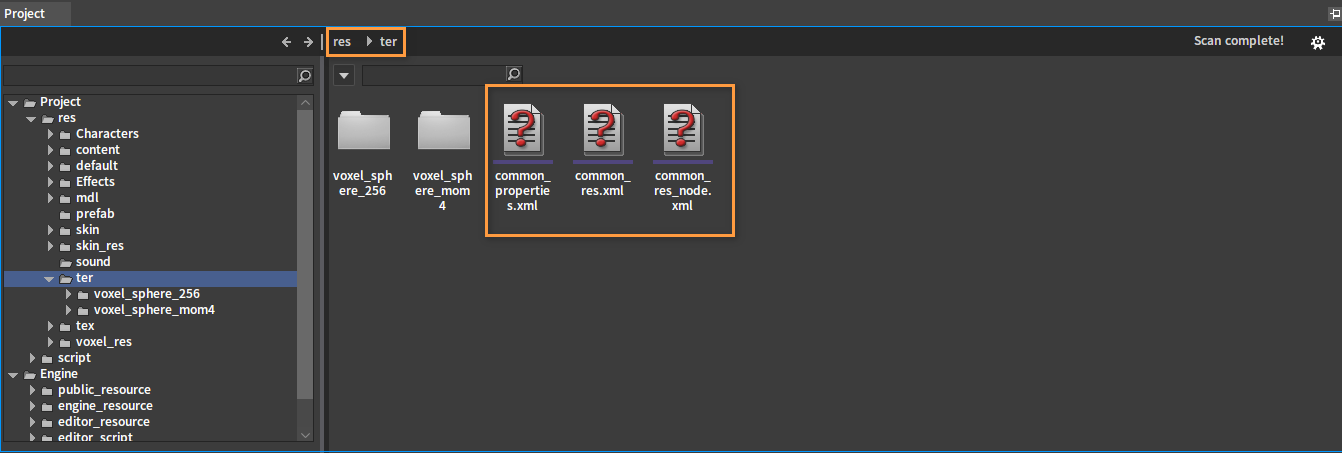
To use the Voxel Resource Generator, first you need to configure the paths to the Property Definition Table, the Resource Table, and the Resource Node Table. The Resource Table contains various types of resources we need to use, such as gold, silver, copper, iron, etc. The Resource Node Table is used to configure various types of ores, and each ore may contain multiple resources, which are all referenced from the Resource Table. The Property Definition Table is used to describe the types of properties in the Resource Table and the Resource Node Table. Here you can create 3 empty XML files first, and then put them into the %Resource%ter directory.
TODO: Subsequent releases are scheduled to support creating the configuration tables in the Editor, and the configuration tables can be placed in any directory of the project.
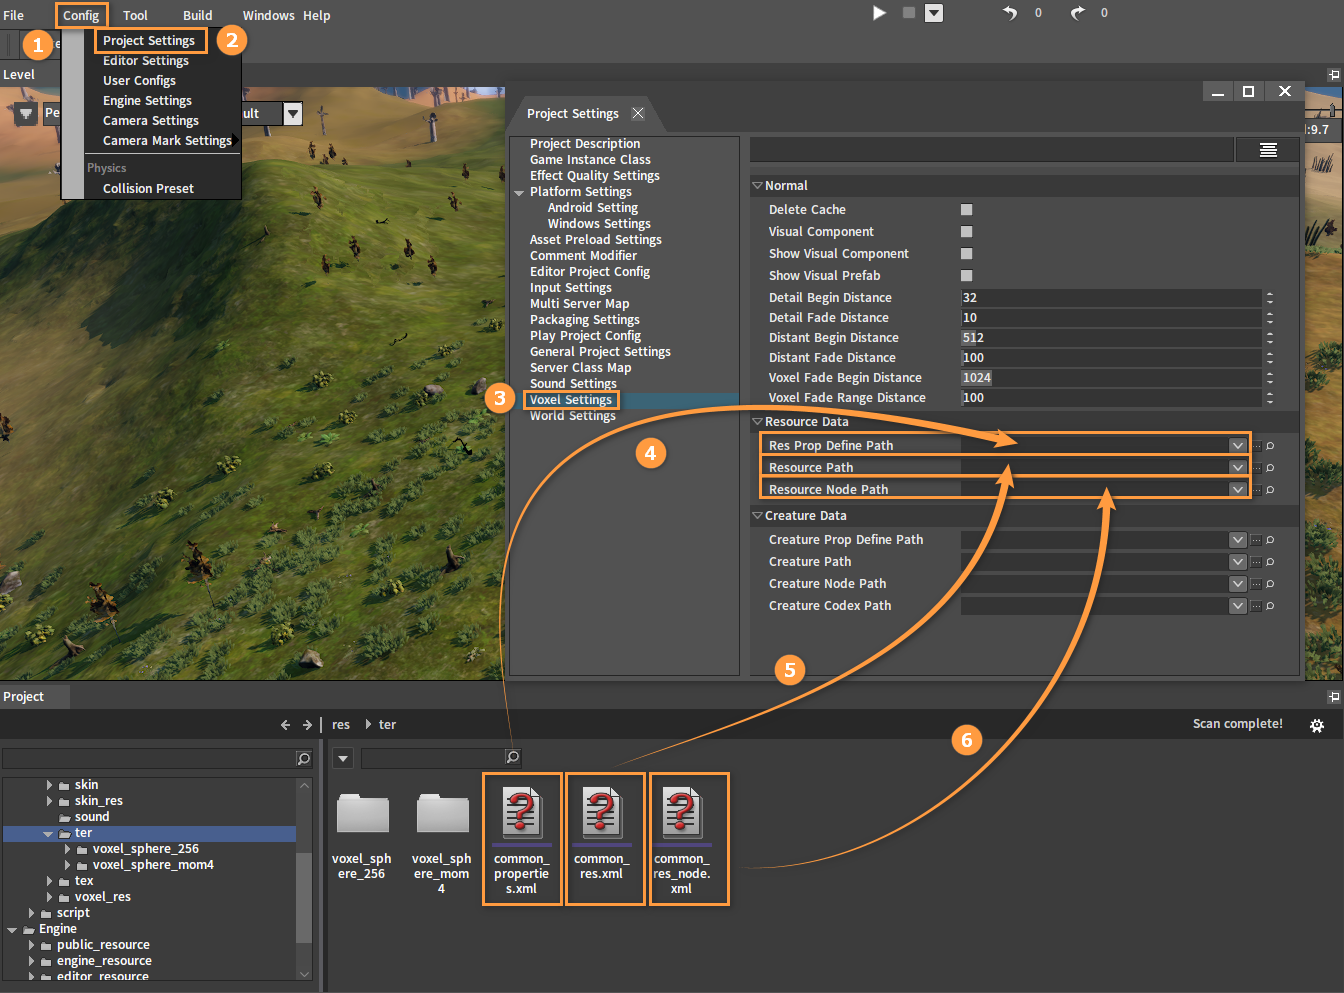
Click Config (Menu Bar) -> Project Settings, select Voxel Settings in the pop-up window, and then drag the created 3 XML files to Res Prop Define Path, Resource Path and Resource Node Path respectively.
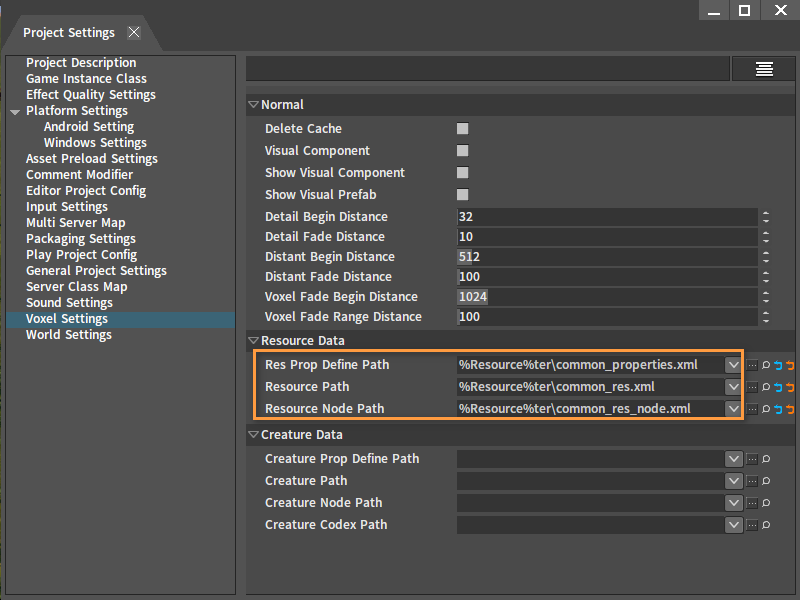
After configuring:
Property Definition Table
The Property Definition Table is used to represent the type of each property in the Resource Table and the Resource Node Table. The types of the used properties need to be defined, otherwise undefined properties will not be displayed when editing the Resource Table and Resource Node Table. And currently they need to be configured manually.
The example of the Property Definition Table is shown below:
<properties>
    <resource name="resource_id" type="string"/>
    <resource name="wuxing_metal" type="float2" mutable="true"/>
    <resource name="wuxing_wood" type="float2" mutable="true"/>
    <resource name="wuxing_water" type="float2" mutable="true"/>
    <resource name="wuxing_fire" type="float2" mutable="true"/>
    <resource name="wuxing_earth" type="float2" mutable="true"/>
    <resource_node name="node_id" type="string"/>
    <resource_node name="display_name" type="string" />
    <resource_node name="type" type="string" />
    <resource_node name="difficulty" type="float" />
    <resource_node name="vobj" type="string" />
    <resource_node name="resource_ids" type="string" />
    <resource_node name="weight" type="float2" />
</properties>
The items labeled resource in the table represent properties used in the Resource Table, and the items labeled resource_node represent properties used in the Resource Node Table. Each item must contain at least name and type, which represents the name and the type of the property respectively. If there is a mutable and the mutable is true, it means the property can be dynamically modified in the game, e.g. wuxing_metal represents a five-element (wuxing) metallic property of the ore, and this property may alter after it has been mined by the player.
For example, as shown above, an item with the name of resource_id means if the resource_id property appears in the Resource Table, then the type of this property will be identified as string and the property is not editable. Wile the property with a name of wuxing_metal is editable.
Currently, there are 17 types of properties available as follows:
invalid
bool
int
int2
int3
int4
float
float2
float3
float4
entity_id
int64
uint64
str_ptr
wide_str_ptr
string
buffer
Resource Table
The example configuration of the Resource Table is shown below, where each item can represent a kind of resource, and the Resource Table can be configured by using the Voxel Resource Editor.
<?xml version="1.0" encoding="utf-8"?>
<data>
    <resource
        resource_id="bronze"
        wuxing_metal="2,5"
        wuxing_wood="1,5"
        wuxing_water="2,5"
        wuxing_fire="1,6"
        wuxing_earth="4,7"
    />

    <resource
        resource_id="copper"
        wuxing_metal="0,55"
        wuxing_wood="2,15"
        wuxing_water="2,5"
        wuxing_fire="5,6"
        wuxing_earth="0,7"
    />
</data>
The resource_id property is a unique and non-repeatable identifier for this resource.
The wuxing_metal, wuxing_wood, wuxing_water, wuxing_fire, and wuxing_earth properties represent a range, where the minimum and maximum values are separated by a comma ",". And when spawning a specific ore, these properties of the ore's resource instances will generate a random value within the range.
Resource Node Table
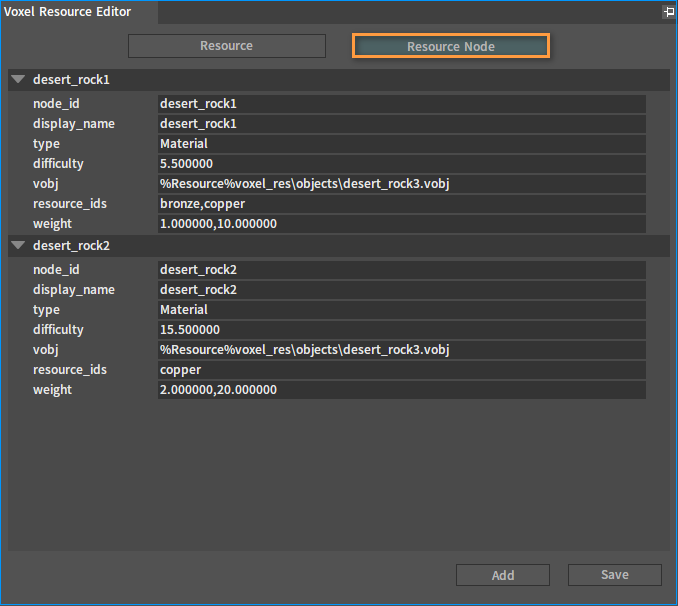
The resource node configuration example used by the ore spot is as follows, and the Resource Node Table can be configured using the Voxel Resource Editor.
<?xml version="1.0" encoding="utf-8"?>
<data>
    <resource_node
        node_id="desert_rock1"
        display_name="desert_rock1"
        type="Material"
        difficulty="5.5"
        vobj="%Resource%voxel_res\objects\desert_rock3.vobj"
        resource_ids="bronze,copper"
        weight="1,10"
    />

    <resource_node
        node_id="desert_rock2"
        display_name="desert_rock2"
        type="Material"
        difficulty="15.5"
        vobj="%Resource%voxel_res\objects\desert_rock3.vobj"
        resource_ids="copper"
        weight="2,20"
    />
</data>
The node_id property is a unique and non-repeatable identifier for the resource_node.
The resource_ids property represents the resources used by this resource_node, and the resource node can contain one or multiple resources. Currently, these two properties are necessary.
Voxel Resource Editor
After configuring the Resource Prop Define Path, Resource Path, and Resource Node Path in the Project Settings window, click the Windows (Menu Bar) -> Game Data -> Voxel Resource to open the Voxel Resource Editor.

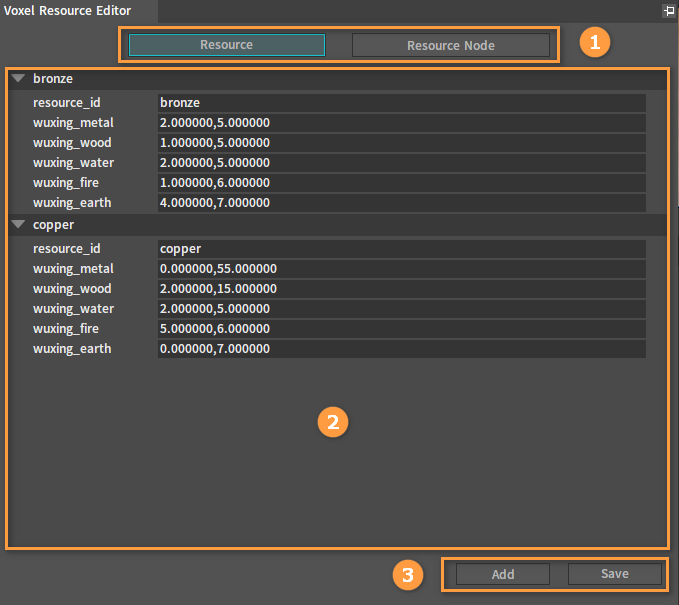
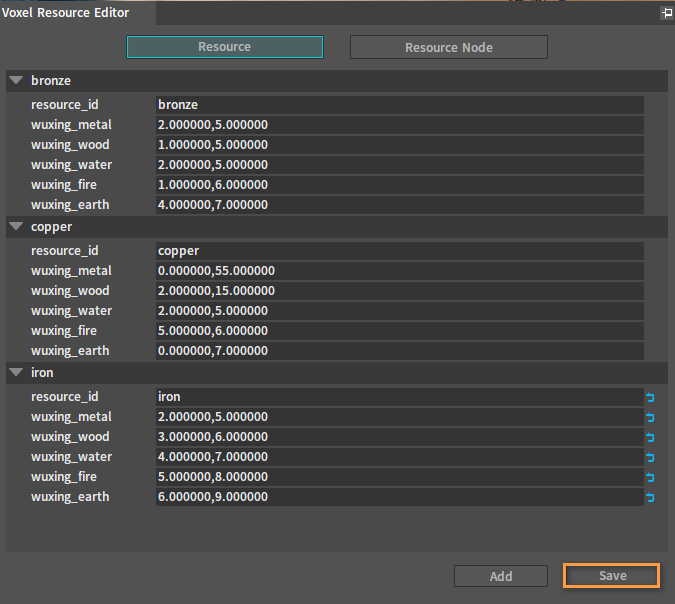
Voxel Resource Editor:
| No. | Description |
|---|---|
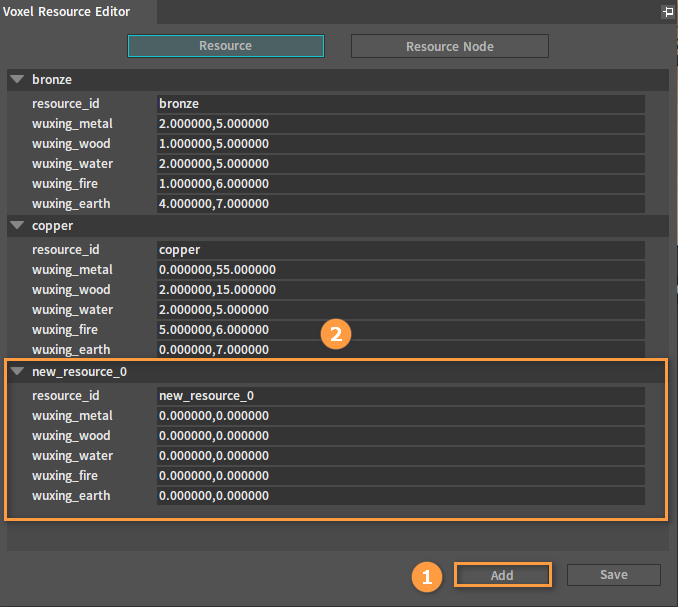
| 1 | Select the type of the currently edited resource. |
| 2 | Display all entries of the currently selected type of resource. |
| 3 | Function buttons. Click the Add button to add a new entry. Click the Save button to save the current type of resource. |
Switching the Currently Edited Resource
After opening the Voxel Resource Editor, the default editing interface is the resource editing interface, and click the Resource Node button on the top to switch to the resource node editing interface.
Adding Resources
Click the Add button to generate a new entry in the middle list, where the property values are the default values.
Deleting Resources
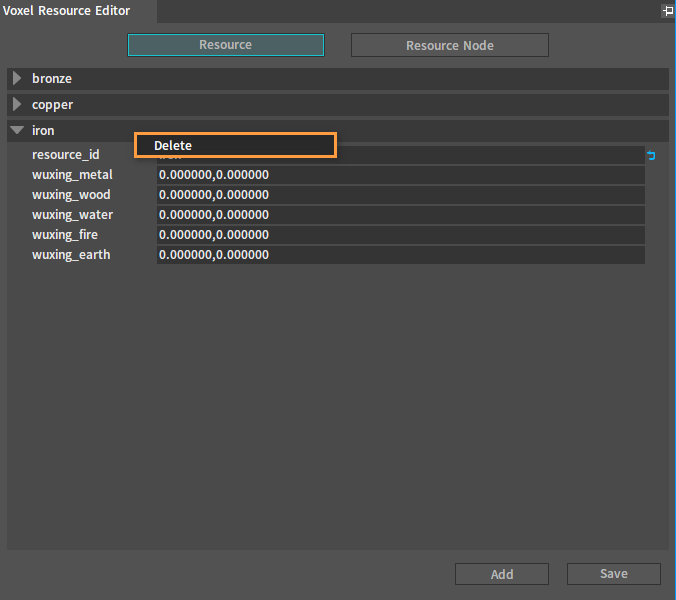
Right-click the title bar of the resource to be deleted and click Delete to delete the current resource.
Editing Properties
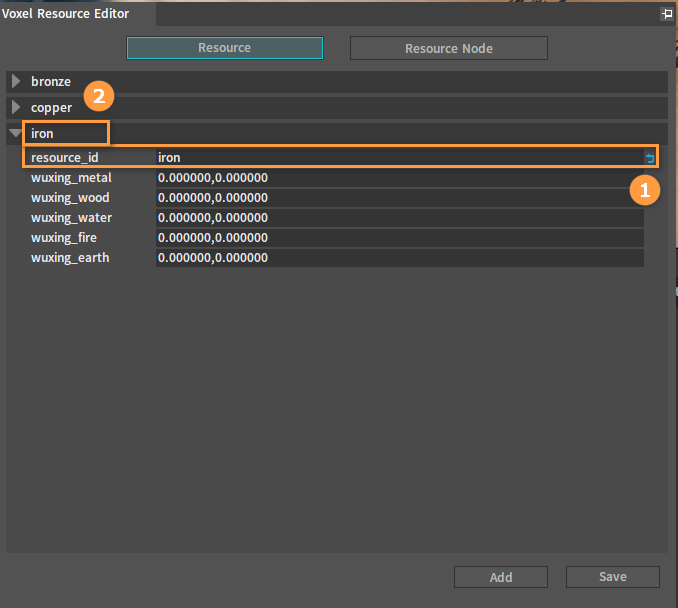
Each property of the resource and resource node can be edited. If the resource_id property is edited, the title bar of the current entry will be changed accordingly.
Saving Modifications
Click the Save button below to save the modifications to the configuration file.
The modified configuration file is shown below:
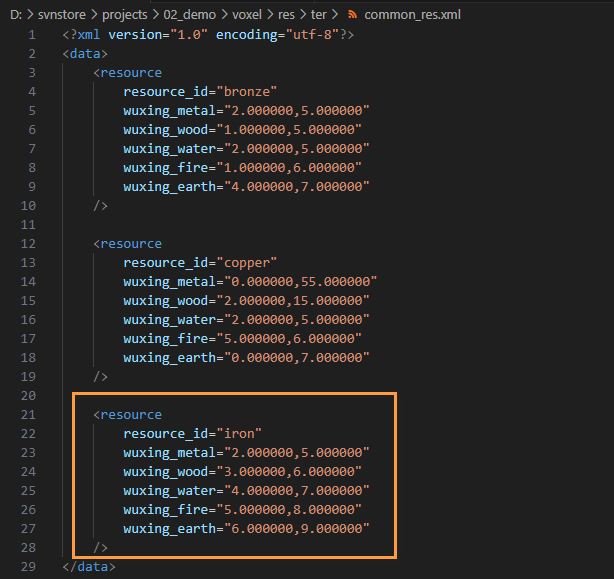
The operations of adding, deleting, editing and saving Resource Node in the Voxel Resource Editor are the same as for Resource.
Using Resources
To use the configured resource nodes in the scene, you need to configure the Ore resources and ecology resources on a level-by-level basis.
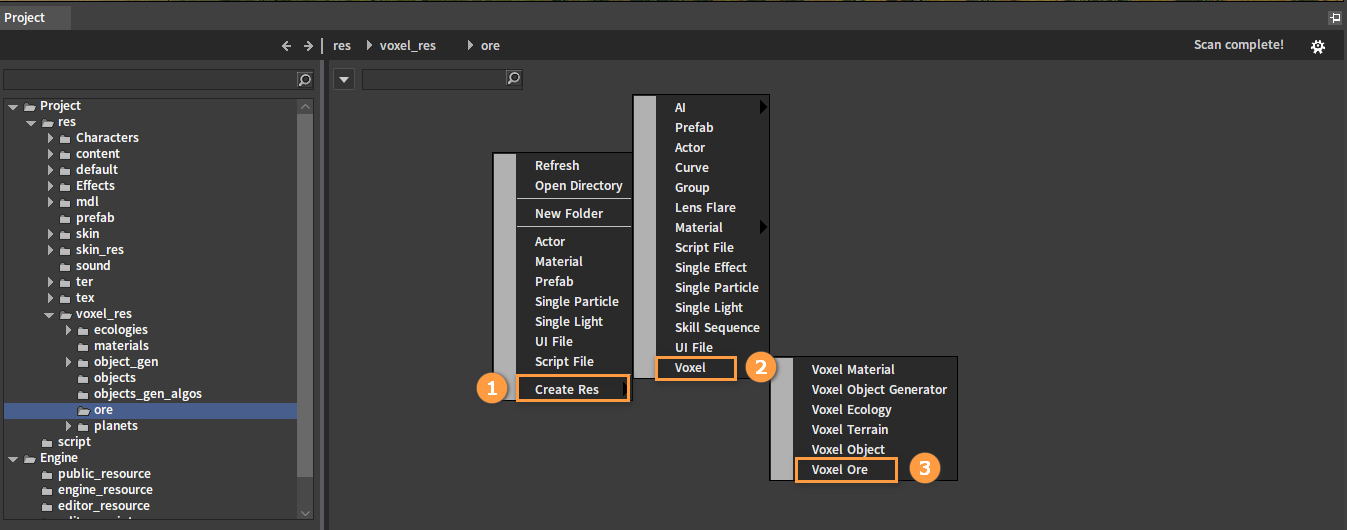
Configuring Ores
Right-click the blank space of the Resource Preview window to open the Shortcut Menu, then click Create Res -> Voxel -> Voxel Ore to create a Voxel Ore file (.vore) for calling the configured resource nodes.
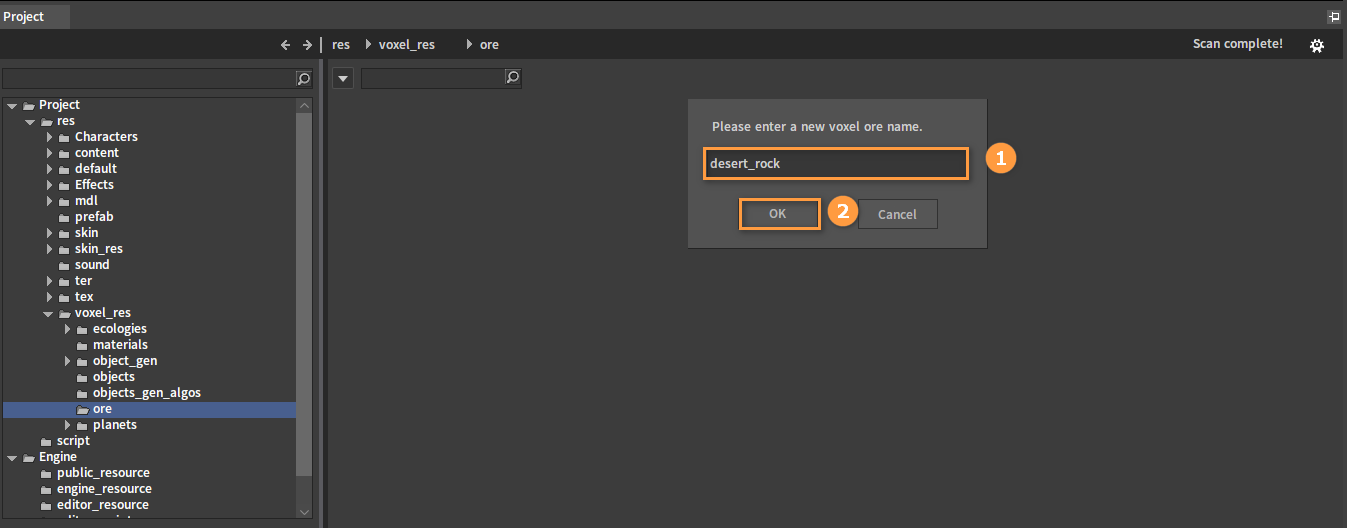
Enter the name in the pop-up window and click the OK button to complete the creation.
Double-click the ore resource file (.vore) to be used to open the corresponding editing interface.
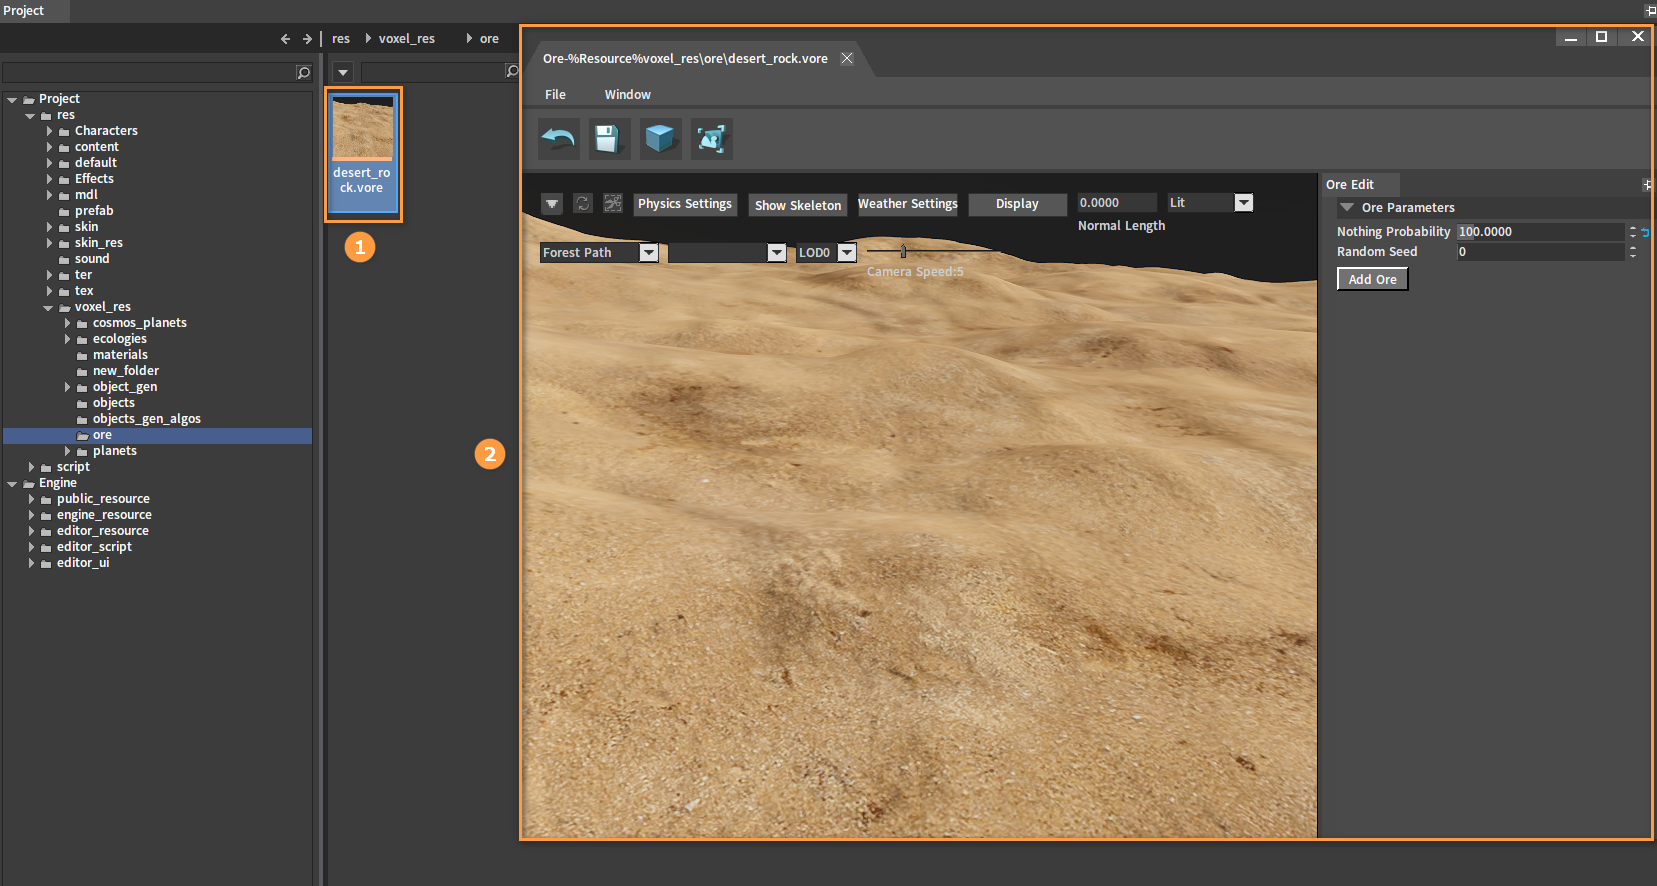
There are no resources configured in this file and only two default properties. Nothing Probability represents the probability of not generating any ore. Here the probability is 80. And Random Seed is used to adjust the distribution of ore.
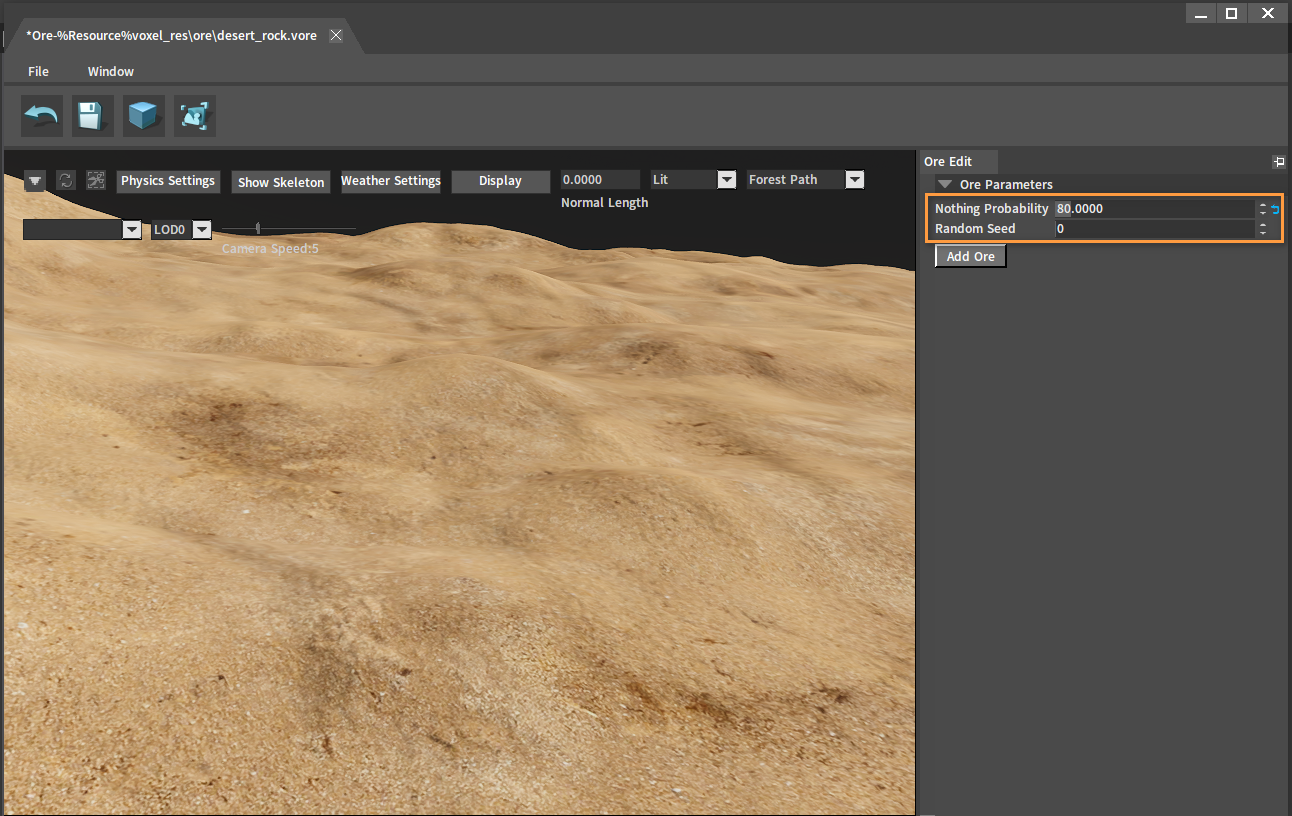
Click the Add Ore button to add an entry for calling the configured resource nodes.

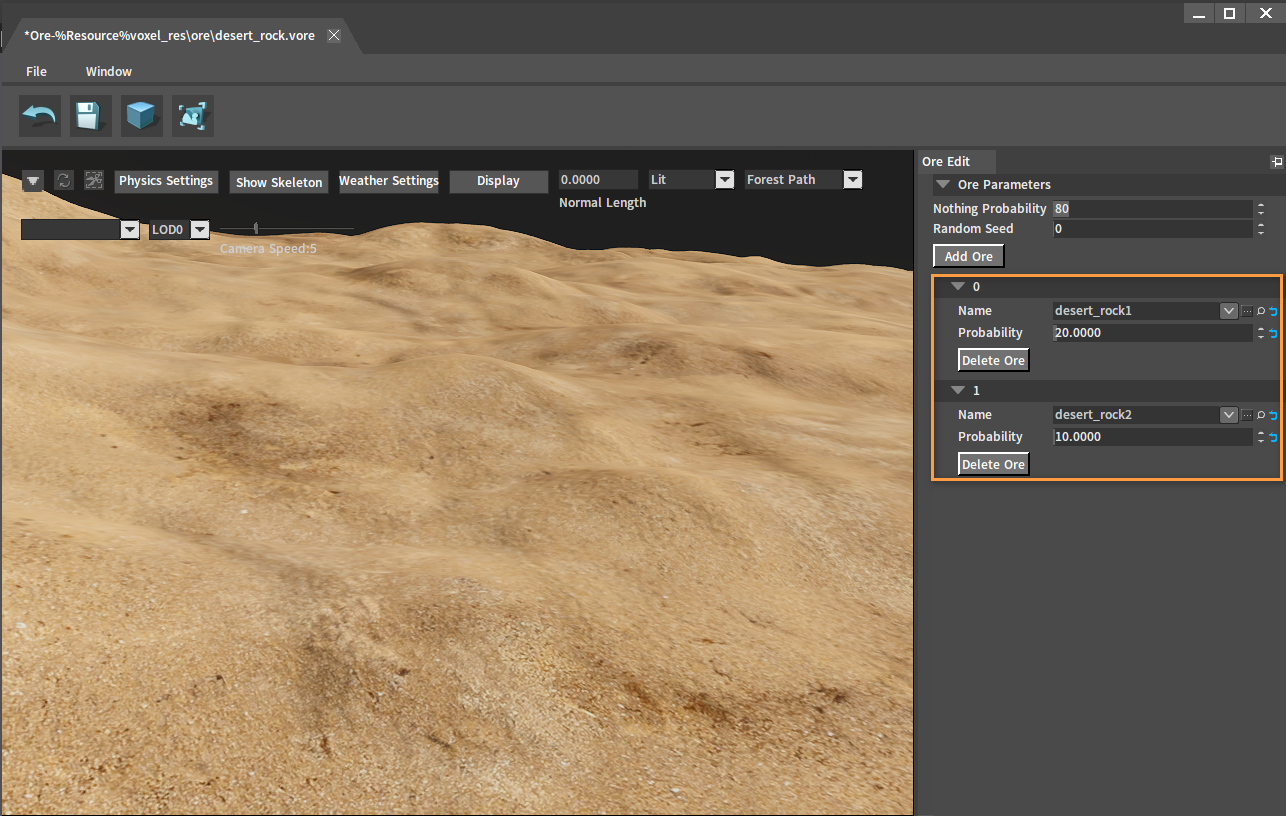
After adding, modify its Name property to the node_id of the resource node in the Resource Node Table, then modify the Probability property to configure the probability of generating this ore. In the example below, the Probability of generating desert_rock1 is 20 and the Probability of generating desert_rock2 is 10.
Note: The total Probability of an ore resource may not be 100, e.g. the ore resource below has an 80/110 probability of generating nothing when generating ores, a 20/110 probability of generating ore desert_rock1, and a 10/110 probability of generating ore desert_rock2.
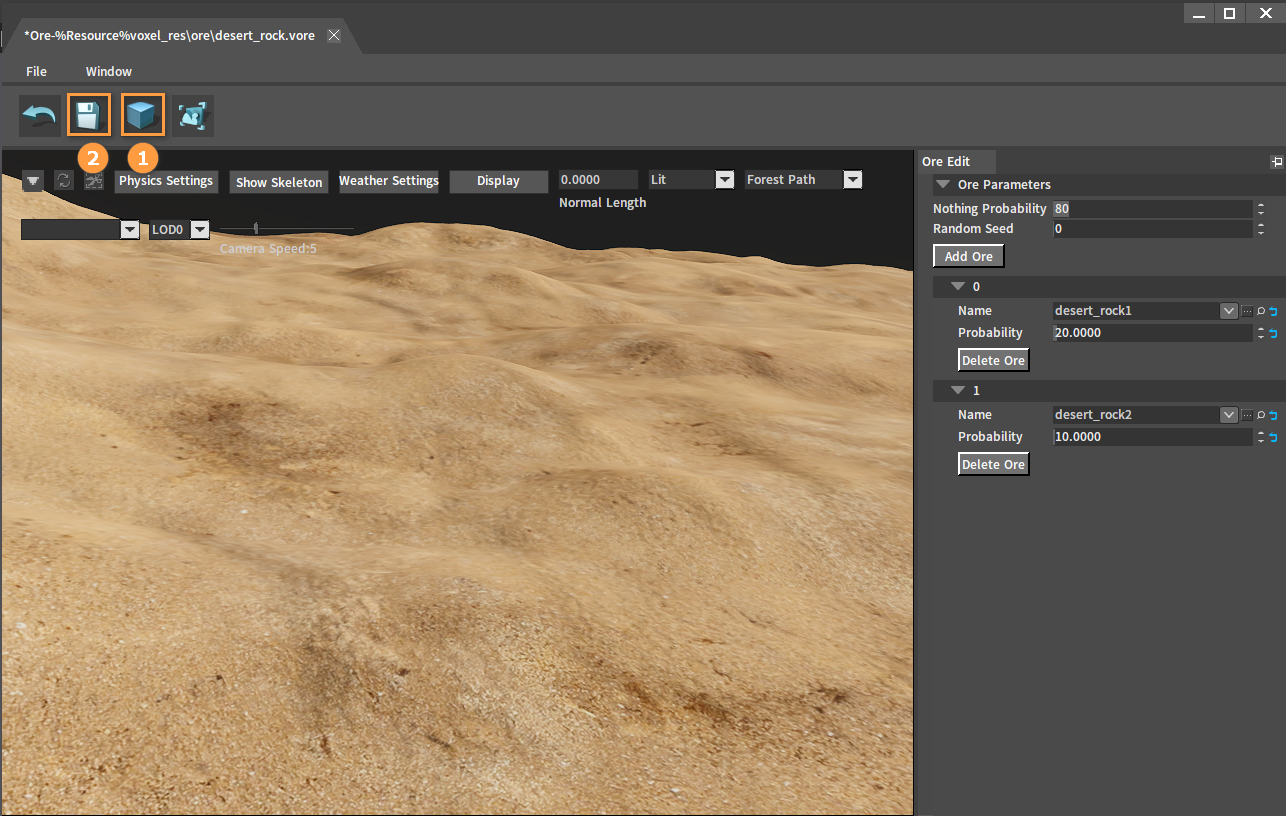
After setting, click the Generate button and the Save button.
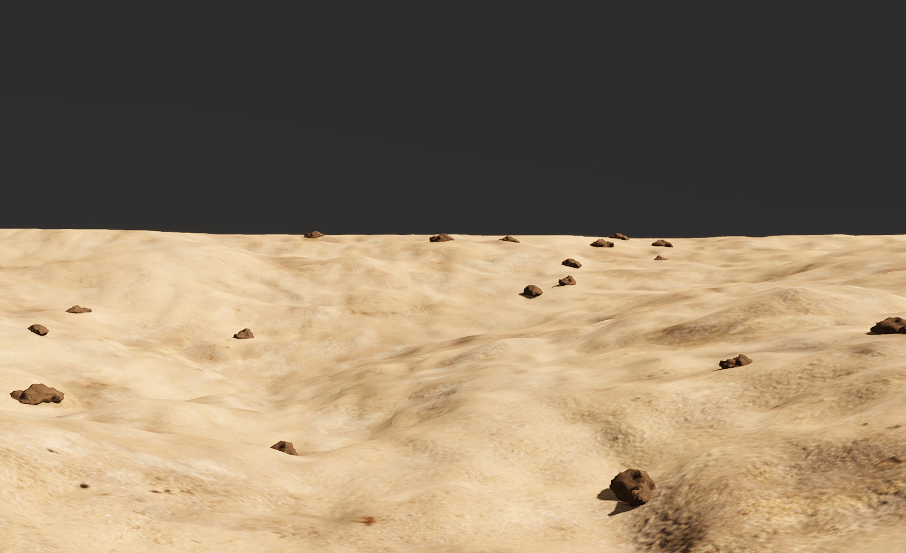
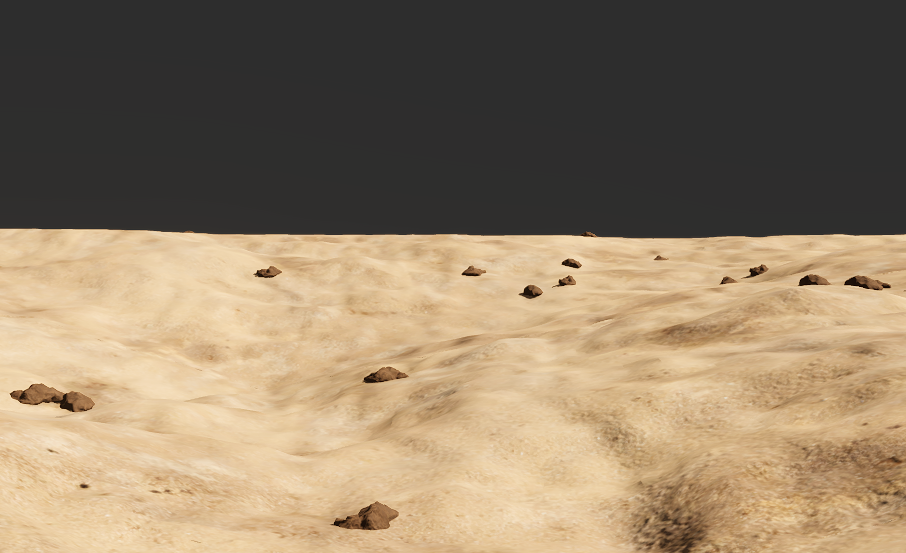
Click Generate multiple times, and you will see that the location and shape of the generated ore are unchanged. If you want the ore distribution to be diverse for files with the same probability, you need to use the Random Seed property. If the value of Random Seed is 0, it means no random seed is used, and if the value is larger than 0, then different values will make the distribution of the ores vary in both locations and shapes.
Effects of different Random Seed values:
Configuring Ecologies
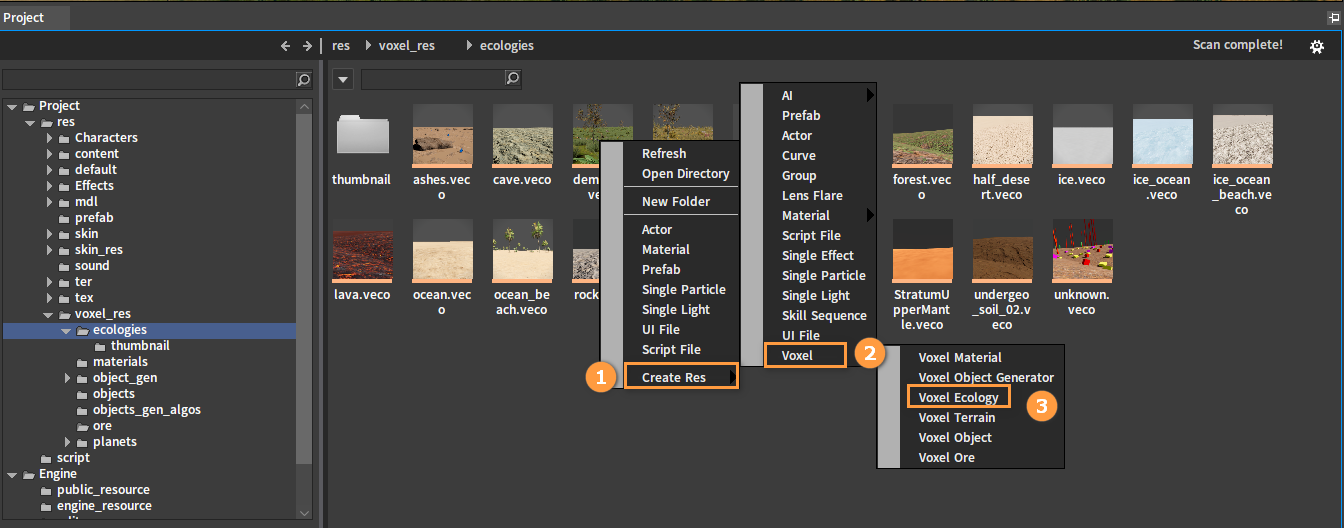
You also need to reference the ore to be used in the Ecology. Select the ecology to be used in the Resource Preview window. If there is no ecology file(.veco), right-click the blank space in the Resource Preview window to open the Shortcut Menu, and click Create Resource -> Voxel -> Voxel Ecology to create a Voxel Ecology file.
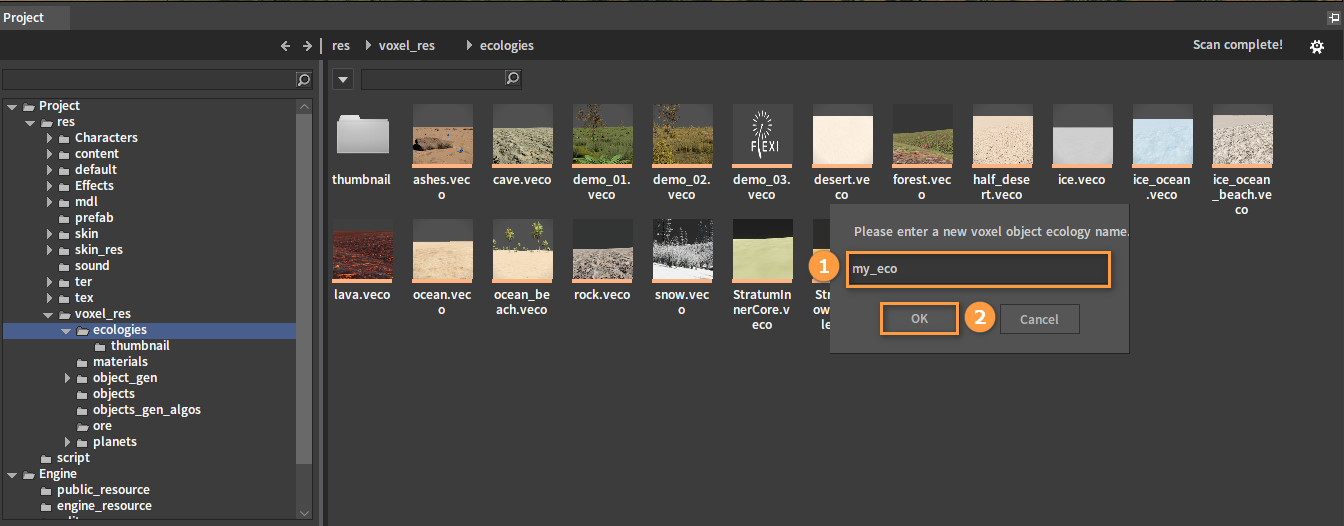
After entering the name in the pop-up window, click the OK button to complete the creation.
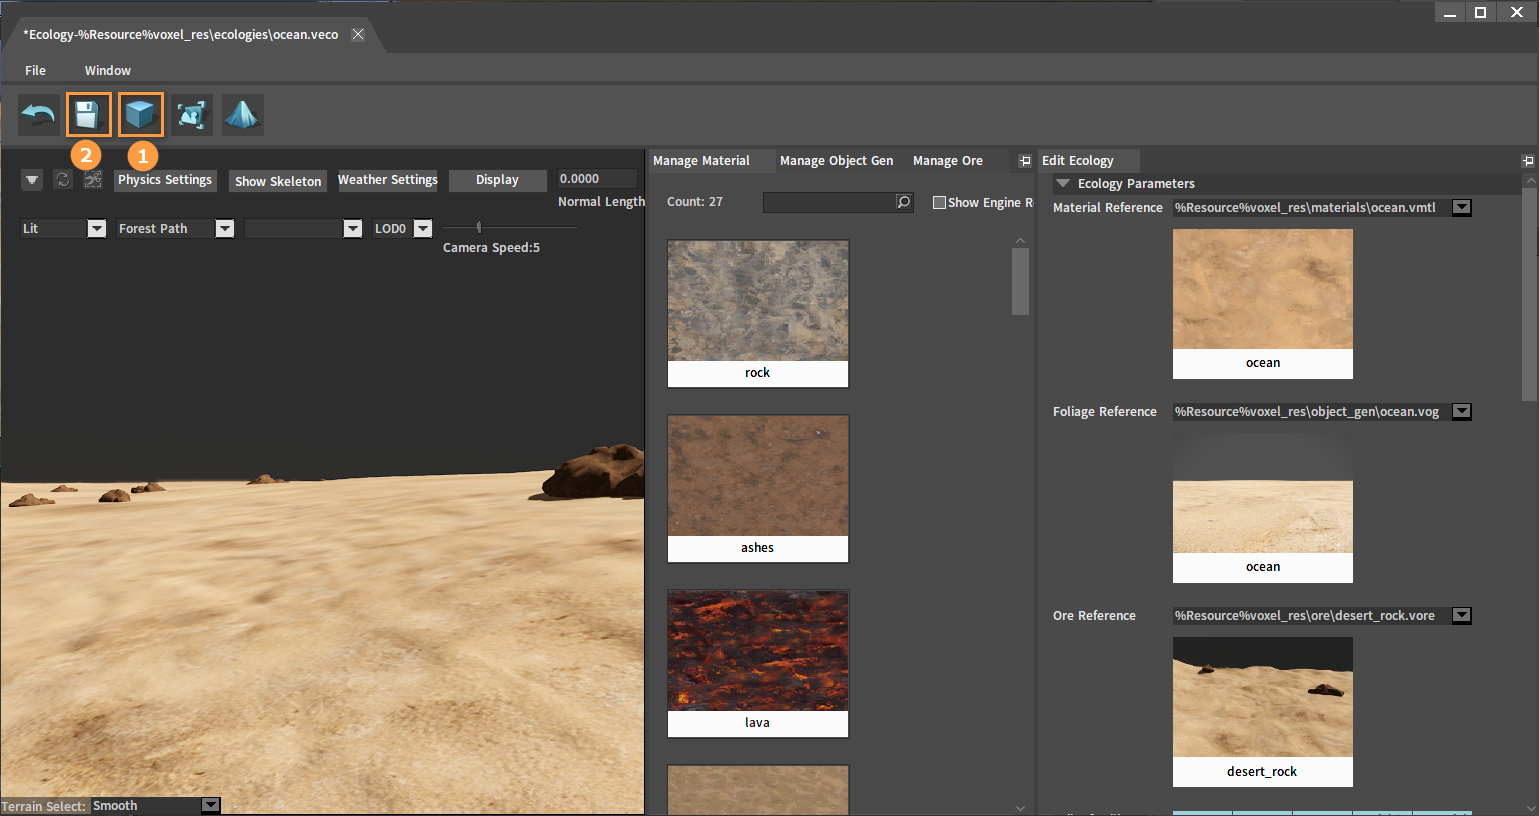
Double-click the ecology file (.veco) to be used to open its corresponding ecology editing interface.
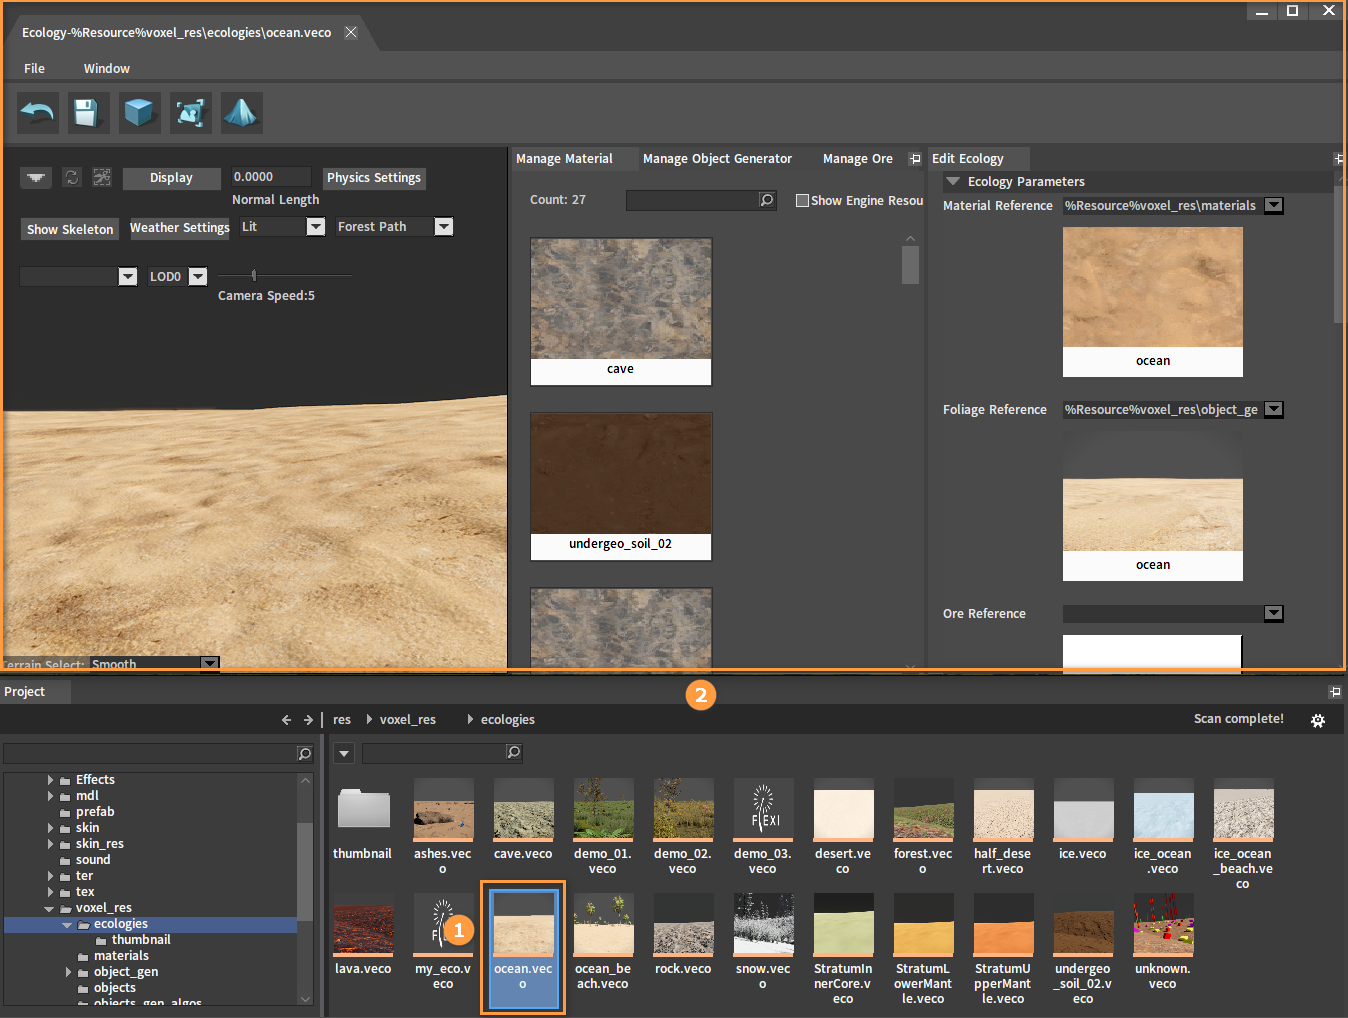
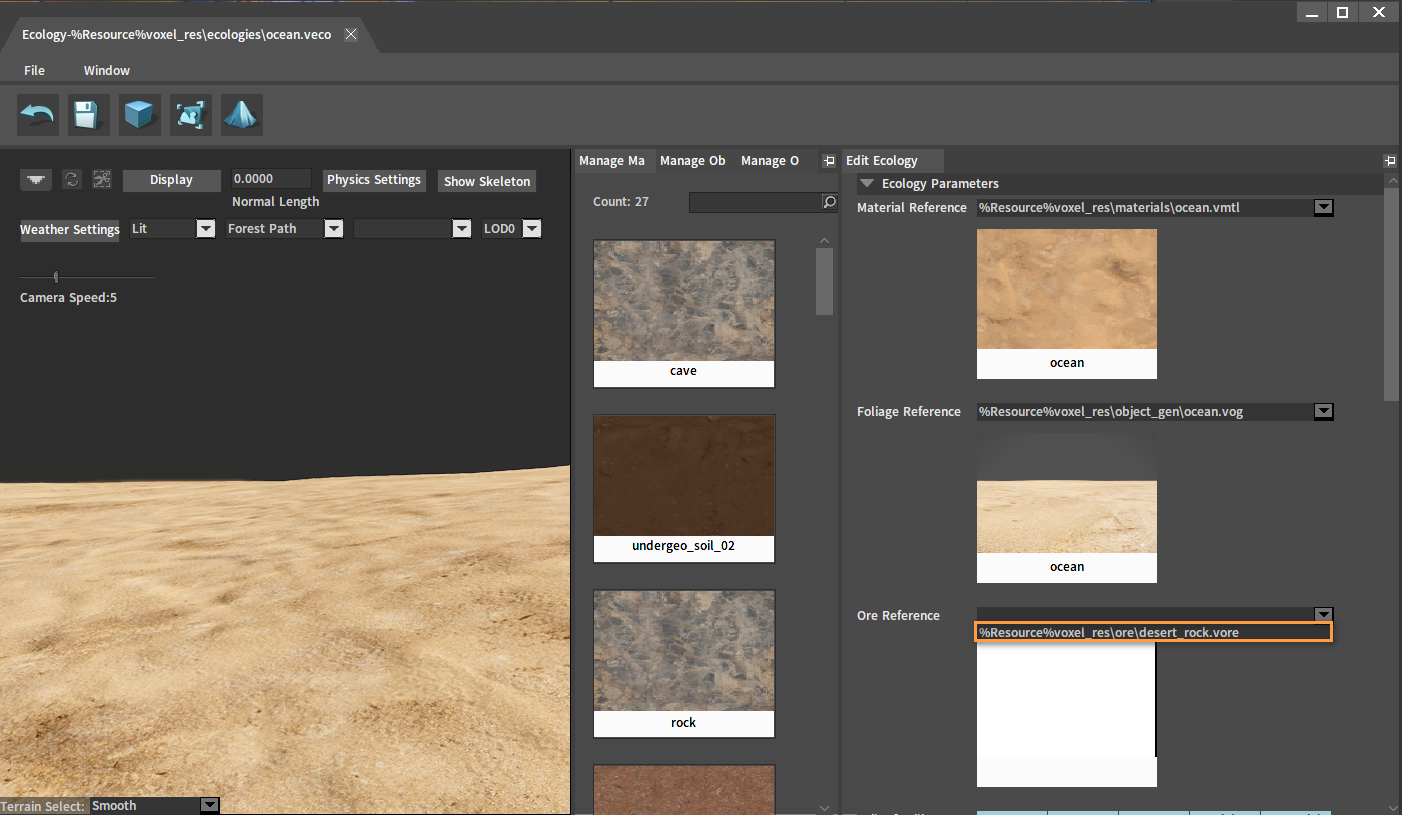
Click the drop-down box of Ore Reference in the editing interface of the ecology to select and configure the ore resource to be used, so that the corresponding ore will be generated in the ecology.
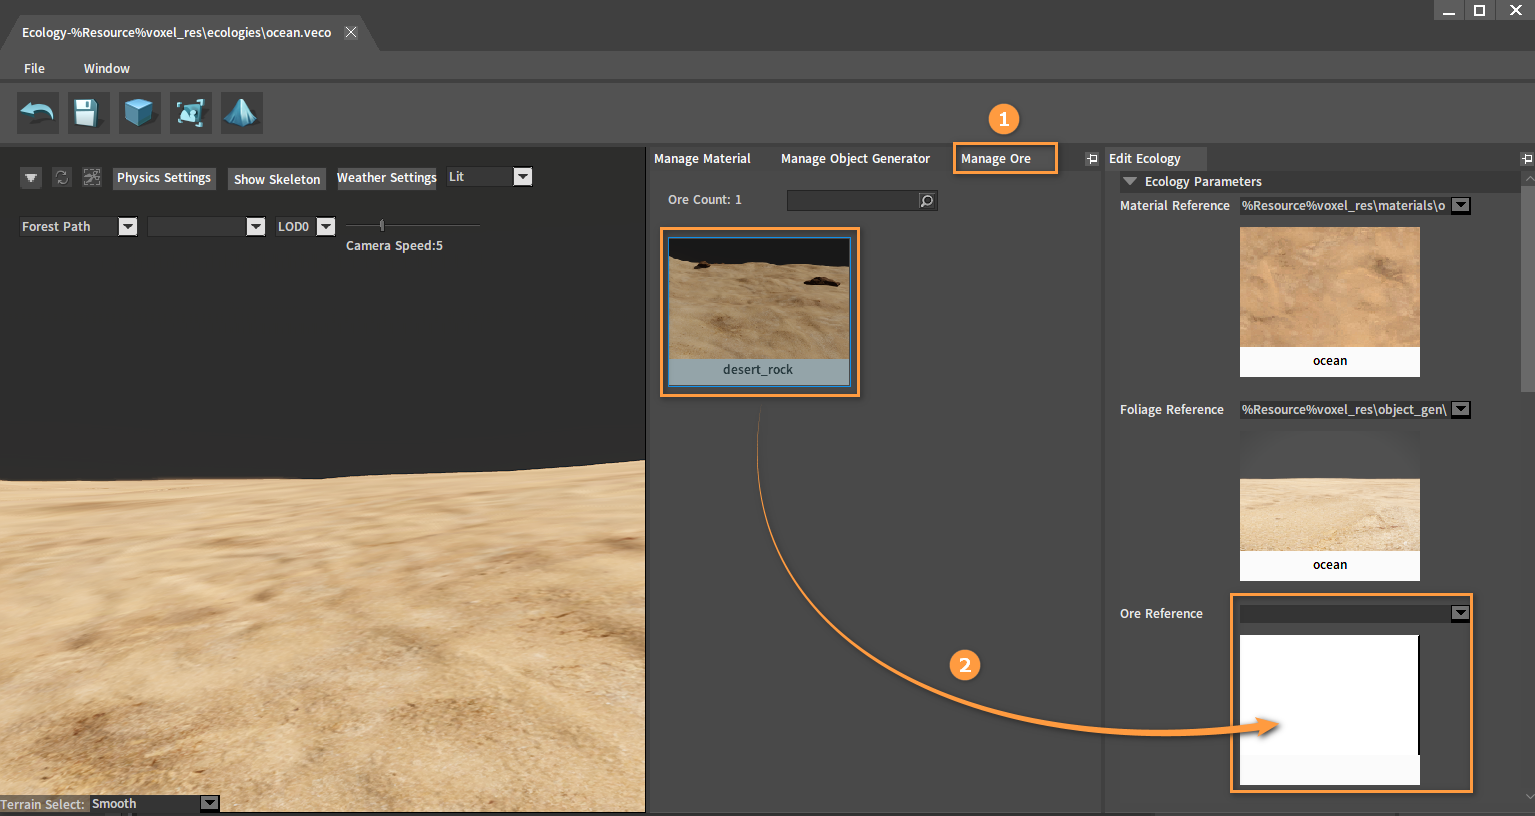
Or you can drag the ore to be used directly from the Manage Ore panel into the slot of Ore Reference in the ecology editing interface to complete the configuration.
After dragging:
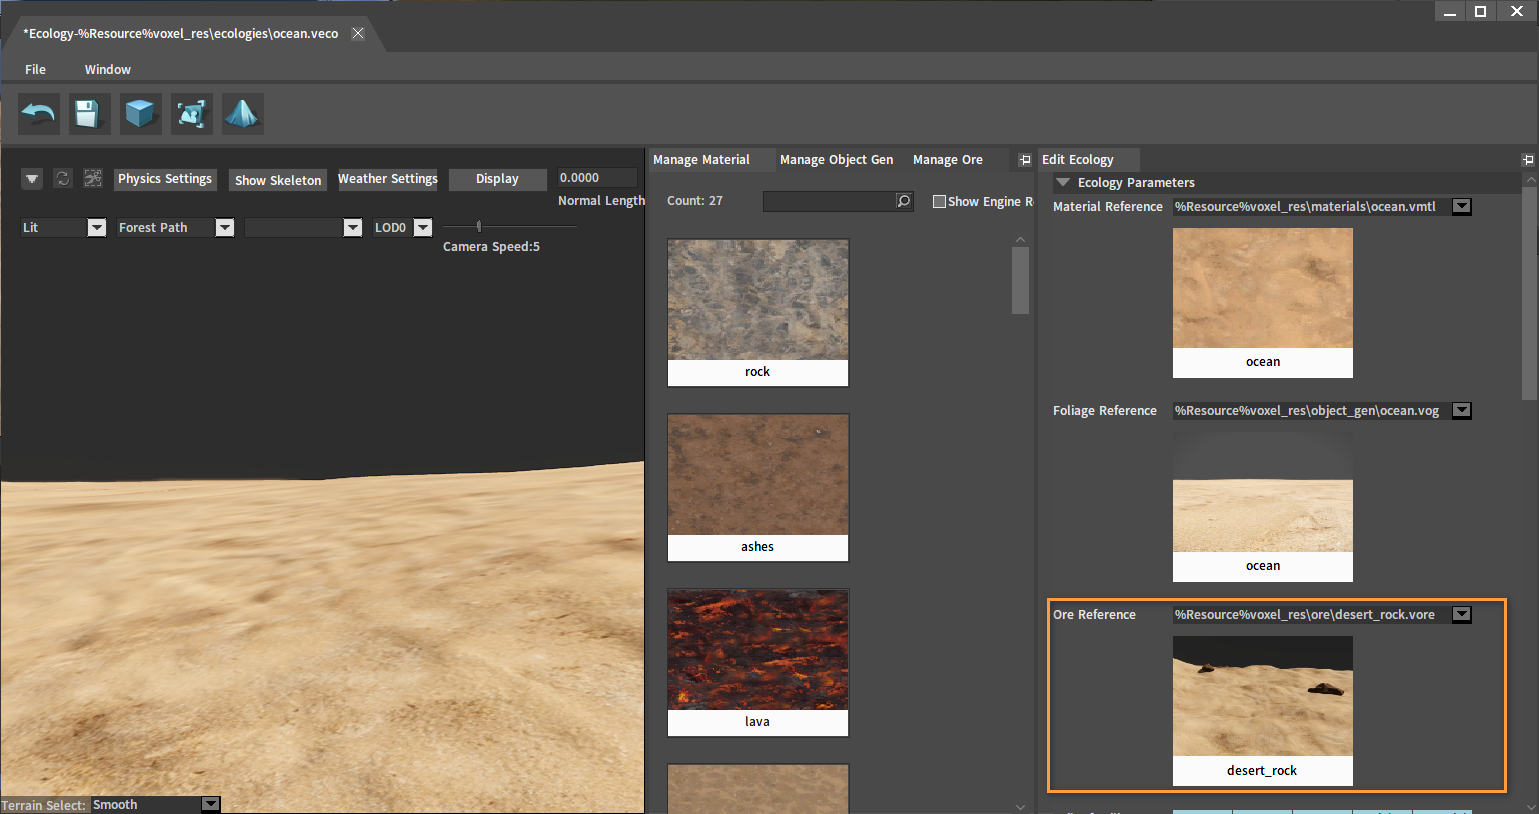
After setting, click the Generate button and the Save button.
Related Interfaces and Code Examples
Interfaces
//Get resource node
virtual const res_node* GetResNode(float local_x, float local_y, float local_z) const;
virtual const res_node* GetResNode(const char* name) const;

//Find ore spots in the area of the surrounding radius (if the name is not null, then find the ore spot with that name)
virtual void FindOresInSphere(
    float local_x, float local_y, float local_z, float radius,
    TArrayPod<ore_data_t, 8, TCoreAlloc>& arrOres, const char* name = 0) const;

//Set and get each property of the ore instance
//Modify the specified property value of the res_index-th resource in the ore instance generated at the specified coordinates to value
bool SetOreResValue(float local_x, float local_y, float local_z, unsigned int res_index, const char* property_name, float value)
//Get the specified property value of the res_index-th resource in the ore instance at the specified coordinates
float GetOreResValue(float local_x, float local_y, float local_z, unsigned int res_index, const char* property_name) const

//Collect all ResNodes currently in use
virtual bool CollectUsedResNode(TArrayPod<const char*, 8, TCoreAlloc>& arrResNodeNames) const;
Code Example 1
//Get the resource_id property of the resource
//Get through the GetResName interface. The GetResName interface accepts an integer parameter to directly get the i-th resource_id from resource_ids.
pChunkMgr->FindOresInSphere(local_x, local_y, local_z, radius, arrOres, name.c_str());
//Get the resource node and traverse the resources in it
size_t ore_num = arrOres.size();
for (size_t i = 0; i < ore_num; i++)
{
    //Get node_id through arrOres[i].name
    const res_node* node = pChunkMgr->GetResNode(arrOres[i].name);

    size_t res_num = node->GetResCount();
    //Traverse resources in the node
    for (size_t j = 0; j < res_num; j++)
    {
        const char* resource_id = node->GetResName(i);
    }
}
Code Example 2
//Get the resource nodes and their related properties used by the ore spots within a certain coordinate range, get and set the properties of the ore instances

//Set the coordinates
float local_x = xxx;
float local_y = yyy;
float local_z = zzz;
float radius = r;

//Get voxel_terrain object
LVoxelTerrain* pCurVoxelTerrain = m_pCurrentVoxelTerrain;
if (pCurVoxelTerrain == nullptr)
{
    return;
}

LVoxelTerrainComponent* pCurVoxelTerComp = pCurVoxelTerrain->GetVoxelTerrainComponent();
if (pCurVoxelTerComp == nullptr)
{
    return;
}

IChunkManager* pChunkMgr = pCurVoxelTerComp->GetChunkManager();
if (pChunkMgr == nullptr)
{
    return;
}

result_string name = "";
TArrayPod<ore_data_t, 8, TCoreAlloc> arrOres;
//Find the surrounding ore spots
pChunkMgr->FindOresInSphere(local_x, local_y, local_z, radius, arrOres, name.c_str());

//Get the resource node and traverse the resources in it
size_t ore_num = arrOres.size();
for (size_t i = 0; i < ore_num; i++)
{
    //Get node_id through arrOres[i].name
    const res_node* node = pChunkMgr->GetResNode(arrOres[i].name);
    //Get other properties in resource_node
    int user_var_type = 0;
    char display_name[Z_PARAM_NAME_SIZE];
    char difficulty[Z_PARAM_NAME_SIZE];
    node->GetAttributeData("display_name", user_var_type, display_name);
    //The difficulty obtained here are strings, which can be converted into floating point numbers through an interface such as atof
    node->GetAttributeData("difficulty", user_var_type, difficulty);

    size_t res_num = node->GetResCount();
    //Traverse resources in the node
    for (size_t j = 0; j < res_num; j++)
    {
        const res_info* res = node->GetResInfo(j);

        //Get the properties of the j-th resource in the resource node.
        XMFLOAT2 wuxing_metal = res->attributes.GetFloat2("wuxing_metal");
        XMFLOAT2 wuxing_wood = res->attributes.GetFloat2("wuxing_wood");
        XMFLOAT2 wuxing_water = res->attributes.GetFloat2("wuxing_water");
        XMFLOAT2 wuxing_fire = res->attributes.GetFloat2("wuxing_fire");
        XMFLOAT2 wuxing_earth = res->attributes.GetFloat2("wuxing_earth");
    }
}

//Get all surrounding entity objects
CVarList args, result;
args.AddFloat(local_x);
args.AddFloat(local_y);
args.AddFloat(local_z);
args.AddFloat(50);
pChunkMgr->GetRangeVisual(args, result);

size_t entity_num = result.GetCount();
for (size_t i = 0; i < entity_num; i++)
{
    PERSISTID ent_id = result.ObjectVal(i);
    IEntity* ent = GetCore()->GetEntity(ent_id);

    IVarTable* var_table = ent->GetCustoms();
    //The entity object that has this property is the ore
    if (var_table->Exists("ore_position"))
    {
        IVar* var = var_table->GetValue("ore_position");
        result_string pos_str = var->StringVal();
        //The coordinates stored in pos_str are comma-separated strings, e.g. "xxx,yyyy,zzzz", which are split and stored in an array for use here
        TArrayPod<result_string, 8, TCoreAlloc> postions = SplitStr(pos_str);

        result_string str_pos1 = postions[0];
        result_string str_pos2 = postions[1];
        result_string str_pos3 = postions[2];

        float pos_x = (float)atof(str_pos1.c_str());
        float pos_y = (float)atof(str_pos2.c_str());
        float pos_z = (float)atof(str_pos3.c_str());

        //Get and set the properties of the ore instance
        //Get the actual value of the float2 property of resource_node
        float weight = pChunkMgr->GetOreValue(pos_x, pos_y, pos_z, "weight");
        pChunkMgr->SetOreValue(pos_x, pos_y, pos_z, "weight", 6.6);

        //Get the actual value of the float2 property of resource
        //Get the wuxing_metal value of the 0th resource of the ore instance at coordinates (pos_x, pos_y, pos_z).
        float wuxing_metal = pChunkMgr->GetOreResValue(pos_x, pos_y, pos_z, 0, "wuxing_metal");
        //Set the wuxing_metal value of the 0th resource of the ore instance at coordinates (pos_x, pos_y, pos_z) to 5.
        pChunkMgr->SetOreResValue(pos_x, pos_y, pos_z, 0, "wuxing_metal", 5);
        //Get the wuxing_metal value of the instance again to verify if the modification was done correctly.
        wuxing_metal = pChunkMgr->GetOreResValue(pos_x, pos_y, pos_z, 0, "wuxing_metal");
    }
}
Code Example 3
//Get all resource nodes used by the current planet
LVoxelTerrain* pCurVoxelTerrain = m_pCurrentVoxelTerrain;
if (pCurVoxelTerrain == nullptr)
{
    return;
}

LVoxelTerrainComponent* pCurVoxelTerComp = pCurVoxelTerrain->GetVoxelTerrainComponent();
if (pCurVoxelTerComp == nullptr)
{
    return;
}

IChunkManager* pChunkMgr = pCurVoxelTerComp->GetChunkManager();
if (pChunkMgr == nullptr)
{
    return;
}

TArrayPod<const char*, 8, TCoreAlloc> arrResNodeNames;
//Get the node_id properties of all used nodes and store them in arrResNodeNames. The node_id can be passed to the GetResNode interface to get the corresponding res_node.
pChunkMgr->CollectUsedResNode(arrResNodeNames);
Code Example 4
//Get the coordinates of the underground ore through the surface object, persistID is the surface object's id.
//If the code fails to get the coordinates (return false) then the visual object is not the surface object of the resource.
IEntity* ent = GetCore()->GetEntity(persistID);
if (ent == nullptr)
{
    return false;
}

IVarTable* var_table = ent->GetCustoms();
if (var_table == nullptr)
{
    return false;
}

if (!var_table->Exists("ore_position"))
{
    return false;
}

IVar* var = var_table->GetValue("ore_position");
result_string pos_str = var->StringVal();

CVarList positions;
string_utils::util_split_string(positions, pos_str.c_str(), ",");

if (positions.GetCount() < 3)
{
    return false;
}

int x = std::stof(positions.StringVal(0));
int y = std::stof(positions.StringVal(1));
int z = std::stof(positions.StringVal(2));