Planet Generation
Overview
This documentation introduces the related features of the planet generation and shows how to create it in the Flexi Engine.
Planet Data Structure
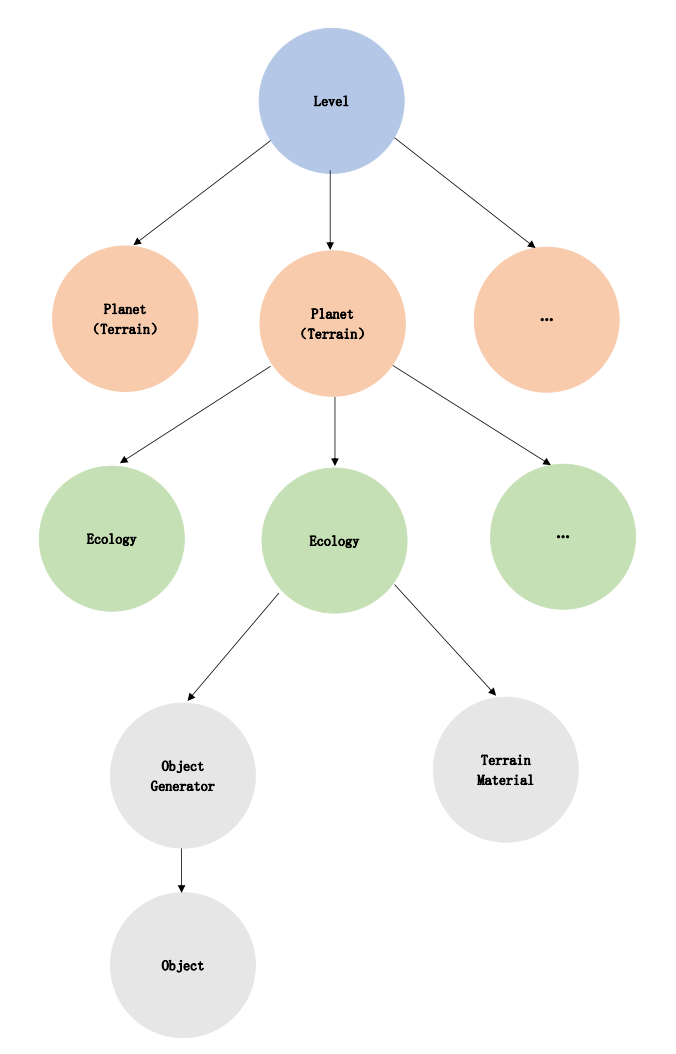
Generated planet data structure:
Planet Generation Tools
Five tools are included:
- Voxel Material
- Voxel Object
- Voxel Object Generator
- Voxel Ecology
- Voxel Terrain
Voxel Material
Creating Materials
Create surface materials for the planet with the Voxel Material tool.
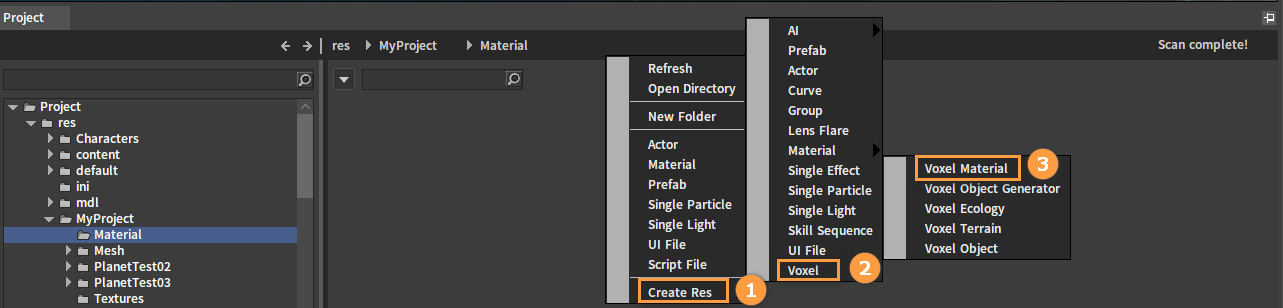
Right-click on the blank space of the Resource Preview window to open the Shortcut Menu. Click Create Res -> Voxel -> Voxel Material, and then enter a name in the pop-up window. Click OK to complete the creation of the Voxel Material file (.vmtl).

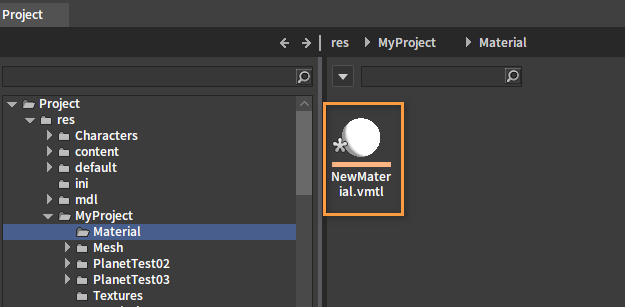
The created Voxel Material file:
Double-click the file to open its editing window.
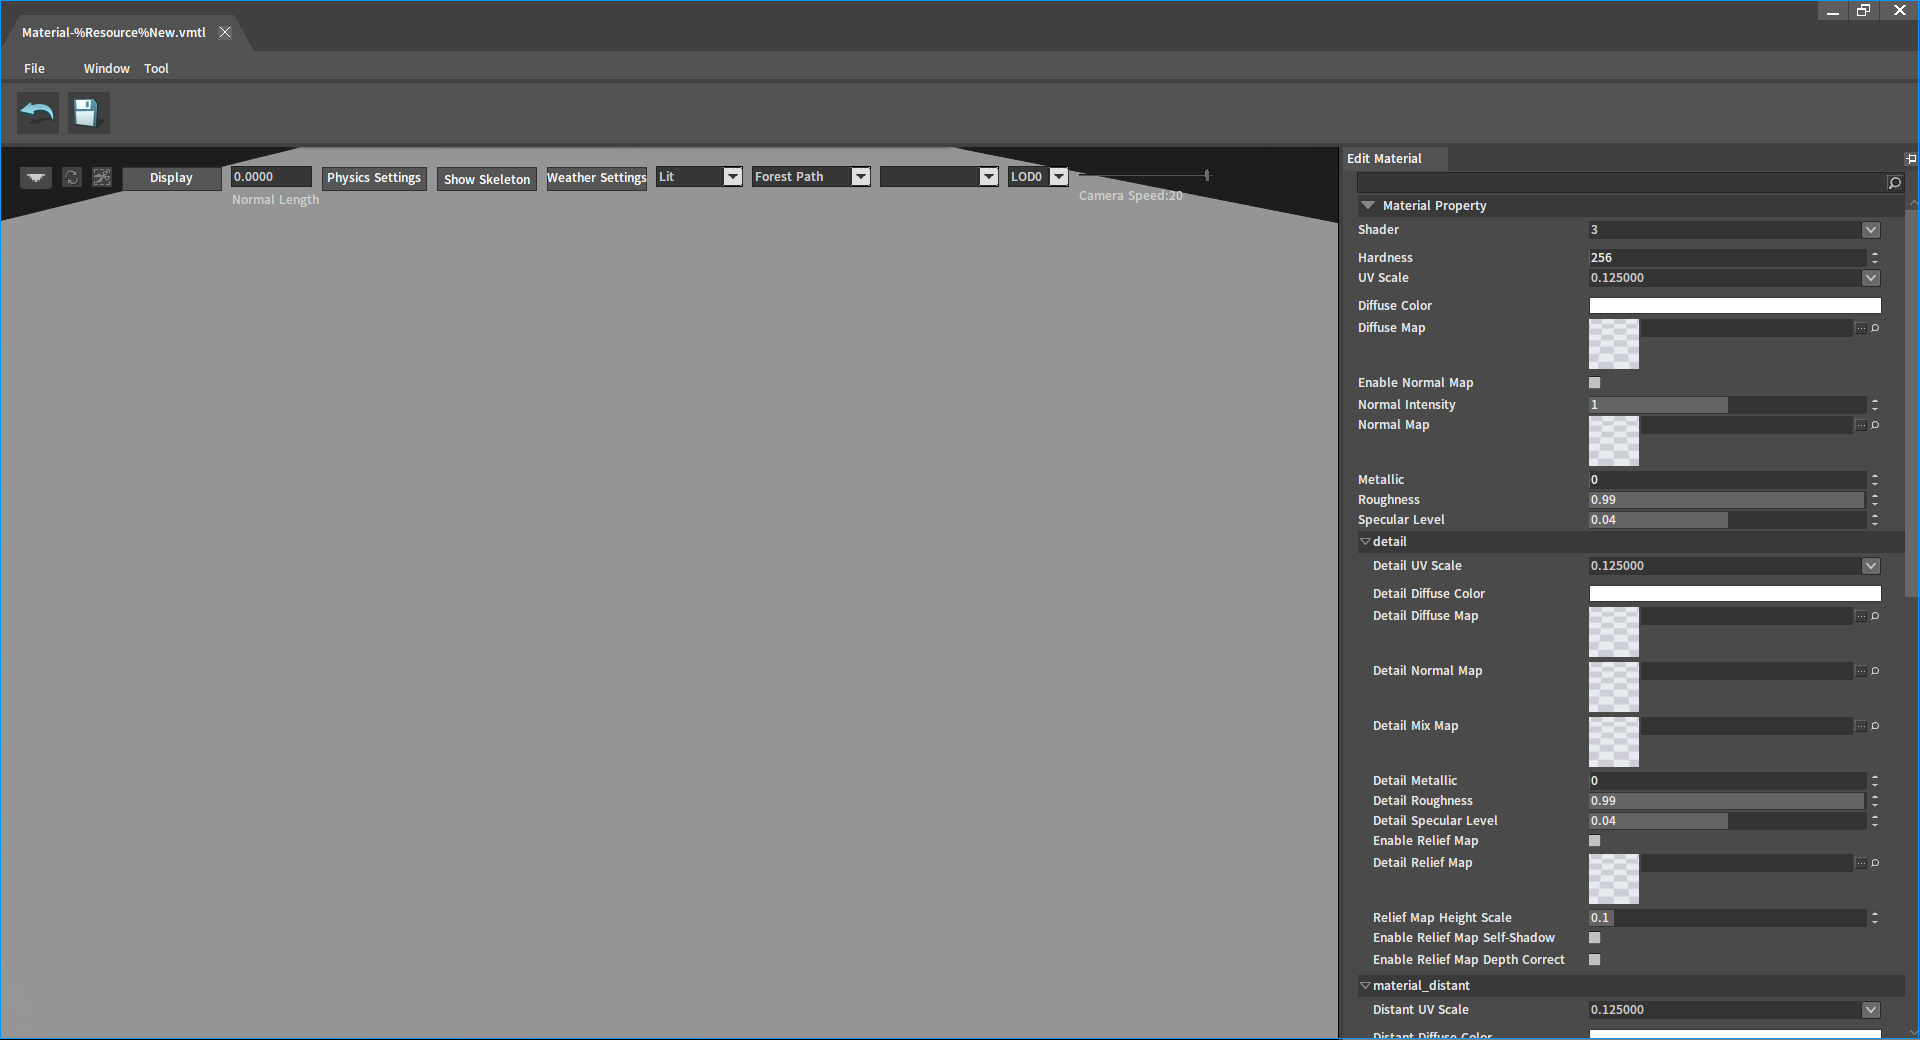
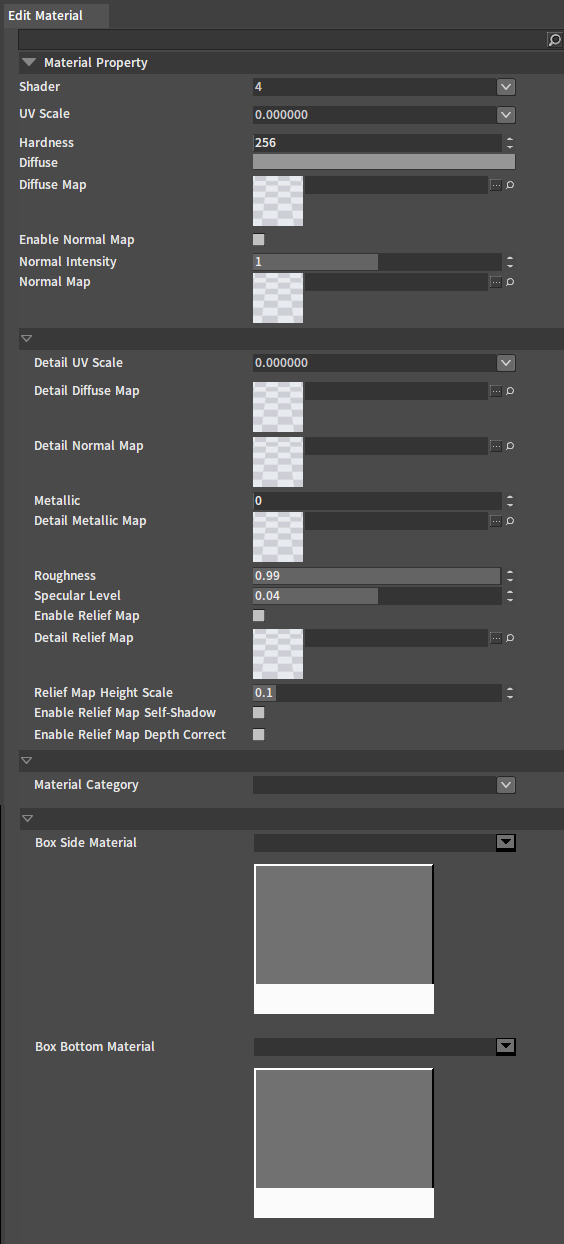
Material Properties
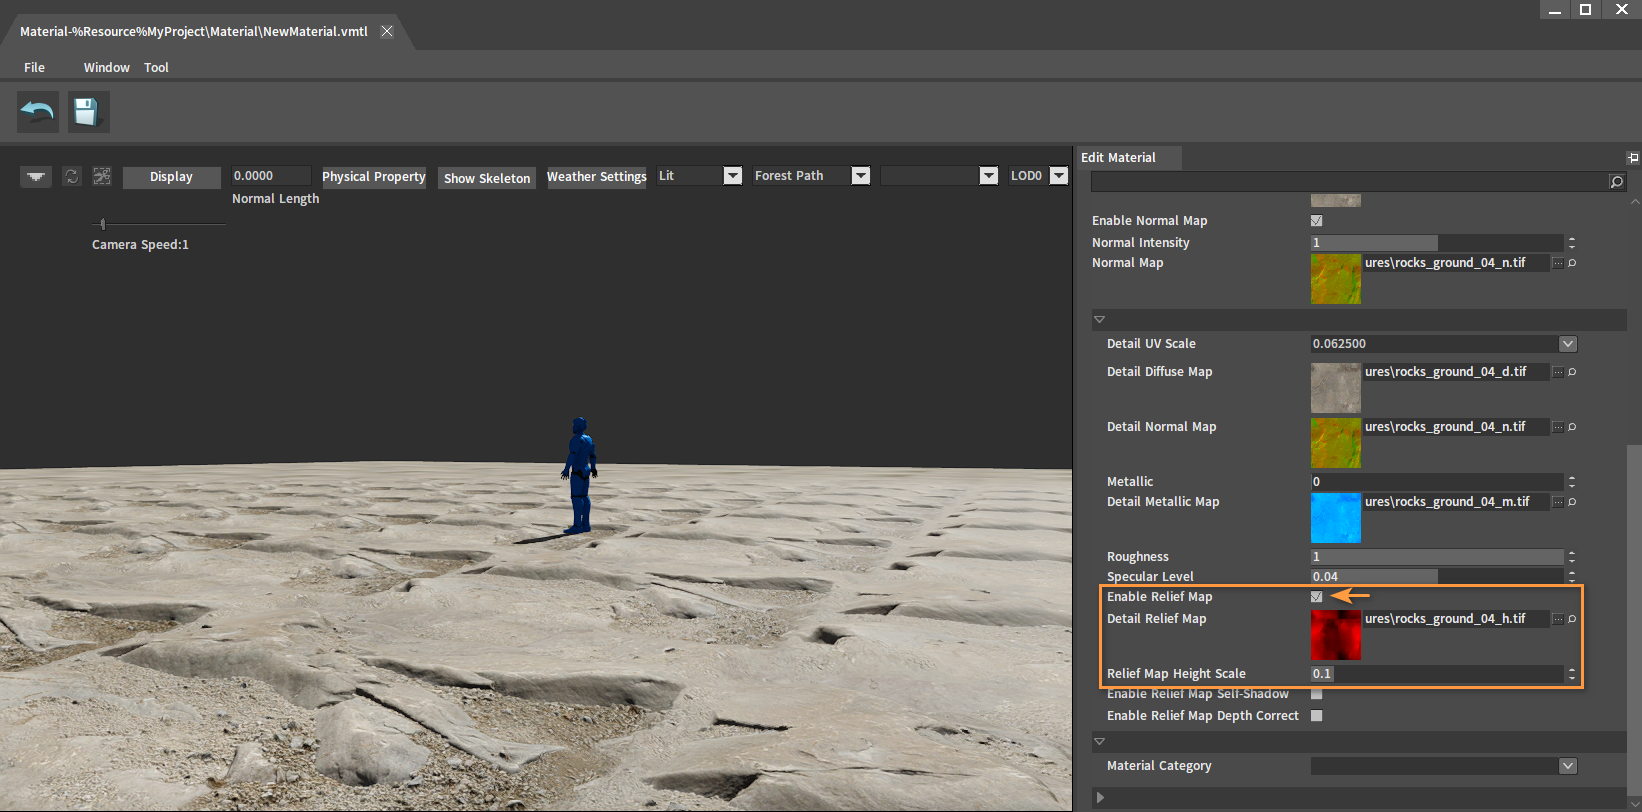
The related properties of the material can be edited in the Edit Material panel of the material editing window.
| Property | Description |
|---|---|
| Shader | The rendering level used by this material (The larger the value, the higher the rendering accuracy). |
| UV Scale | Equal scaled texture UV. |
| Hardness | The hardness of the material, which is related to the mining feature in the game. |
| Diffuse | Diffuse color. |
| Diffuse Map | The original color and reflection information of the material surface. |
| Enable Normal Map | Enable normal maps. |
| Normal Intensity | Texture details of the material (The larger the value, the higher the LODs). |
| Normal Map | The map created by the high poly model, which is used to present more level details of surface bump on the bottom mold. |
| Detail UV Scale | Control the size scaling of close detailed material UVs. |
| Detail Diffuse Map | The original color and reflection information of the close detailed material surface. |
| Detail Normal Map | The map created by high poly model, which is used to present more level details of surface bump in the close detailed bottom mold. |
| Metallic | Specular reflection and diffuse reflection light ratio with the value range from 0-1. The closer the value is to 1, the more similar it is to metal. |
| Detail Metallic Map | Blend map that affects close detailed Metallic, Roughness and Specular. |
| Roughness | The roughness of the material surface with the value range from 0-1. The smaller the value, the more obvious the diffuse reflection of the material, and the smoother the surface. |
| Specular Level | Specular intensity (The higher the value, the more obvious the light reflected by the material). |
| Enable Relief Map | Enable relief map. |
| Detail Relief Map | The map with height information in the channel, which defines the height of the model surface in pixels. |
| Relief Map Height Scale | The larger the value, the greater the height change. |
| Enable Relief Map Self-Shadow | The shadow produced by generating height after enabling the relief map in the scene of the level. |
| Enable Relief Map Depth Correct | Enable depth correction for relief maps in the scene of the level. |
| Material Category | Material category. |
| Box Side Material | The side material of the box voxel. |
| Box Bottom Material | The bottom material of the box voxel. |
Editing Materials
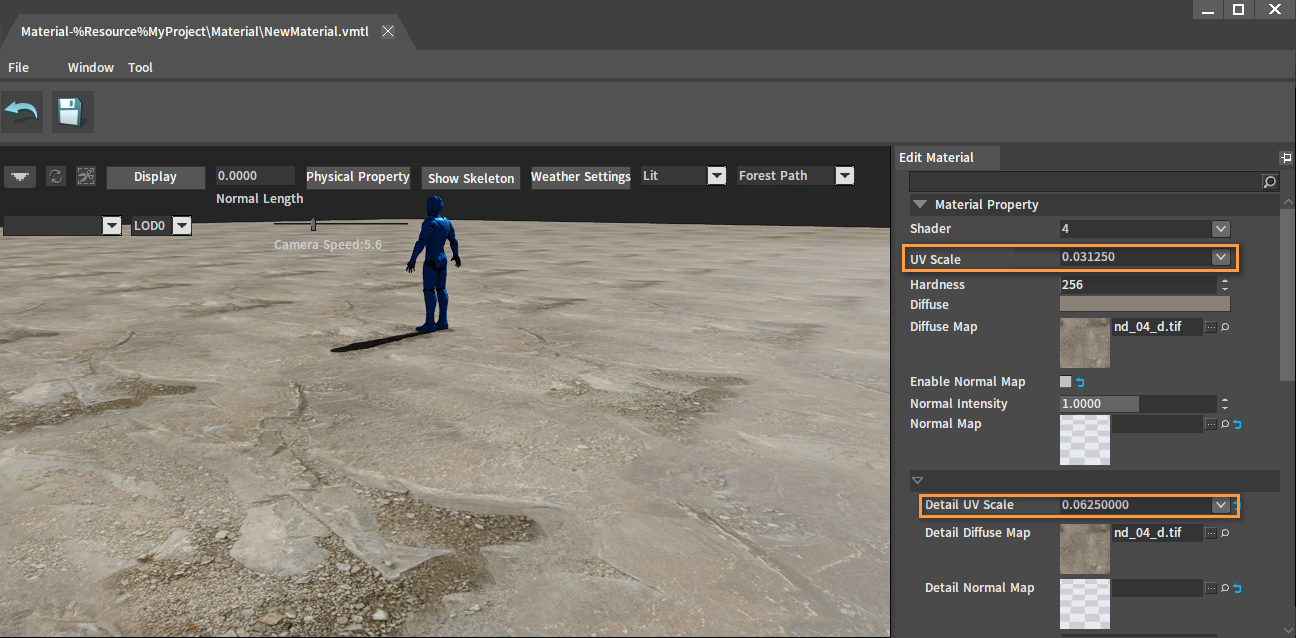
Drag the map file (.tif/.dds/.basis/.png/.veco/.ico) from the Project panel into the Diffuse Map slot in the Edit Material panel.
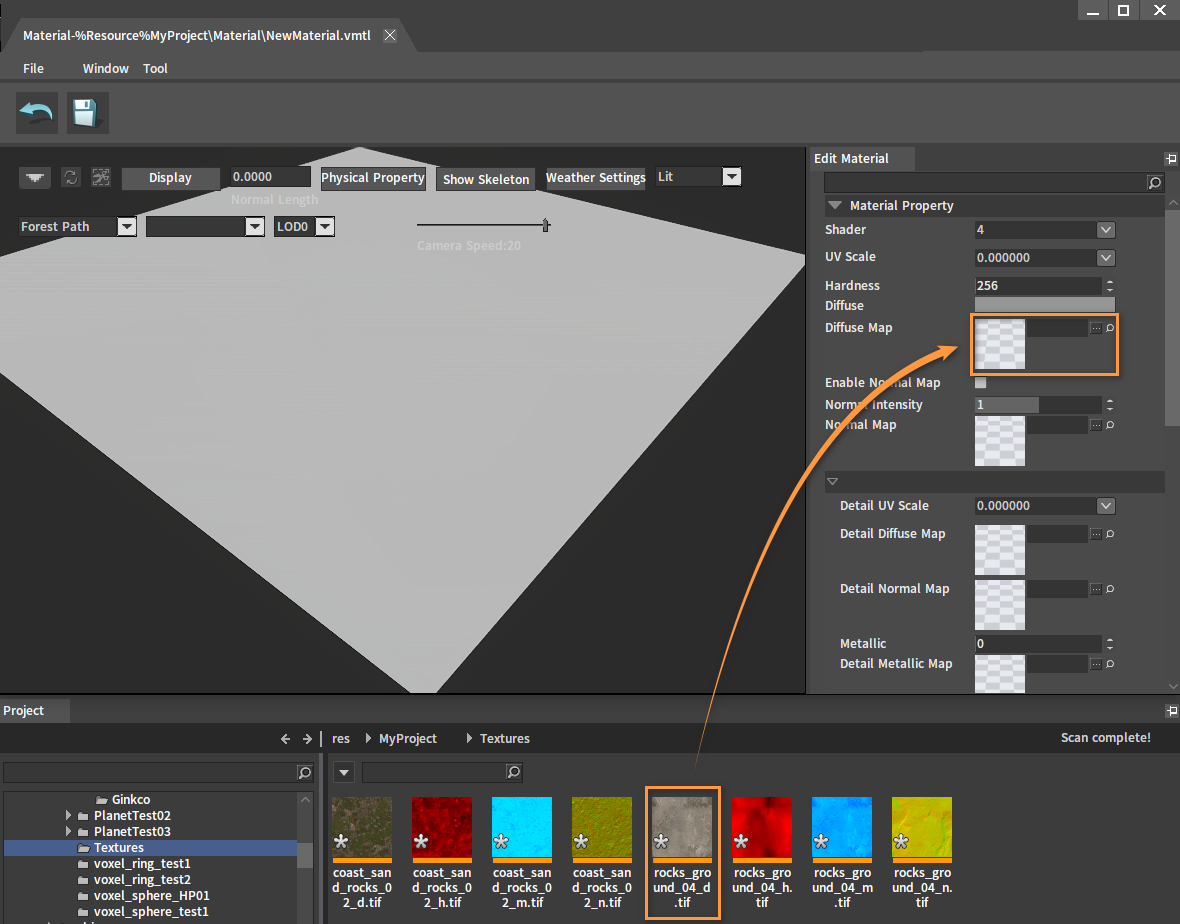
Continue to add Detail Diffuse Map in the same way as above.
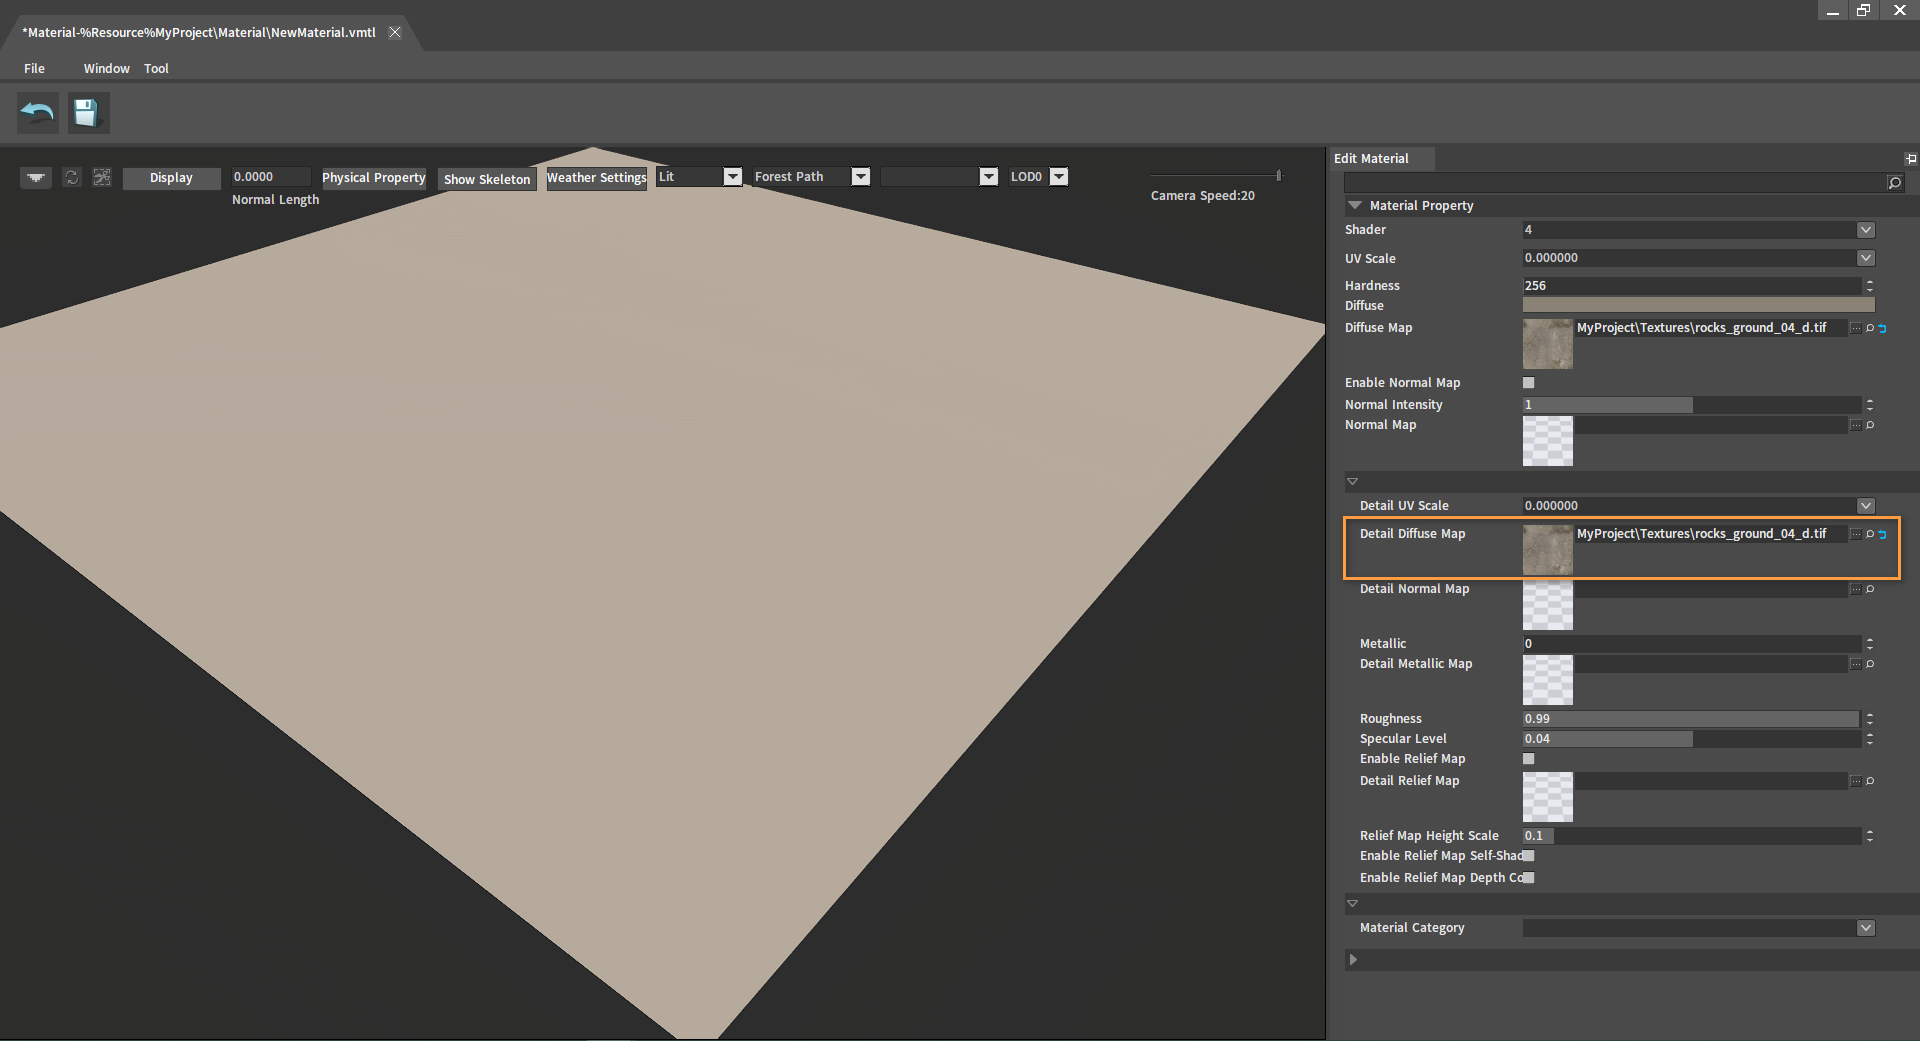
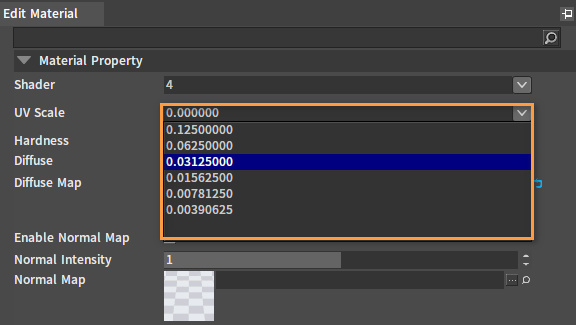
Modify the UV Scale and Detail UV Scale values. Choose the value that has been set in the drop-down box, or enter the value manually.
Note: The value of UV Scale cannot exceed 1. The calculation method of planet UV is different from that of object UV. The calculation methods of planet material UV are 1/8, 1/16, 1/64, 1/128, 1/256. These UV Scale values can be quickly selected in the drop-down box.
The effect is as shown below:
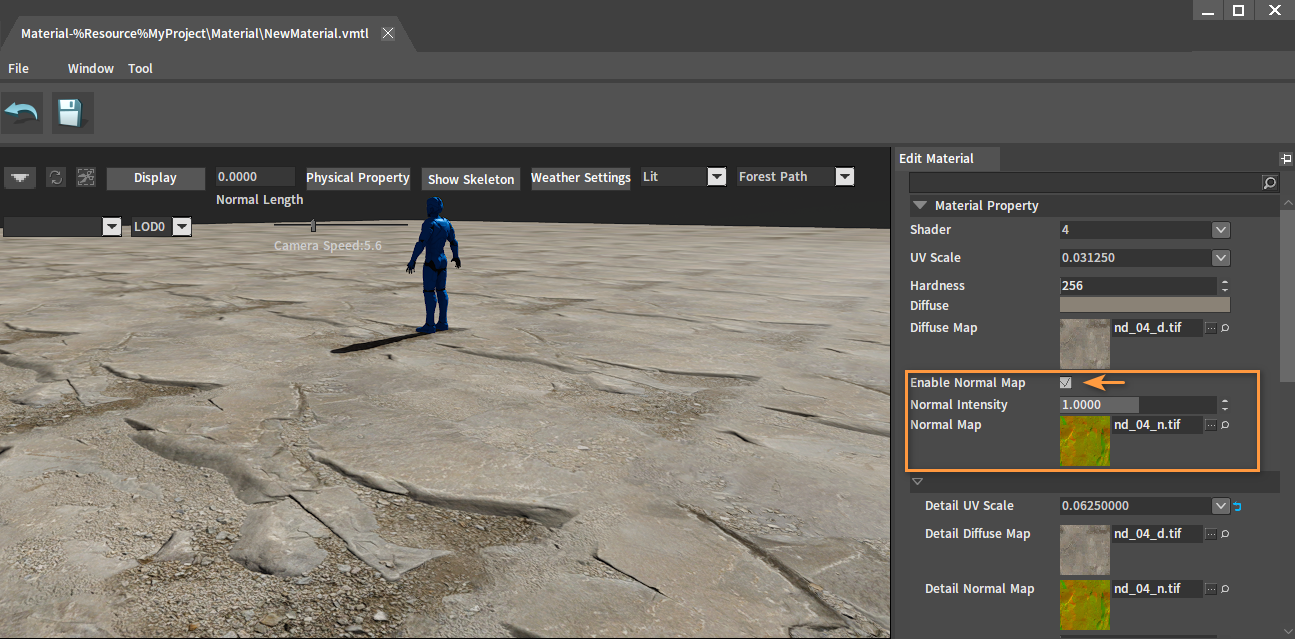
Add a bump effect. Add a Normal Map in the same way as adding a Diffuse Map, and then check Enable Normal Map.
Add a Detail Metallic Map. Adjust the Metallic and Roughness values to change the metallicity and smoothness of the surface material.
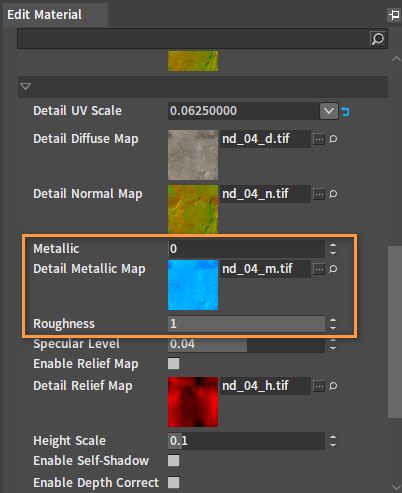
Add bump details. Add a Detail Relief Map in the same way as adding a Diffuse Map, and then check Enable Relief Map. Adjusting the value of the Relief Map Height Scale can change the relief intensity.
Click the  button to save the currently edited material.
Voxel Object
The Voxel Object can be used when creating the Voxel Object Generator, and the created Voxel Objects will be automatically saved in the Object Library. Currently, the Flexi Engine provides two ways to create voxel objects.
Converting XMOD Files to Voxel Object Files
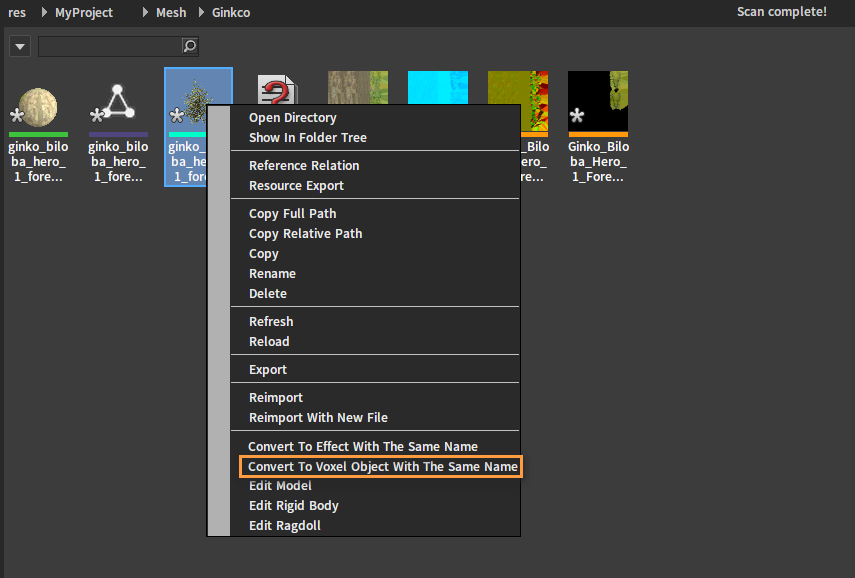
Find the XMOD file in the Project panel, right-click it to open the Shortcut Menu, then select Convert To Voxel Object With The Same Name, and a Voxel Object file (.vobj) will be generated.
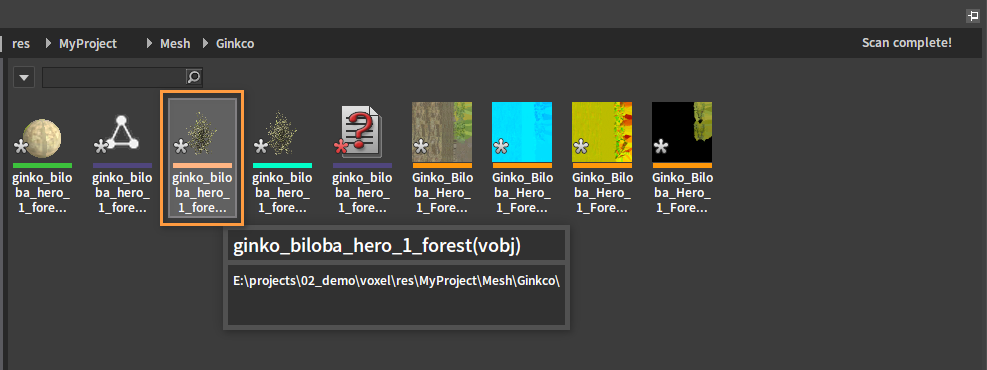
Double-click the Voxel Object file (.vobj) to open its editing window.
Creating Objects
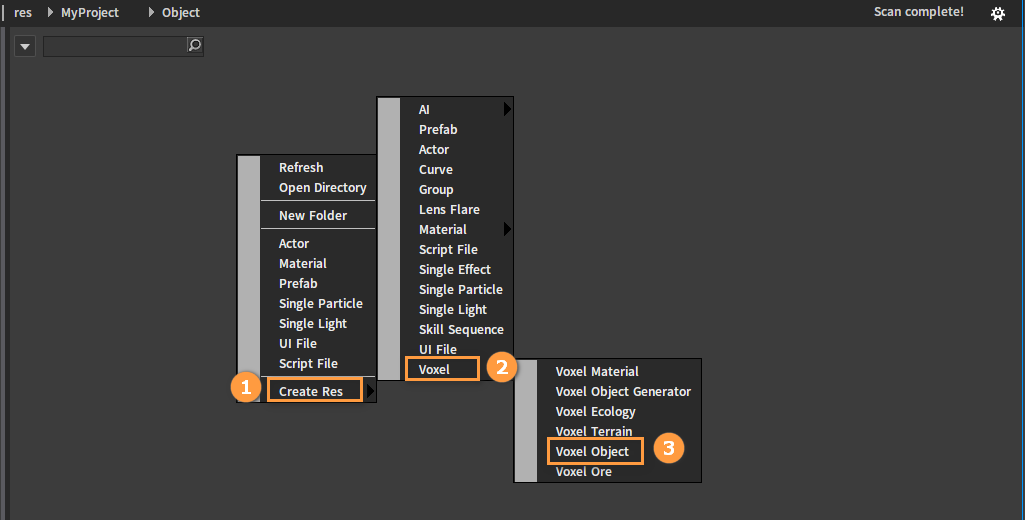
Objects can also be created directly in the Resource Preview window. Right-click on the blank space here to open the Shortcut Menu. Click Create Res -> Voxel -> Voxel Object, and then enter a name in the pop-up window. Click OK to complete the creation of the Voxel Object file (.vobj).

After creation:

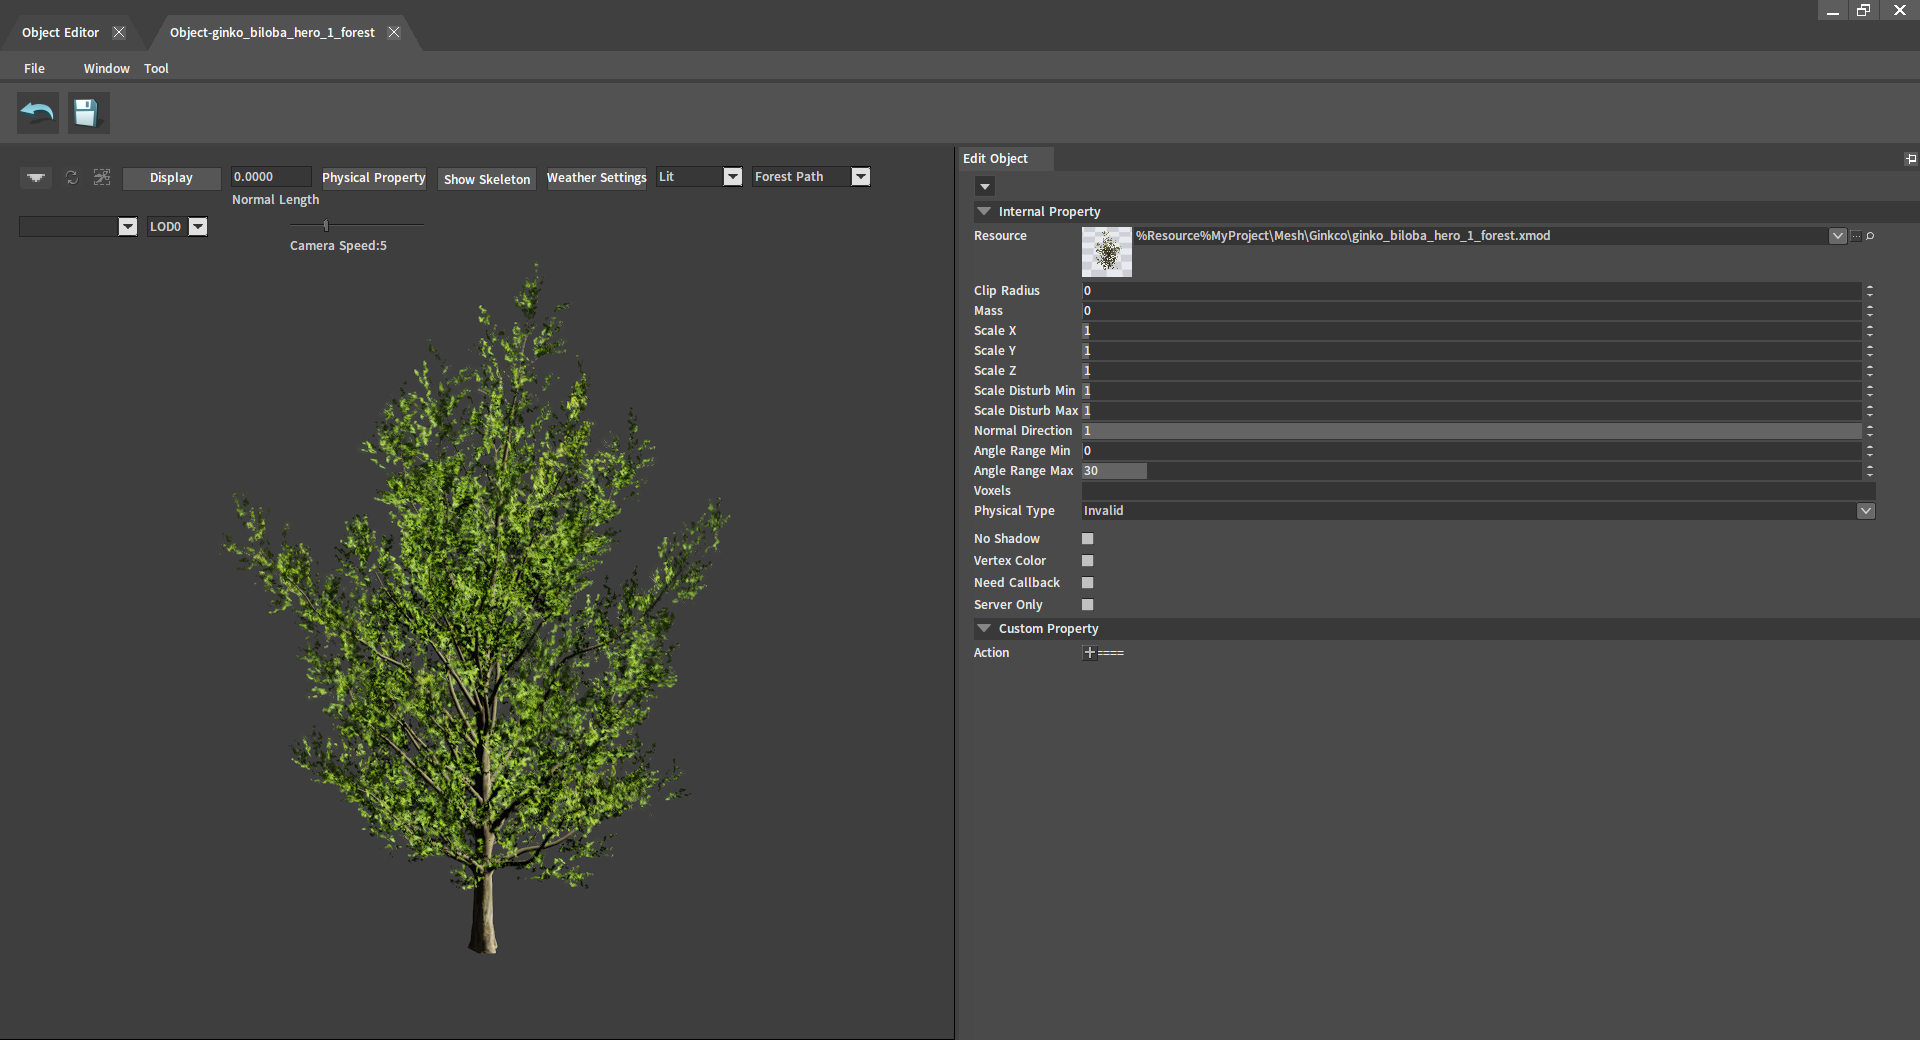
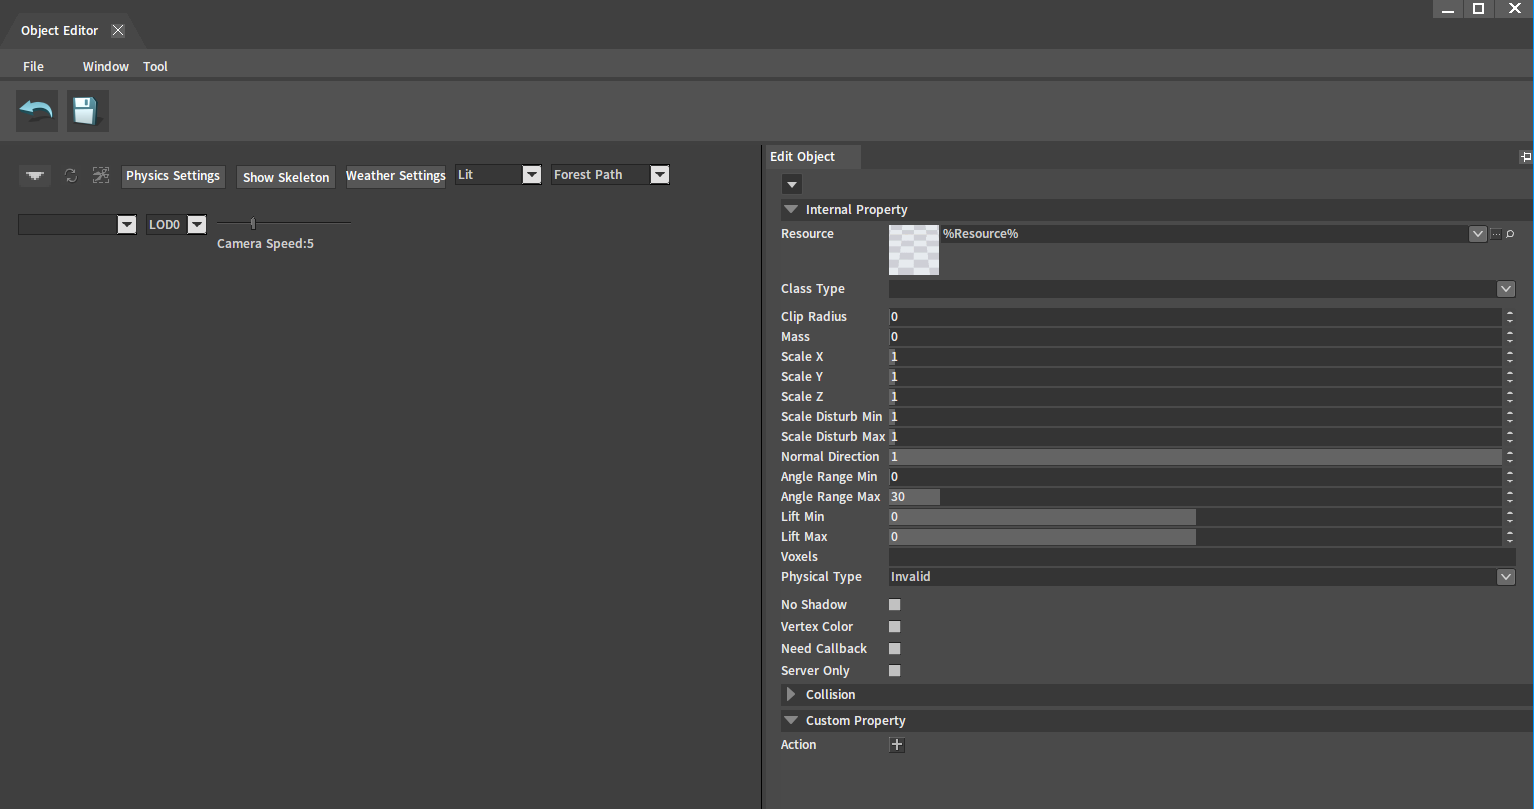
Double-click the Voxel Object file to open the Object Editor.
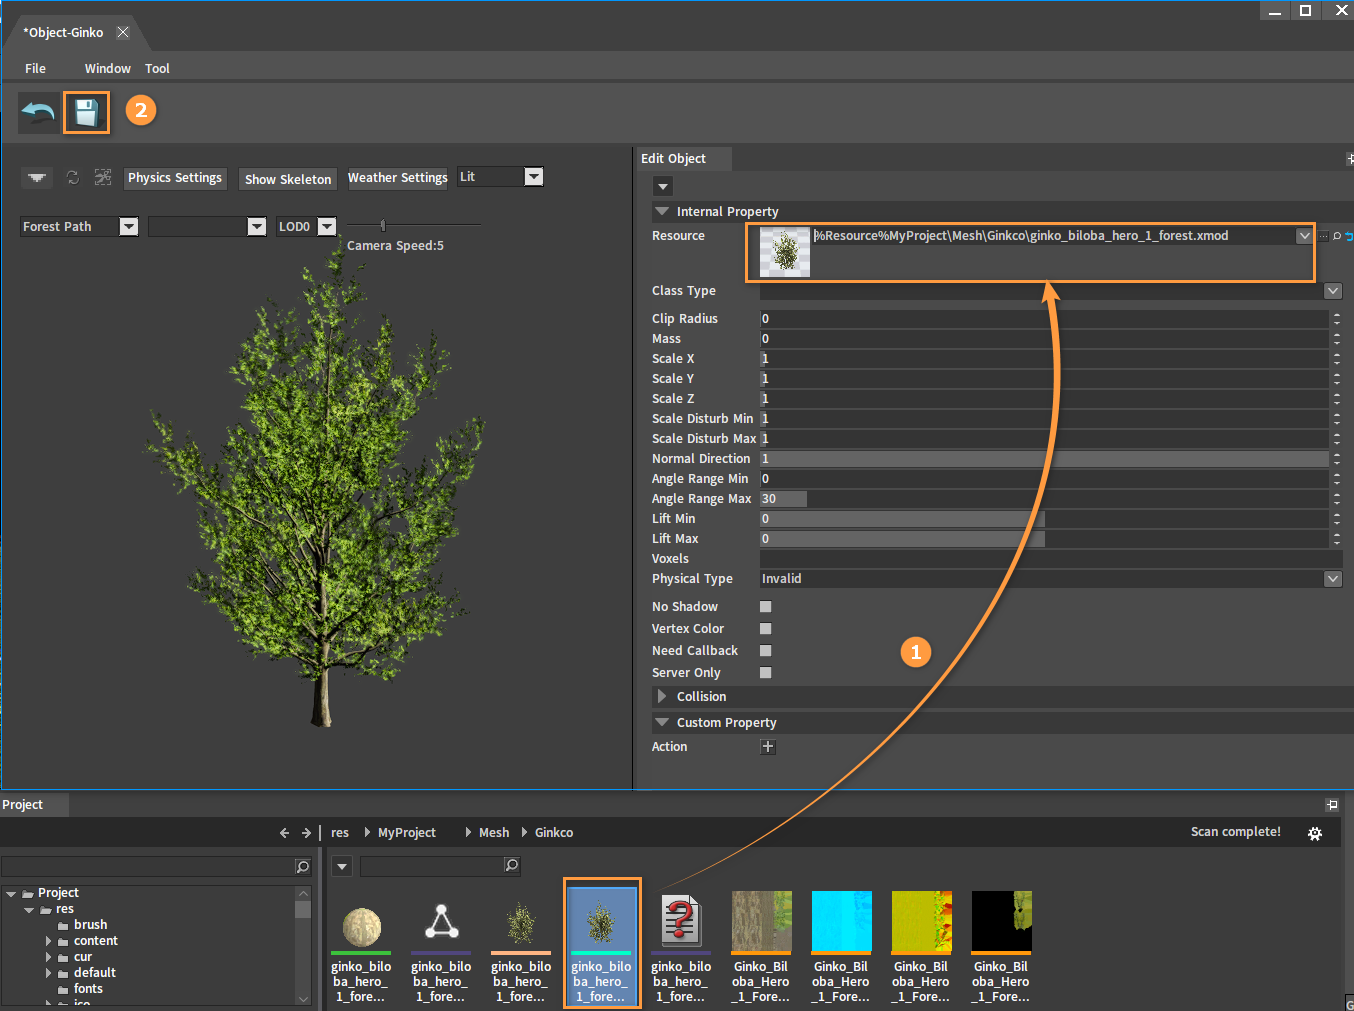
Drag the .xmod file from the Project panel to the Resource slot of the Object Editor and click Save to finish the creation.
Editing Tags
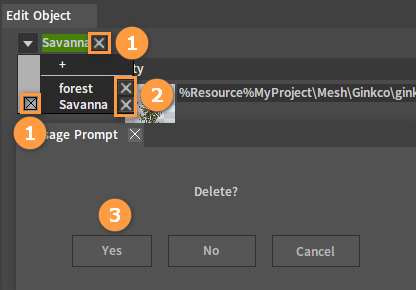
In the Edit Object panel of the Voxel Object editing window, click the ![]() button to select a tag or click the "+" button to add a new tag to assign to the object. With the tag, you can subsequently filter all the objects under the tag in the Object Library.
button to select a tag or click the "+" button to add a new tag to assign to the object. With the tag, you can subsequently filter all the objects under the tag in the Object Library.
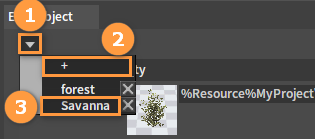
Tag related operations:
| No. | Description |
|---|---|
| 1 | Cancel the tag. |
| 2 | Delete the tag. |
| 3 | Confirm to delete the tag. |
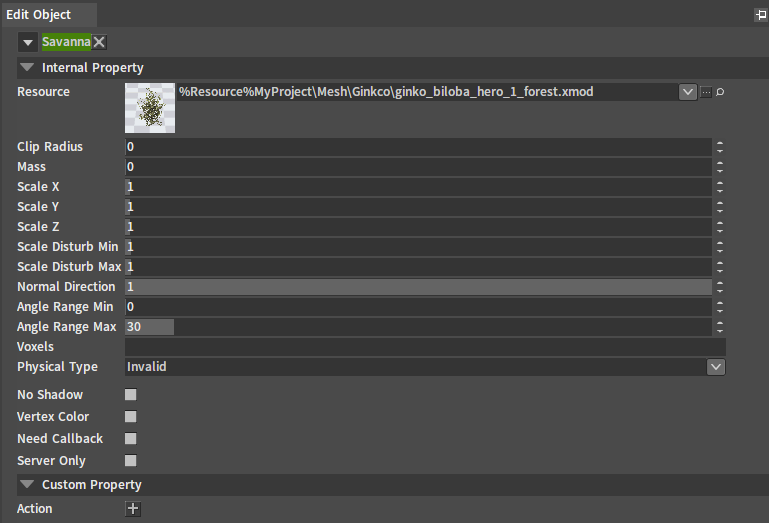
Object Properties
| Setting Item | Property | Description |
|---|---|---|
| Internal Property | Resource | Select the resource. |
| Clip Radius | Clip radius. | |
| Mass | Mass. | |
| Scale X | Scaling in the X-axis direction. | |
| Scale Y | Scaling in the Y-axis direction. | |
| Scale Z | Scaling in the Z-axis direction. | |
| Scale Disturb Min | The threshold for minimum volume change of the object after random generation. | |
| Scale Disturb MAX | The threshold for maximum volume change of the object after random generation. | |
| Normal Direction | Determine the extent to which the model grows along the normal direction of the ground at its location. | |
| Angle Range Min | The threshold for the minimum angle change of the object after random generation. | |
| Angle Range Max | The threshold for the maximum angle change of the object after random generation. | |
| Voxels | Voxel occupancy point. | |
| Physics Type | Select the physics type of the object. | |
| No Shadow | Cancel the display of the object's shadow effect. | |
| Vertex Color | Vertex color. | |
| Need Callback | Whether to receive callbacks or not. Used to implement logic features such as creating NPC triggers. | |
| Server Only | Only read by the Server. Used to implement Server logic features. | |
| Custom Property | Action | Add custom properties about the action to the data block. |
Voxel Object Generator
Creating Object Generators
Add objects (such as foliage) whose distribution can be customized to the planet with the Voxel Object Generator tool.
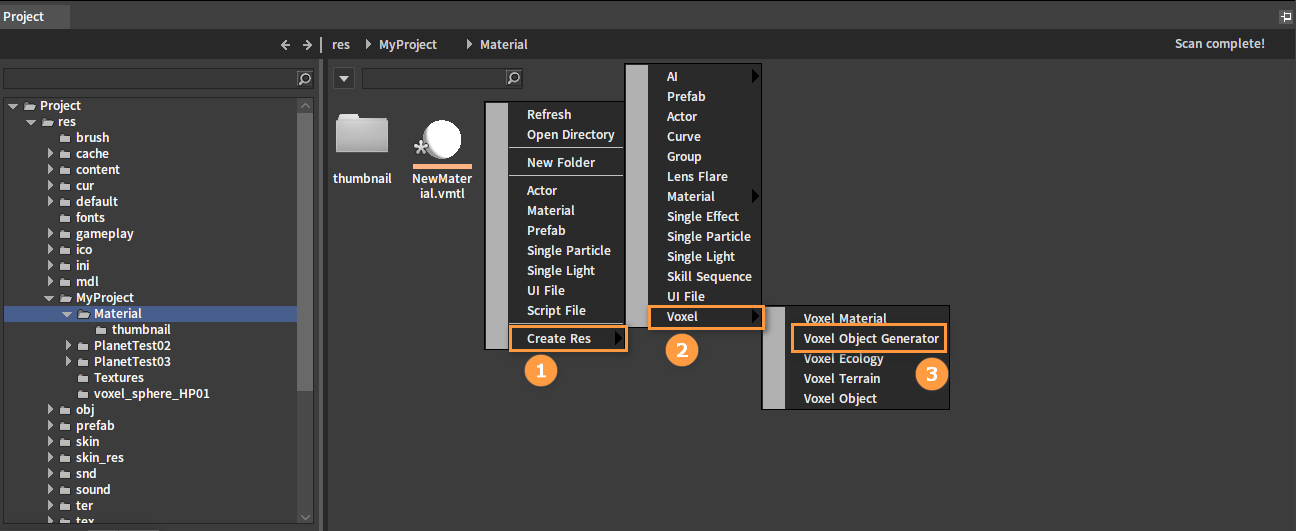
Right-click on the blank space of the Resource Preview window to open the Shortcut Menu. Click Create Res -> Voxel -> Voxel Object Generator, and then enter a name in the pop-up window. Click OK to complete the creation of the Voxel Object Generator file (.vog).
Note: If the name of the created Voxel Object Generator is the same name as that of the Voxel Material, and both are in the same directory, the objects in the Object Generator will be automatically generated on the surface material.

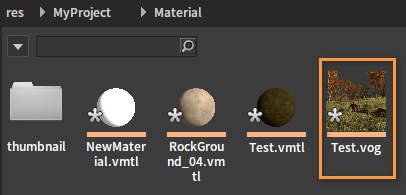
The created Voxel Object Generator file:
Double-click the file to open its editing window.
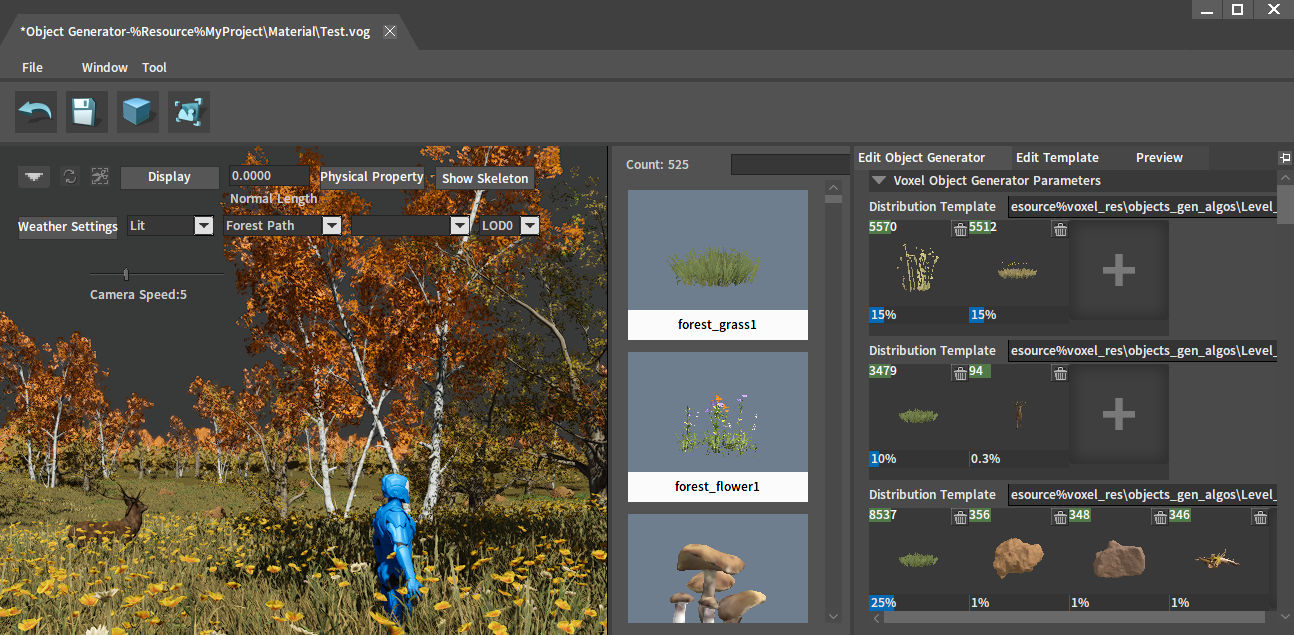
Editing Object Generators
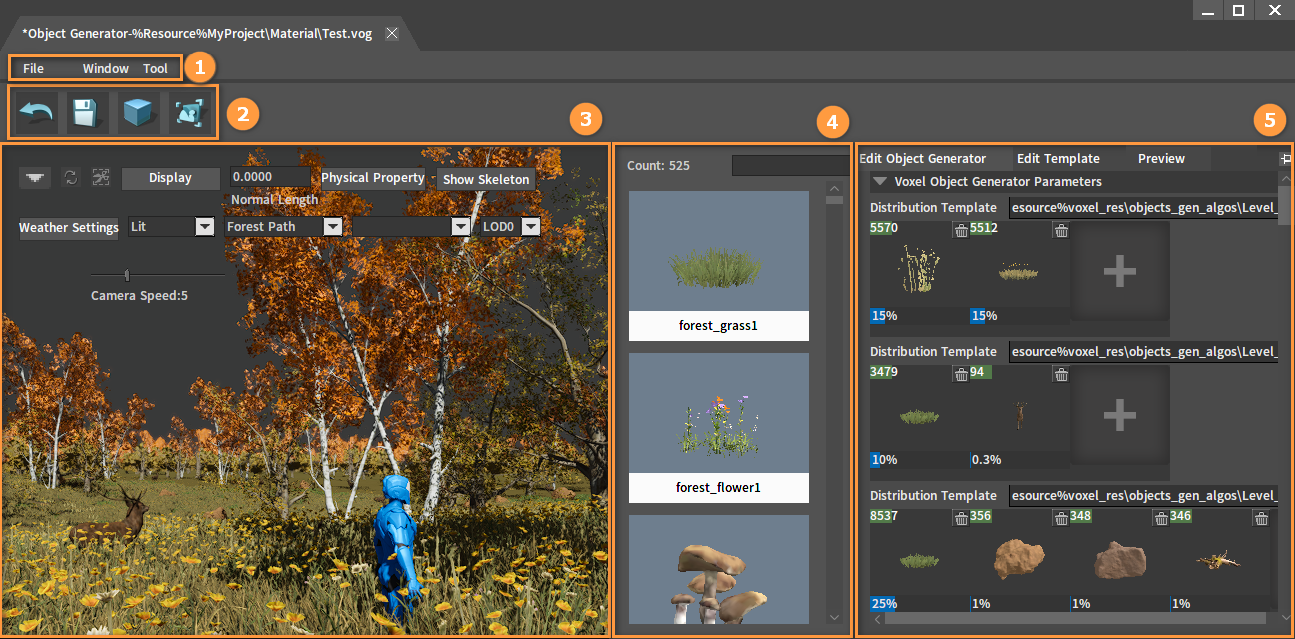
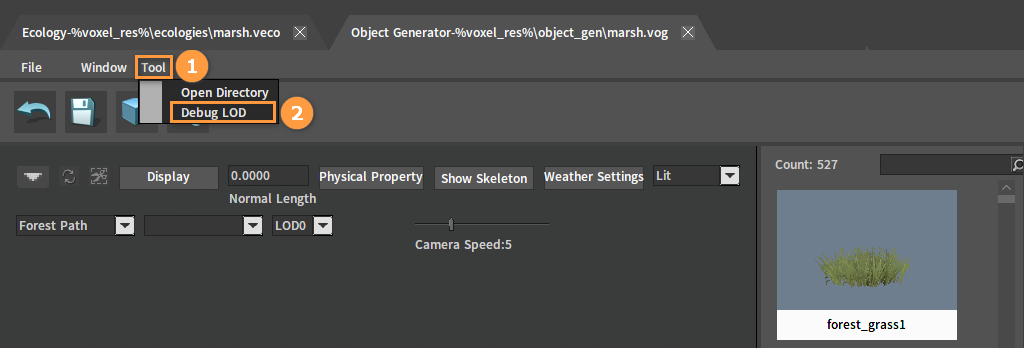
| No. | Name | Description |
|---|---|---|
| 1 | Menu Bar | Provide features including Save, Layout, Open Directory and Debug LOD. |
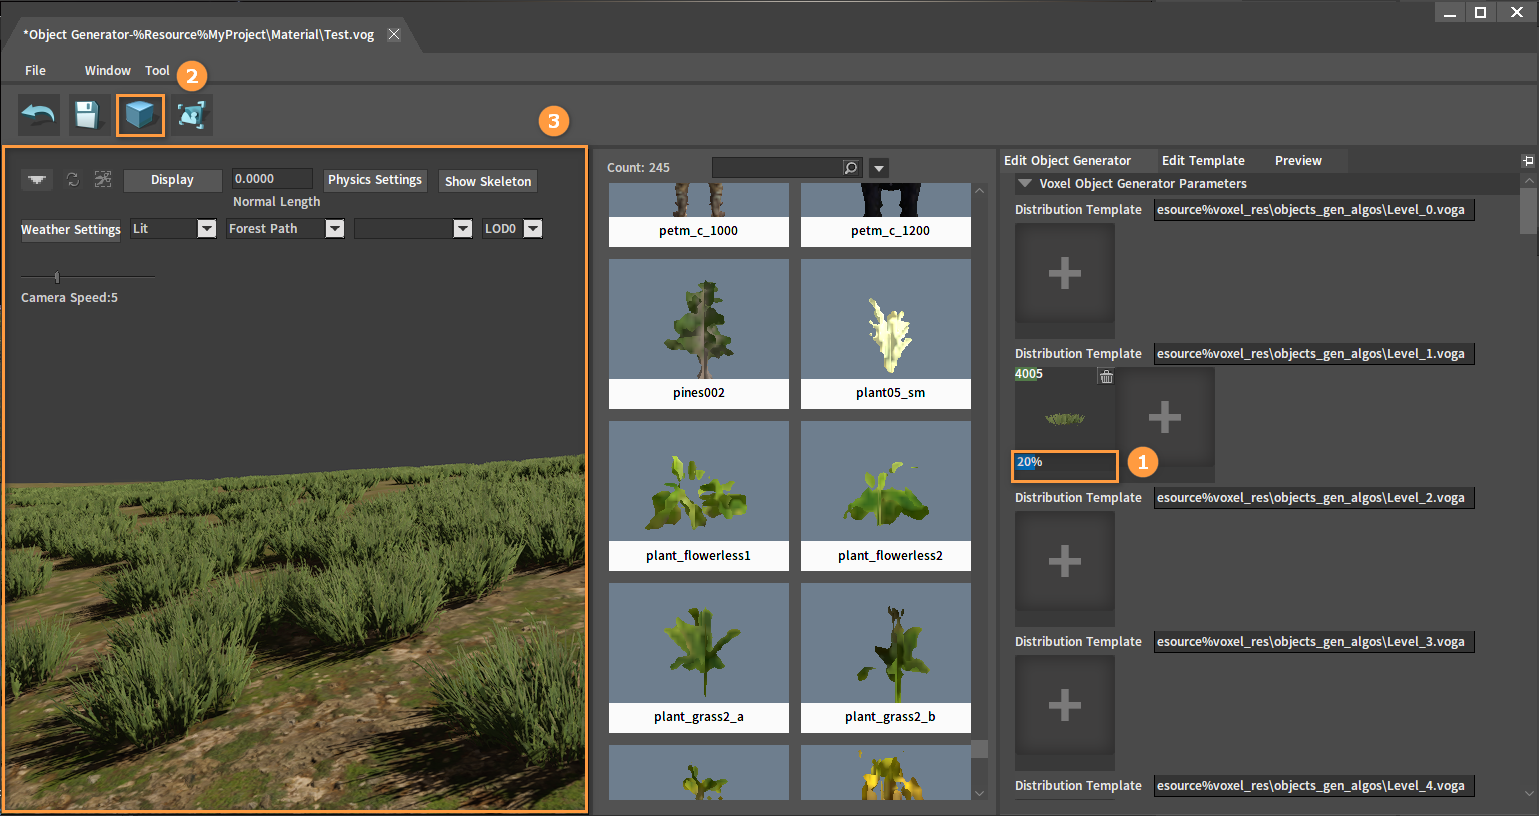
| 2 | Tool Bar | Used to return to the main window of the Object Generator, save and generate object generators, and generate thumbnails of the object generator files. |
| 3 | Preview Window | Used to view the effect of object generation distribution. |
| 4 | Object Library | Used to select objects to be added from the Object Library. |
| 5 | Edit Object Generator Panel Edit Template Panel | Used to add objects in different Distribution Templates and set their distribution ratios. Used to control the density and LODs of the generated objects. |
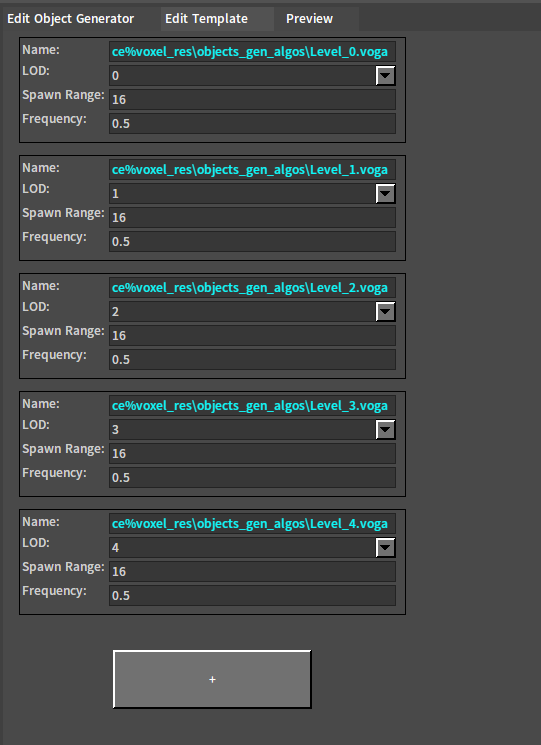
Edit Template Panel
There are five editable default Distribution Templates provided initially by the Engine. New templates can continue to be added.
Click the  button to add new templates and set the related properties in the pop-up window. Then click OK to complete.
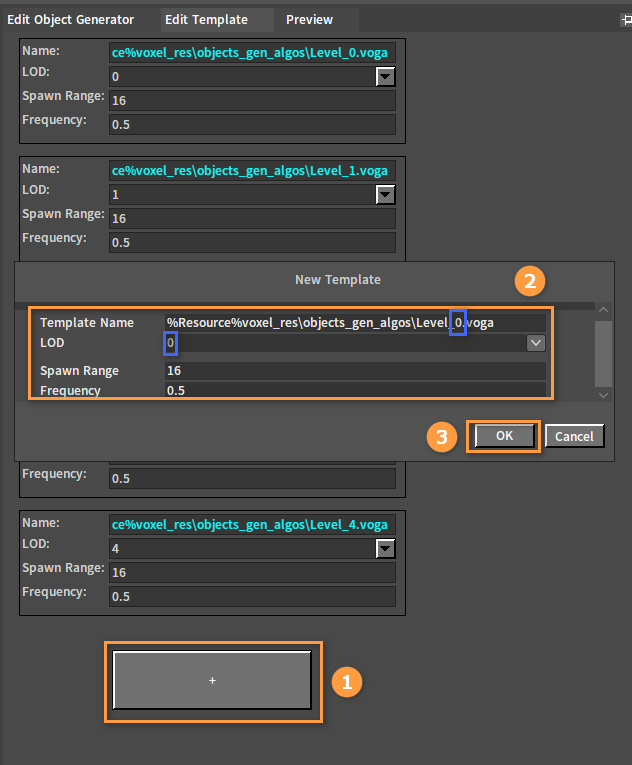
Template properties:
| Property | Description |
|---|---|
| Template Name | Name of the template. |
| LOD | The maximum range level randomly generated by the mesh (The number at the end of the name should be consistent with the LOD level). |
| Spawn Range | Spawn range of the Distribution Template. |
| Frequency | Spawn frequency. |
Click Tool -> Debug LOD to view the LOD distribution.
The LOD distribution effect is as shown below:
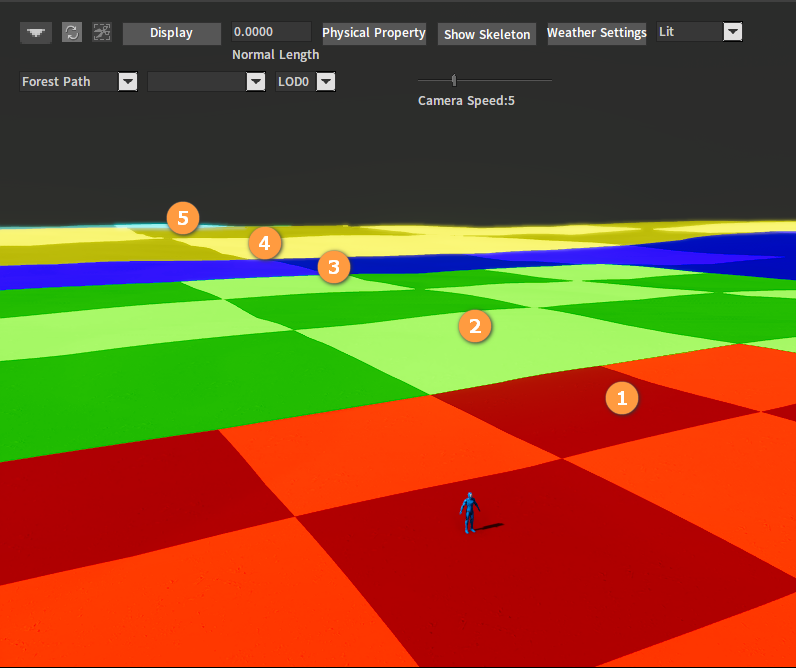
| No. | Description |
|---|---|
| 1 | LOD0 |
| 2 | LOD1 |
| 3 | LOD2 |
| 4 | LOD3 |
| 5 | LOD4 |
The Display Range and Area Ratio of LOD are as follows:

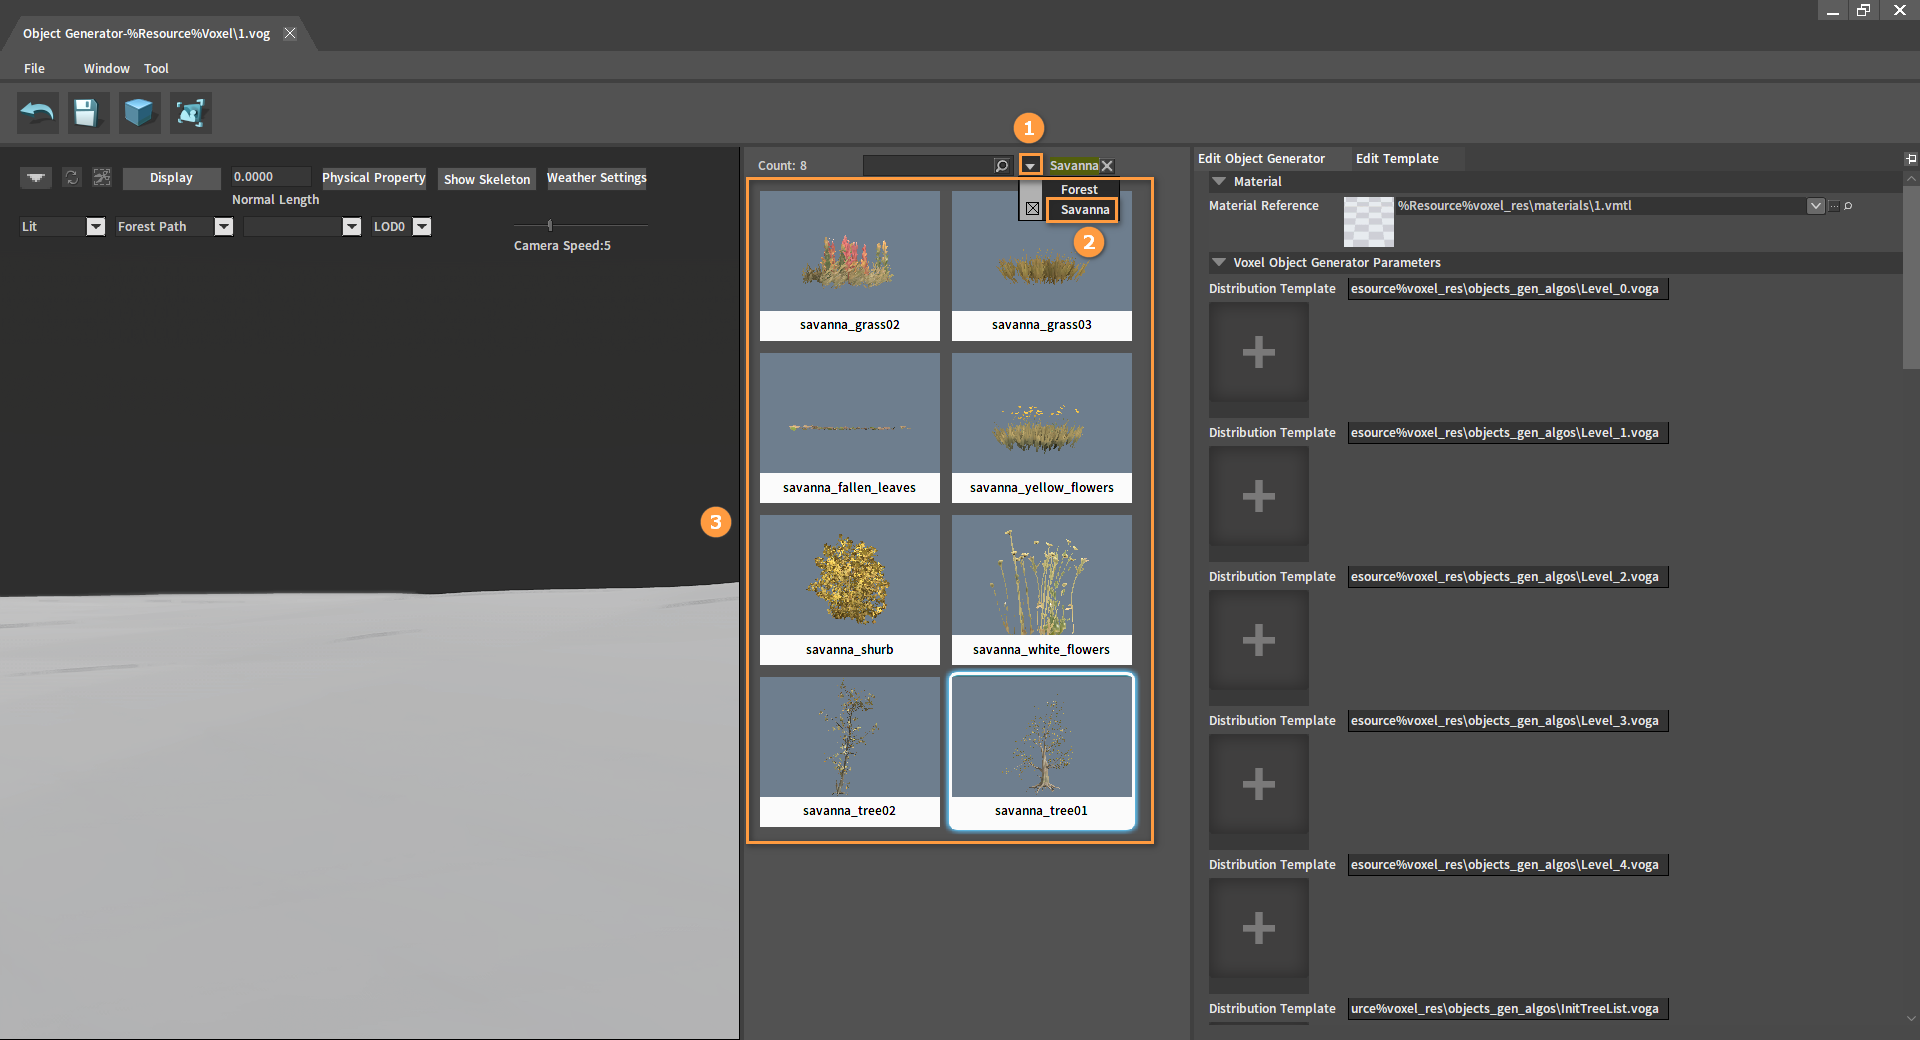
Filtering Objects
Objects can also be filtered according to tags in the Object Library of the Object Generator. Click the ![]() button to select a tag to filter all the objects under the tag in the Object Library, so that you can find the desired object and add it later.
button to select a tag to filter all the objects under the tag in the Object Library, so that you can find the desired object and add it later.
Object Generation
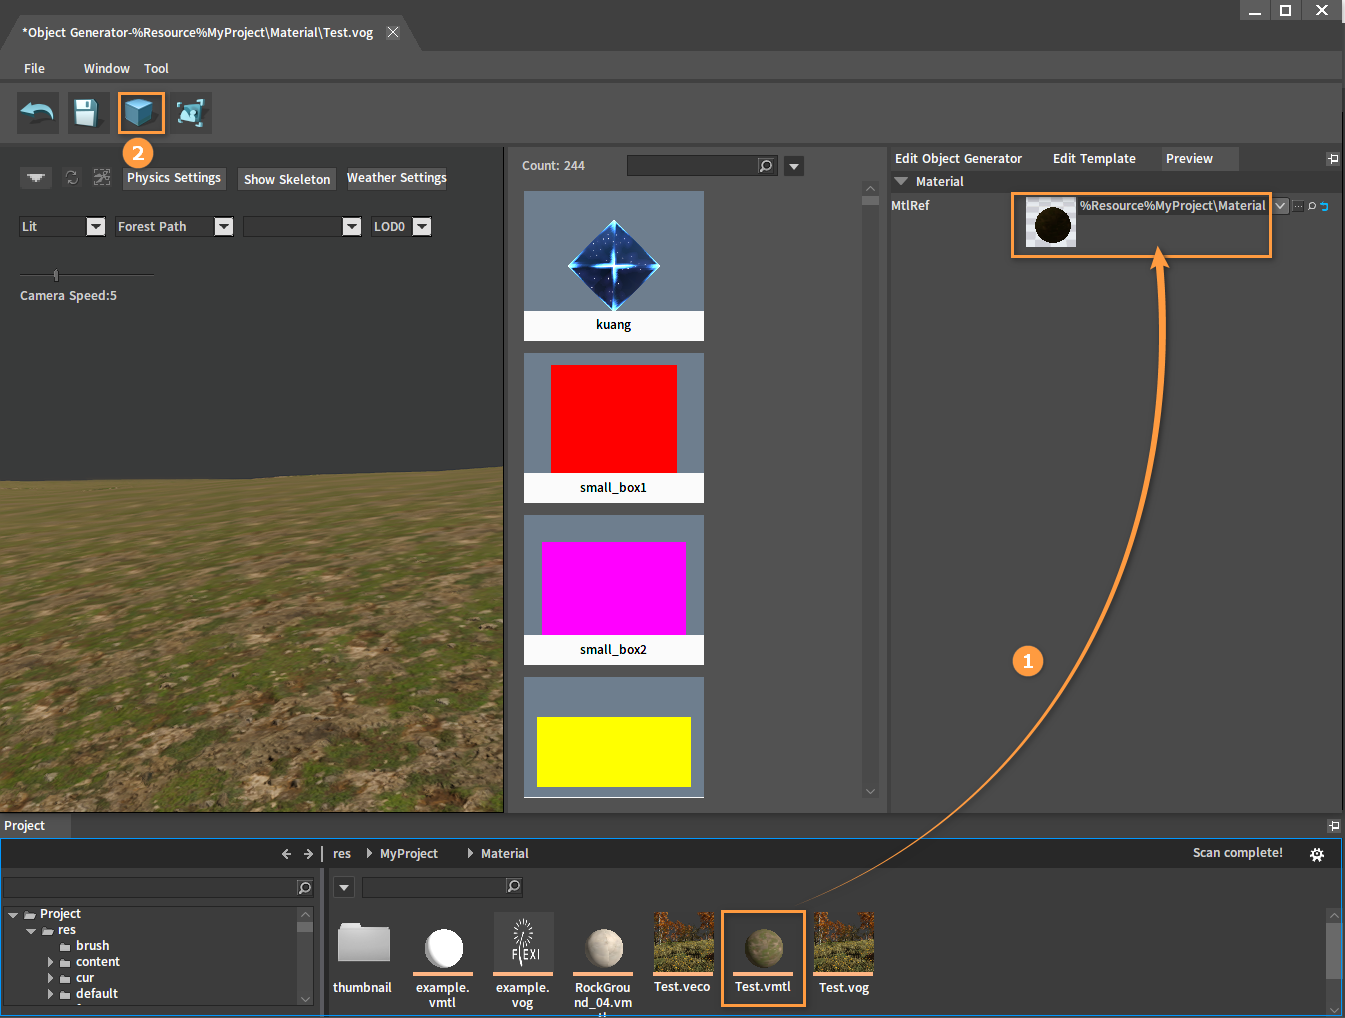
Drag the Voxel Material into the MtlRef in the Preview panel from the Project panel. Click the Generate button to assign the surface material. This material is only for effect reference and has no effect on the object generator itself.
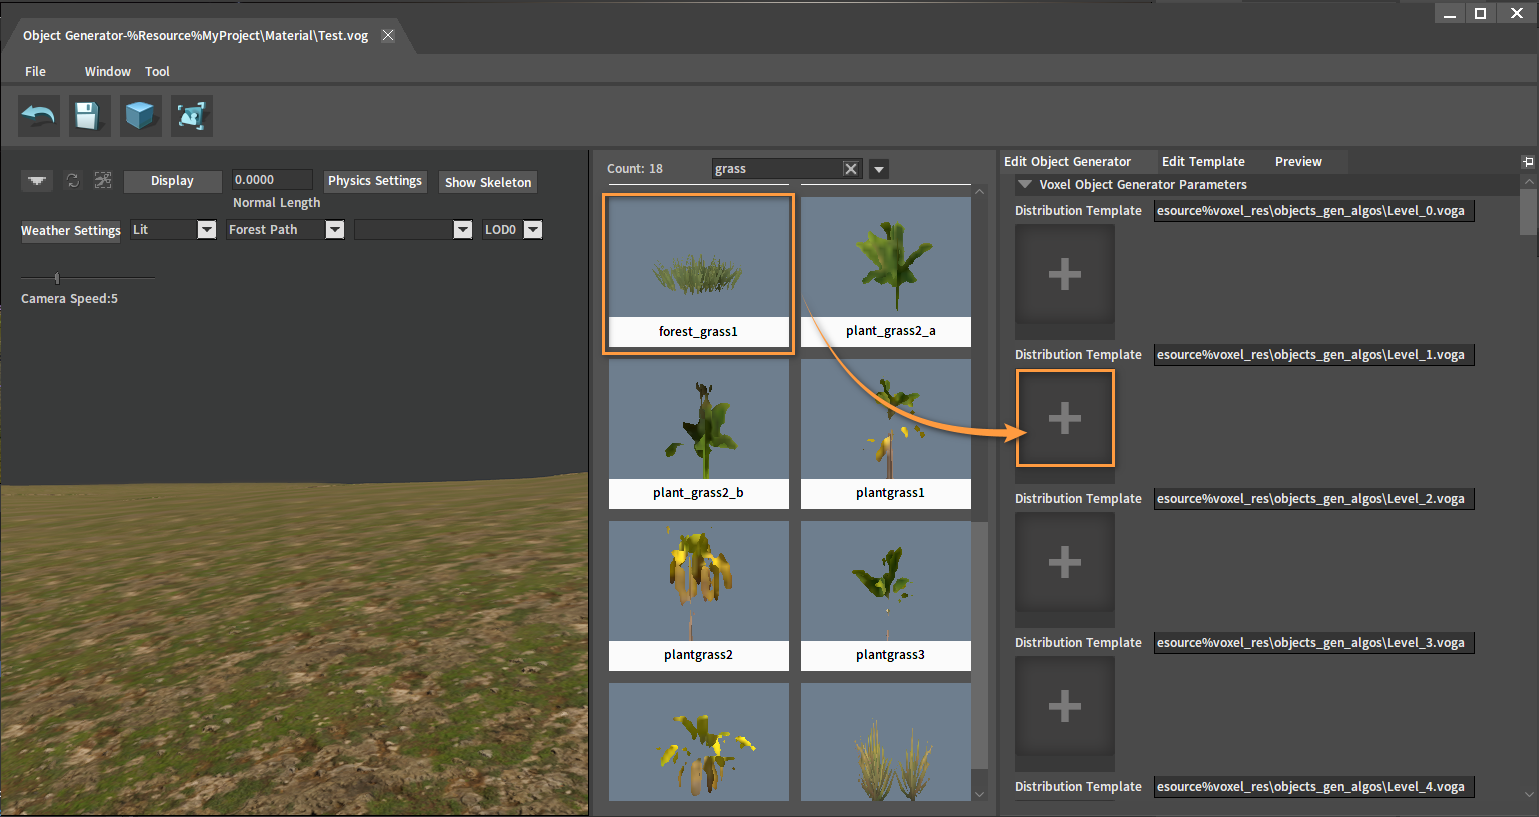
Drag the object into the Distribution Template in the Edit Object Generator panel from the Object Library.
If there are no needed objects in the Object Library, you can create Voxel Objects by yourself. For related content and operations, please refer to Voxel Object in this document.
The generation ratio of the object can be set in the Distribution Template. Click the Generate button after setting and the effect will be displayed in the Preview window.
Voxel Ecology
Creating Ecologies
Create ecologies for the planet with the Voxel Ecology tool.
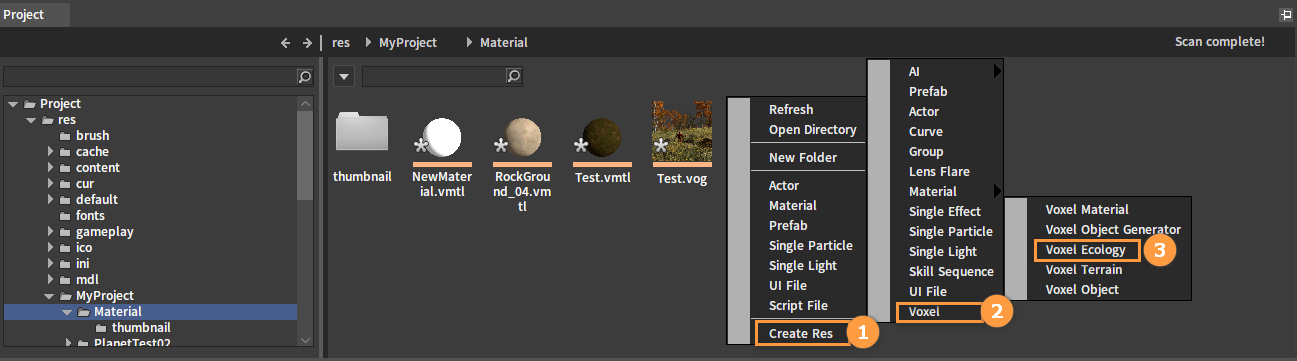
Right-click on the blank space of the Resource Preview window to open the Shortcut Menu. Click Create Res -> Voxel -> Voxel Ecology, and then enter a name in the pop-up window. Click OK to complete the creation of the Voxel Ecology file (.veco).
Note: If the name of the created Voxel Ecology is the same name as those of the Voxel Material and the Voxel Object Generator, and all of them are in the same directory, the ecology will automatically match and use the material and object generator.

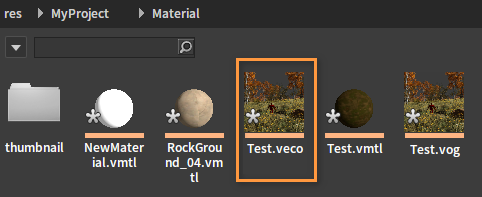
The created Voxel Ecology file:
Double-click the file to open its editing window.
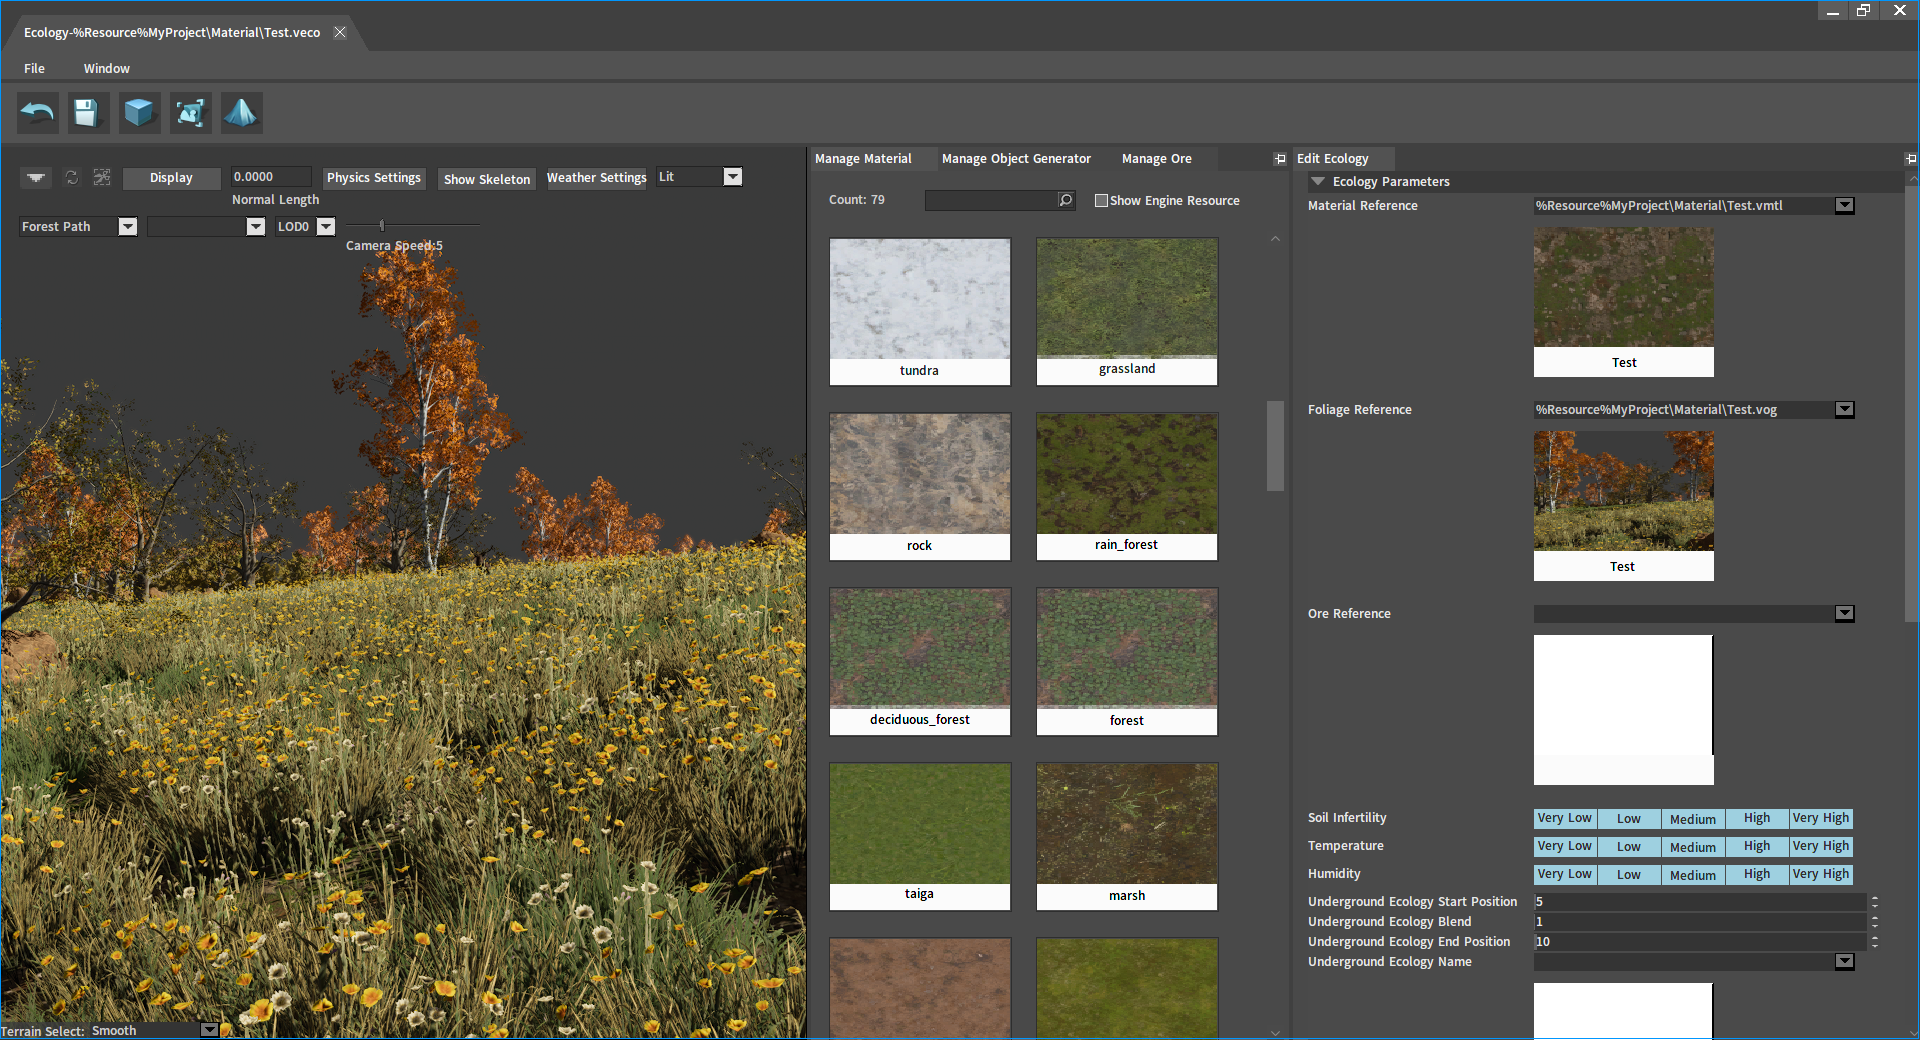
Editing Ecologies
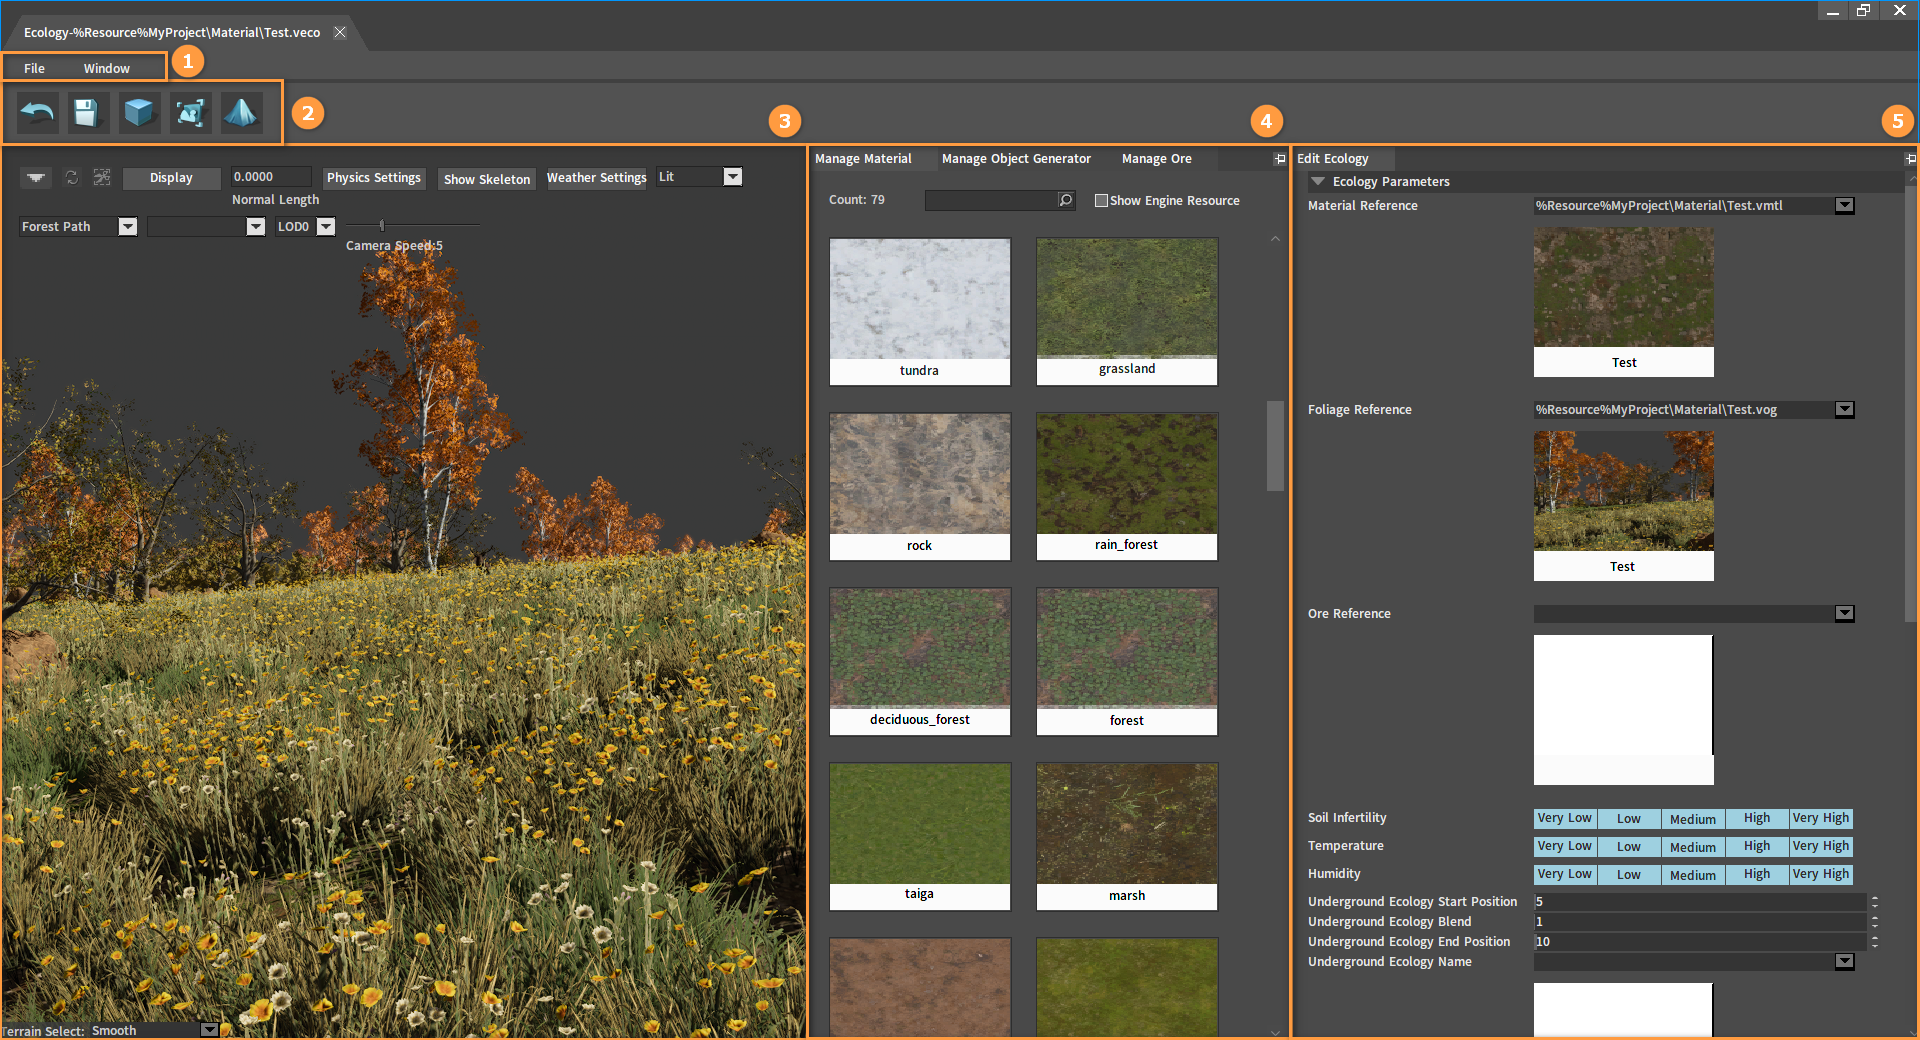
| No. | Name | Description |
|---|---|---|
| 1 | Menu Bar | Provide features including Refresh and Layout. |
| 2 | Tool Bar | Used to return to the main window of the Ecology Editor, save and generate ecologies, generate thumbnails of ecology files, and dig down the surface. |
| 3 | Preview Window | Used to view the effect of ecology. |
| 4 | Manage Material Panel Manage Object Generator Panel | Used to display all Voxel Material files. Used to display all Voxel Object Generator files. |
| 5 | Edit Ecology Panel | Used to edit the related properties of ecology. |
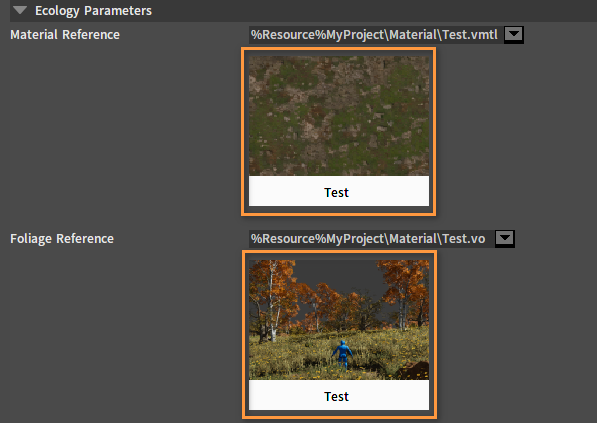
Ecology Properties
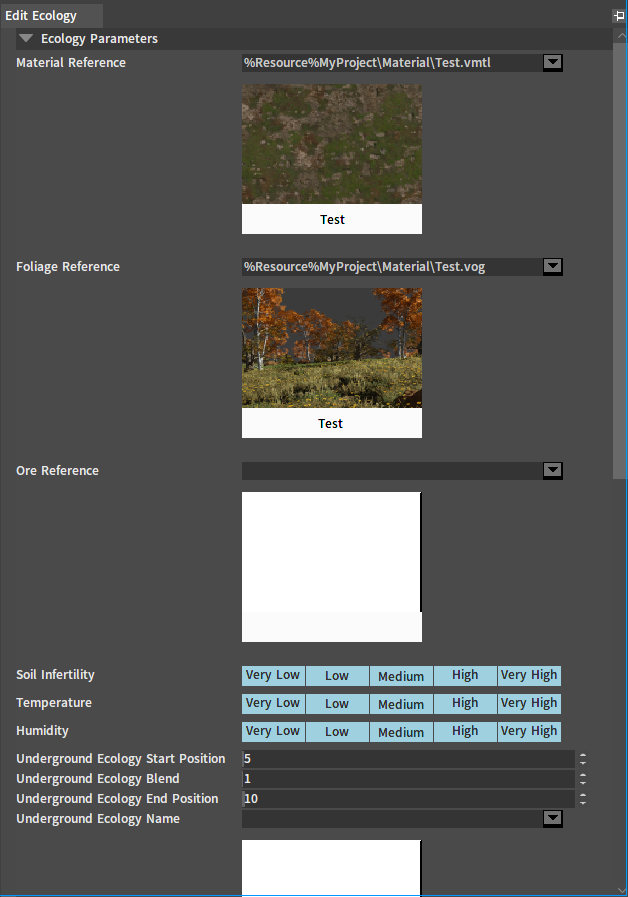
| Property | Description |
|---|---|
| Material Reference | Select the surface material of the ecology. |
| Foliage Reference | Select the object generator of the ecology. |
| Soil Infertility | Control the proportion of this ecology in this area according to the area on the planet that matches the selected Humidity and Temperature. |
| Temperature | Filter materials and object generators based on Temperature. |
| Humidity | Filter materials and object generators based on Humidity. |
| Underground Ecology Start Position | The start position of the underground ecology. |
| Underground Ecology Blend | Affect the blend relation between the original surface ecology and the underground ecology. |
| Underground Ecology End Position | The end position of the underground ecology. |
| Underground Ecology Name | The name of the underground ecology. |
The material and object generators of the ecology can be modified under the Material Reference and Foliage Reference in the Edit Ecology panel. Or replace them by dragging the material and object generators from Manage Material and Manage Object Generator to the corresponding slots.
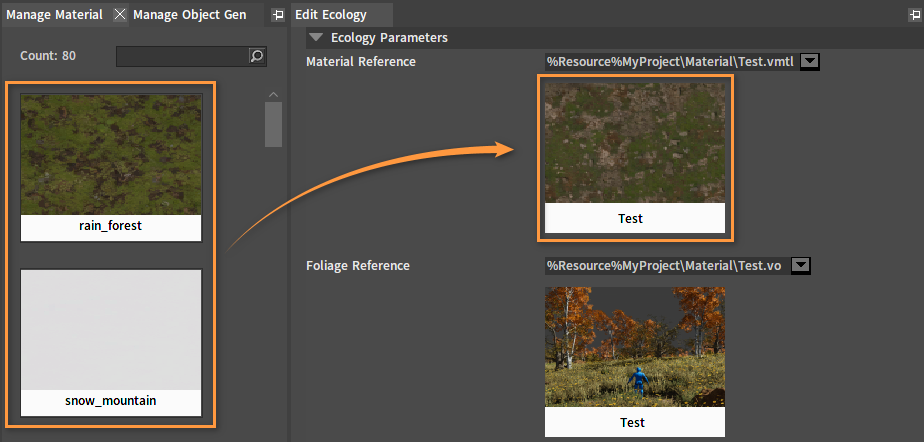
Double-click the slots under Material Reference and Foliage Reference to directly enter the corresponding material or object generator editing interface.
The surface can be dug down or filled up in the Ecology. Select an object generator in the Manage Object Generator panel and drag it into the Underground Ecology Name slot in the Edit Ecology panel. The related properties including Underground Ecology Start Position, Underground Ecology Blend, and Underground Ecology End Position can be modified as needed. Click the Generate button after modification to take effect. Then click the ![]() button in the Tool Bar to dig down the surface (reduce voxel) by Left-click, or fill up the surface (add voxel) by Ctrl + Left-click. Click Save after confirming.
button in the Tool Bar to dig down the surface (reduce voxel) by Left-click, or fill up the surface (add voxel) by Ctrl + Left-click. Click Save after confirming.

Voxel Terrain
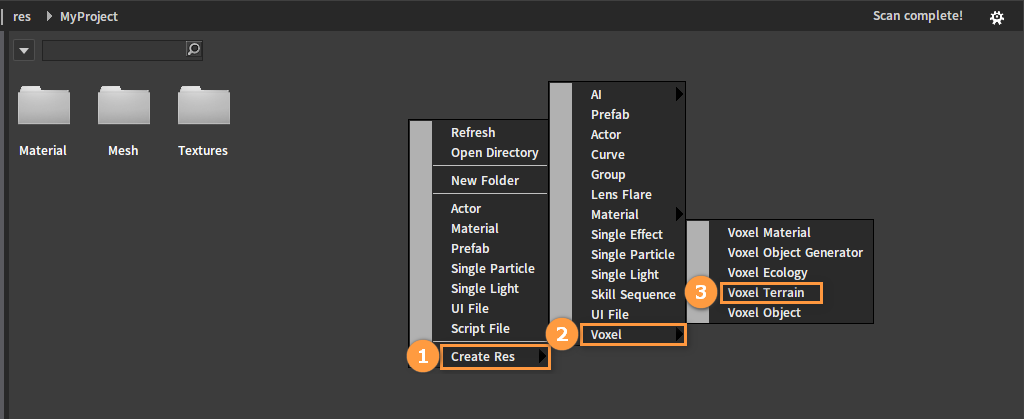
Creating Voxel Terrains
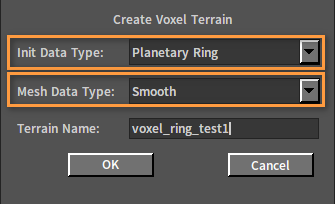
Create a planet and edit its surface and ecology with the Voxel Terrain tool. Planet types are Sphere, Flat Terrain, Cube, Planetary Ring and Math Expression.
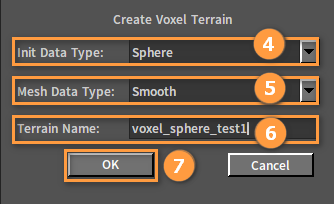
Right-click on the blank space of the Resource Preview window to open the Shortcut Menu. Click Create Res -> Voxel -> Voxel Terrain, then select Init Data Type and Mesh Data Type, and enter Terrain Name in the pop-up window. Click OK to complete the creation of the Voxel Terrain file (.vter).
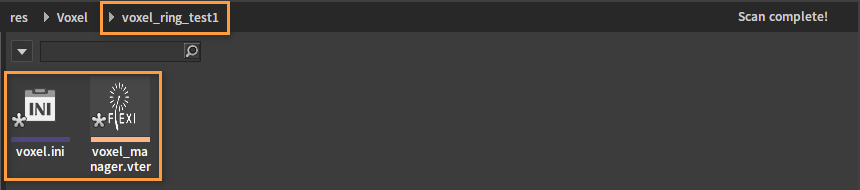
The created Voxel Terrain file:

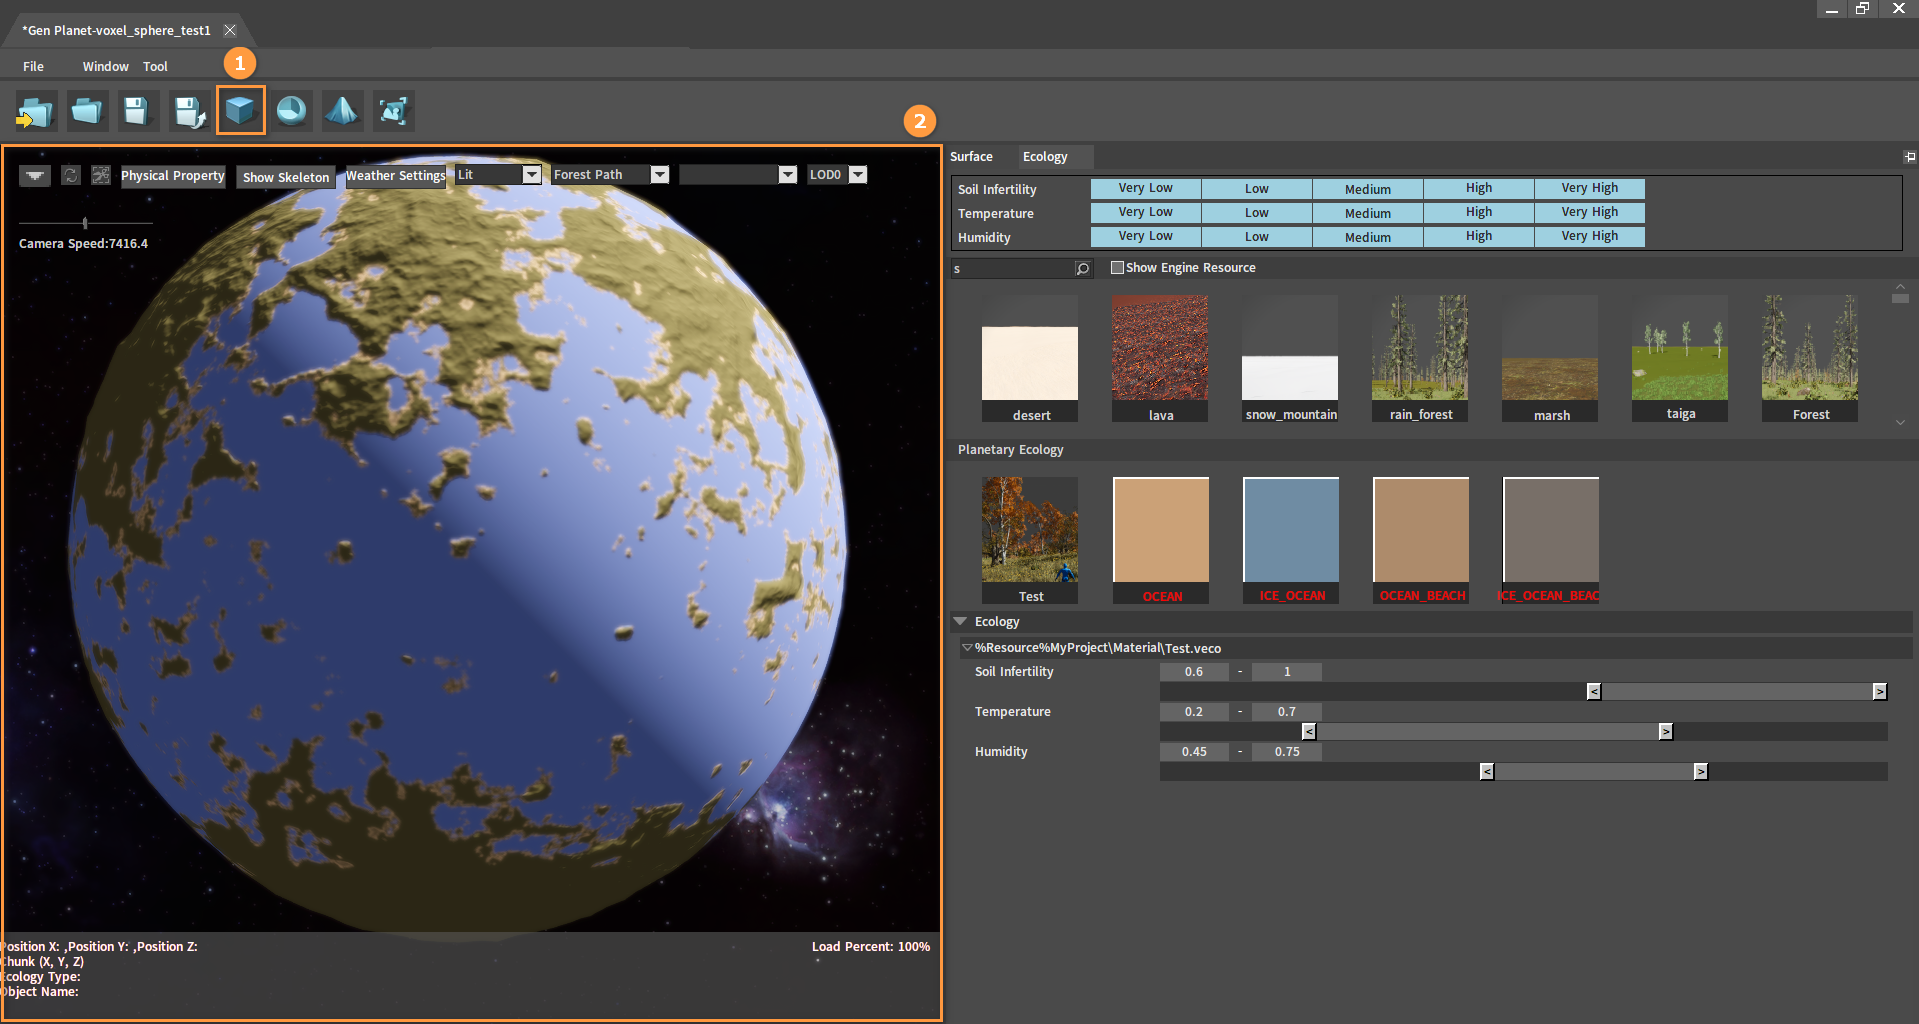
Double-click the file to open the Gen Planet window.
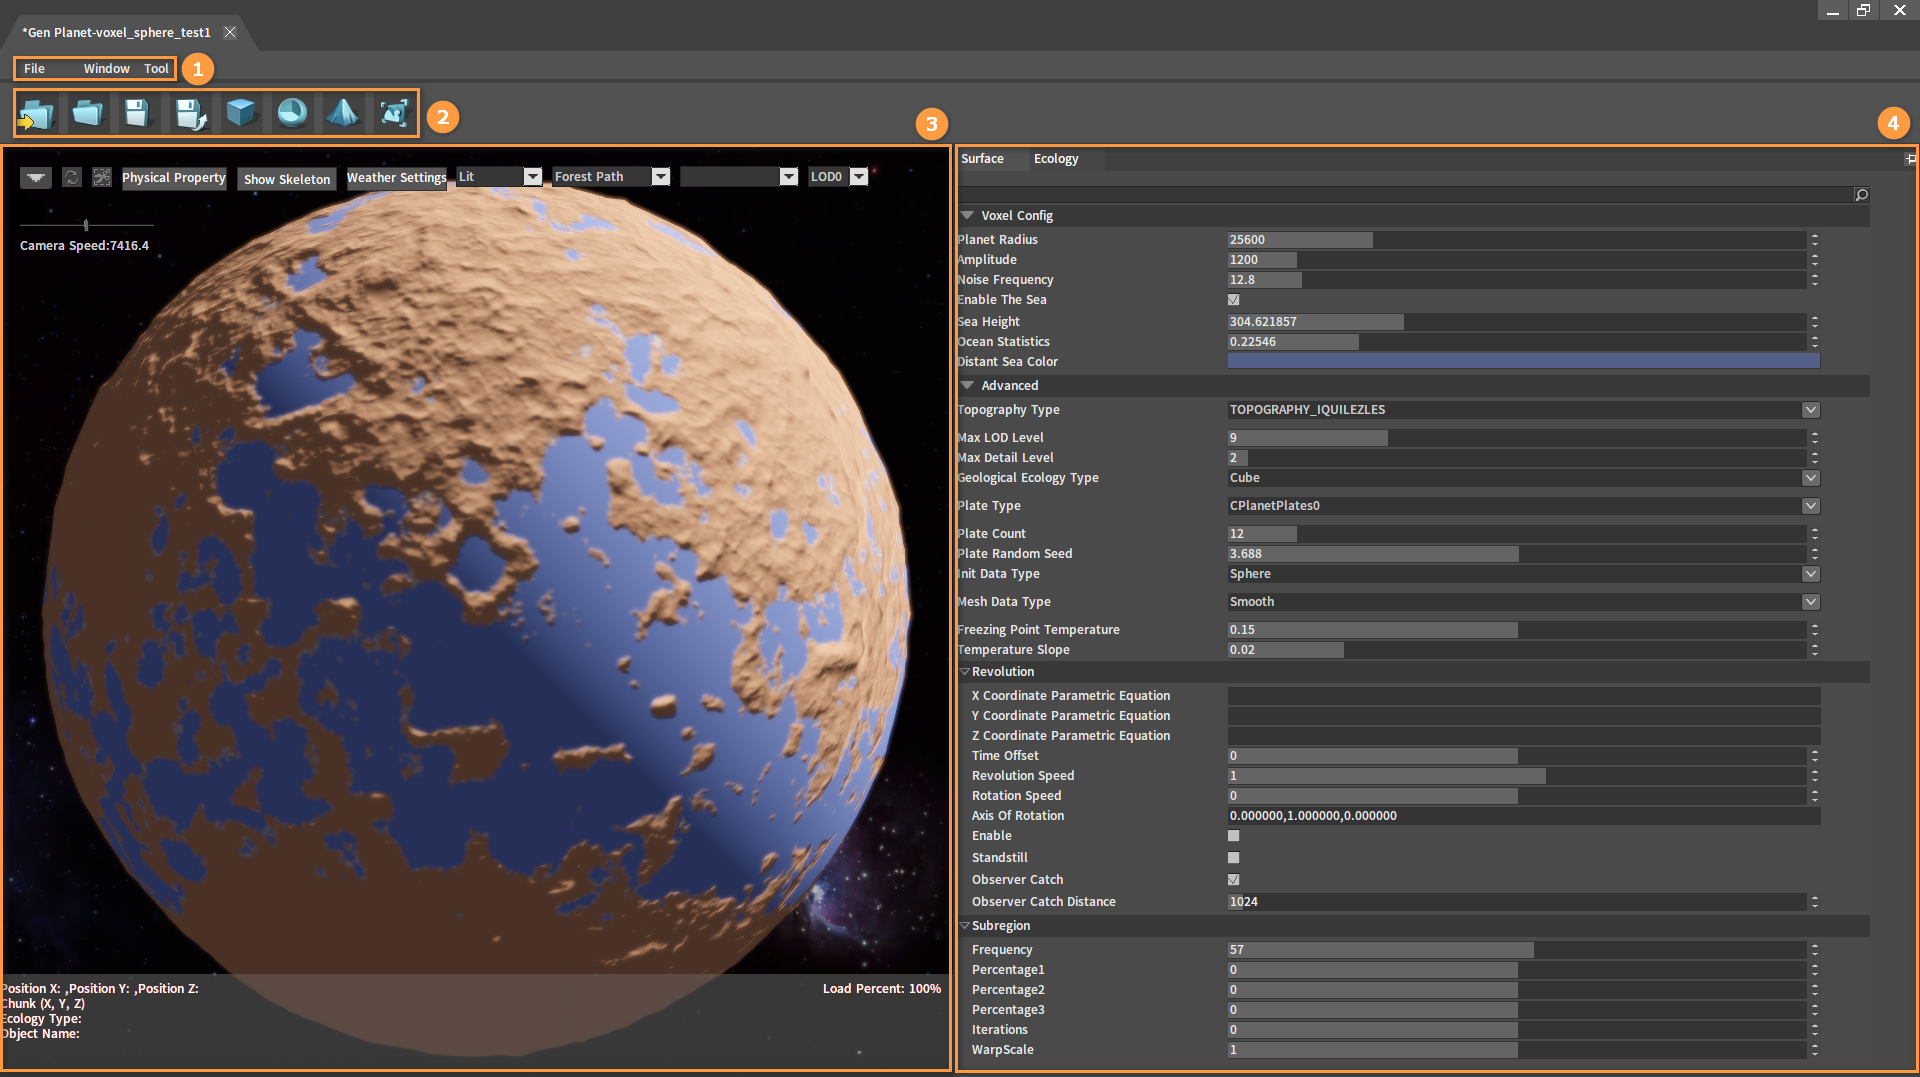
| No. | Name | Description |
|---|---|---|
| 1 | Menu Bar | Provide features including Save, Layout and etc. |
| 2 | Tool Bar | See the Tool Bar section for details. |
| 3 | Preview Window | Used to preview effects of the edited surface and ecology of the planet. |
| 4 | Surface Panel Ecology Panel | Used to edit properties of the planet's surface. Used to add ecologies to the planet. |
Tool Bar

| Icon | Description |
|---|---|
 | Create a Voxel Terrain. |
 | Open a Voxel Terrain. |
 | Save. |
| Save as. |
 | Generate a terrain. Click the button after modifying properties, and the planet will change accordingly. The effect after each generation can be viewed in the Preview window. |
 | Used to view the profile information of the planet. |
 | Generate a planet randomly. |
 | Generate a Voxel Terrain file thumbnail. |
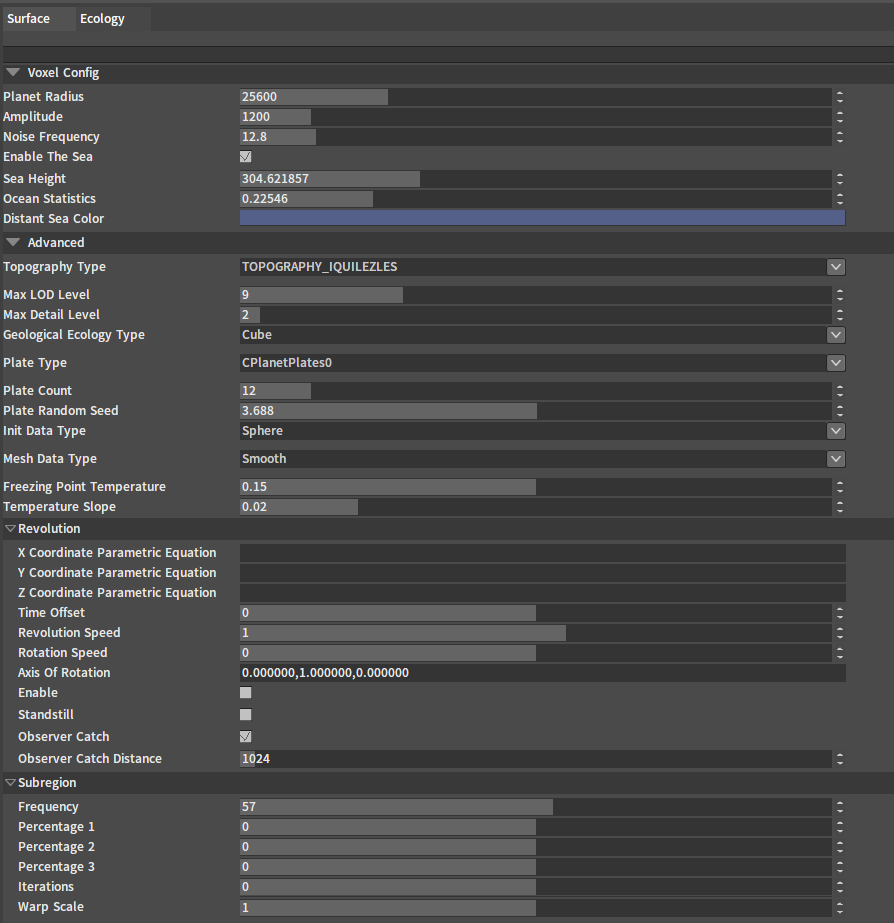
Surface Panel
Properties related to the planet's surface can be edited in the Surface panel.
| Setting Item | Property | Description |
|---|---|---|
| Voxel Config | Planet Radius | Planet radius. |
| Amplitude | The relief of the terrain. | |
| Noise Frequency | The density of mountains within a certain range. | |
| Enable The Sea | Whether the planet has seas. | |
| Sea Height | Sea height. | |
| Ocean Statistics | Ocean-to-land ratio. | |
| Distant Sea Color | Sea color in a distant view. | |
| Advanced | Topography Type | Control the planet's topographical features. |
| Max LOD Level | Maximum number of LOD levels. | |
| Geological Ecology Type | Geological ecology type (e.g. Cube is a cube generated from 3 dimensions, Soil Infertility, Temperature and Humidity). | |
| Plate Type | Plate type. | |
| Plate Count | Plate count. | |
| Plate Random Seed | The location of each plate control point used to generate. | |
| Init Data Type | Voxel scene type. | |
| Mesh Data Type | Mesh data type. | |
| Freezing Point Temperature | Control whether ecologies, mountains or sea water, etc. are frozen (e.g. If the temperature of the sea is below this value, then it will become a glacier). |
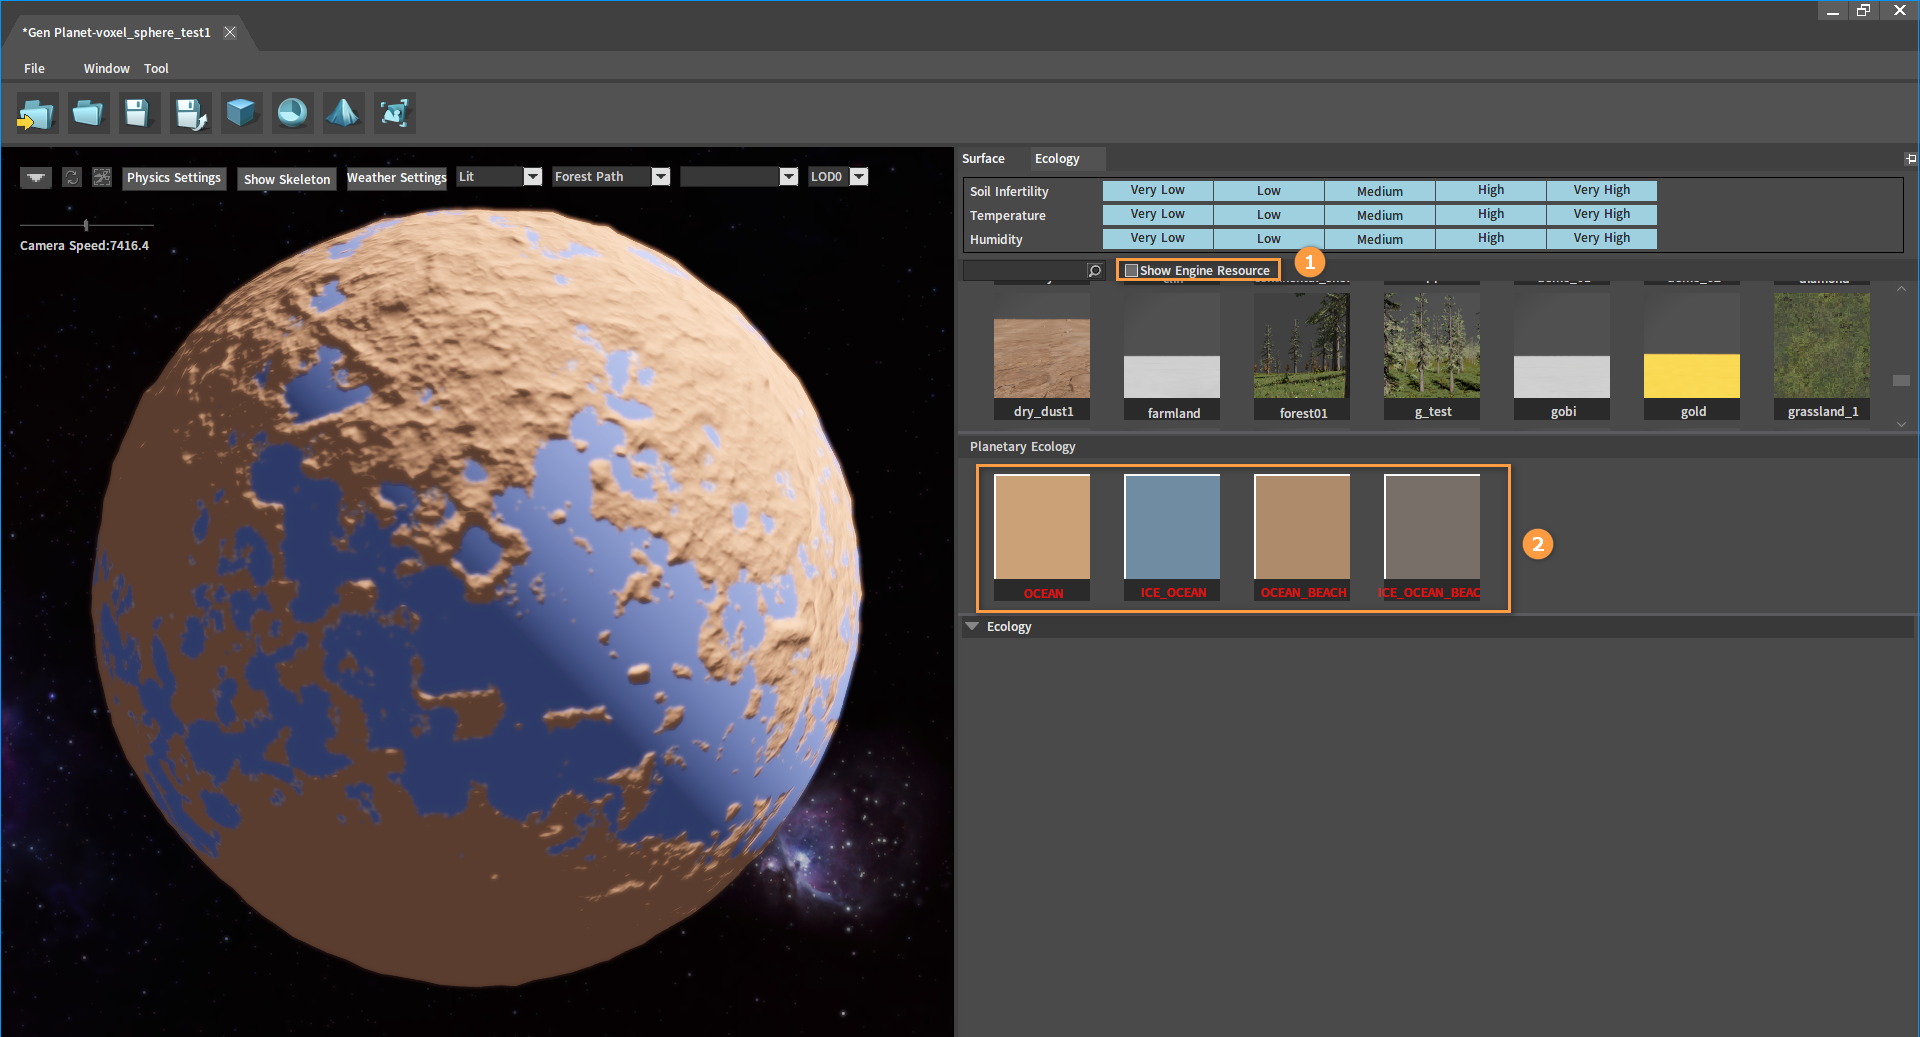
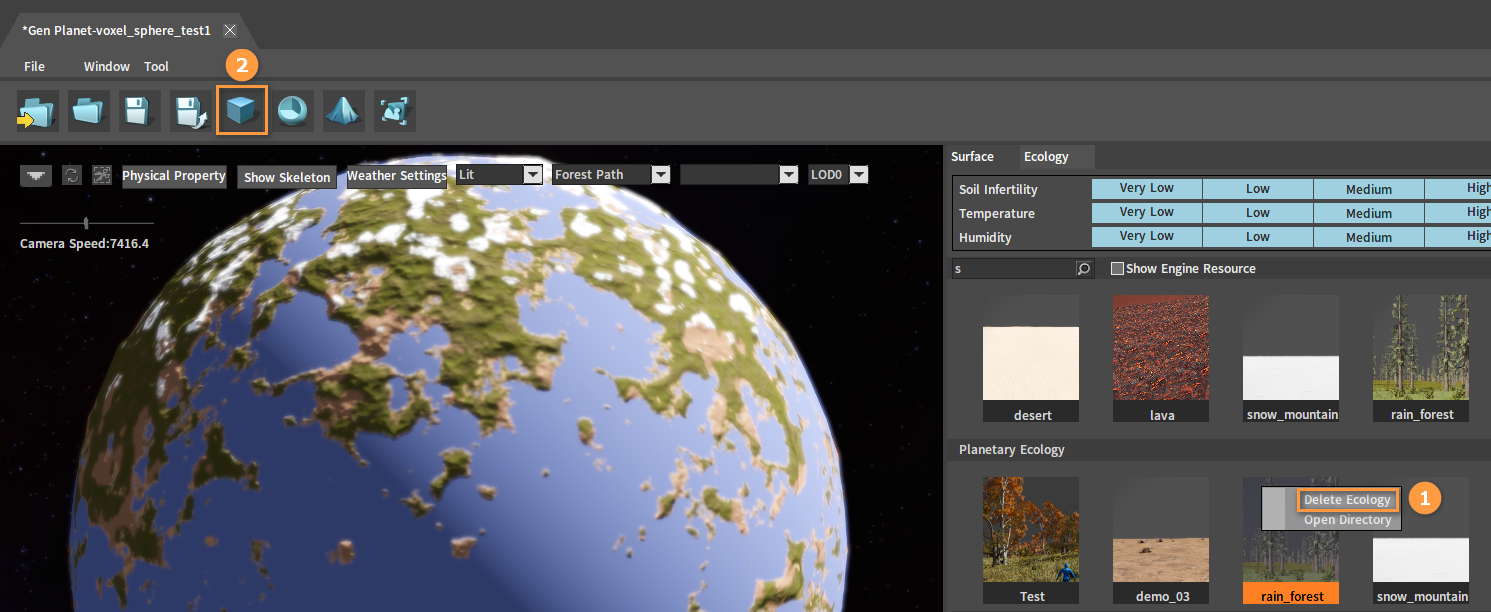
Ecology Panel
You can add ecology to the planet in the Ecology panel. According to the set Soil Infertility, Temperature and Humidity ranges of the ecology, the Engine will automatically complete the distribution of the ecology on the planet.

| No. | Name | Description |
|---|---|---|
| 1 | Filtering Ecology | By selecting Soil Infertility, Temperature and Humidity levels, the eligible ecologies are filtered in the Ecology Library below. |
| 2 | Ecology Library | Display all self-built ecologies and default ecologies in the project. |
| 3 | Planetary Ecology Panel | Display all ecologies used by the current planet with the default ecologies in red. |
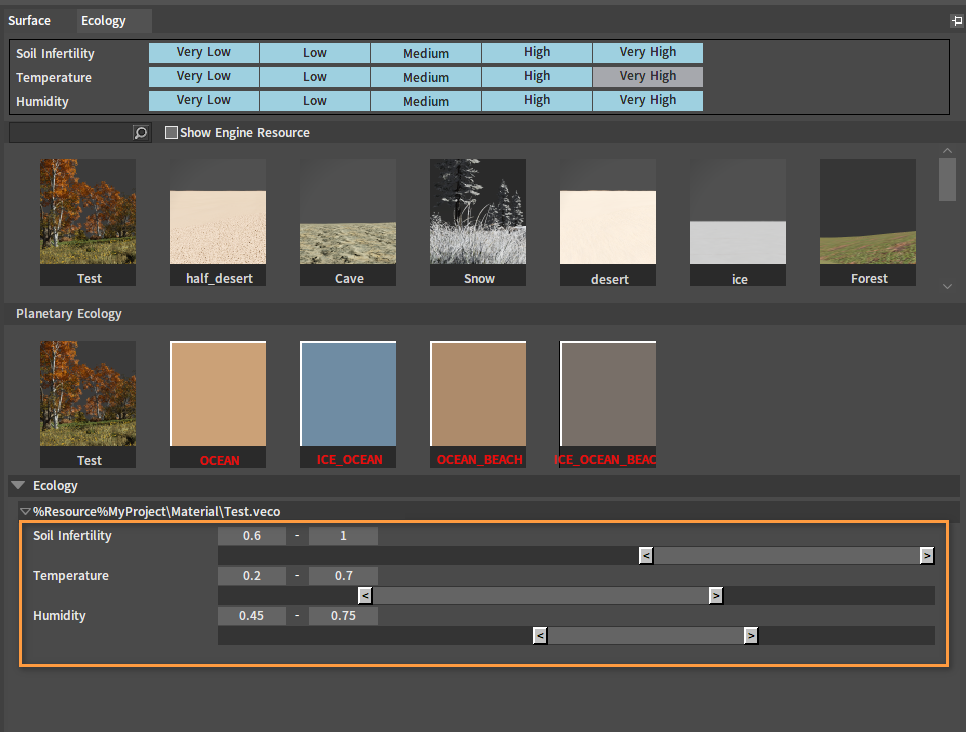
| 4 | Ecology Panel | Set Soil Infertility, Temperature and Humidity ranges of the planet's ecology. |
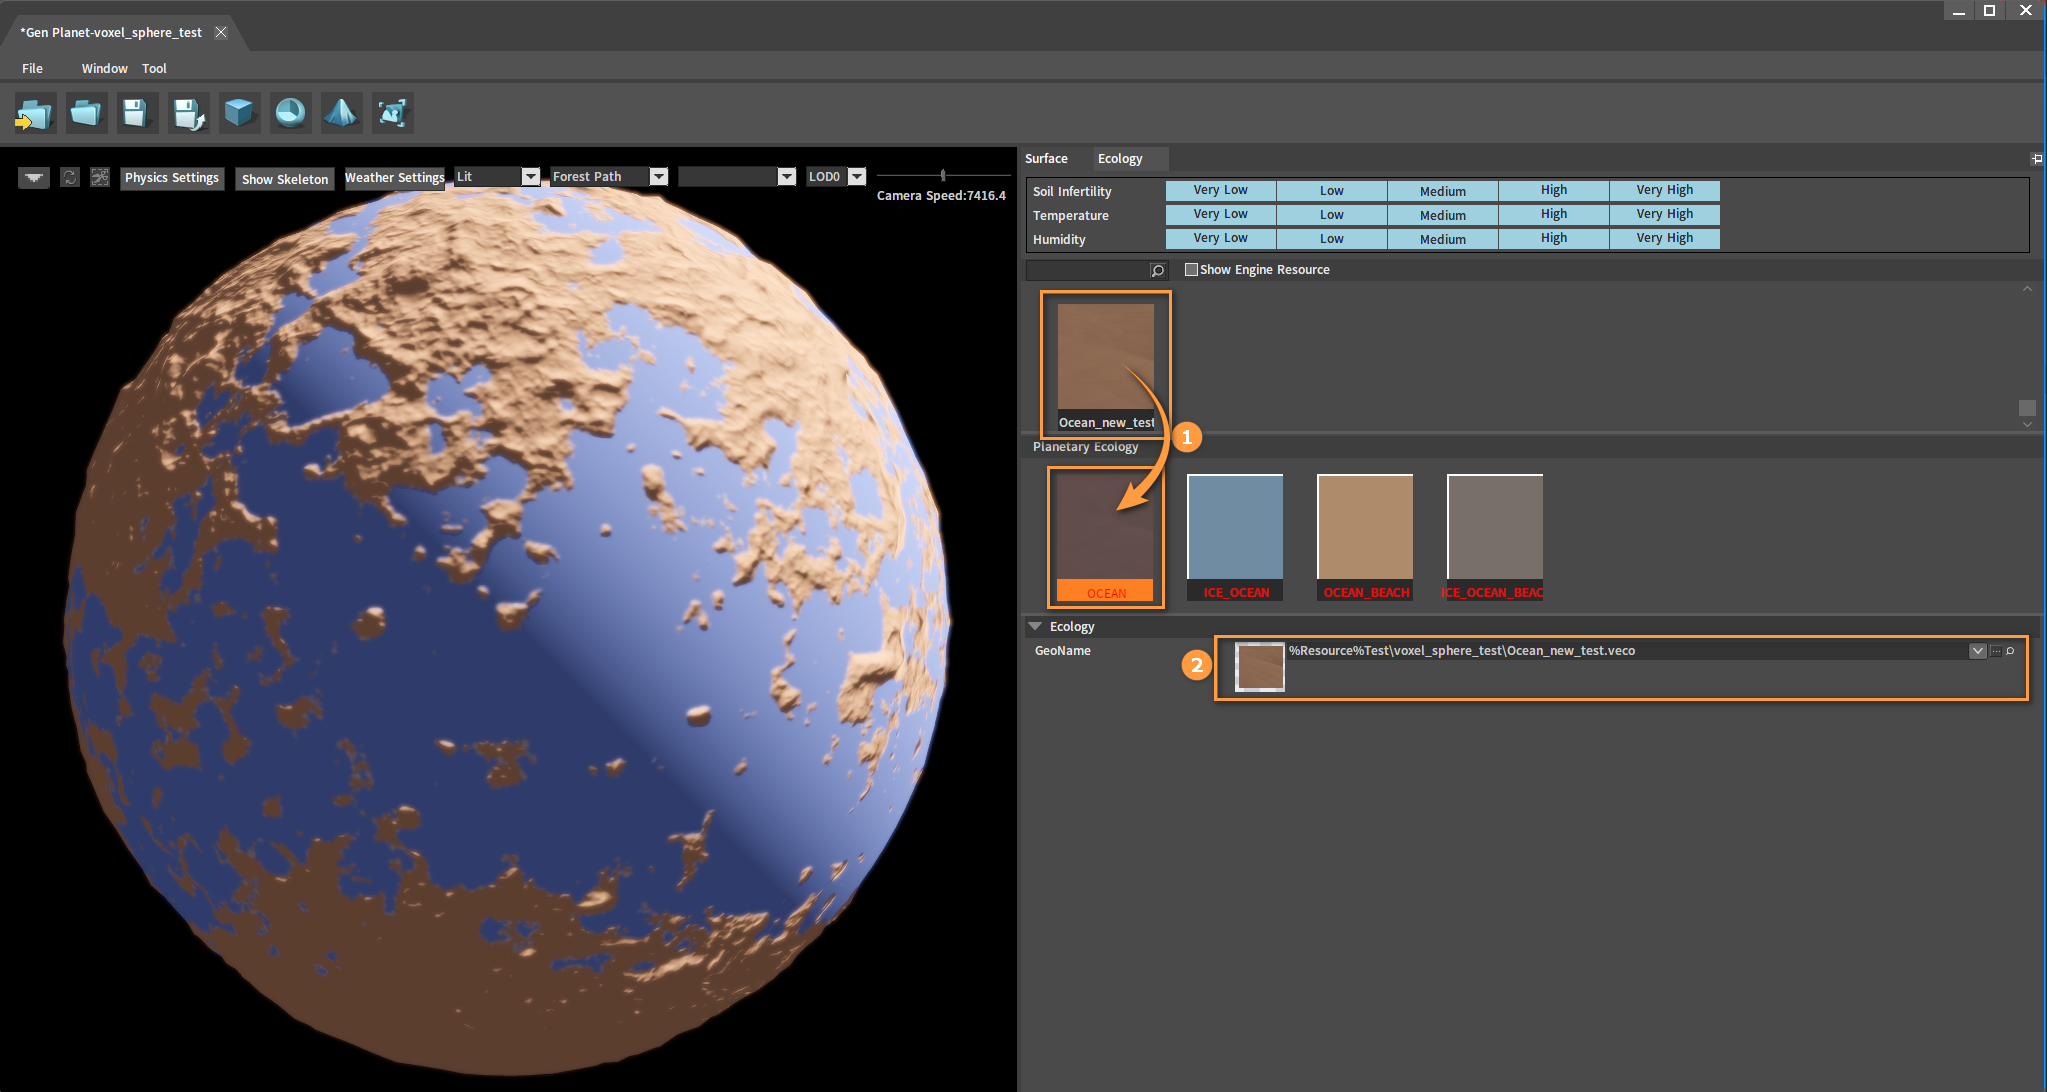
Replacing Default Ecologies
Check the Show Engine Resource button to show the 53 Engine default ecologies. The default ecologies which are displayed in red will be automatically distributed on the planet according to the parameters when creating the planet. They are located in the Engine Directory and cannot be deleted, but can be replaced with other self-built ecologies.
Drag the ecology in the project to a default ecology in red to replace it. After selecting the default ecology, its ecology path can be viewed in the GeoName in the Ecology interface below.
Adding Ecologies
Drag the Voxel Material to be added to the planet into the Planetary Ecology panel.

After dragging:
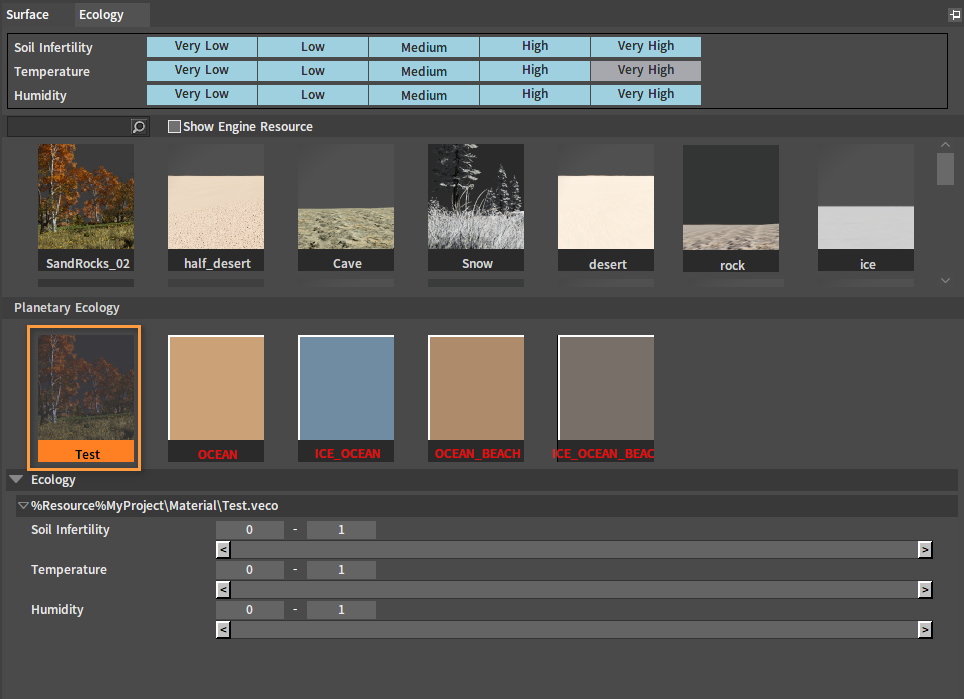
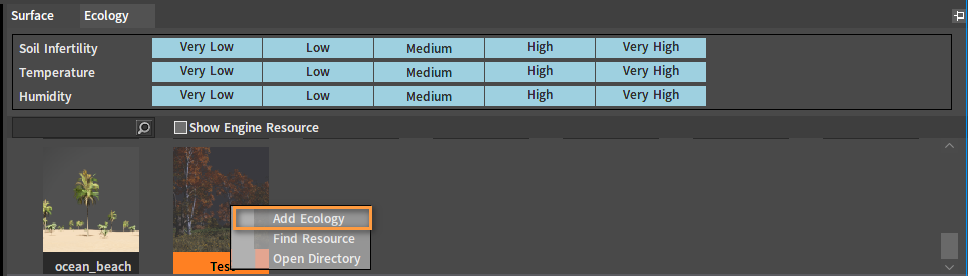
Or directly right-click the needed ecology and select Add Ecology to finish adding.
Set Soil Infertility, Temperature, and Humidity ranges for the ecology in the Ecology panel. For example, the newly added Test ecology has more unfertile soil, more moderate temperature, and higher humidity.
Click the Generate button when settings are done.
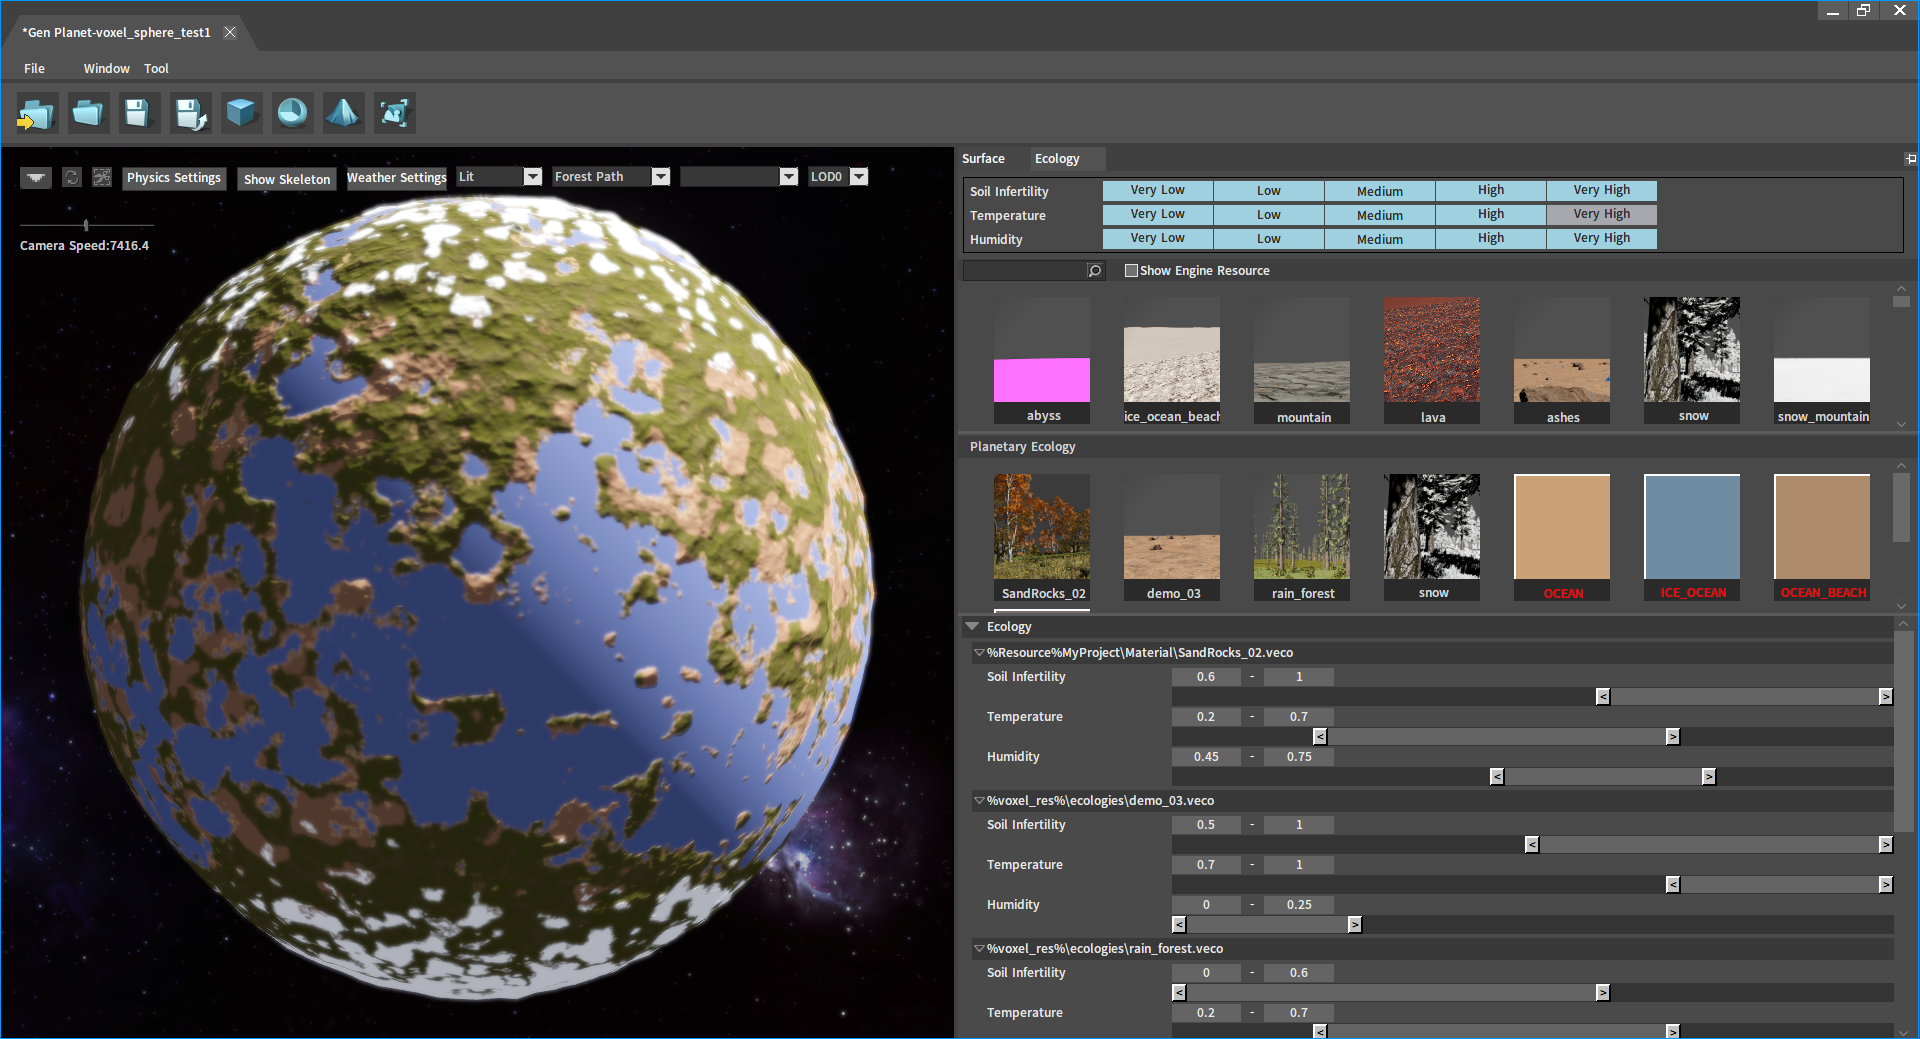
The effect of multiple ecologies:
To delete an unwanted ecology from the planet, right-click the ecology to be deleted in the Planetary Ecology panel, select Delete Ecology, and click the Generate button.
How to Create Planets
Creating Planetary Rings
Create a Planetary Ring Voxel Terrain in the same way as creating a planet by using the Voxel Terrain tool. Select Planetary Ring in Init Data Type and select Smooth in Mesh Data Type.
After creating:
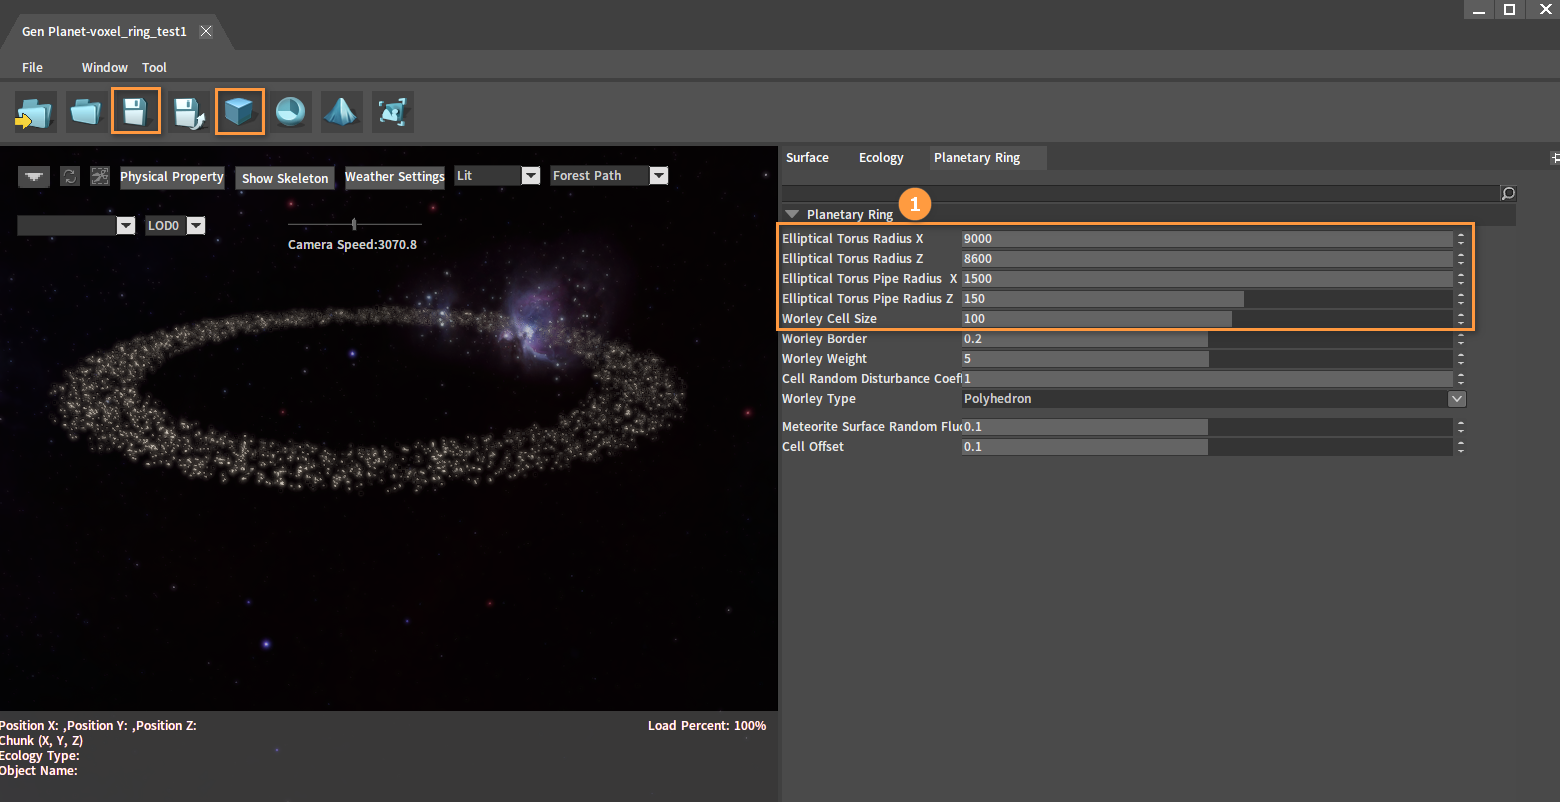
Double-click the Voxel Terrain file to open its editing interface. The radius of the Planetary Ring should be larger than that of the planet. You can increase the values of Elliptical Torus Radius X and Elliptical Torus Radius Z as well as Elliptical Torus Pipe Radius X and Elliptical Torus Pipe Radius Z. Click the Generate button and the Save button. You can add ecologies to the Planetary Ring in the Ecology panel.
Placing Planets and Planetary Rings in the Level
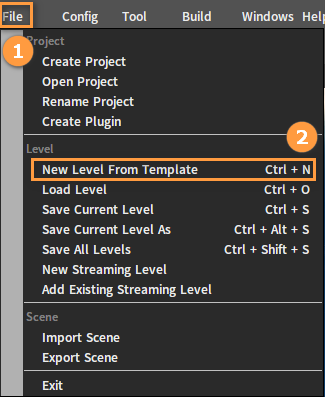
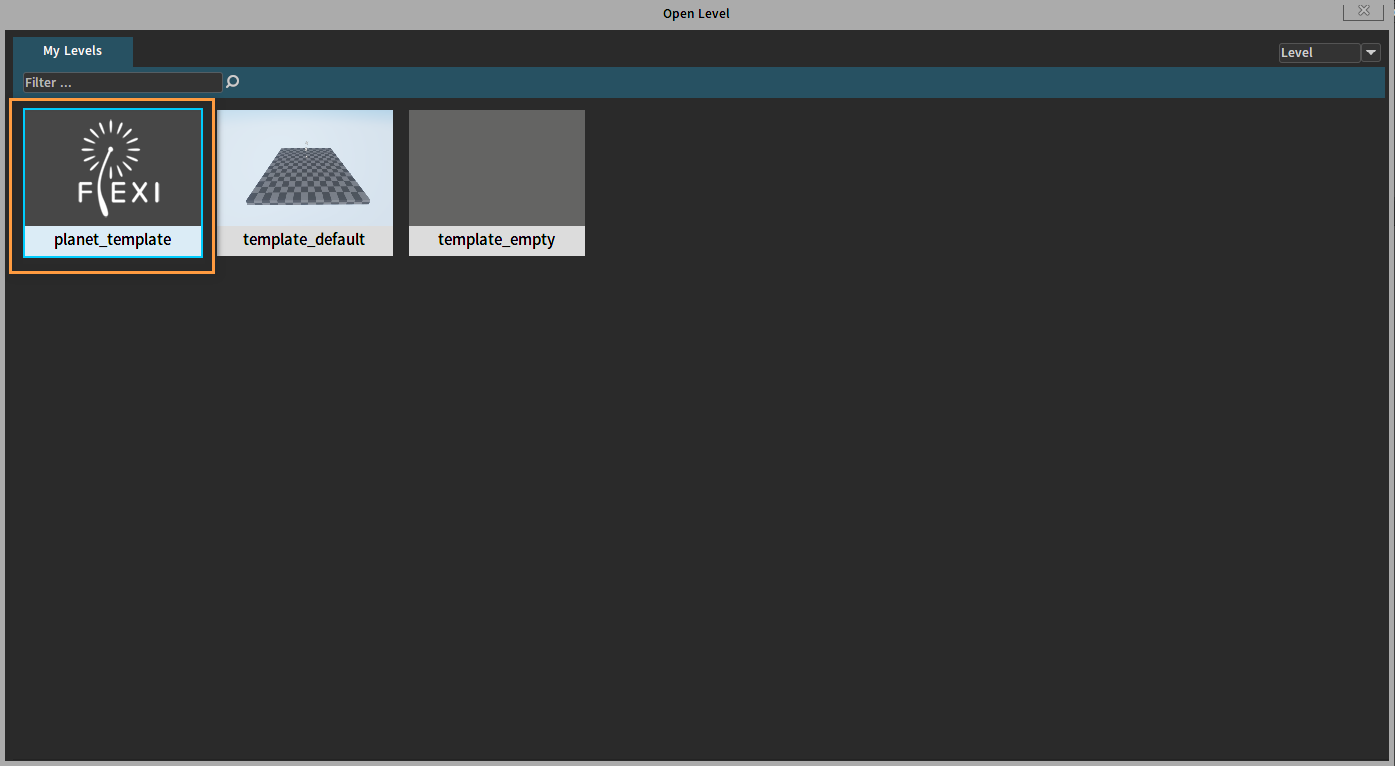
In the Component Editor, click File -> New Level From Template, then select the planet_template in the pop-up Open Level window, and double-click it to enter the level.
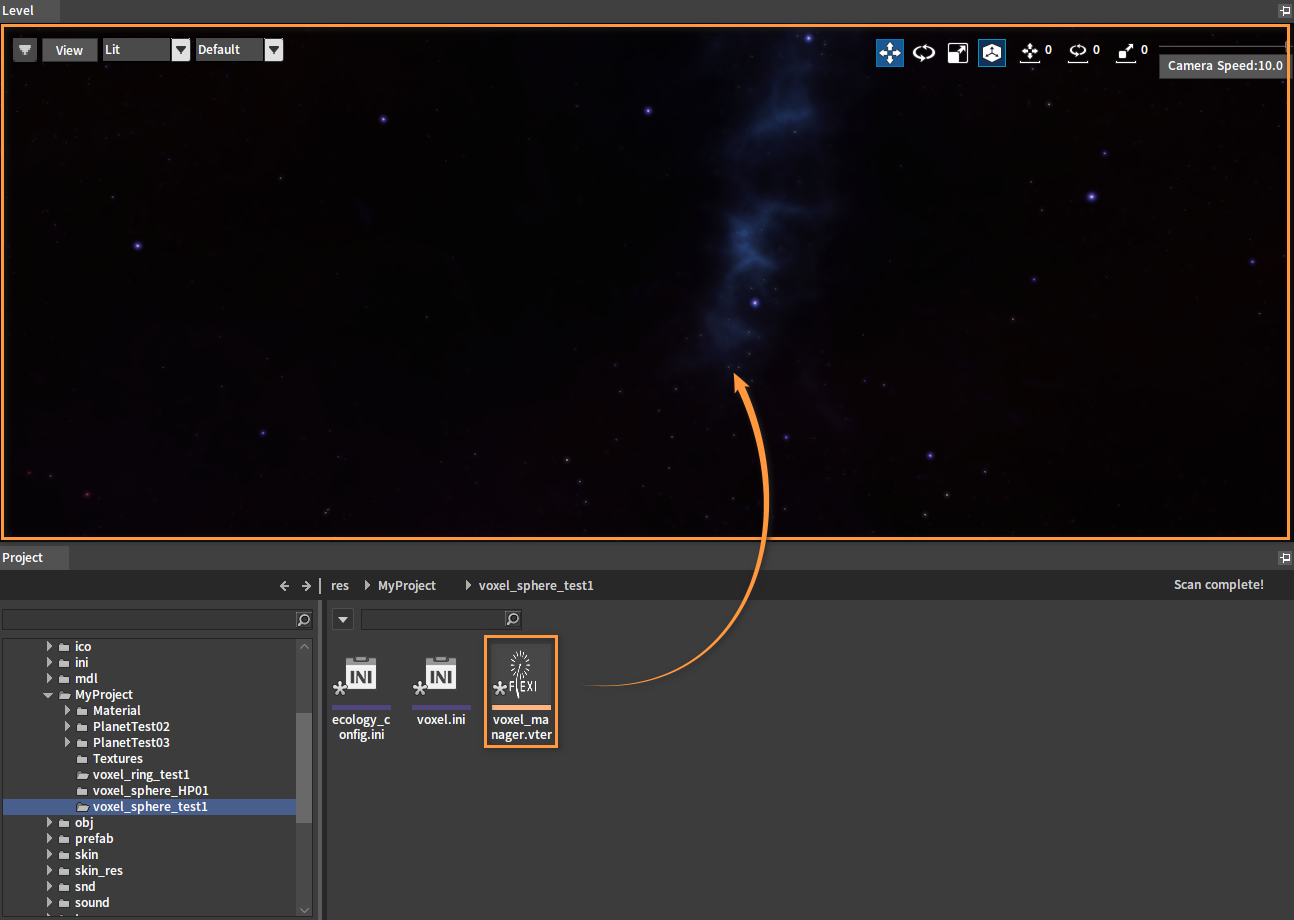
In the Resource Preview window, find the created terrain file (planet) and drag voxel_manager.vter into the Level panel.
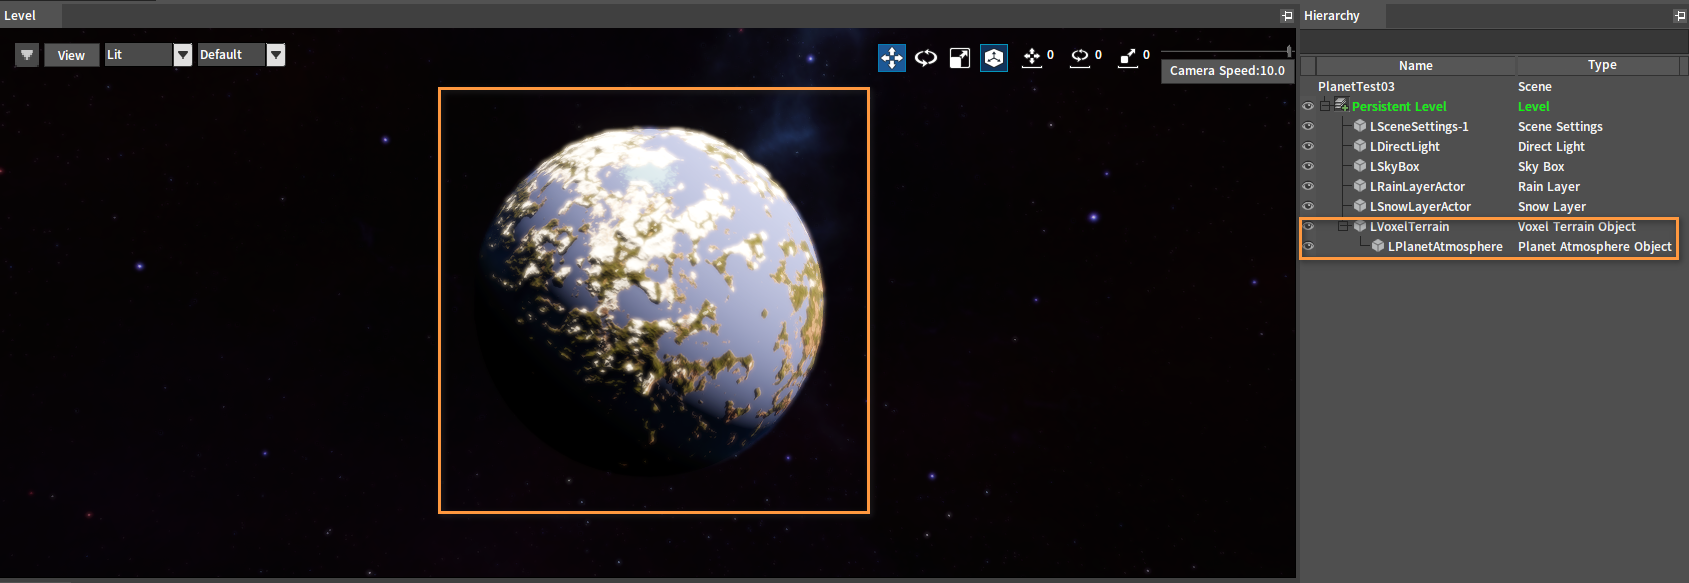
After dragging, the planet can be seen in the Level panel and a Voxel Terrain Object and a Planet Atmosphere Object will appear in the Hierarchy panel.
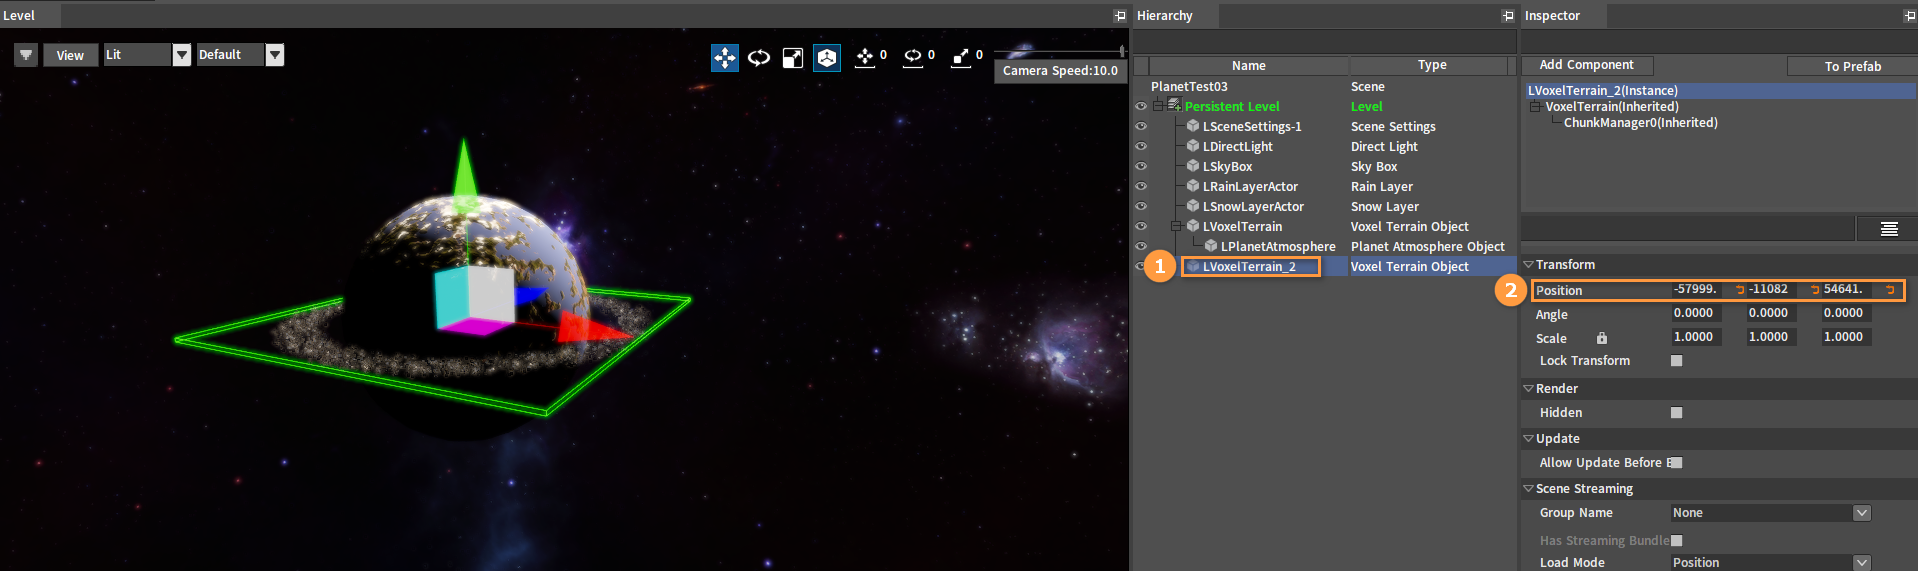
Drag the Planetary Ring into the Level panel in the same way, select the Planetary Ring Voxel Terrain Object in the Hierarchy panel, then in the Transform property of the Inspector panel, set the Position of the Planetary Ring to match the planet.
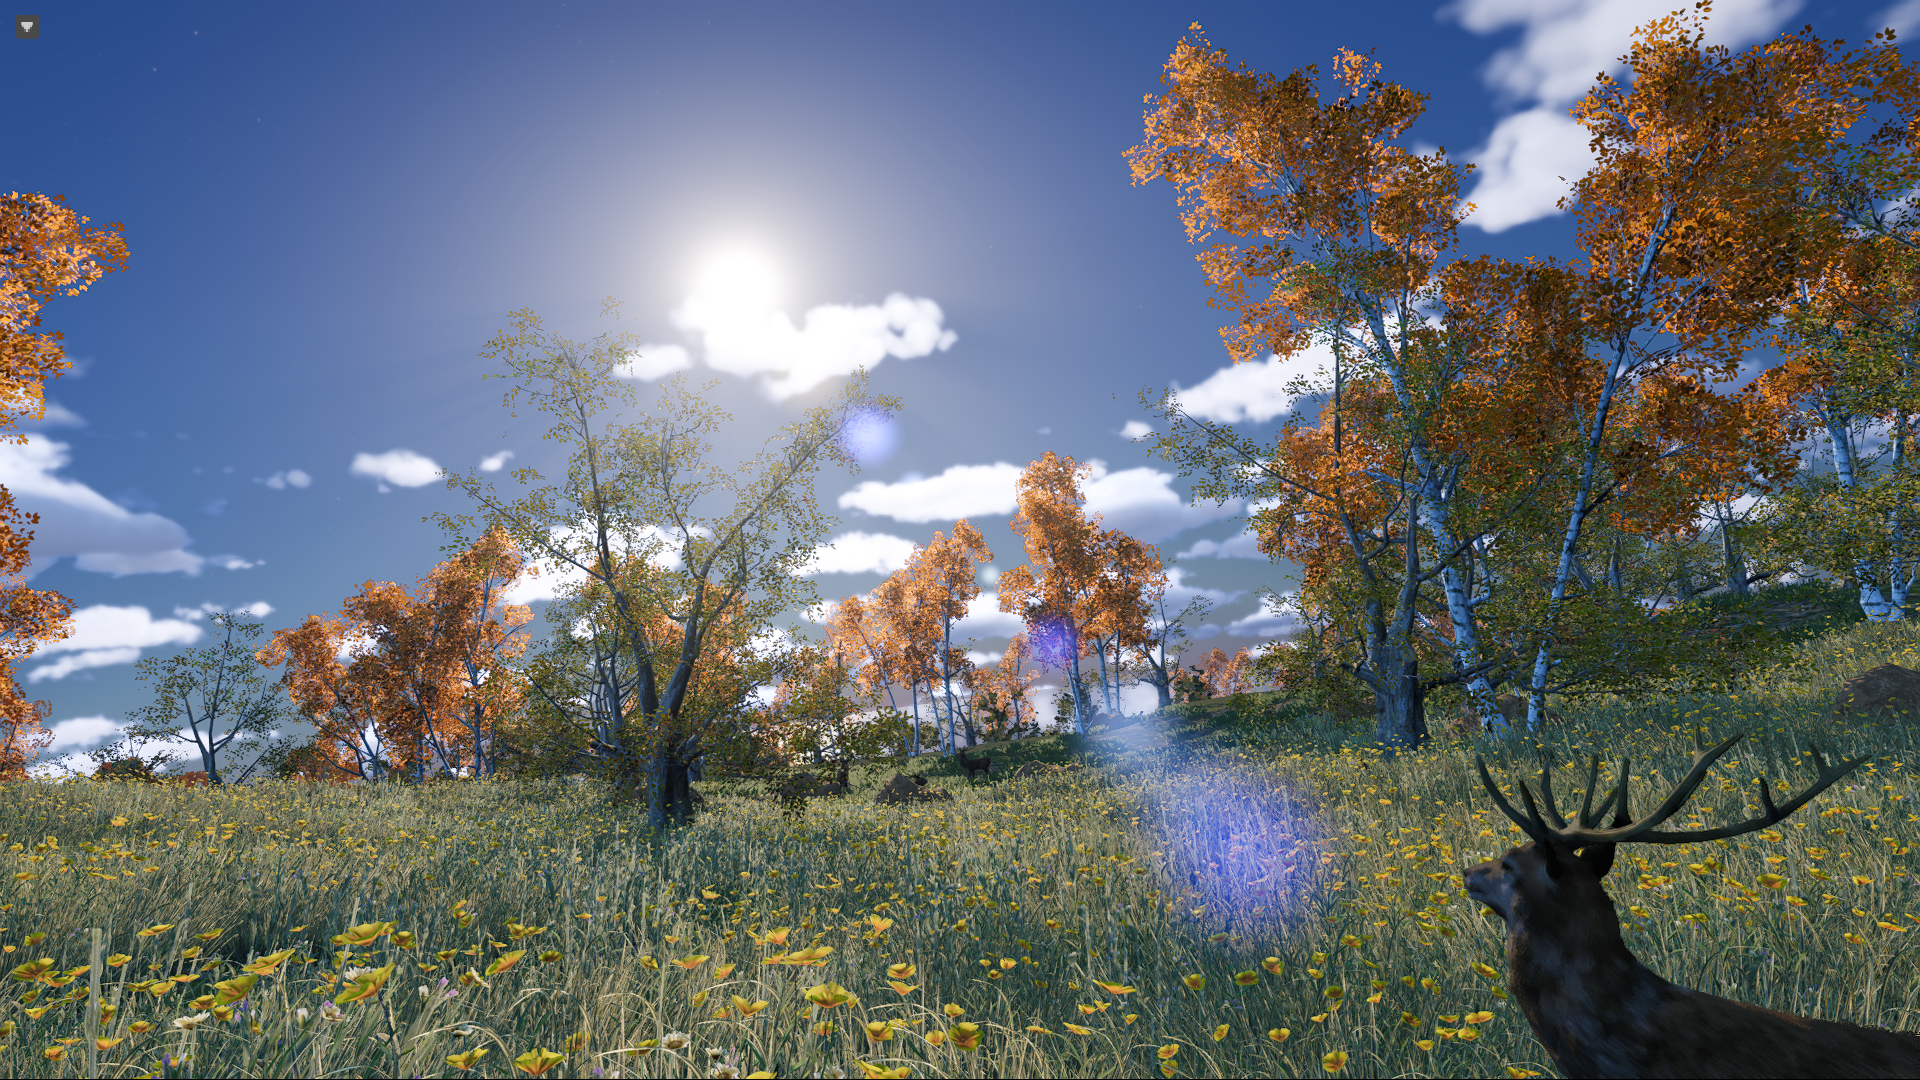
Zoom in to see details of the planet's ecology.