Layered Blend Per Bone Nodes
Last Updated Time: 10/07/2023
Overview
Layered Blend Per Bone can add multiple layers of poses using a per-bone mask on the base pose, commonly used to achieve the requirement of different parts of a character being driven by different animations. Layered Blend Per Bone defines input poses as layers that affect different areas of the skeleton, and blends these layers with weights. For example, it can be used to play different upper body actions while the character is walking.
Using Nodes
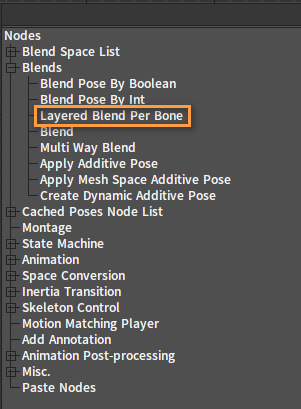
Right-click on the blank space of Anim Tree to open the Node Selection panel. Expand the Blends category, and select Layered Blend Per Bone.
After adding the node:

Click Add Pin on the node to add a new pin to it.

After adding the pin:

Then you can configure the node with appropriate inputs/outputs.
Properties
Select the Layered Blend Per Bone node, then its various properties will be shown in the Property Window.
| Property | Description |
|---|---|
| Blend Weight List | Set the weight of each layer. |
| Mesh Space Rotation Blend | Whether to blend rotation in Mesh Space. |
| Curve Blend Option | Set curve blend behaviors to control the blend mode of the animation layer.
|
| Layer Settings | The layer sets the bone weight mask, and each layer represents the corresponding blend pose. There are as many layers as there are inputted blend poses. Each layer can be configured with multiple branches, where each branch can specify a bone as its root and a depth value as its transition depth. When the depth is less than or equal to 0, the bone and its child bones are not blended and the base pose is applied. When the depth is greater than 0, the bone and all its child bones are blended with the base pose, gradually increasing the blend weight of the blend pose as the depth increases. |
Example
Here is a simple example of using the Layered Blend Per Bone node to make the upper body perform attack animations while the lower body is moving.
This example is built upon the foundation of the Character Quick Start example.
Adding Animations
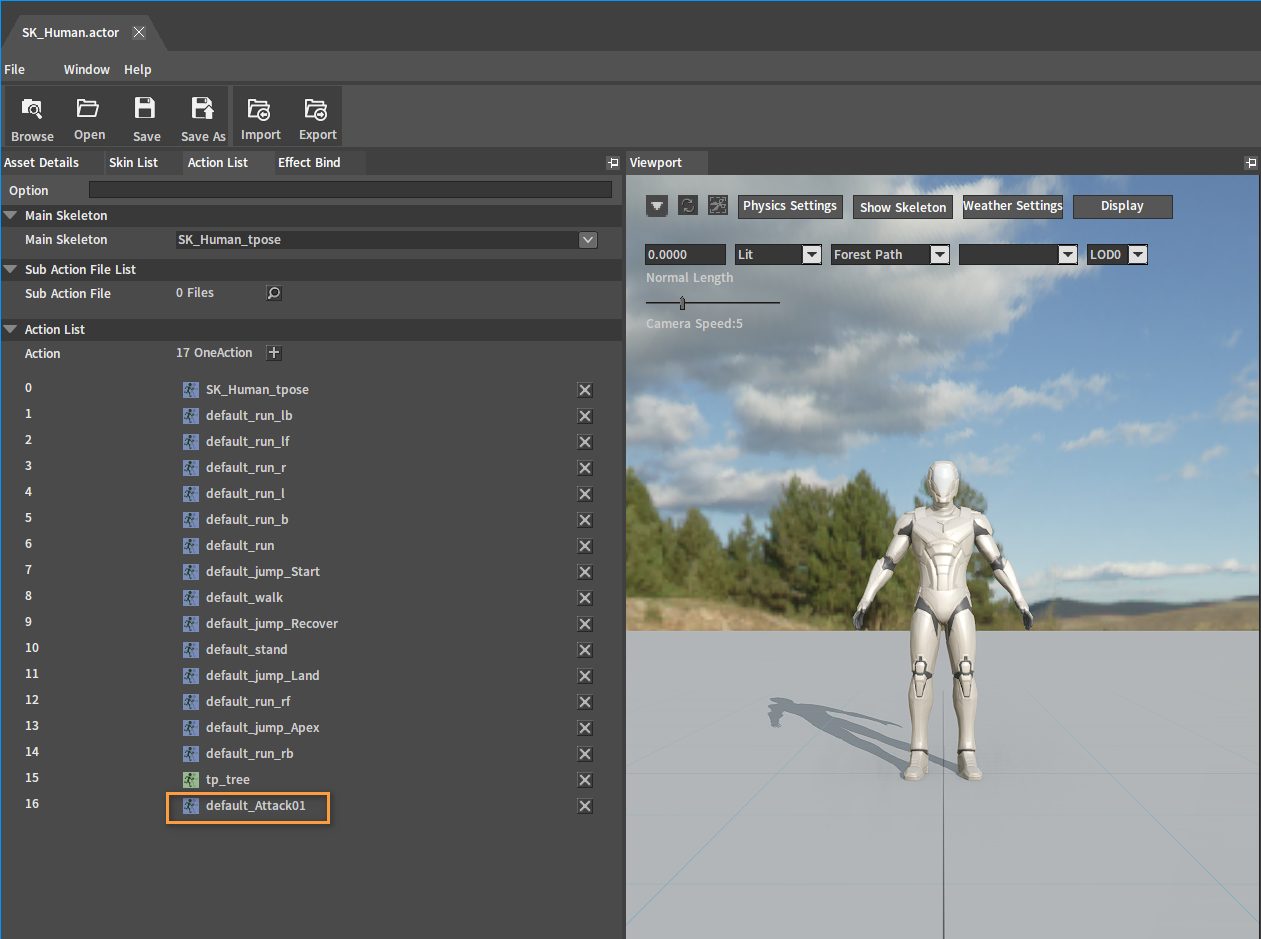
Add the attack animation default_Attack01.xskt to the original Actor SK_Human.actor.
After adding:
Editing Animation Assets
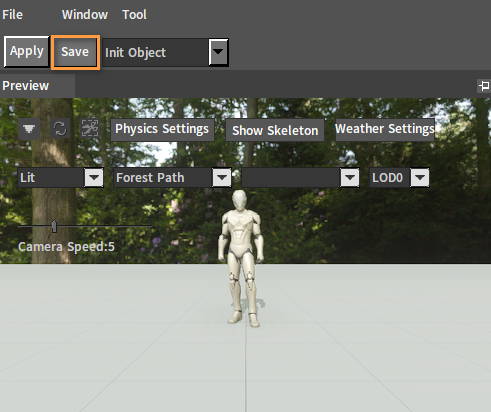
Double-click the early added attack animation default_Attack01 in the Actor Editor to open the Animation Editor, which is the asset editing interface. And in the Asset Details panel, set the Blend In Time to 0.2 and Blend Out Time to 0.3 to make the action switch more smoothly.
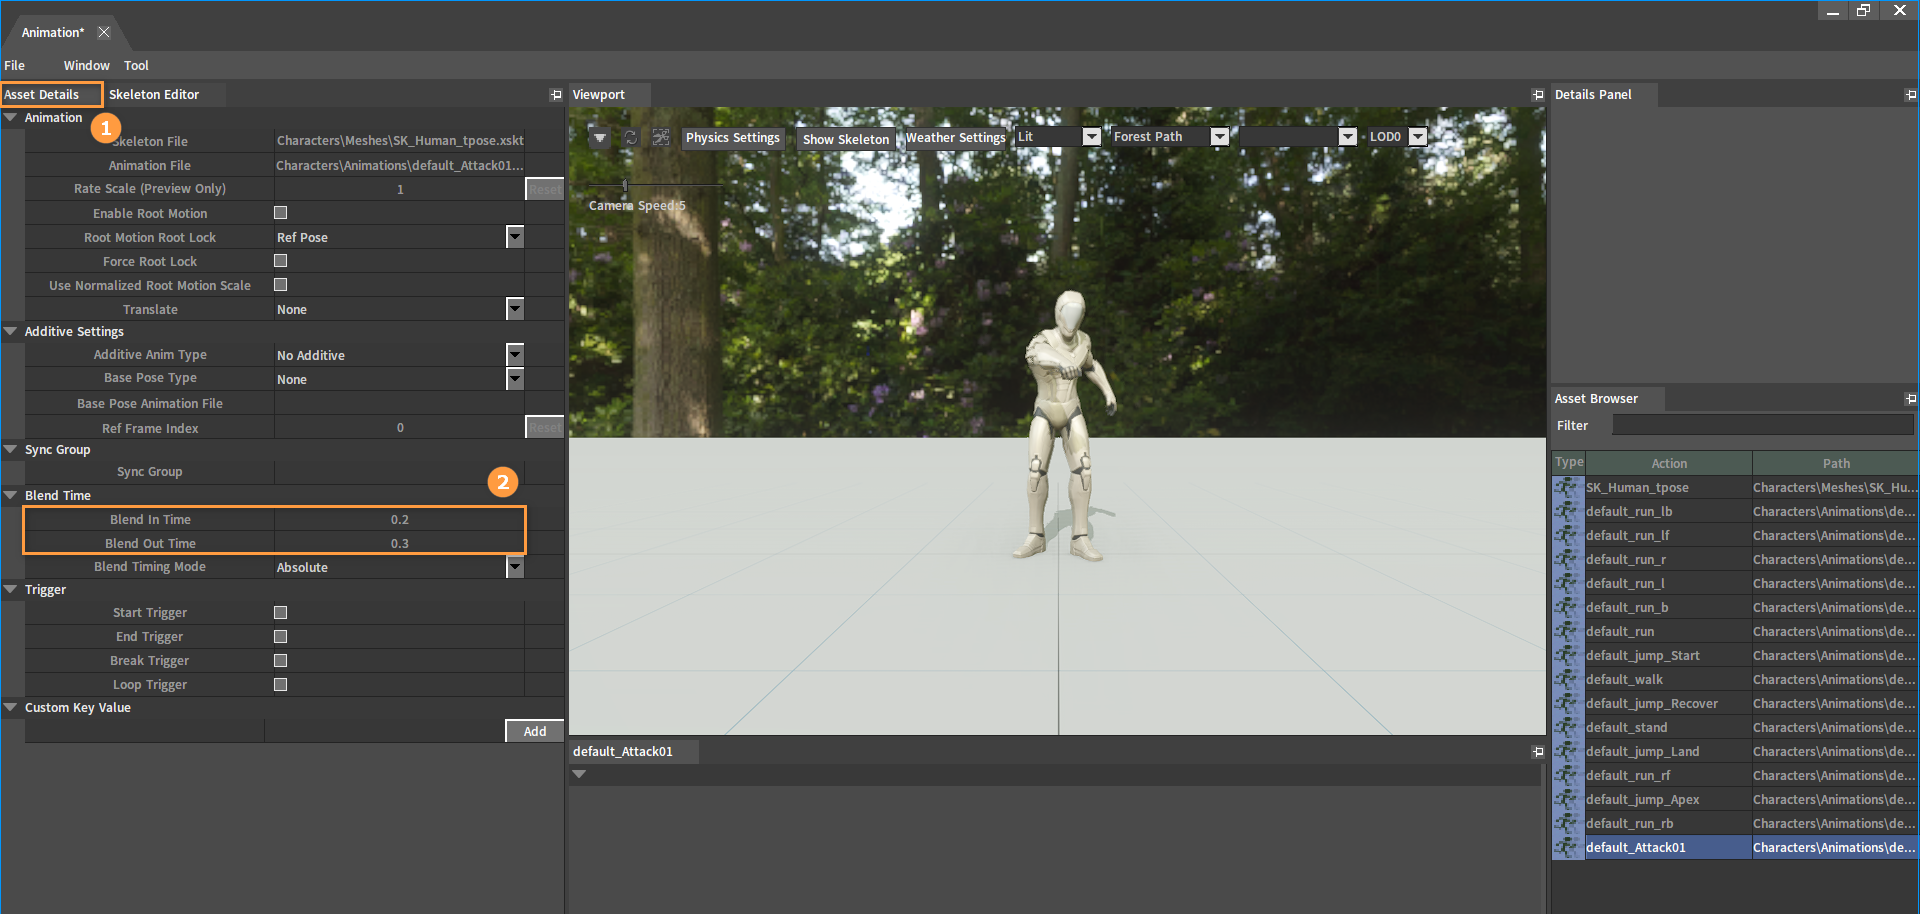
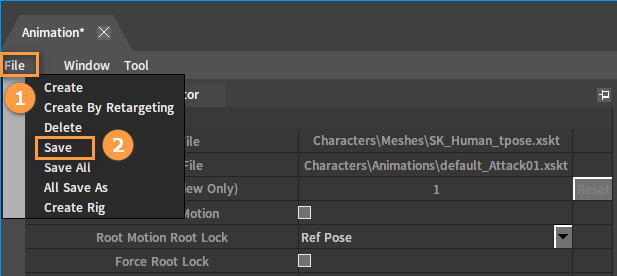
Click File (Menu Bar) -> Save to save the modifications.
Configuring Animation Trees
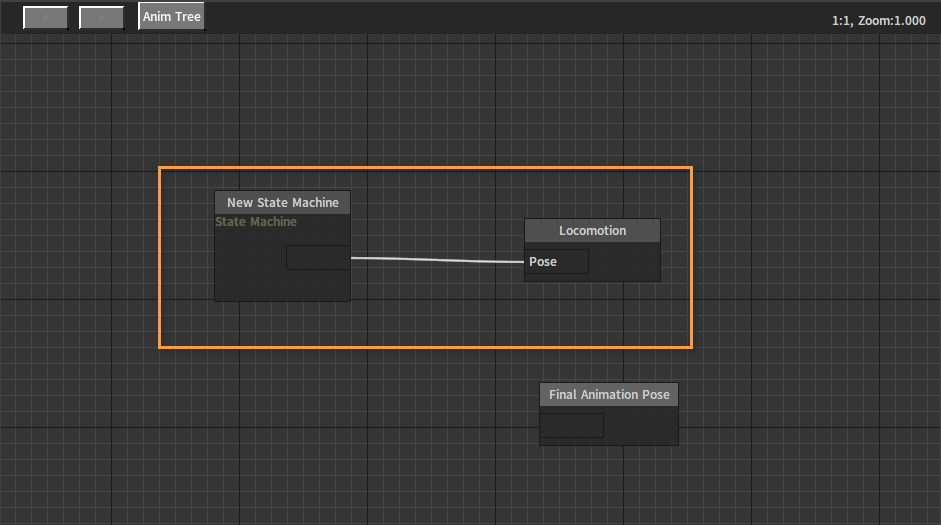
In the Animation Tree created in the Character Quick Start, add a Cached Pose Node and rename it to Locomotion. Connect the State Machine node to this node.
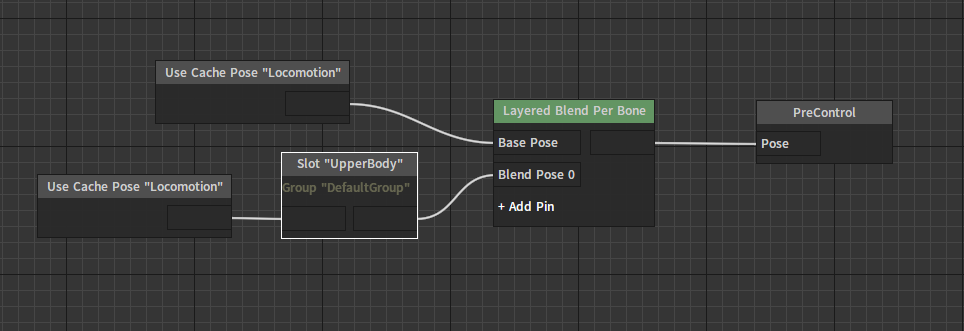
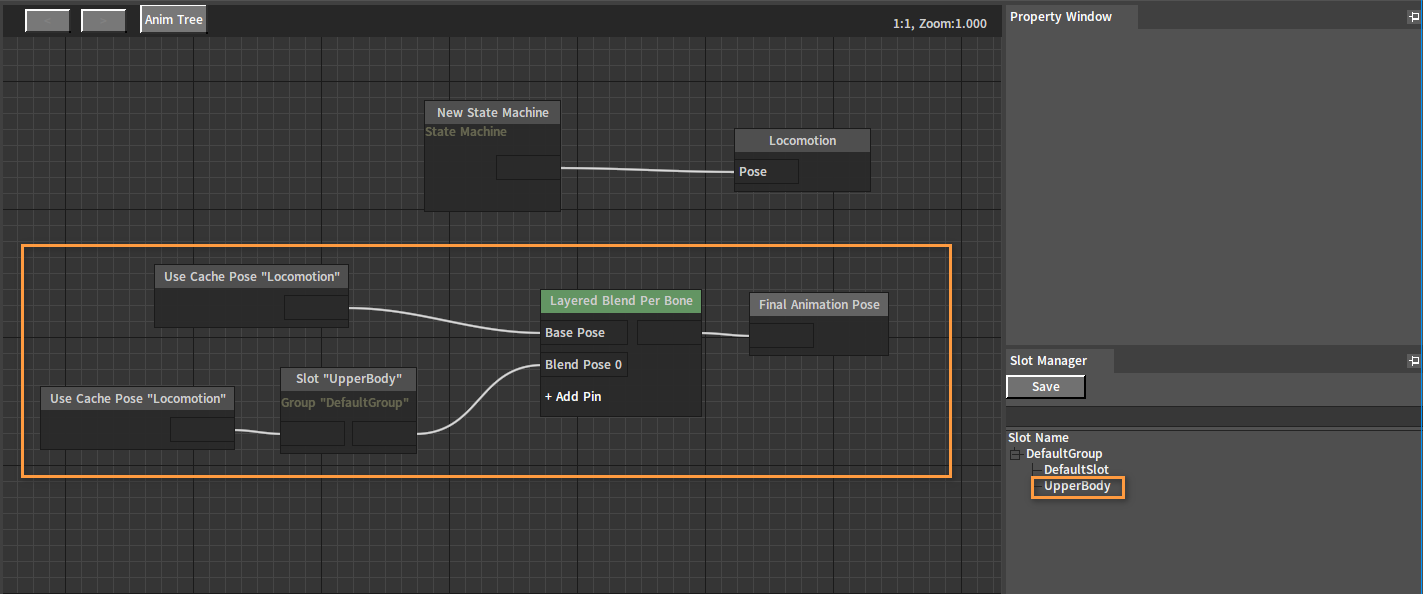
Add an UpperBody slot in the Slot Manager. Then add a Layered Blend Per Bone node, a Slot "UpperBody" node, and two Use Cache Pose "Locomotion" nodes and connect the nodes as shown below.
Note: For the use of Slot nodes, please refer to Animation Slots.
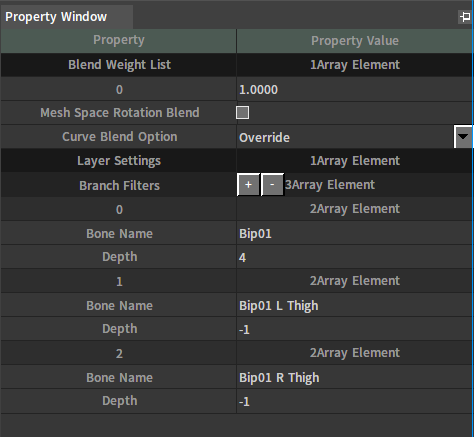
Select the Layered Blend Per Bone node and click the ![]() button in the Property Window to add three layers.
button in the Property Window to add three layers.
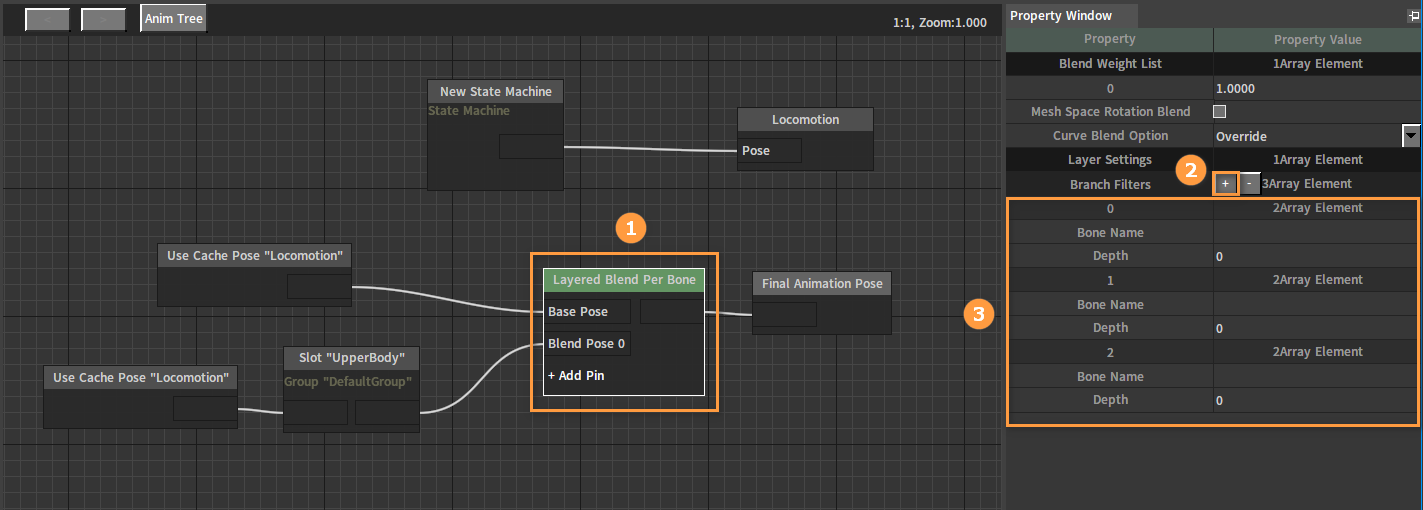
Fill in the Bone Name and Depth for these three layers respectively as shown below to specify the bones affected by the blend node.
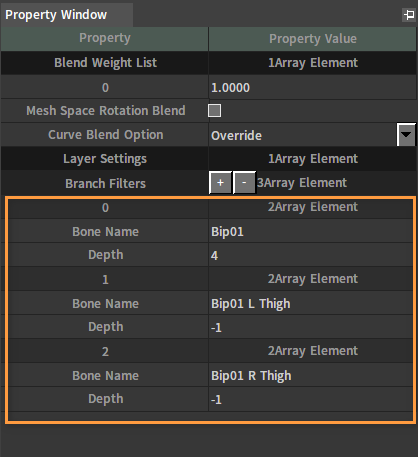
The attack animation that needs to be blended involves the upper body performing the attack action while the lower body remains unblended. The Bip01 bone, with a depth of 4 (greater than 0), controls this bone and its child bones to blend with the base pose.
Bip01 bone (yellow highlight):
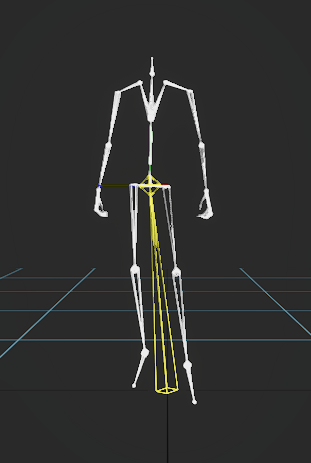
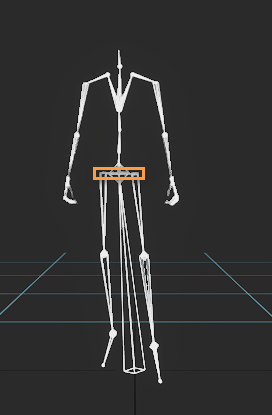
The lower body is for walking animation, so it does not need to be blended. Find the bones controlling the lower body, which are Bip01 L Thigh (left thigh) and Bip01 R Thigh (right thigh), and set the blend depth of these two bones to -1 to prevent blending of the lower body and maintain the walking animation there.
Bip01 L Thigh bone and Bip01 R Thigh bone (orange box):
Click the Save button.
Input Settings
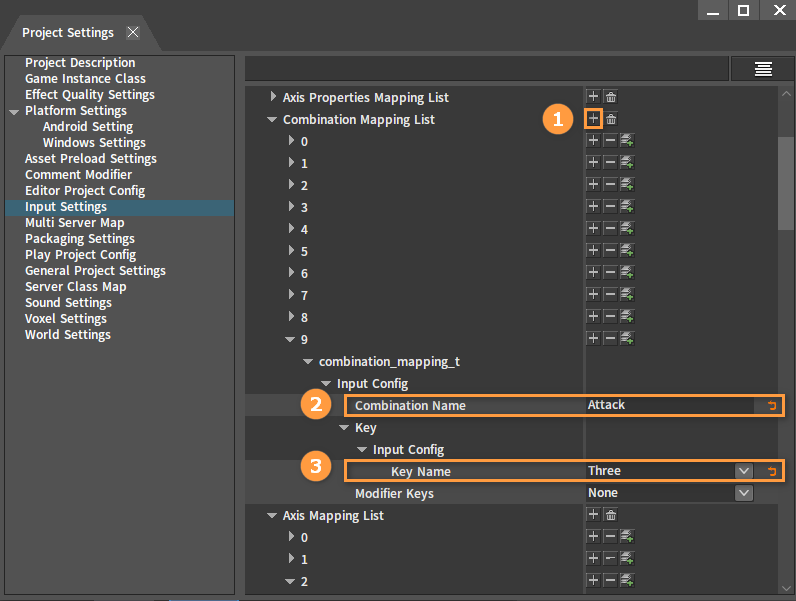
Continue to add a combination mapping in Input Settings which has been mentioned in Editing Input Settings of Character Quick Start. Click the ![]() button next to the Combination Mapping List to add an empty combination mapping, and then set its Combination Name to Attack, and Key Name to Three.
button next to the Combination Mapping List to add an empty combination mapping, and then set its Combination Name to Attack, and Key Name to Three.
Writing Scripts
Continue editing the original script (controller.lua).
Bind the attack callback to the character in the on_setup_input_component() function, as shown below:
input_comp:AddCombinationBinding("Attack", IE_Pressed, true, false, true, "Attack_Pressed")

nx_callback(owner, "Attack_Pressed", "on_attack_pressed")
Blend the attack animation in the callback function on_attack_pressed().
function on_attack_pressed(owner)
    local actor = character_get_actor(owner)
    if not nx_is_valid(actor) then
        return
    end

    actor:BlendAction("default_Attack01", false, false, true, 1.0, true, "UpperBody", true)
end
controller.lua:
--Animation resource types
AT_UNKNOWN = 0
AT_SKELETON = 1
AT_SKELETON_AS_ANIMSEQUENCE = 2
AT_ANIMSEQUENCE = 3
AT_MONTAGE = 4
AT_BLENDSPACE = 5
AT_BLENDSPACE1D = 6
AT_AIMOFFSETBLENDSPACE = 7
AT_ANIMTREE = 8

local IE_Pressed        = 0     --Press the key
local IE_Released       = 1     --Release the key
local IE_Repeat         = 2
local IE_DoubleClick    = 3
local IE_Axis           = 4
local IE_MAX            = 5

local CAMERA_DISTANCE_CHANGE_SPEED = 0.5
local CAMERA_DISTANCE_MIN = -1
local CAMERA_DISTANCE_MAX = 50


--use this for initialization
function on_begin_play(component)
    local owner = component.ActorOwner

    if nx_is_valid(owner) then
        local input_comp = owner.InputComponent

        if nx_is_valid(input_comp) then
            nx_bind_script(owner, nx_current())

            --The first parameter corresponds to the Axis Name in the Input Settings
            --The last parameter is the custom event name
            input_comp:AddAxisBinding("MoveForward", true, false, true, "InputAxisEvent_MoveForward")
            input_comp:AddAxisBinding("MoveRight", true, false, true, "InputAxisEvent_MoveRight")
            input_comp:AddAxisBinding("Turn", true, false, true, "InputAxisEvent_Turn")
            input_comp:AddAxisBinding("LookUp", true, false, true, "InputAxisEvent_LookUp")
            input_comp:AddAxisBinding("AdjustCameraDis", true, false, true, "InputAxisEvent_AdjustCameraDis")

            input_comp:AddCombinationBinding("Attack", IE_Pressed, true, false, true, "Attack_Pressed")

            --The second parameter is the last parameter in AddAxisBinding. The last parameter represents the function name in the script.
            nx_callback(owner, "InputAxisEvent_MoveForward", "on_moveforward")
            nx_callback(owner, "InputAxisEvent_MoveRight", "on_moveright")
            nx_callback(owner, "InputAxisEvent_Turn", "on_turn")
            nx_callback(owner, "InputAxisEvent_LookUp", "on_lookup")
            nx_callback(owner, "InputAxisEvent_AdjustCameraDis", "on_adjust_camera_dis")

            nx_callback(owner, "Attack_Pressed", "on_attack_pressed")

            nx_callback(owner, "on_velocity_changed", "on_velocity_changed")

        end
    end

    nx_callback(component, "on_tick", "tick")
end


--use this for release
function on_end_play(component)
end

--Get actor
function character_get_actor(character)
    if nx_is_valid(character) then
        local mesh_component = character.MeshComponent

        if nx_is_valid(mesh_component) then
            local vis_base = mesh_component.VisBase

            if nx_is_valid(vis_base) and nx_is_kind(vis_base, "Actor") then
                return vis_base
            end
        end
    end

    return nx_null()
end

--Get spring_arm
function character_get_spring_arm(character)
    if nx_is_valid(character) then
        local spring_arm_component = character:FindComponentByClassName("LSpringArmComponent")

        return spring_arm_component
    end

    return nx_null()
end

--Move forward callback
function on_moveforward(owner, axis_value)
    if not nx_is_valid(owner) then
        return 0
    end

    --Get controller Y-axis angle
    local controller = owner.Controller

    if nx_is_valid(controller) then
        local yaw = controller.AngleY
        --Get forward direction
        local x, y, z = nx_function("ext_angle_get_forward_vector", 0.0, yaw, 0.0)

        --Add movement

        owner:AddMovementInput(x, y, z, axis_value)
    end

    return 1
end

--Move right callback
function on_moveright(owner, axis_value)
    if not nx_is_valid(owner) then
        return 0
    end

    --Get controller Y-axis angle
    local controller = owner.Controller

    if nx_is_valid(controller) then
        local yaw = controller.AngleY
        --Get right direction
        local x, y, z = nx_function("ext_angle_get_right_vector", 0.0, yaw, 0.0)

        --Add movement
        owner:AddMovementInput(x, y, z, axis_value)
    end
    return 1
end

--Rotate left and right (around Y-axis) callback
function on_turn(owner, axis_value)
    if not nx_is_valid(owner) then
        return 0
    end

    owner:AddControllerYawInput(axis_value)

    return 1
end

--Rotate up and down (around X-axis) callback
function on_lookup(owner, axis_value)
    if not nx_is_valid(owner) then
        return 0
    end

    owner:AddControllerPitchInput(-axis_value)

    return 1
end

--Mouse wheel callback
function on_adjust_camera_dis(owner, axis_value)
    if not nx_is_valid(owner) then
        return 0
    end

    local spring_arm_component = character_get_spring_arm(owner)

    if nx_is_valid(spring_arm_component) then
        local delta = axis_value * CAMERA_DISTANCE_CHANGE_SPEED

        local cur_value = spring_arm_component.TargetArmLength
        local new_value =  cur_value + delta

        if delta > 0 then
            if new_value > CAMERA_DISTANCE_MAX then
                new_value = CAMERA_DISTANCE_MAX
            end

            spring_arm_component.TargetArmLength = new_value
        else
            if new_value < CAMERA_DISTANCE_MIN then
                new_value = CAMERA_DISTANCE_MIN
            end
            spring_arm_component.TargetArmLength = new_value
        end
    end

    return 1
end


--Velocity change callback
function on_velocity_changed(owner, component_id, new_x, new_y, new_z, old_x, old_y, old_z)
    local actor = character_get_actor(owner)

    if nx_is_valid(actor) then
        if actor:GetBlendActionCount() > 0 then
            local action_name = actor:GetBlendActionName(0)
            local action_type = actor:GetActionType(action_name)
            local action_index = actor:GetActionIndex(action_name)

            if action_type == AT_ANIMTREE then
                local speed = math.sqrt(new_x * new_x + new_y * new_y + new_z * new_z)
                actor:SetAnimTreeValue(action_index, "Speed", speed)

                nx_set_custom(actor,"CurSpeed",speed);
            end
        end
    end

    return 1
end

function on_attack_pressed(owner)
    local actor = character_get_actor(owner)
    if not nx_is_valid(actor) then
        return
    end

    actor:BlendAction("default_Attack01", false, false, true, 1.0, true, "UpperBody", true)
end
Binding Scripts
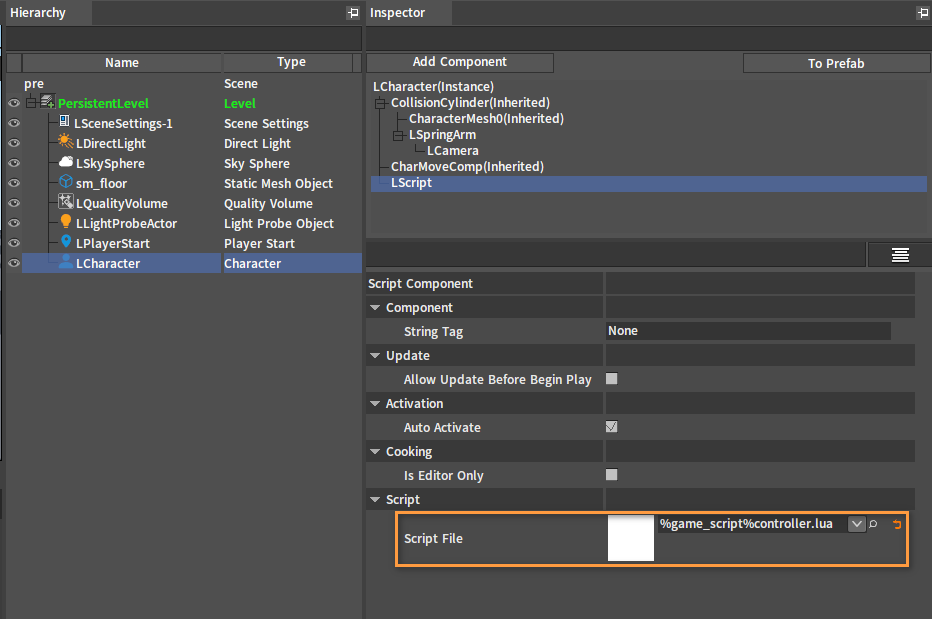
Drag the created script from the Project panel to the Script File of LScript.
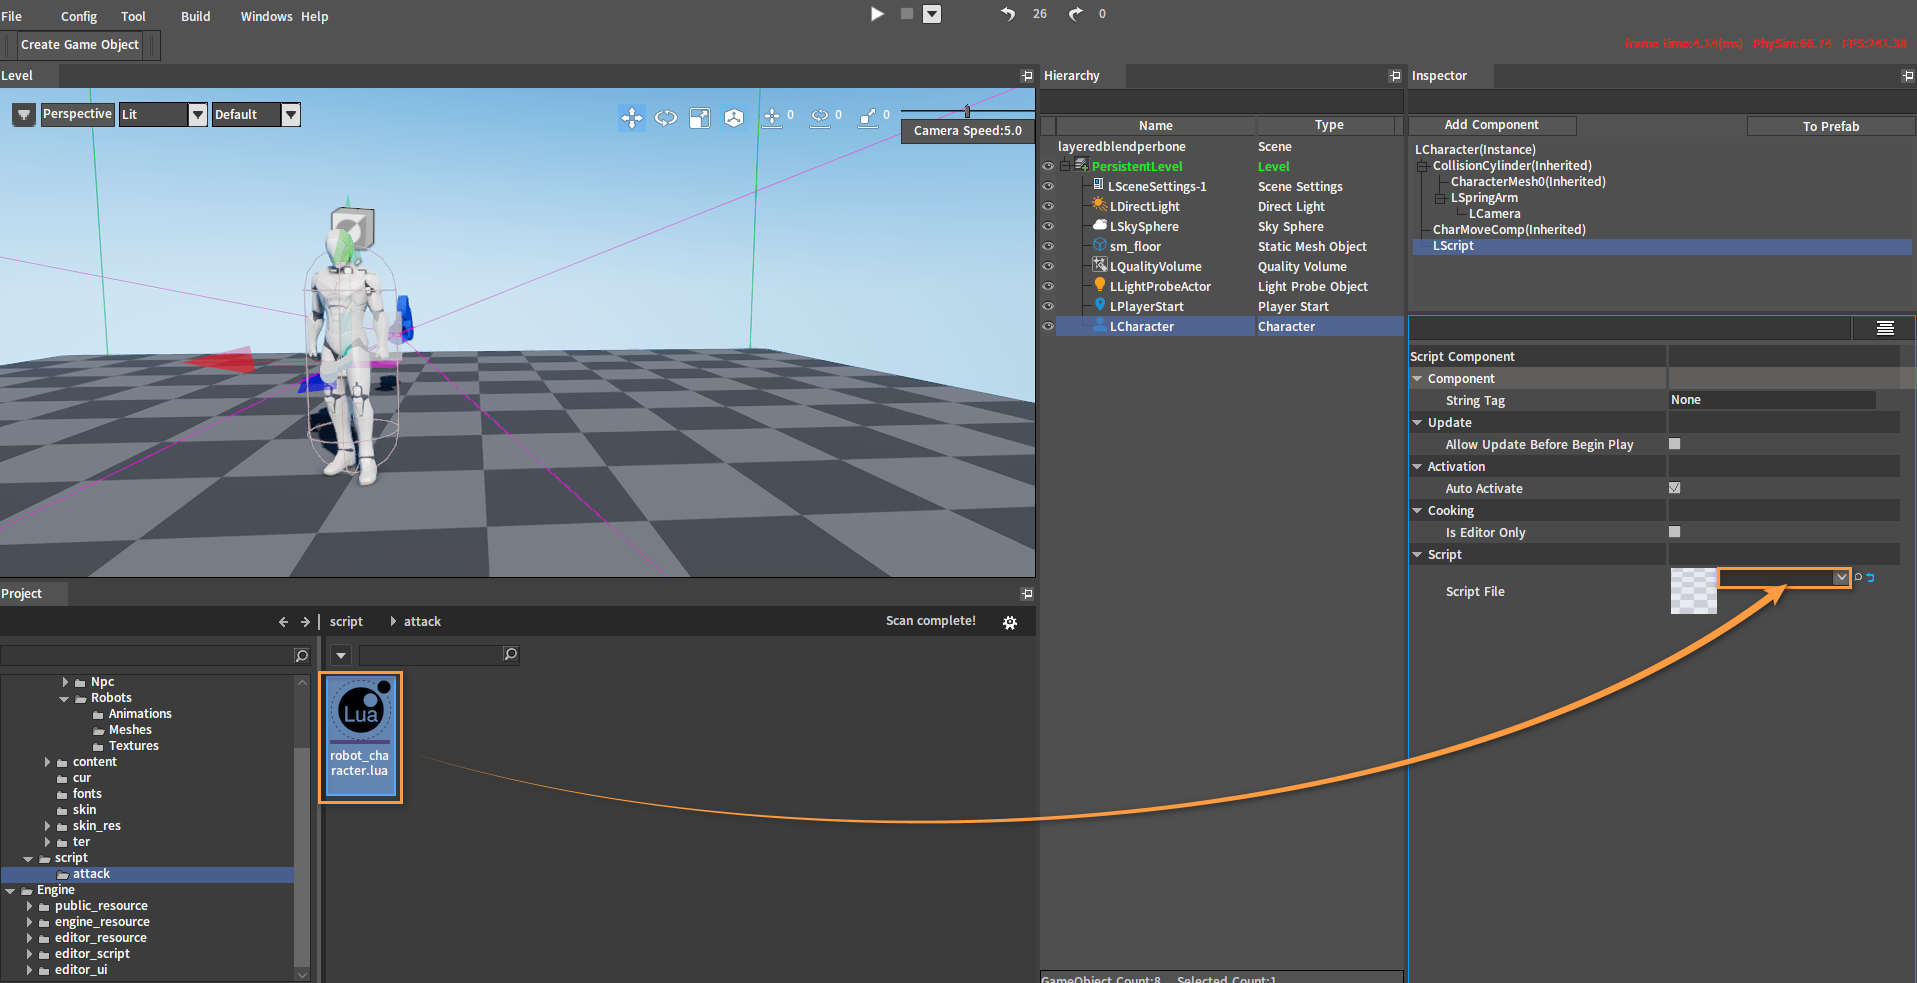
After dragging:
PIE
Click the PIE button, and press 3 while moving with WASD. The character will move and attack simultaneously.
