Animation Trees
Overview
An Animation Tree allows projects to produce node-based action playback management.
Anim Tree Editor
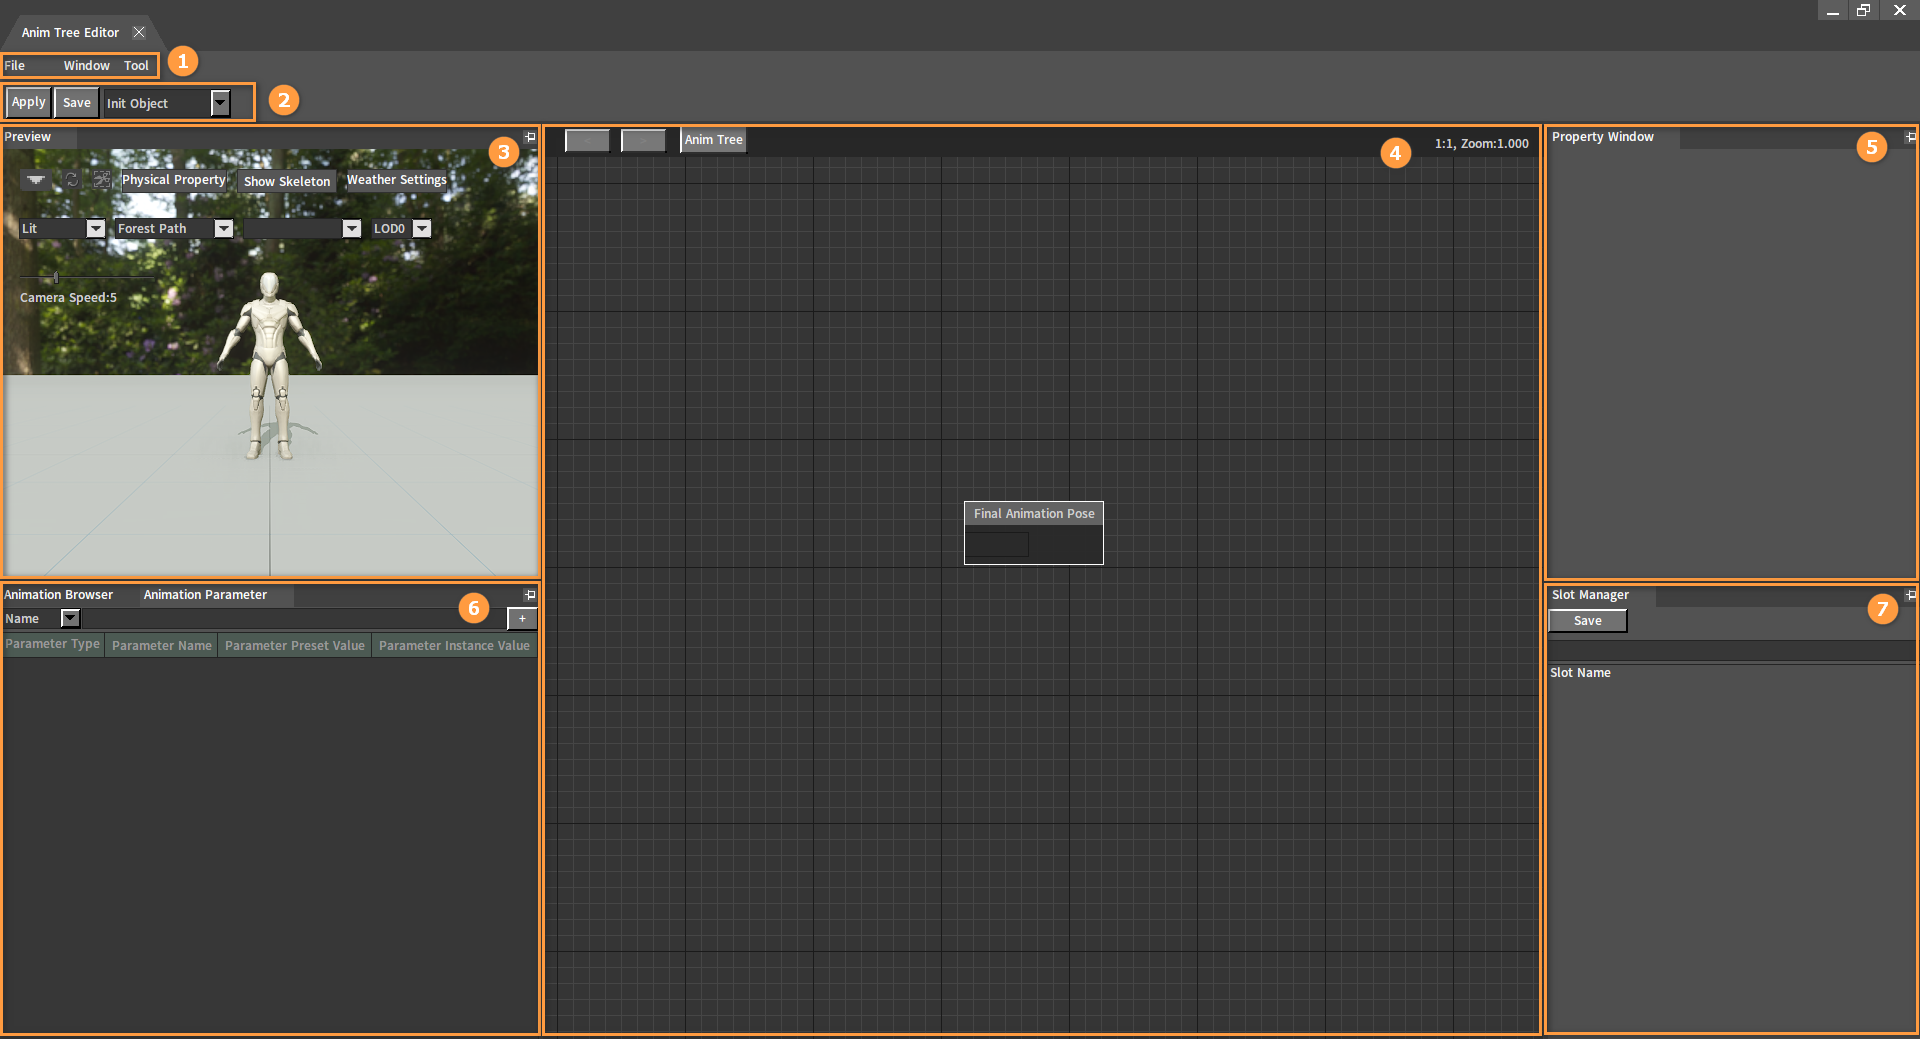
| No. | Description |
|---|---|
| 1 | Menu Bar |
| 2 | Toolbar |
| 3 | Preview Window |
| 4 | Anim Tree Edit Window. Anim Tree can be created, edited and debugged here. |
| 5 | Property Window. Properties related to the currently selected Anim Tree node object can be previewed and edited here. |
| 6 | Animation Browser. It displays the Action List, from which you can drag animation assets to the Anim Tree to create corresponding playback nodes. Animation Parameter Window. It is used for Anim Tree parameter management and real-time debugging. |
| 7 | Slot Manager. It is used to add or delete Slot groups or Slots and modify Slot names. |
Opening the Anim Tree Editor
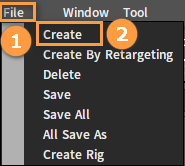
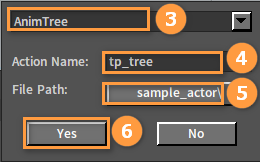
In the Animation Editor, click File -> Create, select Anim Tree in the drop-down box, name the Anim Tree and select the file save path, then click Yes to enter the Anim Tree Editor.
Anim Tree Playback Nodes
Sequence Playback
Sequence Playback Node in the Anim Tree can sample Skeleton or Animation Sequence assets and output poses at specific points in time.
Using Nodes
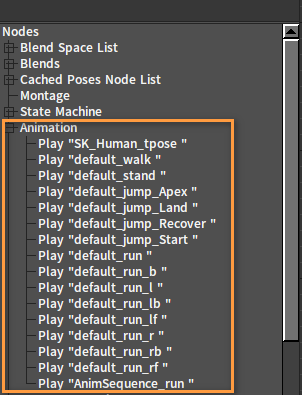
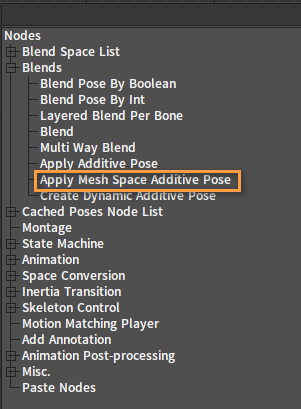
Right-click on the Anim Tree edit panel to open the Node Select panel. Expand the Animation category to browse all valid sequence playback nodes.
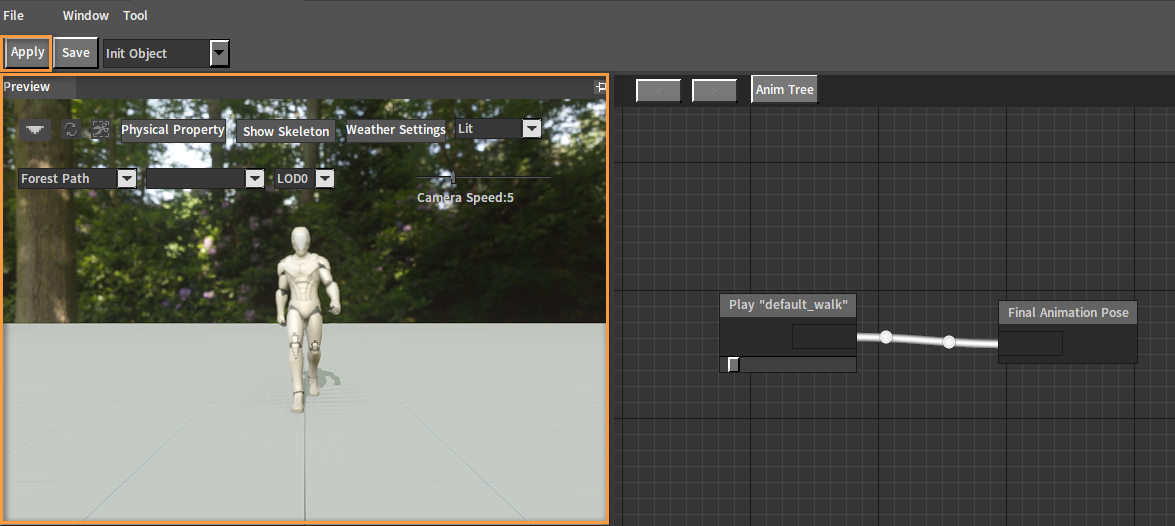
Select a node and place it.

Connect the output pin to the input pin of the target node.


Click the Apply button in the Toolbar to preview the effect as needed. If the button is enabled, the playback node will be driven and the playback will be shown in the Preview window.
Property Settings
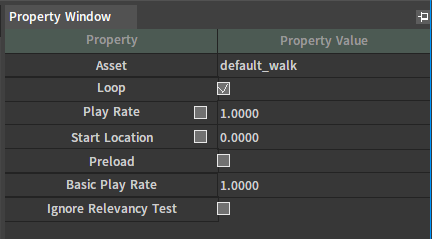
| Property | Description |
|---|---|
| Asset | Asset used by animation playback node. |
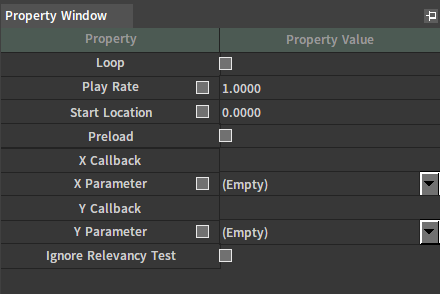
| Loop | Whether to loop play. |
| Play Rate | The playback rate of the animation. When checked, this property uses animation parameters, and you can select the animation floating point parameter as the playback rate. |
| Start Location | The time when the animation starts to play ( in seconds ). When checked, the property uses the animation parameter, and you can select the animation floating point parameter as the Start Location. |
| Preload | Whether to preload the animation while opening the Anim Tree. |
| Basic Play Rate | Scale the animation play rate. |
| Ignore Relevancy Test | When checked, the animation is made to ignore its relevance when switching states in the State Machine. |
Blend Space Player
Blend Space Player Node in the Anim Tree can use Blend Space assets to output poses at specific points in time.
Using Nodes
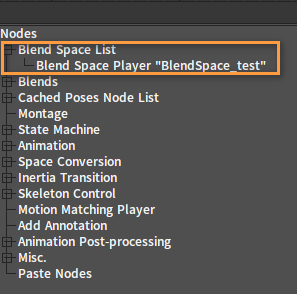
The placement process is similar to that of the sequence playback node.

Property Settings
| Property | Description |
|---|---|
| Loop | Whether to loop play. |
| Play Rate | Animation paly rate. |
| Start Location | Animation start time (in seconds). |
| Preload | Whether to preload the animation while opening the Anim Tree. |
| X Callback | Obtain the horizontal parameter control from the specified callback function. |
| X Parameter | When checked, this property uses the animation floating point parameter, and the drop-down list specifies the parameter from which to get the horizontal direction parameter control amount. |
| Y Callback | Obtain the vertical parameter control from the specified callback function. |
| Y Parameter | When checked, this property uses the animation floating point parameter, and the drop-down list specifies the parameter from which to get the vertical direction parameter control amount. |
| Ignore Relevancy Test | When checked, the animation is made to ignore its relevance when switching states in the State Machine. |
Blend Space 1D Player
Please refer to the Blend Space Player Nodes.
Aim Offset Player
Aim Offset Player Node in the Anim Tree can sample Aim Offset Blend Space assets and output poses at specific points in time.
Using Nodes
The placement process is similar to that of the Blend Space Player node, but specifying input for the Base Pose pin is required.

Property Settings
| Property | Description |
|---|---|
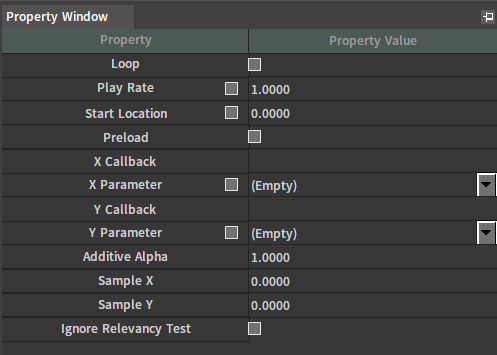
| Loop | Whether to loop the node. |
| Play Rate | The play rate of the node. |
| Start Location | The start location of the node while playing. |
| Preload | Whether to preload the animation while opening the Anim Tree. |
| X Callback | Obtain the horizontal parameter control from the specified callback function. |
| X Parameter | When checked, this property uses the animation floating point parameter, and the drop-down list specifies the parameter from which to get the horizontal direction parameter control amount. |
| Y Callback | Obtain the vertical parameter control from the specified callback function. |
| Y Parameter | When checked, this property uses the animation floating point parameter, and the drop-down list specifies the parameter from which to get the vertical direction parameter control amount. |
| Additive Alpha | Additive Alpha. |
| Sample X | X coordinate sampled in Blend Space. |
| Sample Y | Y coordinate sampled in Blend Space. |
| Ignore Relevancy Test | When checked, the animation is made to ignore its relevance when switching states in the State Machine. |
Aim Offset 1D Player
Please refer to the Aim Offset Player Nodes.
Blend Nodes
Blend Nodes
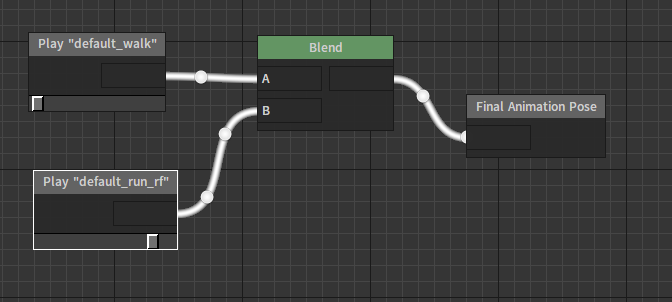
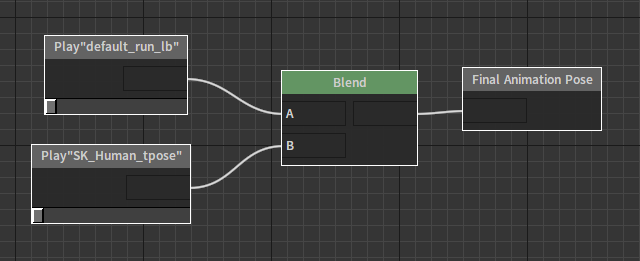
This node can blend input two poses based on the given weight value.
Using Nodes
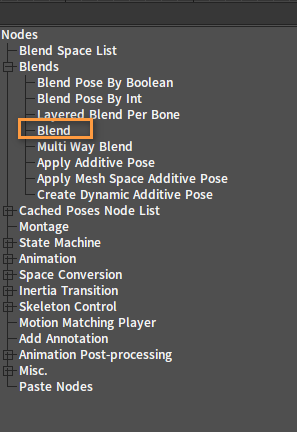
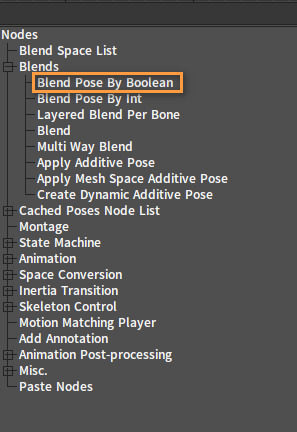
Right-click on the Anim Tree Edit panel to open the Node Select panel. Expand the Blends category and select Blend.
Blend added successfully:

You can still configure the node with appropriate inputs/outputs.
Property Settings
When a node is selected, its properties will be shown in the Property Window.
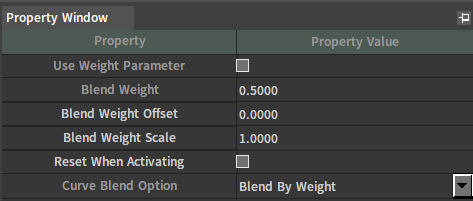
| Property | Description |
|---|---|
| Use Weight Parameter | Whether to use weight parameter. |
| Blend Weight | Blend weight. |
| Blend Weight Offset | Offset of blend weight. |
| Blend Weight Scale | Scale of blend weight. |
| Reset When Activating | Reset child node when reactivating. |
| Curve Blend Option | Set curve blend behaviors to control the blend methods of animation layers. |
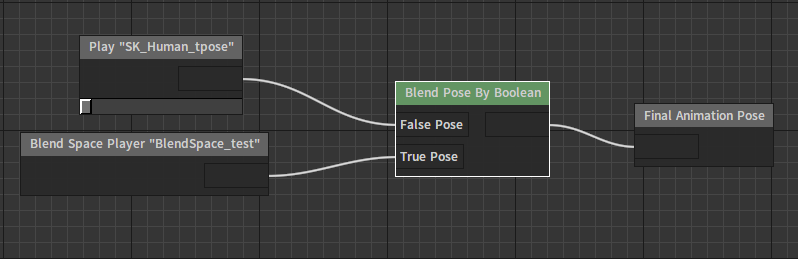
Blend Pose By Boolean
This node controls the output to switch between two inputs based on the Boolean parameter.
Using Nodes
Right-click on the Anim Tree Edit panel to open the Node Select panel. Expand the Blends category and select Blend Pose by Boolean.
Adding successfully:

You can still configure the node with appropriate inputs/outputs.
Property Settings
When a node is selected, its properties are shown in the Property Window.
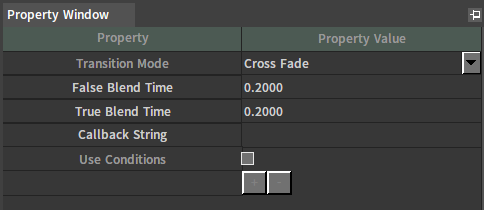
| Property | Description |
|---|---|
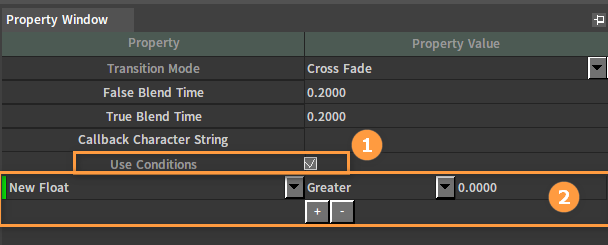
| Transition Mode | Transition mode used when playing the node. |
| False Blend Time | Time required to blend into the false pose. |
| True Blend Time | Time required to blend into the true pose. |
| Callback String | Configure the callback function, and decide whether to migrate based on the return value. |
| Use Conditions | Please refer to the Animation Parameters. |
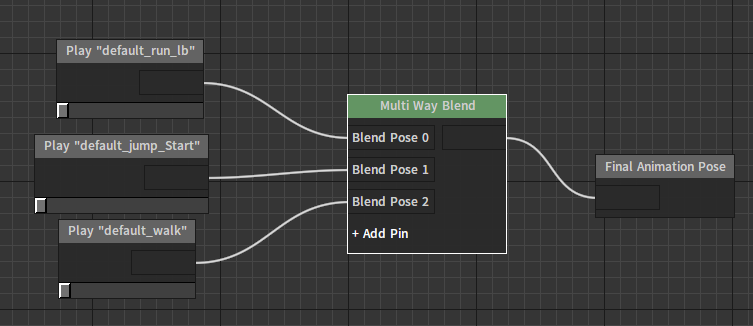
Multi Way Blend
This node can blend multiple poses inputted based on the given weight value.
Using Nodes
Right-click on a state graph of the Anim Tree to open the Node Select panel. Expand the Blends category and select Multi Way Blend.
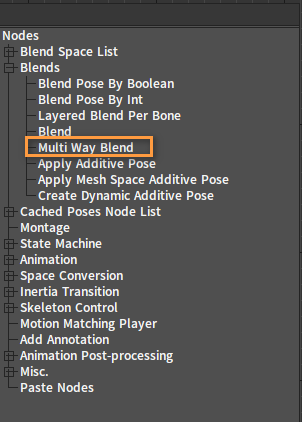
Multi Way Blend added successfully:

Click Add Pin on the node to add a new pin for it.

Pin added successfully:

You can still configure the node with appropriate inputs/outputs.
Property Settings
When a node is selected, its properties are shown in the Property Window.
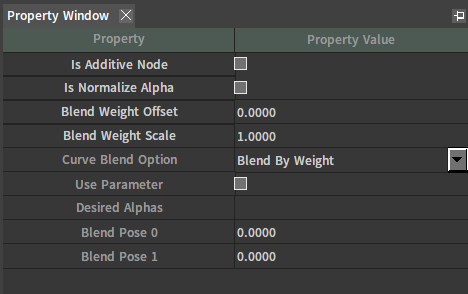
| Property | Description |
|---|---|
| Is Additive Node | Whether the input of this node is an additive type animation. |
| Is Normalize Alpha | Whether to use normalized Alpha values. |
| Blend Weight Offset | Offset of blend weight. |
| Blend Weight Scale | Scale of blend weight. |
| Curve Blend Option | Set curve blend behaviors to control the blend methods of animation layers.
|
| Use Parameter | Allowed to blend the animation poses according to the animation parameters after using them. |
| Desired Alphas | Each item in the list corresponds to the Alphas expected to be assigned to each pin. If the "Is Normalize Alpha" is not checked, the normalized Alpha value will be used. |
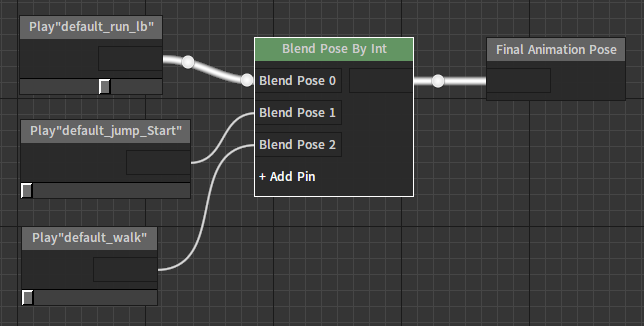
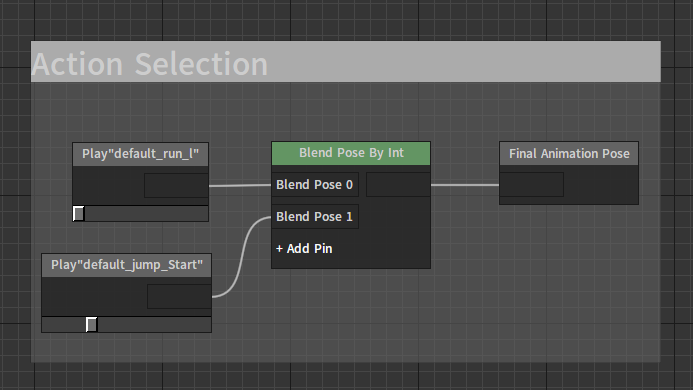
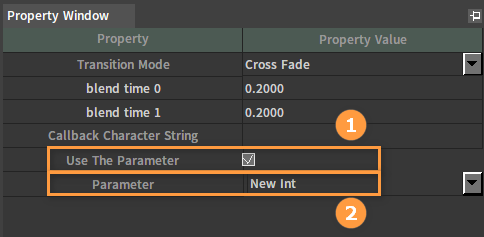
Blend Pose By Int
This node controls the output to switch among multiple inputs based on the Integer parameter.
Using Nodes
Right-click on the Anim Tree to open the Node Select panel. Expand the Blends category and select Blend Pose By Int.
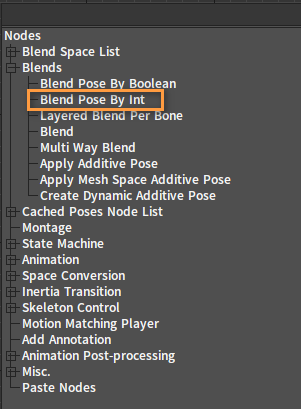
Blend Pose By Int added successfully:

Click Add Pin on the node to add a new pin for it.

Add Pin added successfully:

Then you can configure the node with appropriate inputs/outputs.
Property Settings
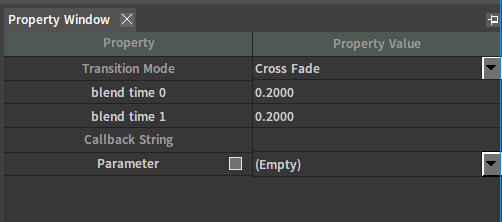
| Property | Description |
|---|---|
| Transition Mode | Transition mode used when playing the node. |
| Blend Time | Time required for each pose to blend in. |
| Callback String | Configure the callback function and decide whether to migrate based on the return value. |
| Parameter | When checked, this property uses the animation integer parameter, and the drop-down list specifies the parameter from which the parameter control amount is obtained. |
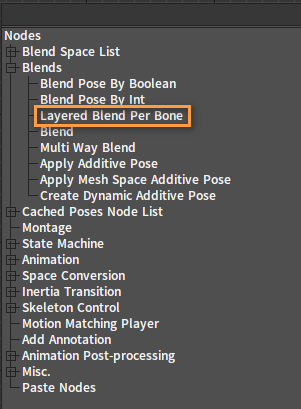
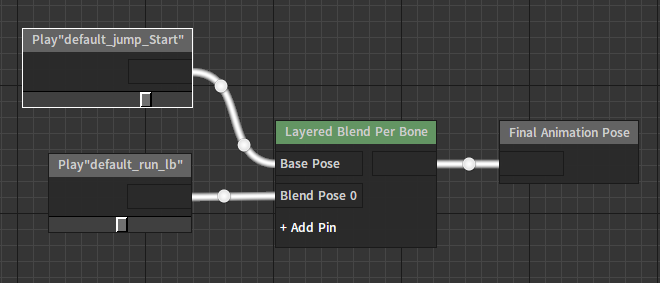
Layered Blend Per Bone
This node can add multiple layers of poses using a per-bone mask on the base pose. It is often applied to realize the demand that different parts of the character are driven by various animations.
Using Nodes
Right-click on the Anim Tree to open the Node Select panel. Expand the Blends category and select Layered Blend Per Bone.
Layered Blend Per Bone added successfully:

Click Add Pin on the node to add a new pin for it.

Add Pin added successfully:

Then you can configure the node with appropriate inputs/outputs.
Property Settings
When a node is selected, its properties are shown in the Property Window.

| Property | Description |
|---|---|
| Blend Weight List | Set the weight of each layer. |
| Mesh Space Rotation Blend | Whether to blend rotation in the mesh space. |
| Layer Setting | Layer Setting Bone Weight Mask. Each layer represents the corresponding blend pose, and the number of layers is the same as that of the blend pose inputted. Each layer can be configured with multiple branches. Each branch can specify a bone as its root and a depth value as its transition depth. When the Depth is less than or equal to 0, the bone and its child bones will not blend but apply the base pose. When the Depth is greater than 0, the bone and all its child bones will blend with the base pose, gradually increasing the blend weight of the blend pose as the Depth increases. |
Applying Additive Pose
This node can add sample data of the Additive Animation on the base pose.
Using Nodes
Right-click on the Anim Tree to open the Node Select panel. Expand the Blends category and select Apply Additive Pose.

Apply Additive Pose added successfully:

Then you can configure the node with appropriate inputs/outputs.
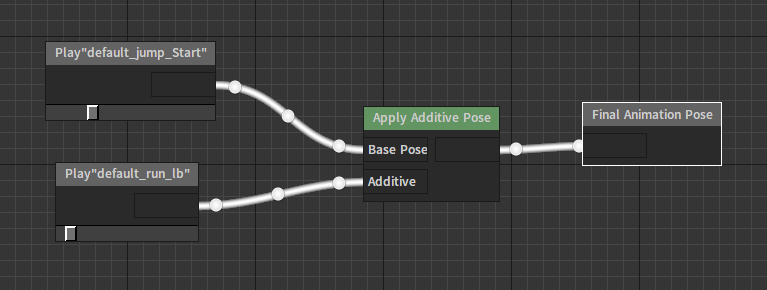
Property Settings
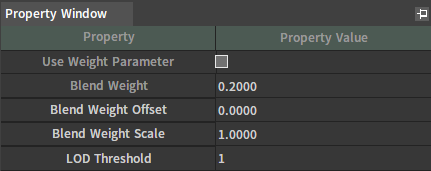
| Property | Description |
|---|---|
| Use Weight Parameter | If checked, the animation parameter will be used. Select the float parameter. After using it, the blend weight can be determined based on the animation parameter. Uncheck to modify the value of the blend weight. |
| Blend Weight | Blend weight. |
| Blend Weight Offset | Offset of blend weight. |
| Blend Weight Scale | Scale of blend weight. |
| LOD Threshold | Maximum LOD allowed for this node. |
Applying Mesh Space Additive Pose
This node can apply the sample data of the Apply Mesh Space Additive Animation on the base pose.
Using Nodes
Right-click on the Anim Tree to open the Node Select panel. Expand the Blends category and select Apply Mesh Space Additive Pose.
Apply Mesh Space Additive Pose added successfully:

Then you can configure the node with appropriate inputs/outputs. Note: The animation inputted from the Additive Pin needs to be configured as an Additive animation in Mesh Space.
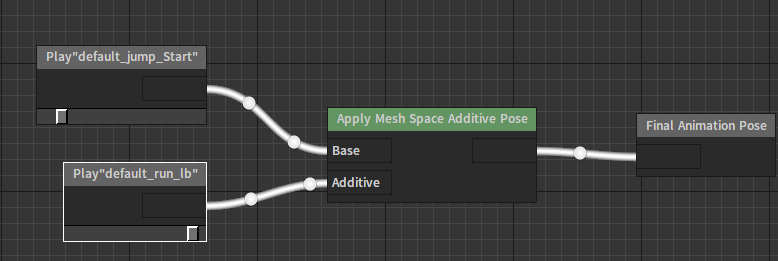
Property Settings
| Property | Description |
|---|---|
| Use Weight Parameter | If checked, the animation parameter will be used. Select the float parameter. After using it, the blend weight can be determined based on the animation parameter. Uncheck to modify the value of the blend weight. |
| Blend Weight | Blend weight. |
| Blend Weight Offset | Offset of blend weight. |
| Blend Weight Scale | Scale of blend weight. |
| LOD Threshold | Maximum LOD allowed for this node. |
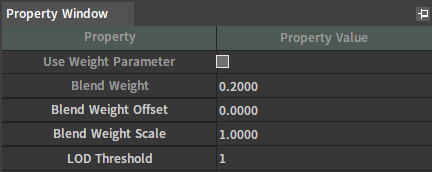
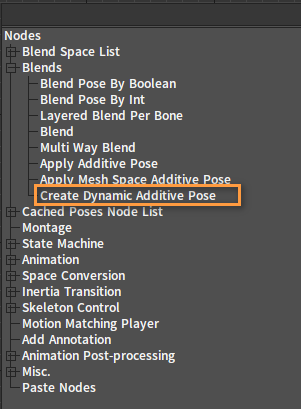
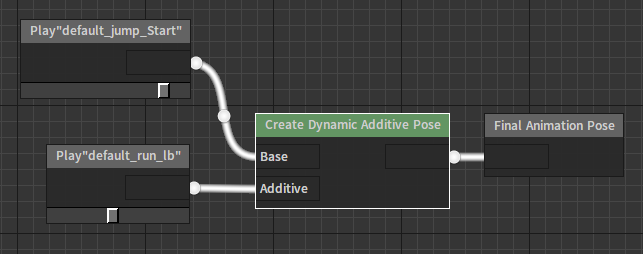
Creating Dynamic Additive Pose
This node can dynamically create data of Additive Animation.
Using Nodes
Right-click on the Anim Tree to open the Node Select panel. Expand the Blends category and select Create Dynamic Additive Pose.
Create Dynamic Additive Pose added successfully:

Then you can configure the node with appropriate inputs/outputs.
Property Settings

| Property | Description |
|---|---|
| Mesh Space Additive | Whether to create additive pose in Mesh Space. |
Cached Pose Related Nodes
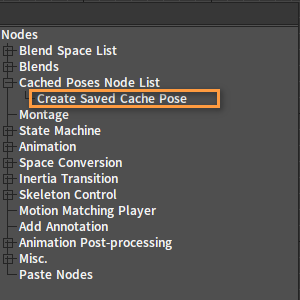
Creating Saved Cache Pose Nodes
This node can save the output pose data of any node of the Anim Tree for other nodes to use.
Using Nodes
Right-click on the Anim Tree Edit panel to open the Node Select panel. Expand the Cached Poses category and select Create Saved Cache Pose.
Create Saved Cache Pose added successfully:

Click the title area to modify the name as needed.

Add a Blend Space node and configure the node with appropriate inputs, so that the output pose of the Blend Space can be cached for other nodes to use.

Property Settings
When a node is selected, its properties are shown in the Property Window.

| Property | Description |
|---|---|
| Cache Name | Edit cache name. |
Using Cached Pose Nodes
This node can output cached pose data for other nodes to use.
Using Nodes
Right-click on the Anim Tree to open the Node Select panel. Expand the Cached Poses category and select Use Cache Pose Saved Test Pose.
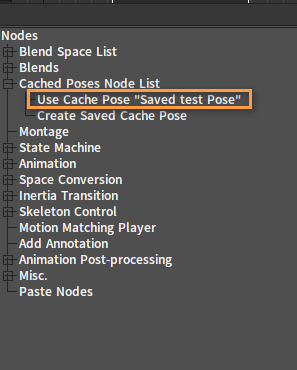
Added it to the diagram:

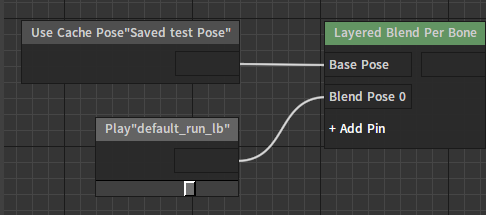
Then the cache pose node can be connected to any required node. E.g.
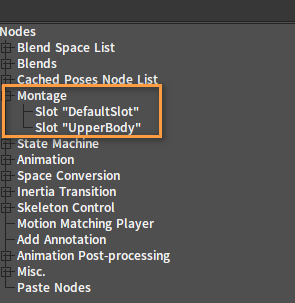
Slot Nodes
The Slot node is used to insert animation poses played outside the Anim Tree for other nodes to use.
Using Nodes
Right-click on the Anim Tree to open the Node Select panel, select Slot under the Montage category.
Slot added successfully:

Slot nodes are often used together with Layered Blend Per Bone nodes to achieve upper and lower body movement synthesis for characters. E.g.
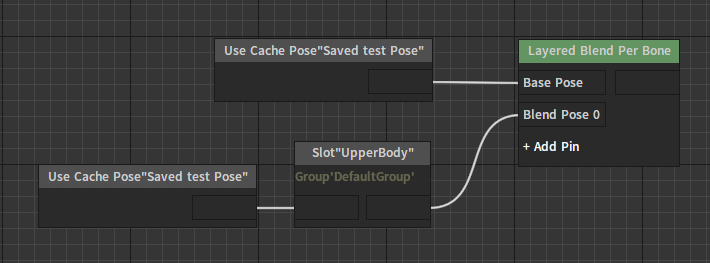
When there is no input outside the Anim Tree, the input of the Slot“UpperBody” pin equals to the output. The character plays a Locomotion animation.
When there is input from the exterior, the node’s output will switch to the external input. The upper body of the character will be replaced by the inputted animation.
Property Settings
When a node is selected, its properties are shown in the Property Window.

| Property | Description |
|---|---|
| Group | Slot group. |
| Slot | Select different Slot. |
| Transition Mode | Select the transition mode when playing a Slot node.
|
Other Nodes
Pose Snapshot
This node can use previously cached Pose Snapshots.
Using Nodes
Right-click the Anim Tree to open the Node Select panel, expand the Misc. category and select Pose Snapshot.
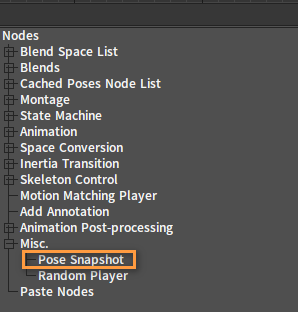
Pose Snapshot added successfully:

Pose Snapshot can be used to save a pose from a certain time in the past for future use.
For example, we can use it to achieve the effect of the character getting up after falling down in a ragdoll pose.
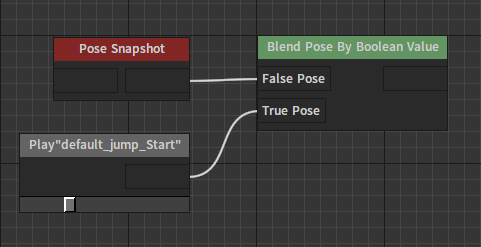
Capture a Pose Snapshot when the character standing up, then switch from the snapshot pose to the playing standup pose by using Blend Pose By Boolean Value node.
Property Settings
When a node is selected, its properties are shown in the Property Window.

| Property | Description |
|---|---|
| Snapshot Name | Desired name for the snapshot. |
Annotation
This node provides annotations for the Anim Tree and marks out the area it covers, and offers text description and uniform drag-and-drop operations via the Title Bar.
Using Nodes
Right-click the Anim Tree to open the Node Select panel, and select Add Annotation.
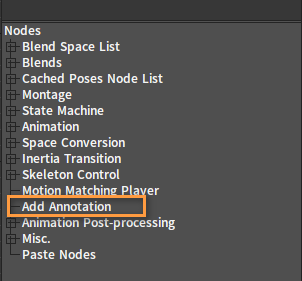
Add Annotation added successfully:

The node can be resized by dragging and dropping it to encompass the area of the node to be annotated.
And by setting the text in the Title Bar to complete the annotation of this area.
Property Settings
When a node is selected, its properties are shown in the Property Window.

| Property | Description |
|---|---|
| Annotation | Edit annotation text. |
Animation Post-processing Nodes
CCDIK
This node applies the CCDIK algorithm to parse the input pose.
Using Nodes
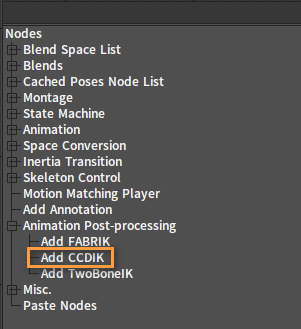
Right-click to open the Node Select panel in the Anim Tree, expand the Animation Post-processing category and select Add CCDIK.
CCDIK added successfully:

The pose that requires CCDIK solution can be connected to its input pin.
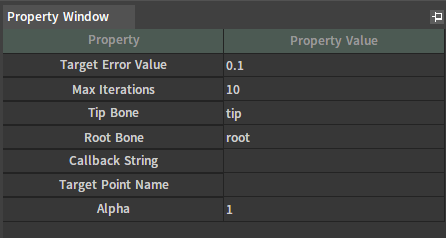
CCDIK Node Property Settings
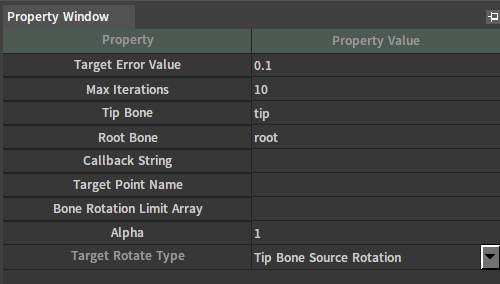
| Property | Description |
|---|---|
| Target Error Value | The maximum permissible value between the tip and the target. |
| Max Iterations | The maximum iterations of the solution algorithm. |
| Tip Bone | Tip bone. |
| Root Bone | Root bone index. |
| Callback String | Execute the callback string. When the callback string returns false, the node capabilities will not be executed. |
| Target Point Name | Mark the target point position of the bone. |
| Bone Rotation Limit Array | A list of values separated by commas is used to limit the rotation of bones. If the array elements are less than the number of bones, the unmatched bones will not be restricted. If the array elements are more than the number of bones, the excess values will be discarded. |
| Alpha | Blend weights. |
| Target Rotate Type | Describe the rotation type of the Tip Bone after it is solved to the target point.
|
FABRIK
This node applies the FABRIK algorithm to parse the input pose.
Using Nodes
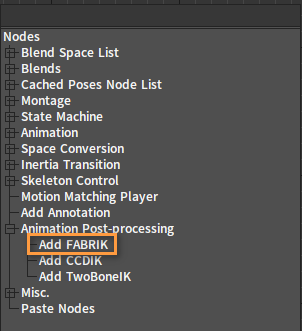
Right-click to open the Node Select panel in the Anim Tree, expand the Animation Post-processing category and select Add FABRIK.
FABRIK added sucessfully:

The pose that requires FABRIK parsing can be connected to its input pin.
Property Settings
| Property | Description |
|---|---|
| Target Error Value | The maximum permissible value between the tip and the target. |
| Max Iterations | The maximum iterations of the parsing algorithm. |
| Tip Bone | Tip bone. |
| Root Bone | Root bone index. |
| Callback String | Execute the callback string. When the callback string returns false, the node capabilities will not be executed. |
| Target Point Name | Mark the target point position of the bone. |
| Alpha | Blend weight. |
TwoBoneIK
This node applies the TwoBoneIK algorithm to parse the input pose.
Using Nodes
Right-click to open the Node Select panel in the Anim Tree, expand the Animation Post-processing category and select Add TwoBoneIK.
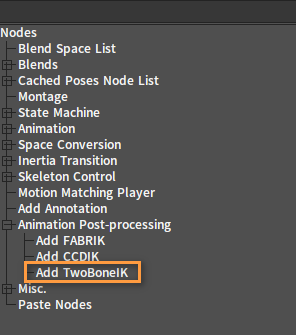
TwoBoneIK added successfully.

The pose that requires TwoBoneIK parsing can be connected to its input pin.
Property Settings

| Property | Description |
|---|---|
| Tip Bone | Marked IK tip bone. |
| Callback String | Execute the callback string. When the callback string returns false, the node capabilities will not be executed. |
| Target Point Name | Mark the target point position of the bone. |
| Joint Point Name | Joint point position. |
| Alpha Name | Specify the name of the animation's floating point parameter, and use the value of this parameter as the blend weight. |
| Target Rotate Name | Specify the name of the animation parameter (string or vector type) and use the value of the parameter as the rotation of the target point, with the rotation components separated by commas for the string type. |
| Rotate From Target | Whether to rotate according to the target point. |
| Rotate From Parent | Whether to rotate according to the parent bone. |
| Allow Stretch | Whether the bone allow stretch or not. |
| Stretch Start | Stretch start ratio. |
| Stretch Max | Maximum stretch scale. |
| Allow Rotate | The maximum rotation angle of the target bone. |
State Machine Nodes
State Machine
A State Machine node contains several states and transitions among states. Each state contains an Anim Tree and each transition includes a set of transition rules. Driven by external logic, the State Machine switches between states according to transition rules. The State Machine blends the output animation of the active state as its own output pose, and then passes it to its Anim Tree for further processing.
Creating State Machine Nodes
Right-click to open the Node Select panel in the Anim Tree, expand the State Machine category and select Add New State Machine.

Add New State Machine added successfully:

Click the title area of the node to enter the edit mode and modify the name of the State Machine.

Double-click the node to enter the state graph of the State Machine node.

The state and organizational structure can be created in the state graph.
Creating State Nodes
In the State graph, right-click to open the Node Select panel, and select Add State.

Create a New State node.

Click on the title area of the New State to edit the state name.

Property Settings

| Property | Description |
|---|---|
| State Name | Edit state name. |
| Start State Event | The name of the Start state event callback function. |
| End State Event | The name of the End state event callback function. |
| Fully Blend Into State Event | The name of the fully blend into state event callback function. |
| Reset On Every Entry | Whether to reset the child nodes of the associated Anim Tree on every entry. |
Creating Transition Nodes
An arrow representing transition can be pulled up by dragging the mouse from the state border.
![]()
Release the mouse in the appropriate place, and a node selection menu will pop-up, then select the desired node to create.

Select Add State.

In this way, a transition state and a target state are created at the same time.
How to Build the State Machine
In practice, an overall design can be carried out in the state graph according to the action requirements of the character.
And then implement state by state, transition by transition.
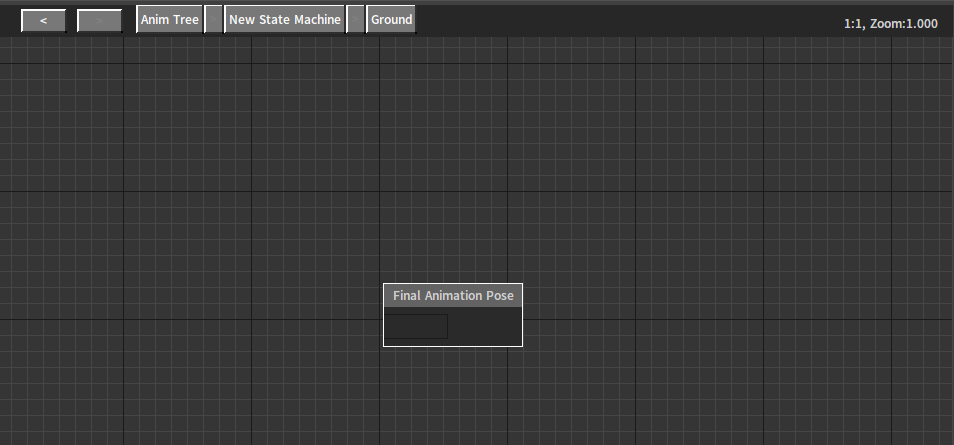
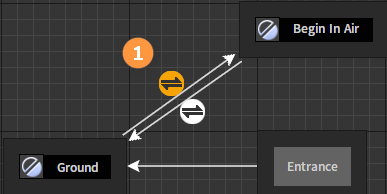
For example, double-click the Ground state node to open the associated Anim Tree.
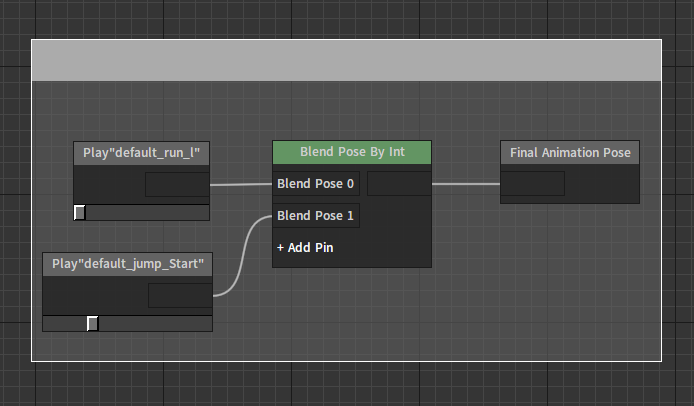
Various Anim Tree nodes mentioned above (including State Machine nodes) can be added to the Anim Tree to fulfill the desired ground action requirements. Here take the Blend Space Player node as an example:

Once this state is set, you can use the Navigation Bar to jump out of the editing layer and return to the previous state graph.
![]()
Next, edit other states and transition rules. For example, you can select a transition between the Ground and Begin In Air states and edit it in the Property Window to complete the configuration of transition rules.
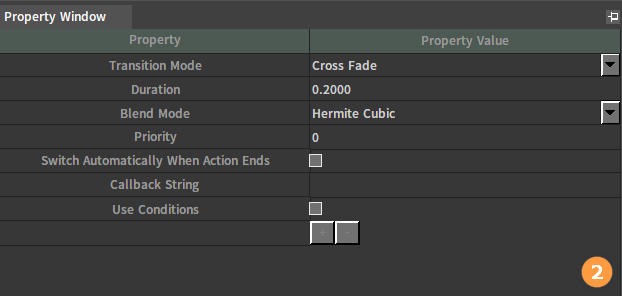
| Property | Description |
|---|---|
| Transition Mode | Transition Mode to connect two state animations. |
| Duration | The duration applied to fade in and fade out. |
| Blend Mode | The blend mode applied to fade in and fade out. |
| Priority | Animation Editor transition priority. |
| Switch Automatically When Action Ends | Whether to stop the automatic switch when the previous state action ends. |
| Callback String | Configure the callback function and determine whether to transit based on the return value. |
| Use Conditions | Refer to "Animation Parameters". |
Conduit
Unlike a regular state, the Conduit can be regarded as a special state, which does not contain an Anim Tree. In addition to controlling state transitions, State Machine also provides a kind of node called Conduit for one-to-many, many-to-one or many-to-many state switching requirements. The Conduit is similar to a state where the Anim Tree has been removed. It has an internal “allow transition or not” rule. By configuring this rule, when a state attempts to transit through a Conduit, it can be determined whether further transition can occur through it.
Creating Conduit Nodes
In the state graph, right-click to open the Node Select panel, and select Add Conduit.

Create a new Conduit node.

Click on the title area of the newly created state to edit the name.

Property Settings

| Property | Description |
|---|---|
| Conduit Name | Edit conduit name. |
| Can Entry | Whether can enter the conduit node. |
Using Nodes
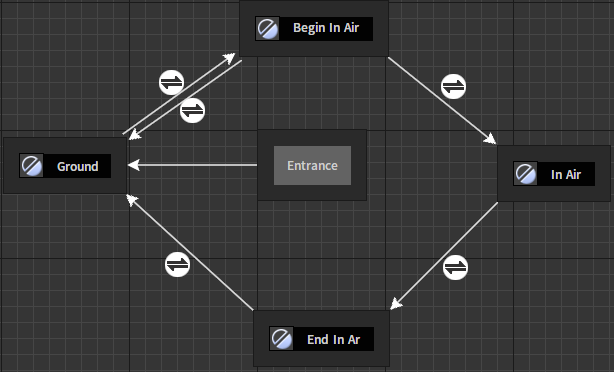
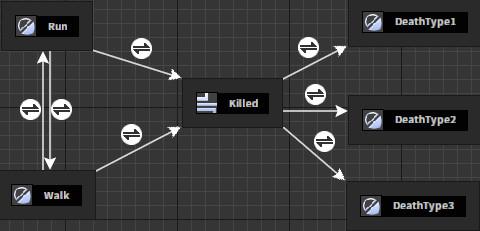
As shown below, the Killed node in the graph is a Conduit node. When the character is attacked in the Walk or Run state, and the health point is below the death threshold, the logic will control state to transit to the Killed Conduit node. Specific transition rules will determine which state to switch to.
State Machine Property Settings
When a node is selected, its properties are shown in the Property Window.
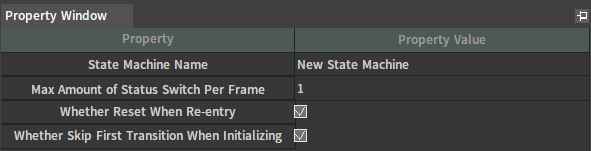
| Property | Description |
|---|---|
| State Machine Name | Edit state machine name. |
| Max Amount Of State Switch Per Frame | The maximum amount of running state transitions per frame. |
| Whether Reset When Re-entry | Whether a reset is required during second entry, if unchecked, update from the last leaving state. |
| Whether Skip First Transition When Initializing | If checked, it will be directly transited to the state that satisfies the rules; Otherwise, the entry state is transited to the state where the rule is satisfied. |
Copying/Pasting Nodes
To facilitate editing, the Flexi Editor allows users to perform copy and paste operations on all nodes and their connections within the currently selected area.
Build an existing node structure in the current Anim Tree, which you can choose to copy from an existing Anim Tree (This can be done between different Editors). The operation is as follows:
First, select a target area in the Anim Tree.
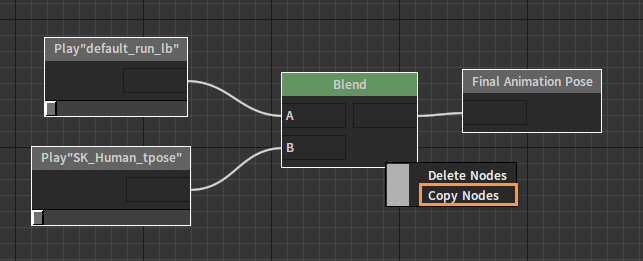
Then use the shortcut keys Ctrl + C or right-click on any selected node and select Copy Nodes.
Finally, press the shortcut keys Ctrl + V or right-click on a blank space in the target Anim Tree and select Paste Nodes.

Animation Parameters
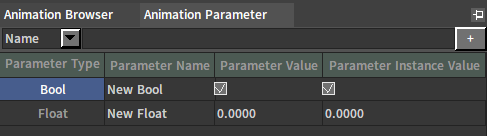
Each Anim Tree instance can hold a set of parameters that can be modified externally and read internally of the nodes.
Adding Parameters
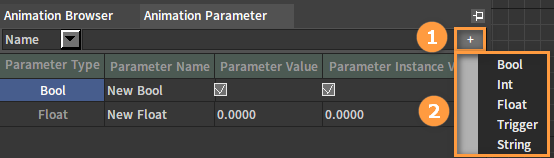
Click ![]() to select a desired parameter type to add a new parameter.
to select a desired parameter type to add a new parameter.
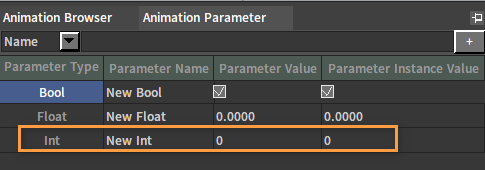
Editing Parameters
In the new Parameter entry, Parameter Name, Parameter Value and Parameter Instance Value can be edited.
The Parameter Value refers to the default value of the Anim Tree.
The Parameter Instance Value refers to the parameter value in the current Anim Tree instance. Modifying this value can affect the Anim Tree in real-time.
Applying Parameters
For example, in the Blend Pose By Int node, the control values of node can be specified by using parameters, so that the animation data processing inside the Anim Tree can be controlled externally.
Another example is that in the Mix Pose by Boolean Value node, various parameters can be applied for conditional expressions, and the final results are used to control the blend of nodes.
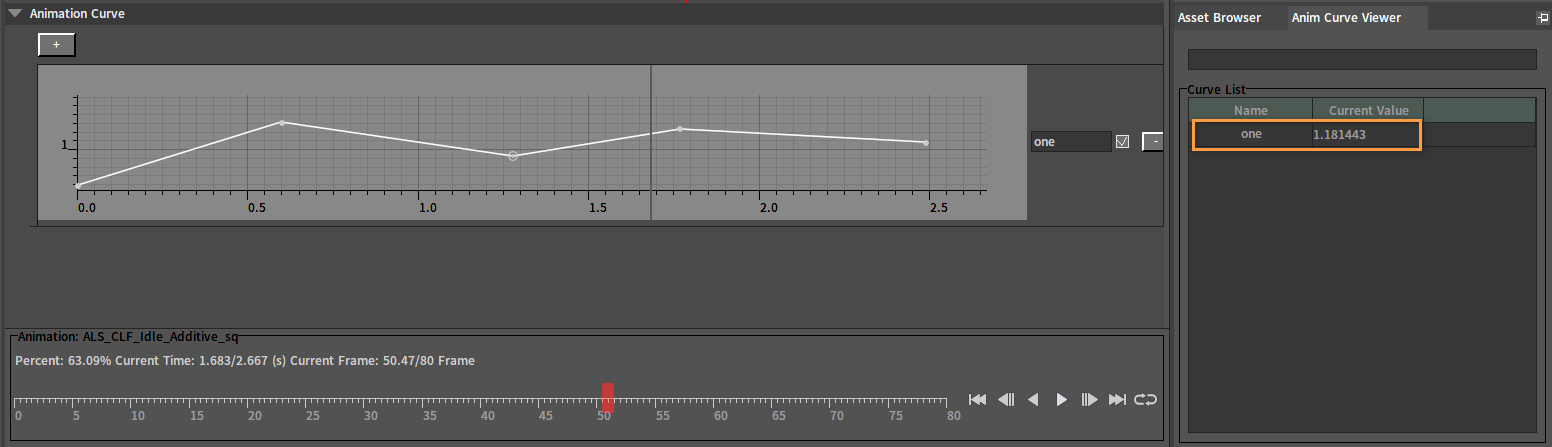
Anim Curve Viewer
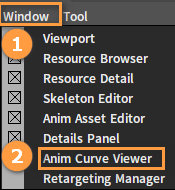
The Anim Curve Viewer is in off mode by default. Click Window -> Anim Curve Viewer to bring it up.

This panel displays the current values of the curve contained in the target skeleton in real time.