Publishing Online Projects
Last Updated Time: 10/11/2023
Overview
This documentation introduces the specific process of publishing online projects.
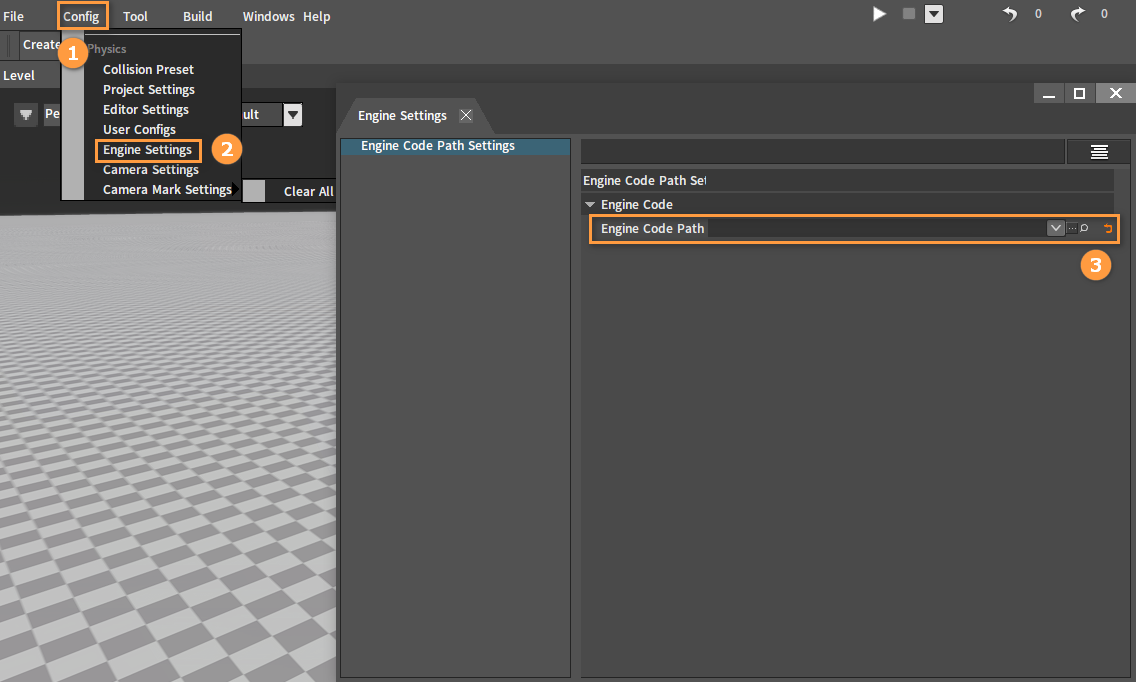
Setting Engine Paths (Except for Non-CPP Code Project)
Click Config (Menu Bar) -> Engine Settings to open the Engine Settings window and set the Engine Code Path here.
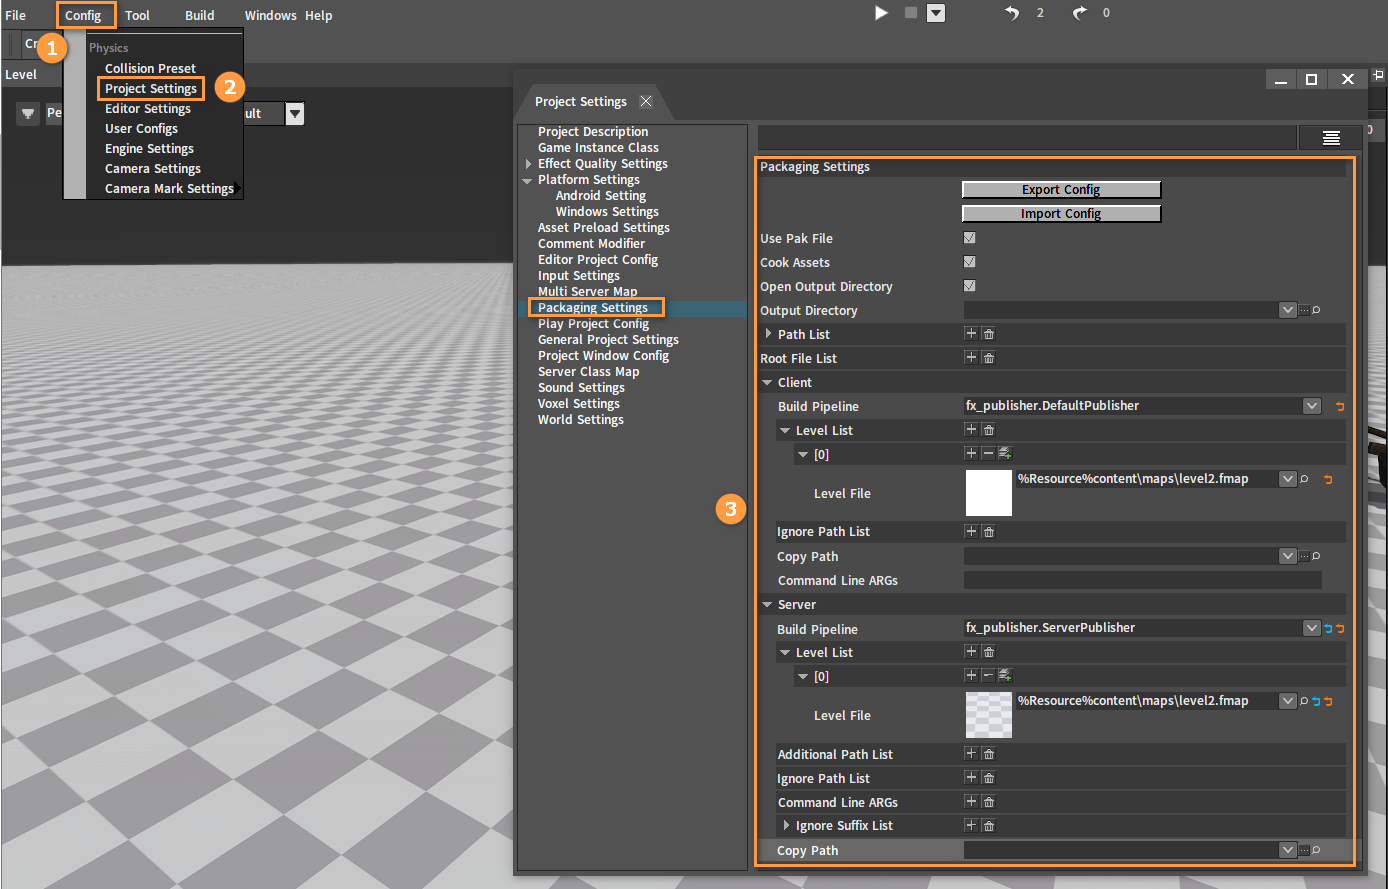
Setting Packaging Configuration
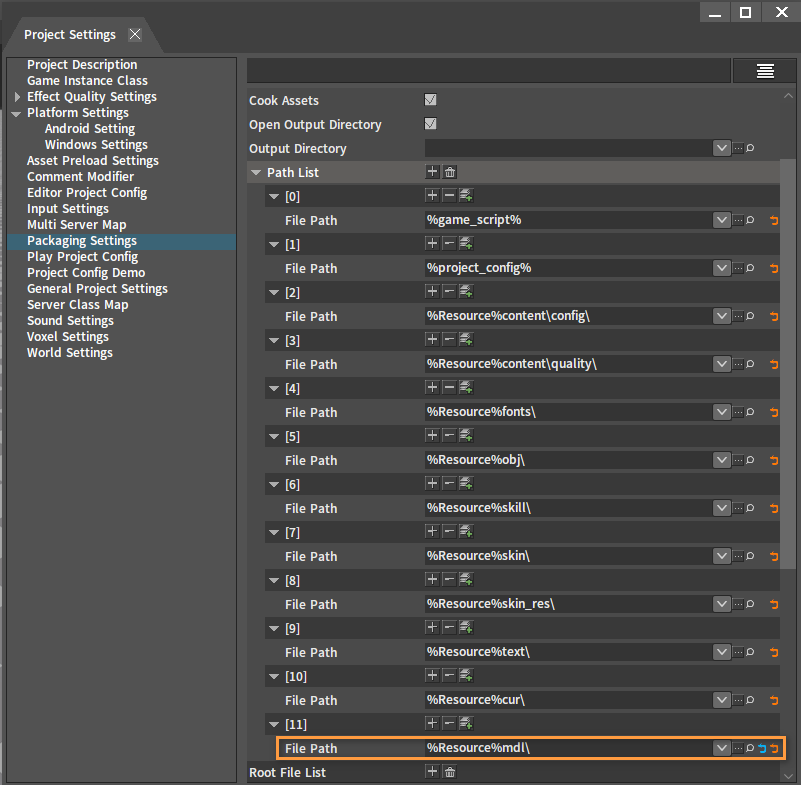
Click Config (Menu Bar) -> Project Settings to open the Project Settings window and click the Packaging Settings here. Then the interface is as shown below:
| Category | Property | Description |
|---|---|---|
| Public | Export Config | Export packaging configuration. |
| Import Config | Import packaging configuration. | |
| Use Pak File | Whether to package. If checked, it will be packaged; if not checked, it will not be packaged. | |
| Cook Assets | Whether to cook assets. If checked, it will be cooked; if not checked, it will not be cooked. (For the Client only, while the Server does not cook by default). | |
| Open Output Directory | Whether to open the directory after packaging is complete. If checked, it will be opened; if not checked, it will not be opened. | |
| Output Directory | The output directory of the package (Non-mandatory configured item). | |
| Path List | The resource directory necessary for the project (Server and Client). | |
| Root File List | Root files. The necessary files except for the above necessary resource directory can be found according to the corresponding reference relationships. | |
| Client | Build Pipeline | Build pipeline (User-definable). |
| Level List | Levels need to be published by the Client of the project. | |
| Ignore Path List | Exclude the path list directories when packaging in Client. | |
| Copy Path | The directory that the Client of the project needs to copy separately. | |
| Command Line ARGs | Additional command line arguments appended by the Client. | |
| Server | Build Pipeline | Server build pipeline (User-definable). |
| Level List | Levels need to be published by the Server of the project. | |
| Additional Path List | The project Server additionally included directories (except the resource directory in the Path List above). | |
| Ignore Path List | Exclude the path list directories when packaging in Server. | |
| Command Line ARGs | Server command line (used to generate Server startup bat). | |
| Ignore Suffix List | Server excluded suffix list. | |
| Copy Path | The directory that the Server of the project needs to copy separately. |
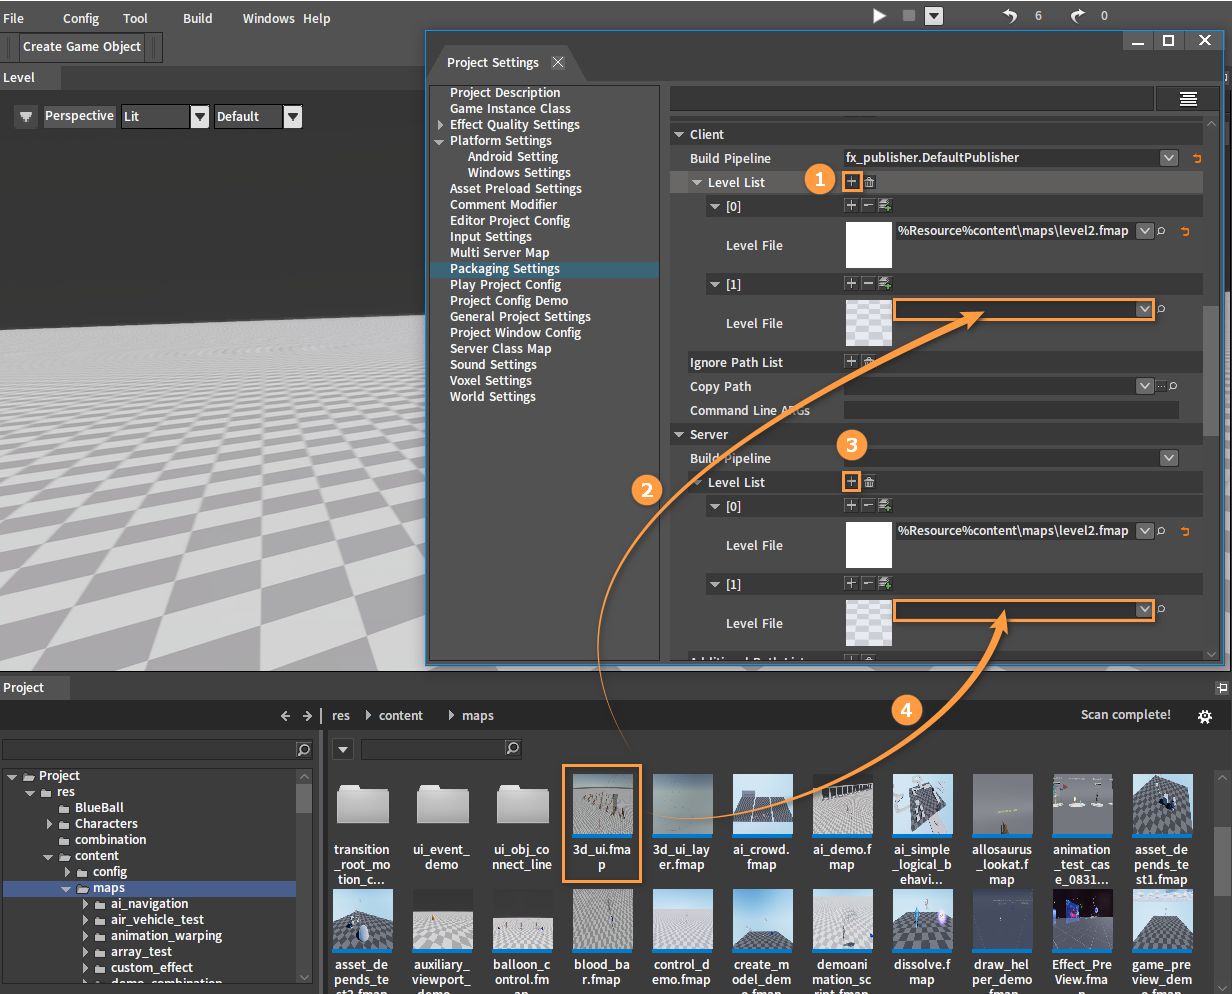
If you need to set Level List, click the ![]() button in the Title Bar under the Client and the Server respectively to add new Level Files. Then find the level that needs to be packaged from the Project panel, and drag it to the Level File.
button in the Title Bar under the Client and the Server respectively to add new Level Files. Then find the level that needs to be packaged from the Project panel, and drag it to the Level File.
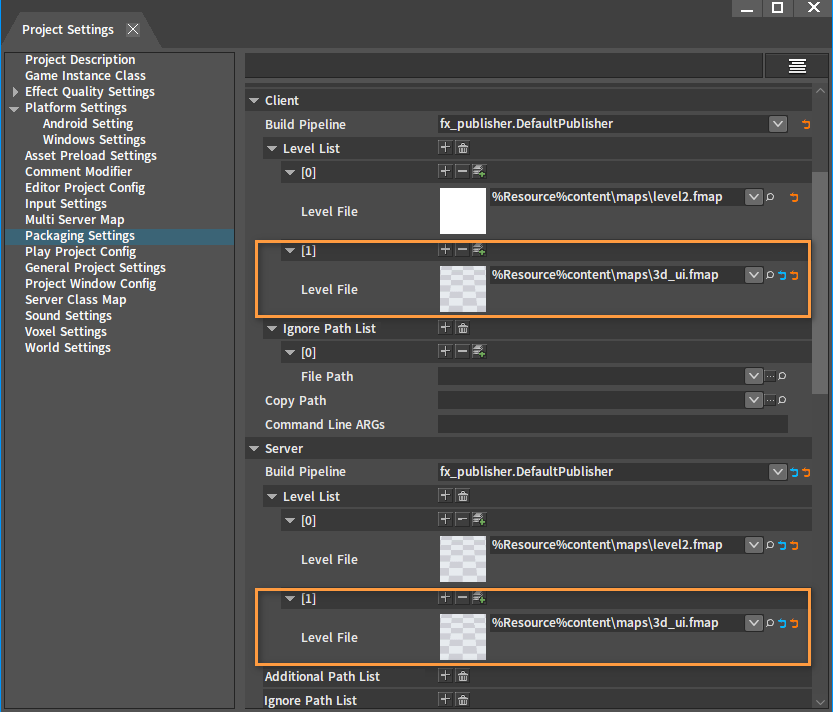
After setting:
If you need to add a resource directory, click the ![]() button in the Title Bar of Path List to add a new resource File Path. Then click the
button in the Title Bar of Path List to add a new resource File Path. Then click the ![]() button on the right side of File Path. Select a resource folder in the pop-up window, and click OK.
button on the right side of File Path. Select a resource folder in the pop-up window, and click OK.

After adding:
Platform Settings
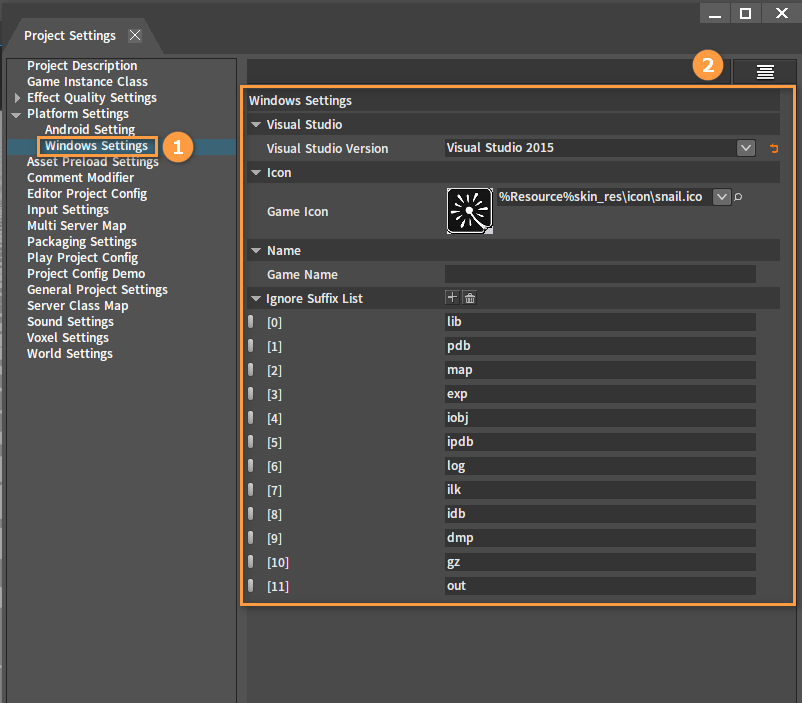
Windows Settings
Click Windows Settings under Platform Settings in the Project Settings window.
| Property | Description |
|---|---|
| Visual Studio Version | Select the appropriate version of Visual Studio. If it shows in red, it means that this version is not installed on the device. |
| Game Icon | Generate an icon for the Client (.exe). |
| Game Name | Generate the name of the Client (.exe). If not set, the generated Client name will be the project name by default. |
| Windows Ignore Suffix List | Windows excluded suffix list. |
Windows One-click Packaging
Client
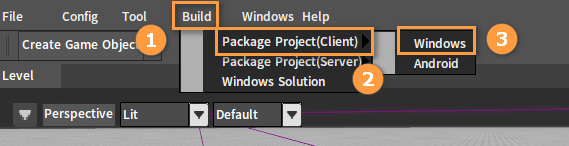
Click Build (Menu Bar) -> Package Project (Client) -> Windows.
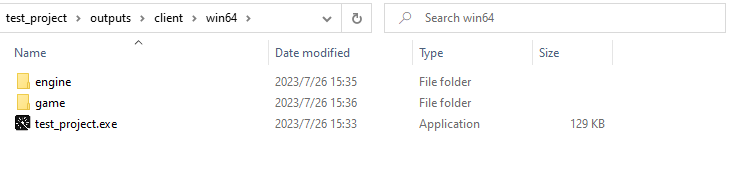
Wait for the packaging to complete with the packaged content in the output directory of the packaging configuration. If no output directory is configured, it will be packaged in the outputs directory of the project, for example, test_project/outputs/client/win64.

After packaging:
Server
Click Build (Menu Bar) -> Package Project (Server) -> Windows.
Wait for the packaging to complete with the packaged content in the output directory of the packaging configuration. If no output directory is configured, it will be packaged in the outputs directory of the project, for example, test_project/outputs/server/win64.
After packaging:
