Animation Assets and Editing Tools
Overview
Animation Assets which can be modified in the Animation Editor can control the actions of characters.
Skeleton
Skeleton Assets (suffix .xskt) are the base Skinned Animation asset type of the Flexi Engine Skinned Animation system, currently created and exported by DCC tools, as well as directly through the Engine Editor FBX import tool, they contain skeleton hierarchy and bone/auxiliary point animation data. Skeleton Assets can also be used as Animation Assets.
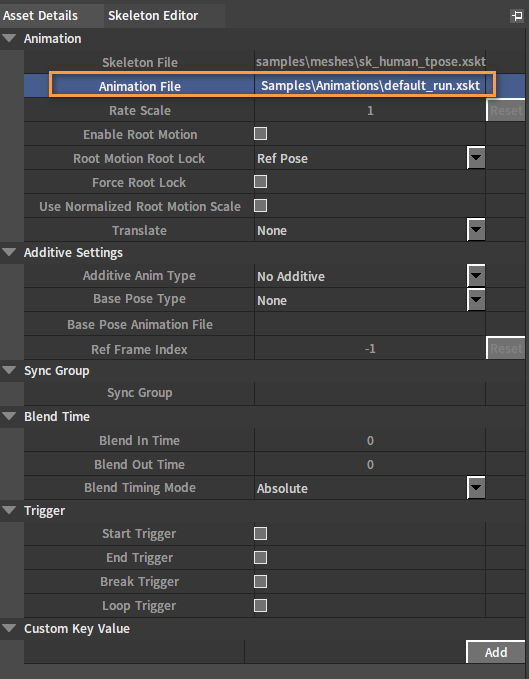
Asset Details
Currently, the Animation Editor does not provide direct editing for the Skeleton assets data. You can adjust its configurations in the animation set in the Asset Details panel.

| Property | Description |
|---|---|
| Skeleton File | Source skeleton file path |
| Animation File | Animation file path (Read Only) |
| Rate Scale (Preview Only) | Play rate scaling factor (Preview Only) |
| Enable Root Motion | Read Only |
| Root Motion Root Lock | Read Only |
| Force Root Lock | Read Only |
| Use Normalized Root Motion Scale | Read Only |
| Translate | Legacy root motion related settings. Clear Z-Axis and Clear X,Z Axes can be chosen. |
| Additive Anim Type | Read Only |
| Base Pose Type | Read Only |
| Base Pose Animation File | Read Only |
| Ref Frame Index | Read Only |
| Sync Group | Sync group |
| Blend In Time | Blend in time |
| Blend Out Time | Blend out time |
| Blend Timing Mode | When using Absolute timing mode, blend in and blend out time are not affected by the play rate; When using Relative timing mode, blend in and blend out time are affected by the play rate and vary proportionally to the animation duration. |
| Start Trigger | Start play trigger event |
| End Trigger | End play trigger event |
| Break Trigger | Break play trigger event |
| Loop Trigger | Loop play trigger event |
| Custom Key Value | Custom key value |
Editing Animations
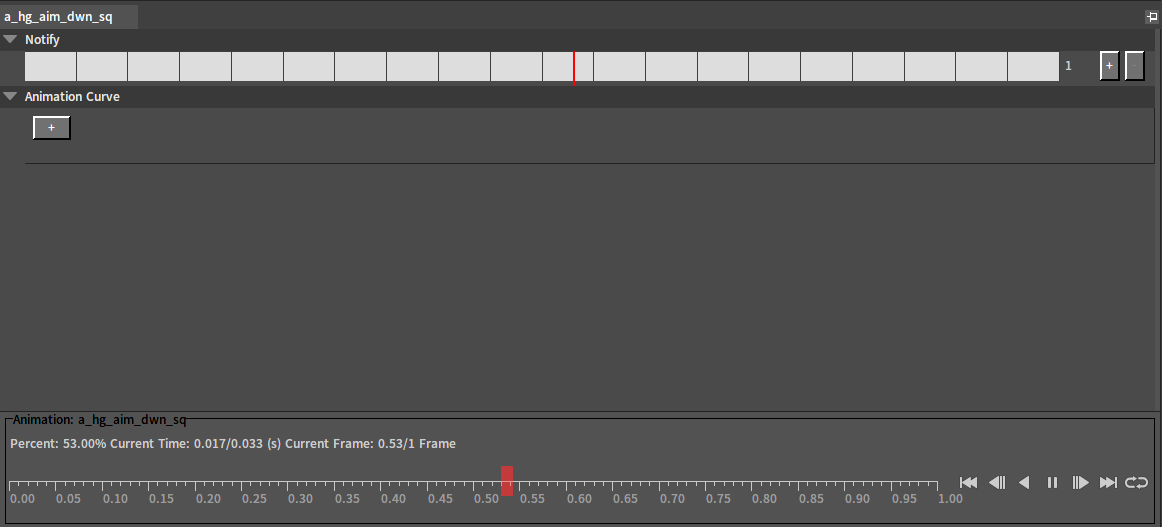
The animation playback controller is to control the playback of the preview animation.

The red cursor ![]() can mark the current animation playback position, and provide manual control of the playback position by dragging it.
can mark the current animation playback position, and provide manual control of the playback position by dragging it.
Scroll the mouse wheel on the timeline to zoom in and out, and the position of the mouse cursor is the zoom center. When the timeline is zoomed in, use the right mouse button to drag and drop to translate it, so you can control the red cursor’s position precisely.

| Icon | Description |
|---|---|
| Skip to the first frame | |
| Previous frame | |
| Play backwards | |
| Play forwards | |
| Next frame | |
| Skip to the last frame | |
| Loop playback |
Animation Sequences
Animation Sequence is a composite animation asset based on skeleton asset. It is created by the Animation Editor and provides advanced features such as retargeting, root motion, notifying, marker-based sync and curve editing on top of the skeleton.
Animation Sequence can be played standalone in the pipeline directly, or used for composite assets such as Montage, Blend Space and Anim Tree.
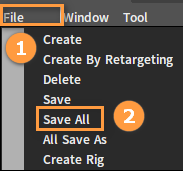
Creating Animation Sequences
Click File -> Create to open the Asset Creating window to create an Animation Sequence Asset.

Asset Details
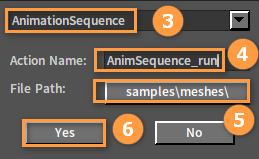
An Animation File needs to be specified in the Asset Details panel, and you can continue setting up the Animation Sequence by changing other items.
| Property | Description |
|---|---|
| Skeleton File | Source skeleton file path |
| Animation File | Animation file path (Read Only) |
| Rate Scale | Play rate scaling factor |
| Enable Root Motion | Enable root motion or not |
| Root Motion Root Lock | The way to lock the root bone after the root motion is extracted
|
| Force Root Lock | Force locking of the root bone, regardless of whether root motion has been extracted |
| Use Normalized Root Motion Scale | Use normalized root motion scaling (To avoid the effect of non-normalized scaling on root motion results) |
| Translate | Legacy root motion related settings. Clear Z-Axis and Clear X,Z Axes can be chosen. |
| Additive Anim Type |
|
| Base Pose Type |
|
| Base Pose Animation File | Specified the animation file to use as the base pose |
| Ref Frame Index | Specified frame |
| Sync Group | Sync group |
| Blend In Time | Blend in time |
| Blend Out Time | Blend out time |
| Blend Timing Mode |
|
| Start Trigger | Start playback trigger event |
| End Trigger | End playback trigger event |
| Break Trigger | Break playback trigger event |
| Loop Trigger | Loop playback trigger event |
| Loop playback trigger event | Custom key value |
Notifies
Notifies
Notify can locate specific points in the Animation Sequence, and then set the event to occur at the specific point to which the notify is added.
Notify typically adds effects such as sounds and particles to Animation Sequence, which makes it more animated and meets the needs of game creation in many ways.
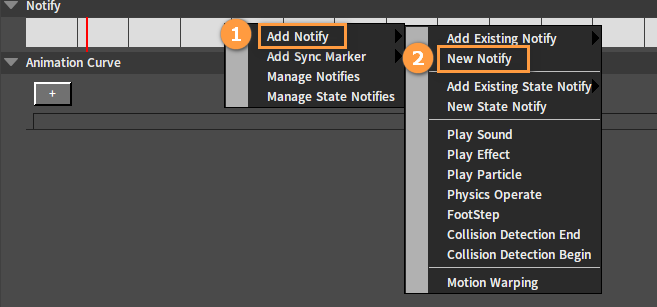
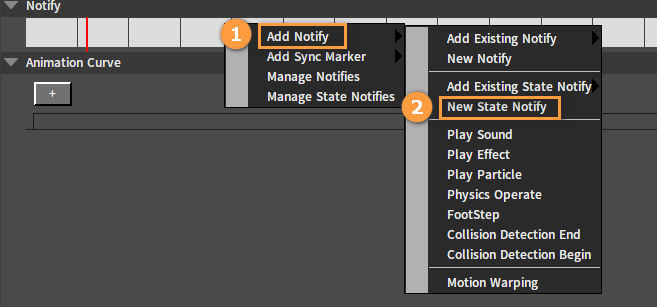
Adding Notifies
Right-click on the track and select Add Notify -> New Notify, and enter the Notify Name in the pop-up New Notify window to complete the creation.

Moving Notifies
Notify can be moved within a single track or between multiple tracks by dragging and dropping.
Single Track:
![]()
Multiple Tracks:

Adding State Notifies
State Notify is basically the same as the standard notify mentioned above. The difference is that you can set the start frame, the end frame and the duration of the notify.
Right-click on the track and select Add Notify -> New State Notify, and enter the Notify Name in the pop-up New Notify window to complete the creation.

Managing Notifies
Right-click on the track and select Manage Notifies or Manage State Notifies, then you can delete the existing notifies in the Details panel or change their names.


Sync Markers
Sync Marker is used to mark the animation sync interval and find the sync action in different animations and add sync markers. Animations with matching markers will be able to complete the sync.
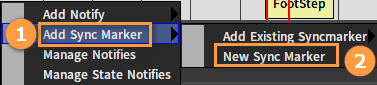
Adding Sync Markers
Right-click Add Sync Marker -> New Sync Marker on the track and enter the sync marker name in the pop-up New Sync Marker window to complete the creation.

Moving Sync Markers
Same as the operation of Moving Notifies.
Editing Notifies and Sync Markers
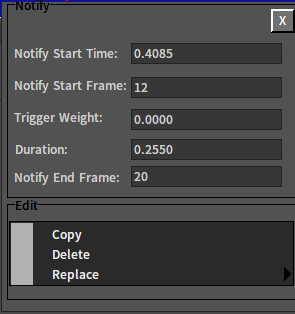
Right-click on the Notify and Sync Marker icons in the track to open the corresponding editing windows to copy, delete and replace them.
Notify Editing Window:

State Notify Editing Window:
Sync Marker Editing Window:

Editing Curves
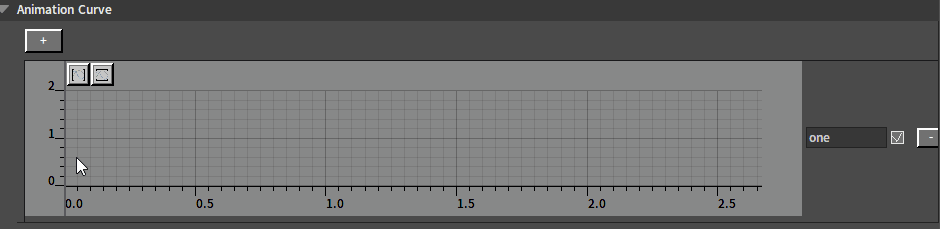
Click ![]() in the Animation Curve panel to add a curve to the asset.
in the Animation Curve panel to add a curve to the asset.


You can edit the curve name in the text box on the left of each curve panel.
![]()
The checkbox in the middle allows you to expand or collapse the curve editing panel.
![]()
Click "-" in the right Toolbar to delete the curve.
![]()
You can edit the curve after expanding the Curve Editor, as shown below.

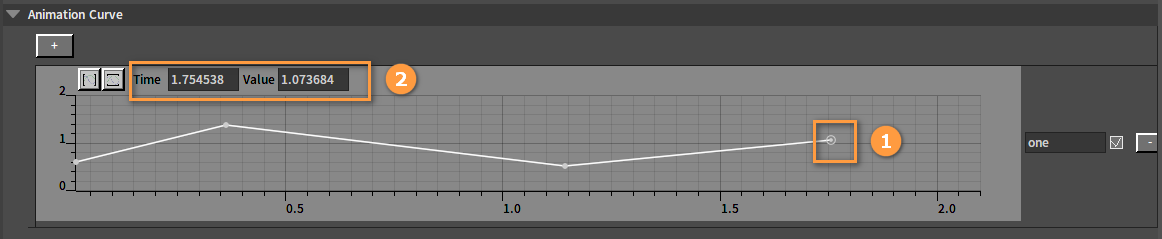
Editing Keyframes
Keyframes can be added by double-clicking on an empty area.
Multi-select keyframes by holding down the Ctrl key.
Select the keyframe, right-click in the blank area to delete the keyframe in the pop-up menu.

After selecting a single keyframe, the parameters of Time and Value can be adjusted in the pop-up edit box.
Adjusting Viewport
The Viewport can be adjusted to the appropriate range by using the two buttons in the upper left corner according to the range of curve values.

The Viewport can be adjusted manually by scrolling the mouse wheel; Holding down the Ctrl key at the same time will be scaled horizontally; Holding down the Shift key at the same time will be scaled vertically.
Animation Playback Controller
Please refer to Skeleton -> Editing Animations.
Montage
Montage is a composite animation asset based on Skeleton and/or Animation Sequence, which can linearly merge animation clips referenced from the Skeleton and/or Animation Sequence to a track and allow users to cut and recombine them into several custom sections. These custom sections can be played standalone in the pipeline or inserted into specified Slots in the Anim Tree as external animation sources.
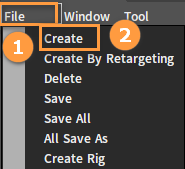
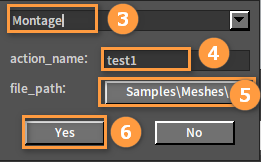
Creating Montage
Click File -> Create to open the Asset Creation window. Then you can create a Montage asset in it.
Asset Details
The current animation Montage can be set by modifying the related properties in the Asset Details panel.
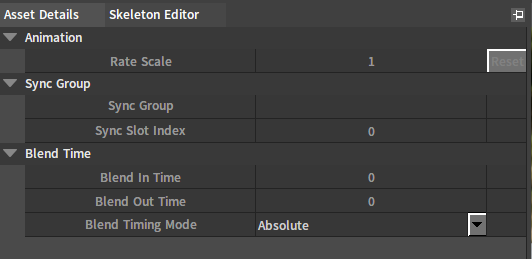
| Property | Description |
|---|---|
| Rate Scale | Play rate scale factor |
| Sync Group | Sync group |
| Sync Slot Index | Sync slot index |
| Blend In Time | Blend in time |
| Blend Out Time | Blend out time |
| Blend Timing Mode | Absolute timing mode: The blend in and out time will not be influenced by the play rate; Relative timing mode: The blend in and out time will be influenced by the play rate and changes in proportion to the animation duration. |
Montage Tracks
The newly created Montage contains an empty animation track.

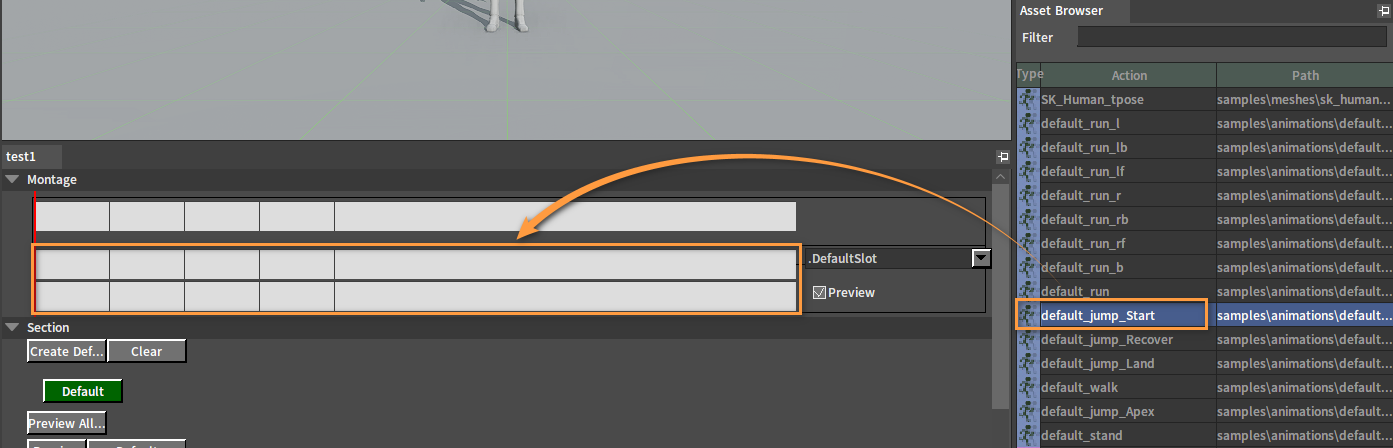
Create segment. Drag the skeletons or Animation Sequence assets in the Action List to the track to add animations.

Drag multiple segments of animations into the same track to merge them into one animation for clipping.

Right-click on an existing track and select Create Track to add a new one.

Check the Preview checkbox to select the track to be previewed. (Note: If the later assigned Track Slot is already in use, then the track cannot be previewed. A warning icon will be displayed in the Editor. You need to reassign a Slot for it.).

Right-click on the newly added track and select Delete Track to delete it.

Sections
There is a Default section in each track. If you want to create a new section, right-click on the track and select Create Montage Section. Then enter a new name for it in the pop-up window, and press Enter to complete the creation.

![]()

If you want to remove a section, right-click on it and select Delete Montage Section.

Drag the section horizontally in the track to adjust its position. Note: Similar to the scale of the timeline, we can scale the track by rolling the mouse wheel on it to improve the precision of section placement.
Editing Sections
In this area, you can reorganize the playback sequence between the sections newly created in the Montage.

| No. | Name | Description |
|---|---|---|
| 1 | Toolbar | To arrange all the sections in sequence from front to back, or to clear relationships between them. |
| 2 | Section Buttons | A set of buttons marked with all section names. They are used to assign the subsequent of the selected section in the Section List. |
| 3 | Section List | The sections are arranged linearly, which can be rearranged into any custom linear sequence. |
Rearranging Sections
Click Clear in the Tool bar. Then each section will be restored to independent individuals, which will no longer be sorted.
![]()

Select the Default section.

Select the subsequent of the current section in the Section Button area, for example, section03.
![]()

Set section01 as the subsequent of section03 in the same way.

If you set section03 as the subsequent of section01 at the same time, the list will be shown as below:

(Note: The color change of section01 and section03 indicates that they form a loop.)
Similarly, we can form a list of section02 and section04, and make section04 self-loop.

Click the X button after each section block will disassociate it from its subsequent.
Before:

After:

Click Preview All Sections button to play all sections in sequence from beginning to end, or you can click the Preview button in front of each list to preview each list respectively.
Slots
A Slot is used to manage the animation playback system of skeletal meshes. It can subdivide meshes by parts, so that the animation of a complete character can be divided into partial ones to play according to the specification.
After assigning Slots to them during the animation Montage creation, these Montage animations can be turned into ones that can change their own playback position.
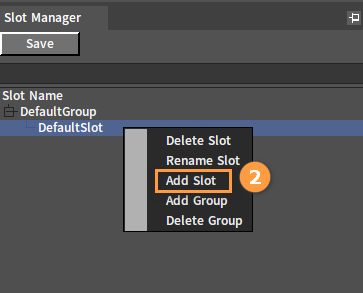
Right-click Slot Name in the Slot Manager of the Anim Tree Editor and select Add Default Group And Slot, then right-click Default Slot and select Add Slot. Enter the Slot name in the pop-up window.


Assigning Slots
In the Montage panel, open the drop-down menu to the right of the track to select the needed Slot.

Previewing
Check the Preview checkbox to assign the current track to be previewed. (Note: If the later assigned Track Slot is already in use, then the track cannot be previewed.)

Notifies
Please refer to Animation Sequence Assets -> Notifies.
Animation Curve
Please refer to Animation Sequences -> Editing Curves.
Animation Playback Controller
Please refer to Skeleton -> Editing Animations.
Blend Spaces
A Blend Space is a composite asset based on Skeleton and/or Animation Sequence, which can accept multiple input controls (currently two at most) to control the blend of multiple animation sample points.
It supports standalone playback, playback nodes for Anim Tree, and Anim Tree Slot nodes input.
Blend Spaces Creation and Types
Different types of Blend Space provide numerous features in the Asset Editor.
Different Blend Space types can be created in the following steps.
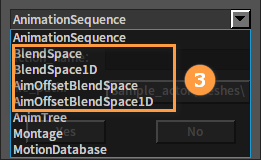
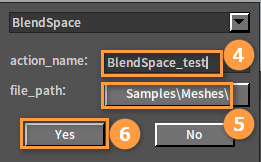
Click File -> Create to open the Asset Creation window. Then you can create a Blend Space asset in it.

Blend Space 1D
Blend Space 1D is a one-dimensional variant of Blend Space. It can be created, edited and used in the same way as Blend Spaces.

Aim Offset Blend Space
An Aim Offset Blend Space is a special Blend Space asset for processing demands including weapon or character look-at aiming. It only blends mesh space additive type poses and adds the result to the inputted base pose.
It supports playback nodes for Anim Tree and Anim Tree Slot nodes input.
Aim Offset Blend Space 1D
Aim Offset Blend Space 1D is a one-dimensional variant of Aim Offset Blend Space. It can be created, edited and used in the same way as Aim Offset Blend Space.
Asset Details
Blend Spaces can be set by modifying the related properties in the Asset Details panel.
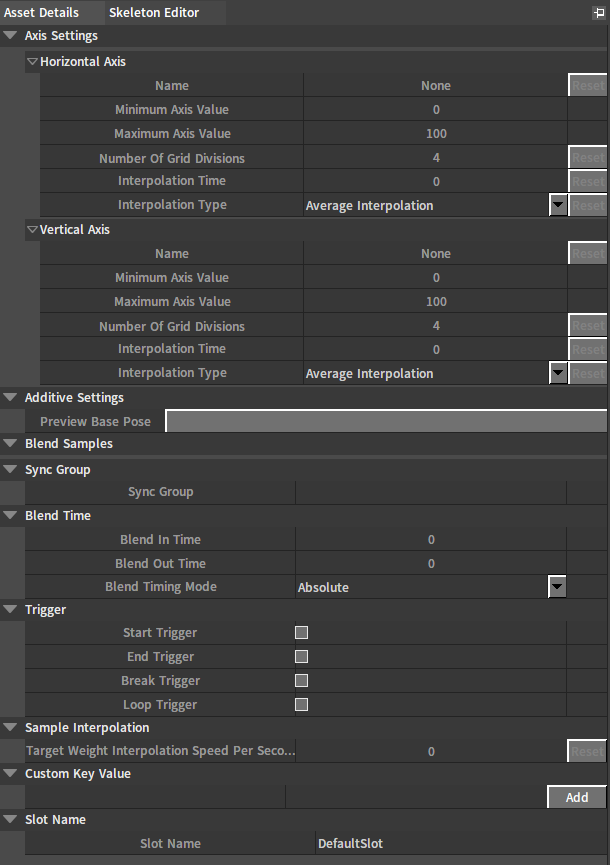
| Option | Property | Description |
|---|---|---|
| Horizontal Axis | Name | Horizontal axis name |
| Minimum Axis Value | Minimum horizontal axis value | |
| Maximum Axis Value | Maximum horizontal axis value | |
| Number of Grid Divisions | Number of horizontal axis grid divisions | |
| Interpolation Time | Horizontal axis interpolation time | |
| Interpolation Type | Horizontal axis interpolation type.
| |
| Vertical Axis | Name | Vertical axis name |
| Minimum Axis Value | Minimum vertical axis value | |
| Maximum Axis Value | Maximum vertical axis value | |
| Number of Grid Divisions | Number of vertical axis grid divisions | |
| Interpolation Time | Vertical axis interpolation time | |
| Interpolation Type | Vertical axis interpolation type
| |
| Additive Settings | Preview Base Pose | Preview base pose |
| Blend Samples | Blend Samples | Sample Animation List: List members are dynamically adjusted with the addition or deletion of samples. Each member provides horizontal axis coordinates, vertical axis coordinates, associated animation and play rate. |
| Sync Group | Sync Group | Sync group |
| Blend Time | Blend In Time | Blend in time |
| Blend Out Time | Blend out time | |
| Blend Timing Mode | ||
| Trigger | Start Trigger | Start playing trigger event |
| End Trigger | End playing trigger event | |
| Break Trigger | Break playing trigger event | |
| Loop Trigger | Loop playing trigger event | |
| Sample Interpolation | Target Weight Interpolation Speed Per Second | Speed of interpolating to target |
| Custom Key Value | Custom Key Value | Custom key value |
| Slot Name | Slot Name | Slot name |
Using Blend Spaces
A two-dimensional grid is generated in the Blend Space sample grid editing area, whose number of grid divisions is determined by the Number Of Grid Divisions in the Asset Details panel. A sample point can be set on any grid line intersection point.

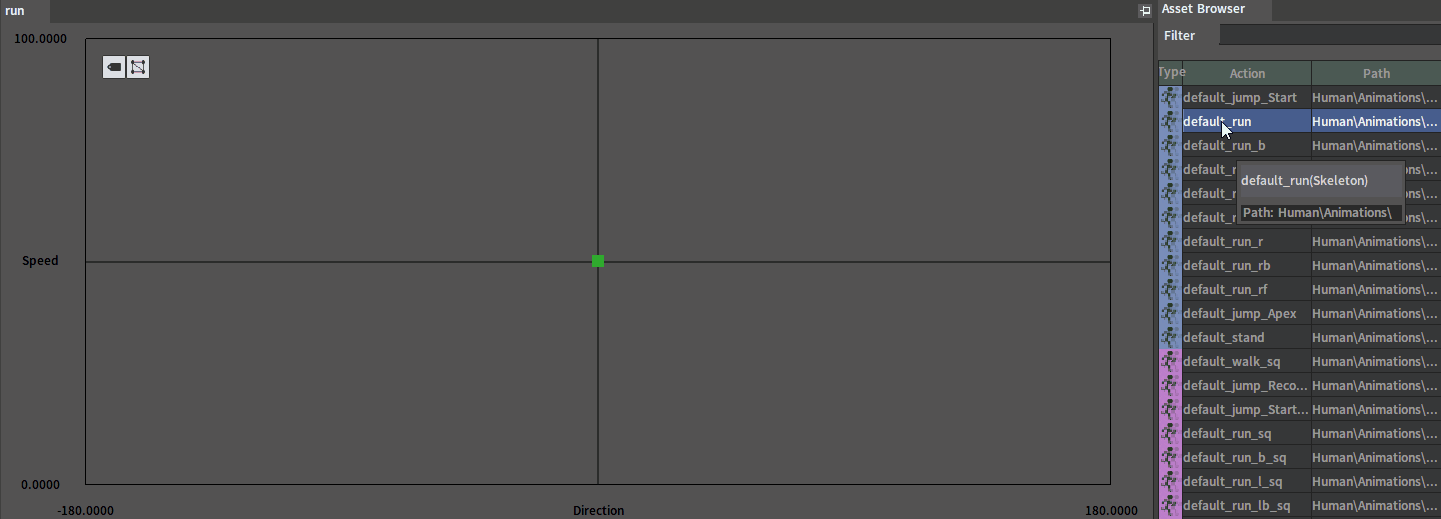
Sample points can be added by dragging Skeleton or Animation Sequence assets from the Action List to specific intersections.
Click the ![]() icon to enable or disable the animation name associated with the sample point.
icon to enable or disable the animation name associated with the sample point.

Click the ![]() icon to enable or disable the display of the triangles in the grid section.
icon to enable or disable the display of the triangles in the grid section.
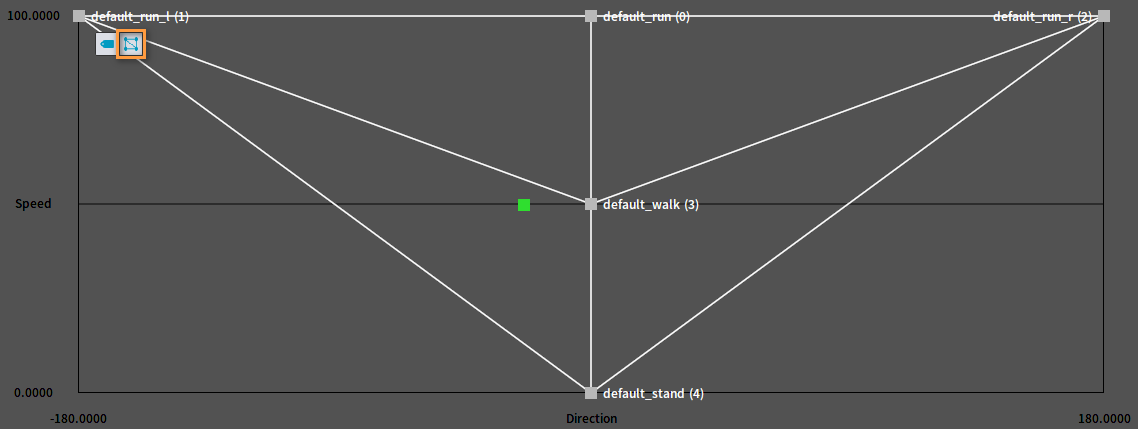
Drag the sample point to adjust its position.

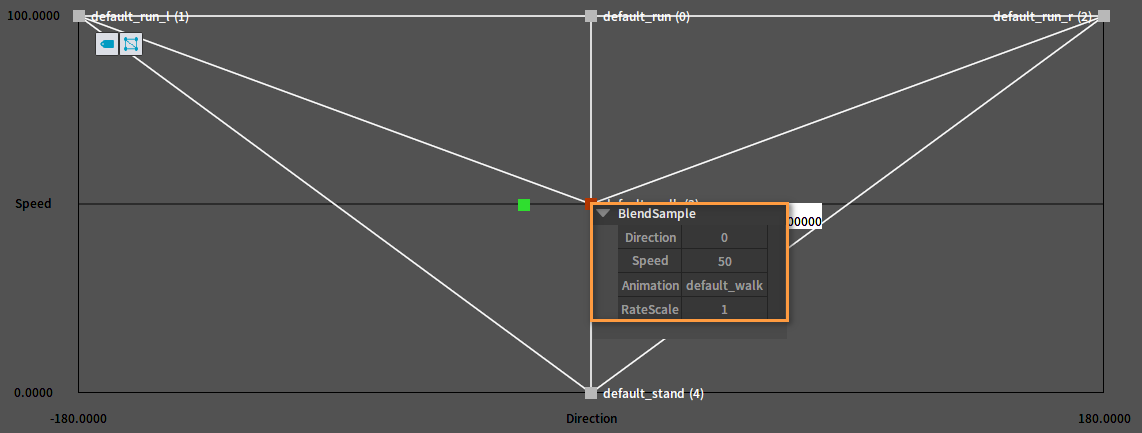
Right-click on a sample point to open the Sample Point Edit window where you can adjust its settings. (Note: The settings here are the same as those in Blend Samples of the Asset Details panel.)
Select a sample point first and press Delete key to delete it.
After deleting the centered sample point:
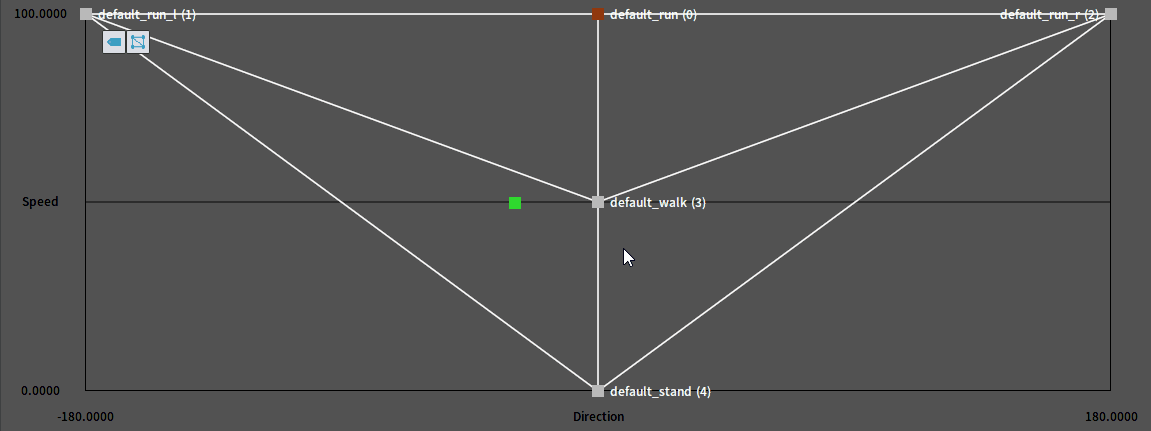
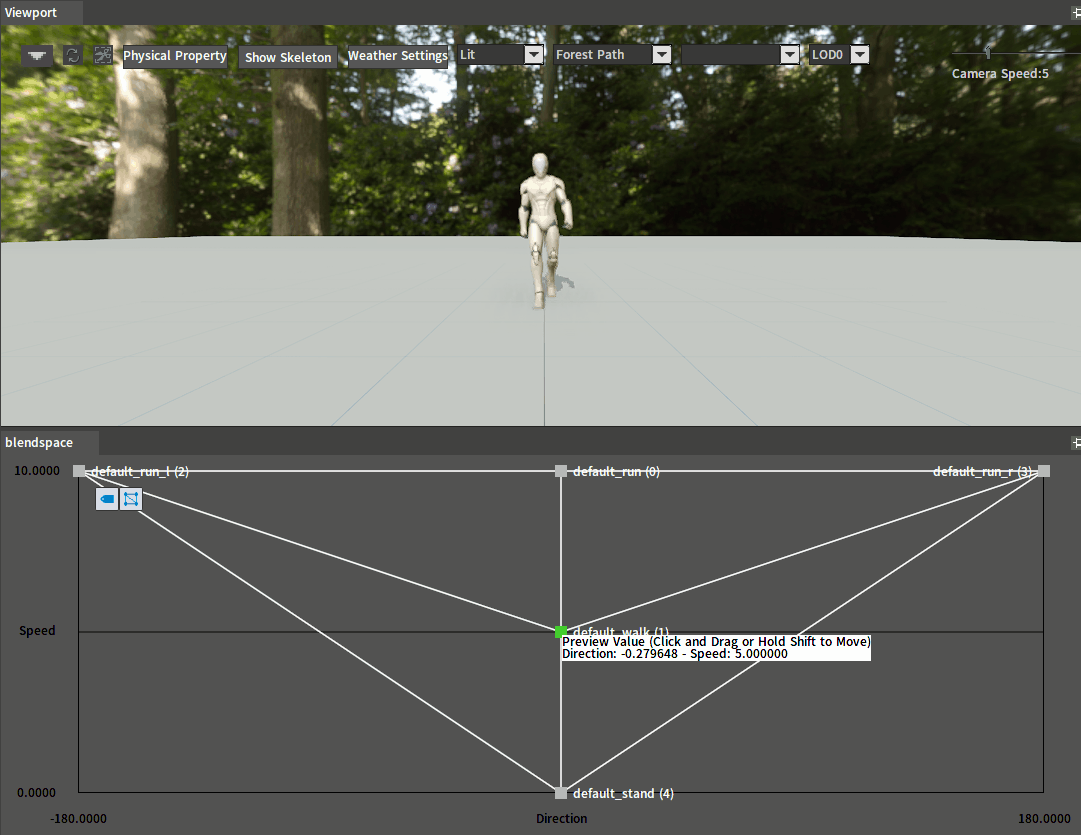
Simulate the change of the input control by dragging the green square in the panel, observing whether the blend result is as expected in the Viewport. In addition, a prompt window containing current blend state information will pop up in the panel during the dragging. It will display the current input control. Press and hold the Ctrl key while dragging to view the blend weight details of each node, which will help us better analyze the causes of blend results.
Animation Playback Controller
Please refer to Skeleton -> Editing Animations.
Aim Offset
Aim Offset is a special Blend Space asset for processing demands including weapon or character look-at aiming. It only blends the mesh space additive type poses and adds the result to the inputted base pose.

Creating Animation Sequence Assets
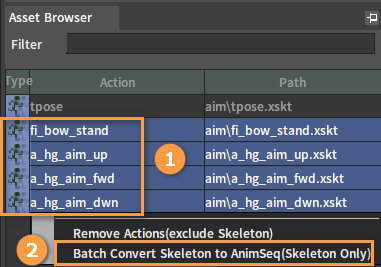
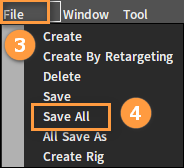
Select four original assets including a_hg_aim_dwn, a_hg_aim_fwd, a_hg_aim_up and fi_bow_stand in the Asset Browser of the Animation Editor. Right-click and select Batch Convert Skeleton to Anim Seq (Skeleton Only) to batch create four corresponding Animation Sequence assets. Then click File -> Save All.

Creating Additive Assets
Double-click a_hg_aim_dwn_sq under the Asset Browser to open its edit panel.
Modify the asset in the Asset Details panel.
| Name | Value |
|---|---|
| Additive Anim Type | Mesh Space |
| Base Pose Type | Selected Animation Frame |
| Base Pose Animation File | fi_bow_stand_sq.anim_sequence |
| Ref Frame Index | 0 |
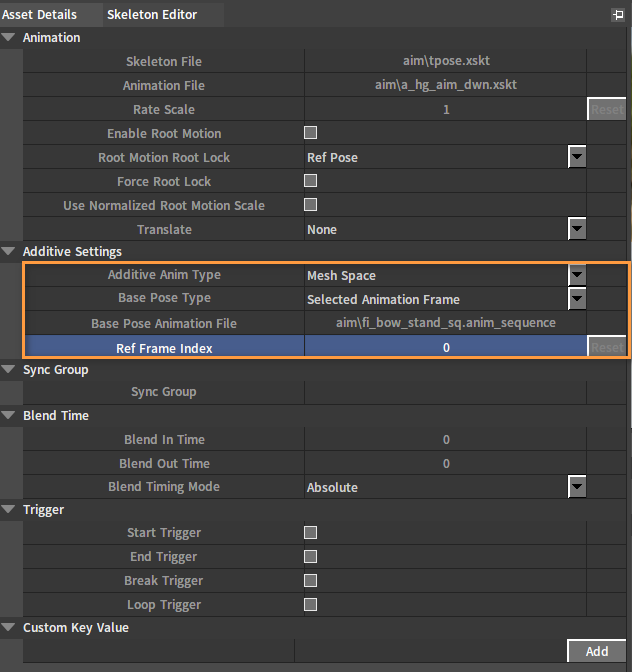
Click File -> Save All after modification. Then a a_hg_aim_dwn_sq_Additive.xskt file will be generated under the current resource directory.
Modify the a_hg_aim_fwd_sq.anim_sequence and a_hg_aim_up_sq.anim_sequence assets in turn.
Creating Aim Offset Blend Space 1D Asset
Please refer to the Blend Space Creation and Types to create an Aim Offset Blend Space 1D asset.
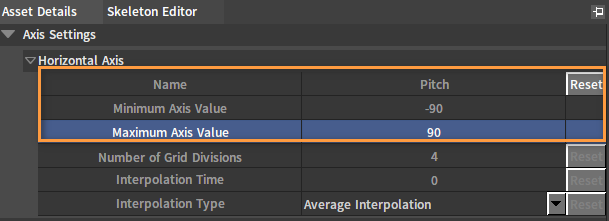
Modify the asset in the Asset Details panel.
| Name | Value |
|---|---|
| Name | Pitch |
| Horizontal Axis: Minimum Axis Value | -90 |
| Horizontal Axis: Maximum Axis Value | 90 |
Drag the A_hg_Aim_Dwn_sq, A_hg_Aim_Fwd_sq and A_hg_Aim_Up_sq in the Asset Browser to the grid of the Asset Edit panel.
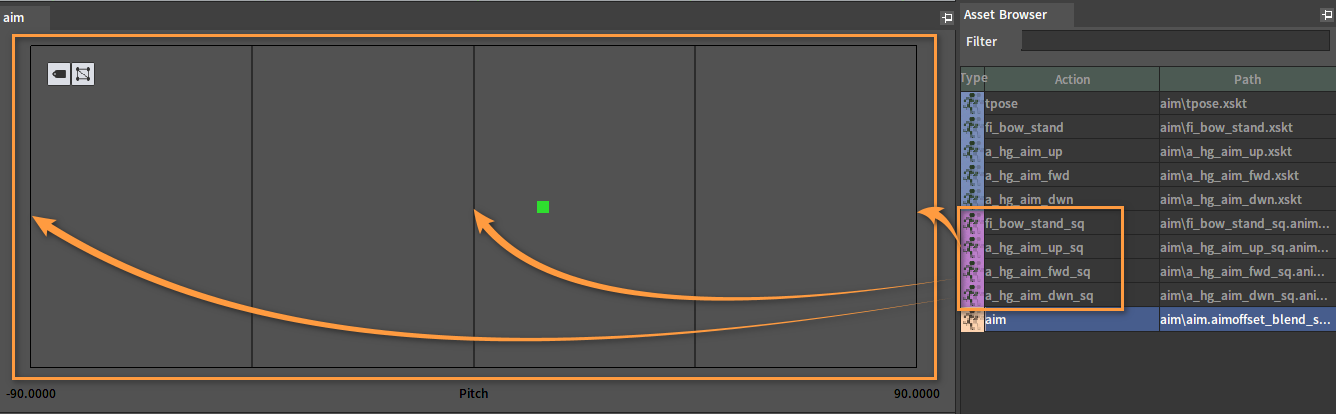

Modify the Preview Base Pose in the Asset Details panel to fi_bow_stand_sq.anim_sequence.

Click Save All.