Resources Workflow
Importing and exporting resources in the Engine
Essential plugins
Installing Plugins
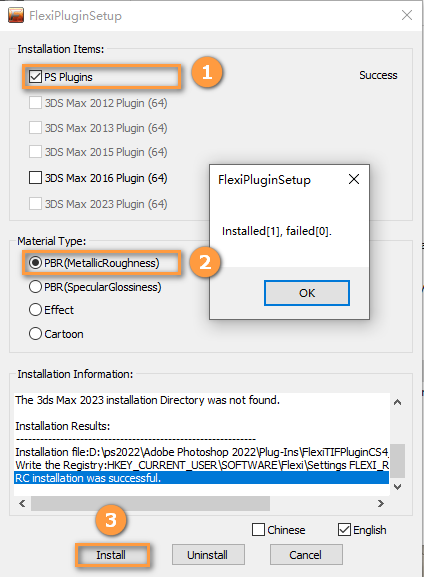
Installing Photoshop Export Plugin
The plugin works with Max 2016 version and Photoshop (CS5-CC 2018) version.
The plugin locates under the directory ...\client\windows\tools\FlexiPluginSetup.exe in the Editor folder.
Run the program “FlexiPluginSetup.exe”.
Select PS Plugins and PBR (MetallicRoughness) in the Installation items panel and the Material Type panel respectively. Click Install to finish the process.
Resource Types
The common types are as follows:
| Type | Format |
|---|---|
| Texture Map | TIF |
| Static Mesh | XMOD |
| Skeletal Mesh | XMOD |
| Animation File | XSKT |
| Effect File | EFFECT |
| Particle File | PARTICLE |
| Physics | CHB, NXX |
| Audio | WAV |
Importing Resources to Flexi
Model Resources
Use external softwares to create resource types that can be used by Flexi.
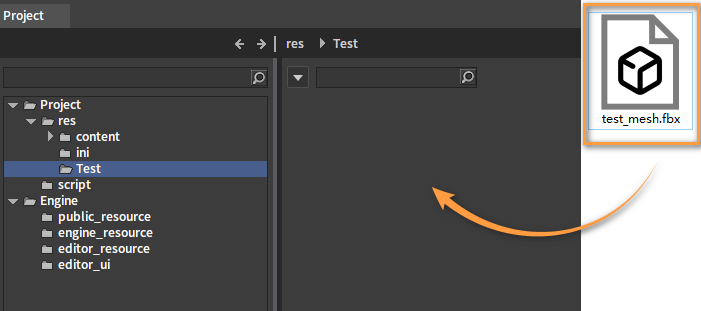
Importing Static Meshes
Select a mesh as needed and export it as an FBX file in external softwares (Note: Multiple files are allowed.).
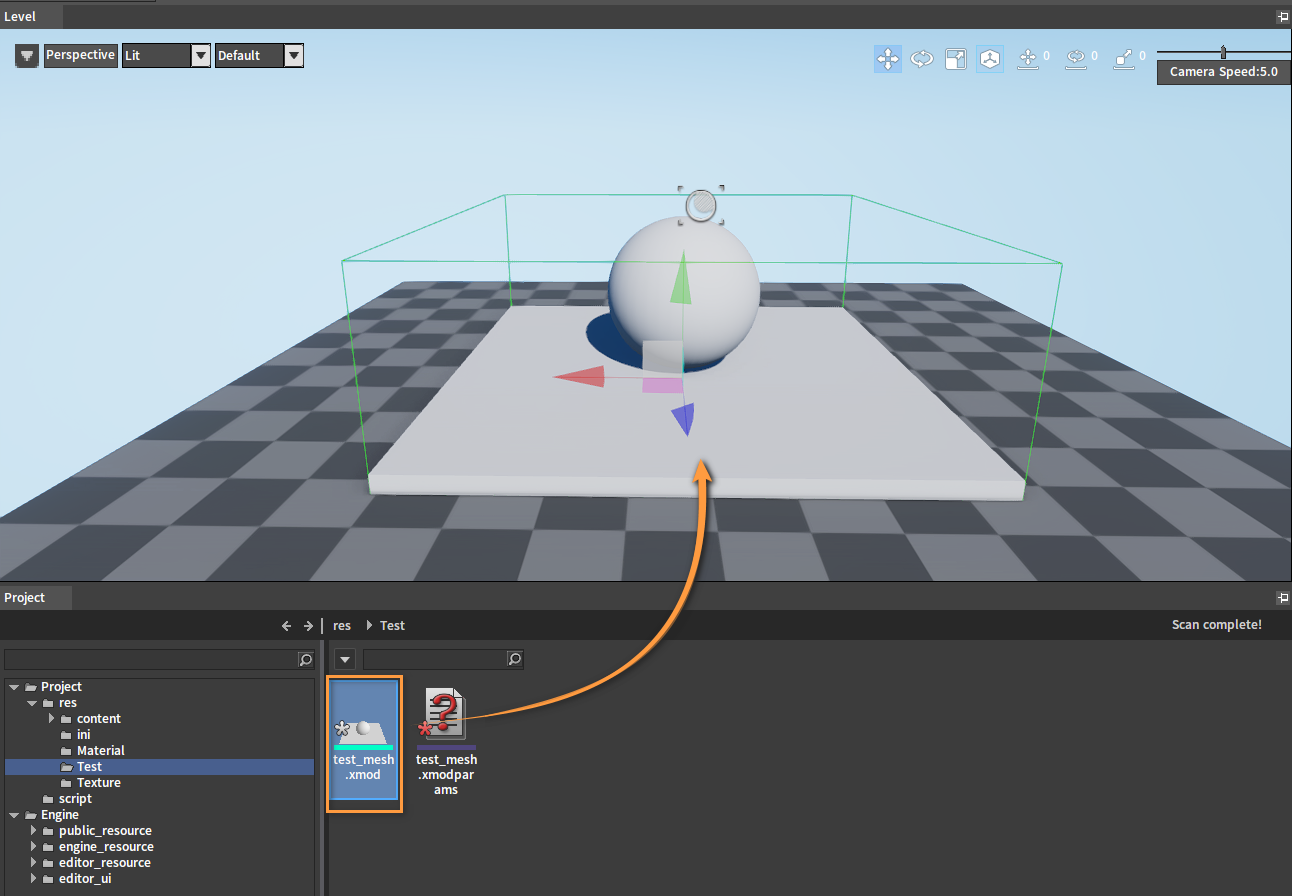
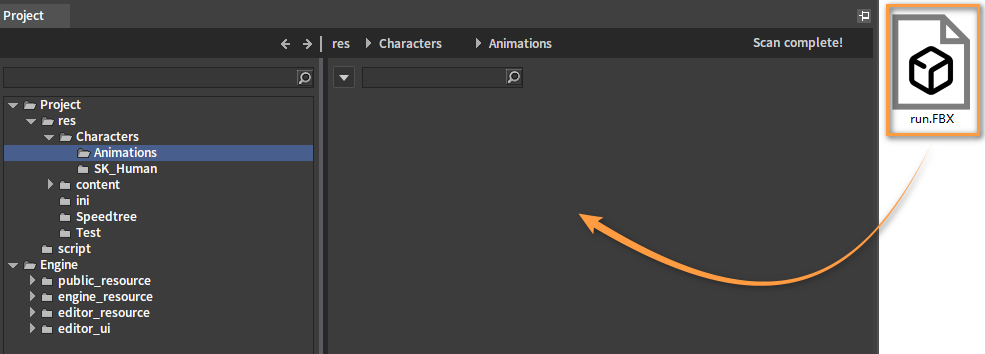
Create a folder under the resource directory in the Engine Project panel and open it to store resources. Then drag the FBX file to be imported into the Resource Preview window in Flexi.
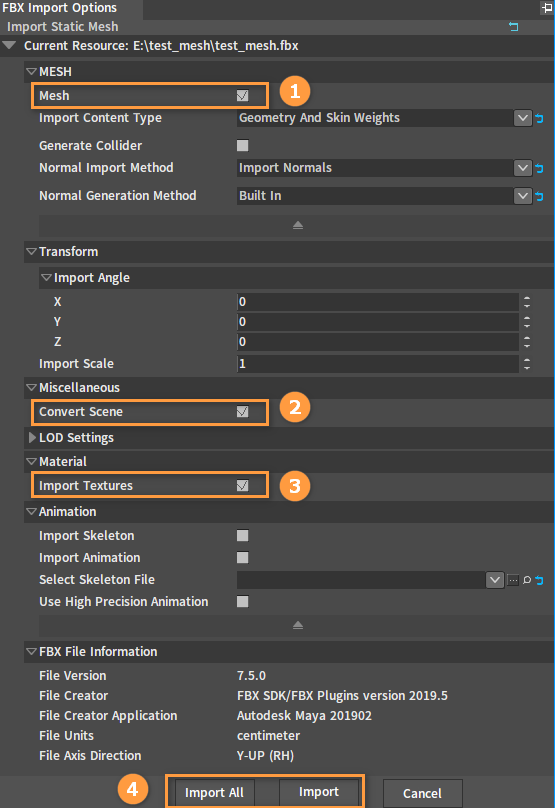
Make the settings in the pop-up FBX Import Options window.
| NO. | Name | Description |
|---|---|---|
| 1 | Mesh | Whether to import mesh. |
| 2 | Convert Scene | Whether to convert the scene from the FBX coordinates to the Flexi Engine coordinates. The file units will also be matched. |
| 3 | Import Textures | Whether to import textures. |
| 4 | Import All/Import | Import all meshes or a single mesh. |
When importing FBX, splitting the sub-nodes of the model is not supported. When the FBX file is imported successfully, an .xmodparams file with the same name will be generated at the same time to record the import information.
Check whether the resource has been imported correctly by viewing it in the Level panel.
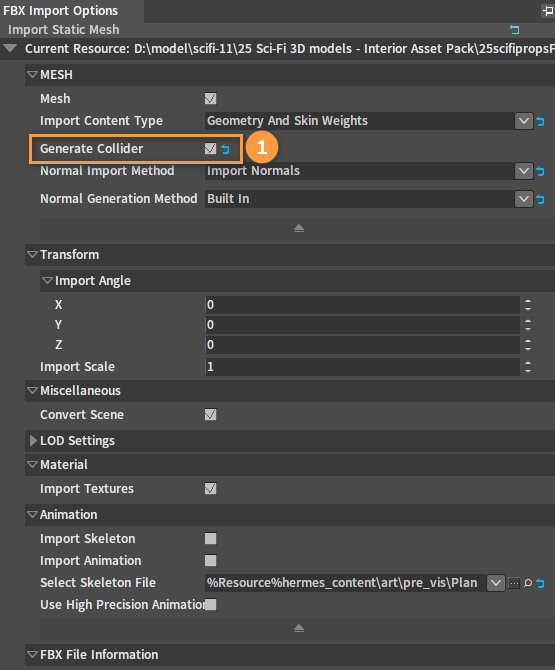
Creating Colliders
Collision is very important in the Engine for many interactions depending on it. Physics collisions can be generated in the Engine, but it is still highly recommended to create custom collision geometry in a 3D software and export it together with the render mesh.
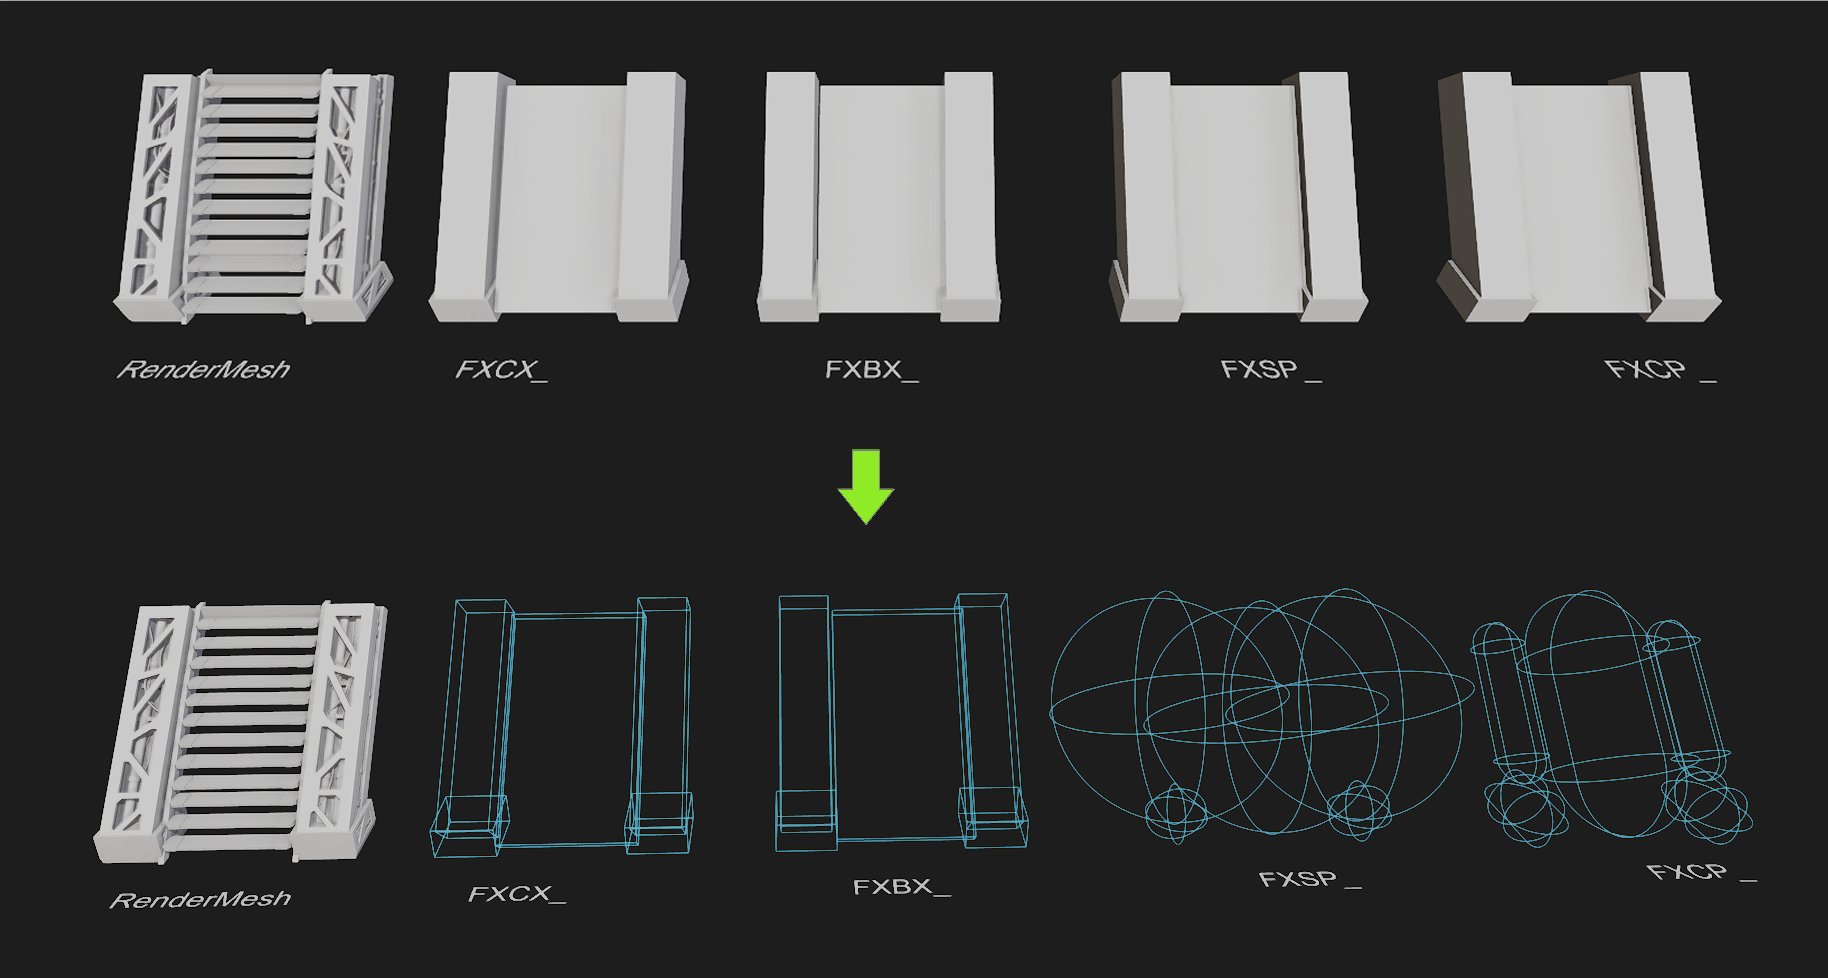
Collider naming rules:
| Mesh Prefix and Naming | Description |
|---|---|
| FXSP_[RenderMeshName]_## | Generate physics colliders according to the sphere. |
| FXCP_[RenderMeshName]_## | Generate physics colliders according to the capsule. |
| FXBX_[RenderMeshName]_## | Generate physics colliders according to the box. |
| FXCX_[RenderMeshName]_## | Generate physics colliders according to the convex. |
| FXTA_[RenderMeshName]_## | Generate physics colliders according to the triangle. |
The naming convention needs to be consistent with the name of the associated render meshes.
## indicates a numeric suffix (if you don't want to see the RenderMesh words, you can also create Empty Objects in the 3D software, and match the Empty Object names to the Collider names, such as in 3DMAX, you can use Dummy or Helper instead, and in Blender, you can create Empty Object instead).
Import the Collider FBX file. Drag the Collider FBX file into the Engine Resource Preview window, and check the Generate Collider option in the pop-up FBX Import Option window.
Creating LODs
How to import static mesh LODs:
The level of detail (LOD) of static mesh can be imported to the Flexi Engine from external 3D modeling softwares such as 3Ds Max, Maya and Blender.
Setting up static mesh LODs:
Autodesk 3Ds Max:
Select all meshes and click Group -> Group to bring up the dialog box.
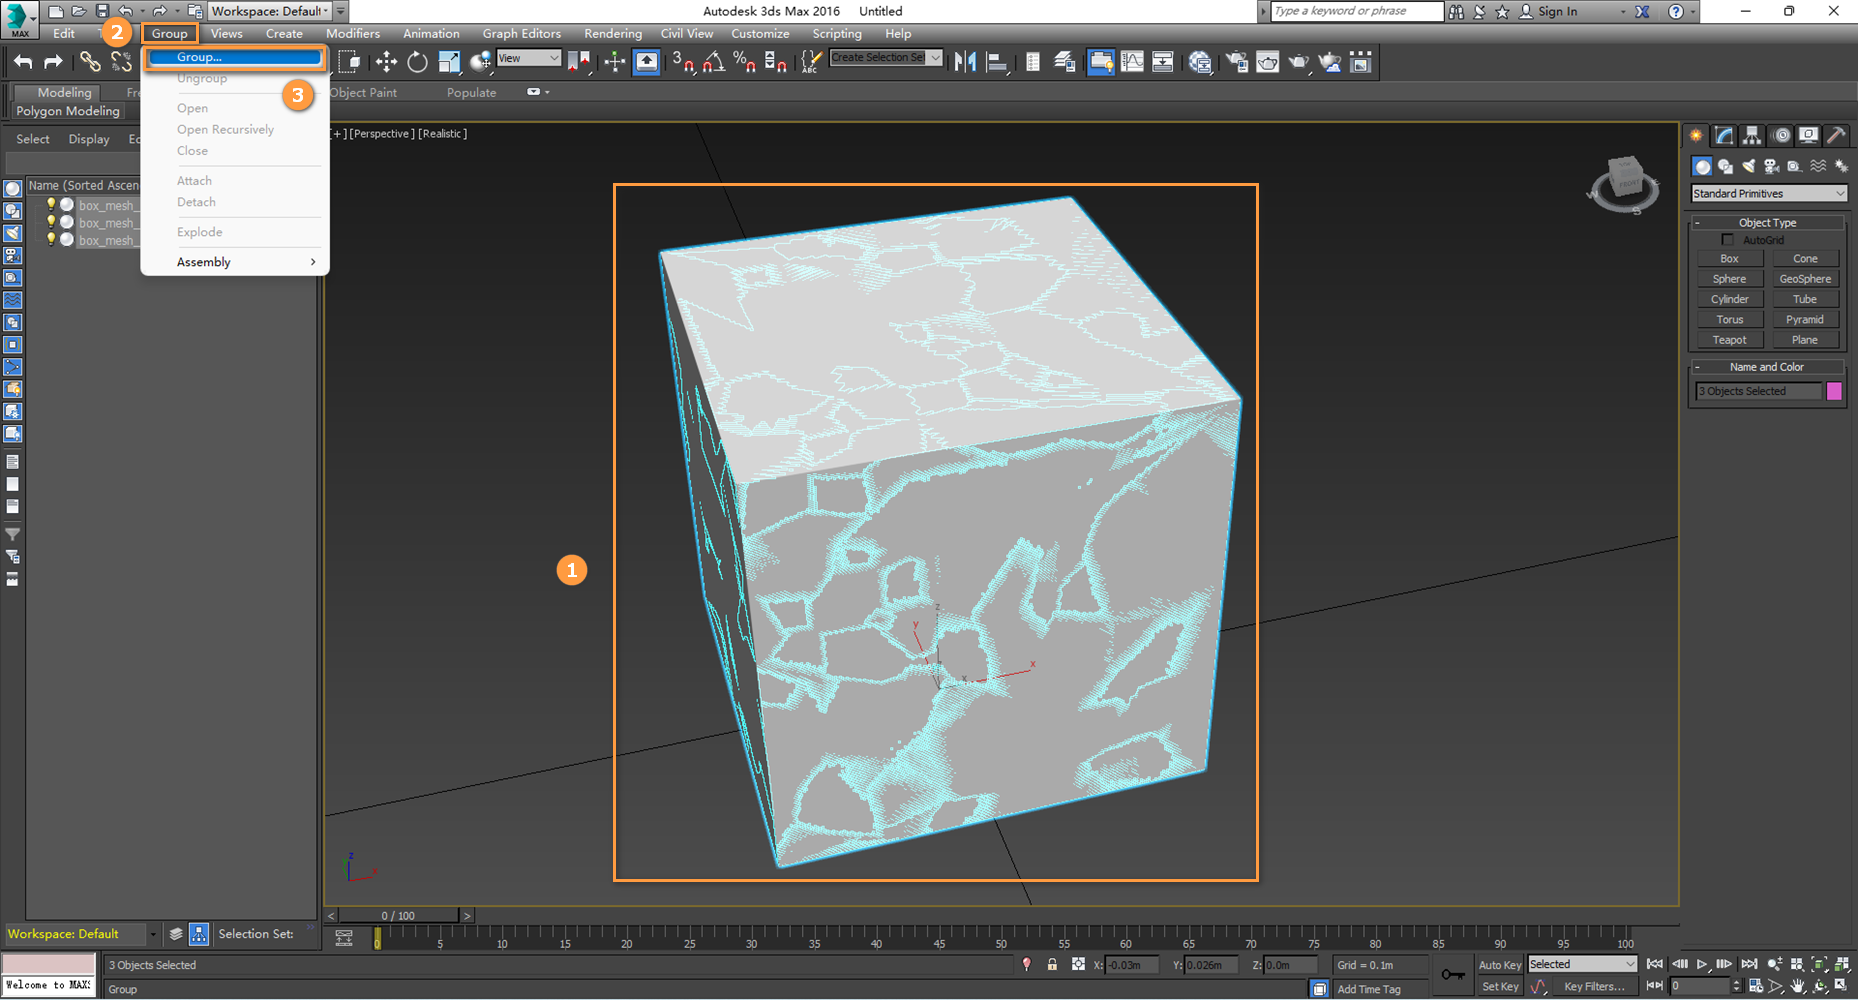
Enter a name for the new group in the dialog box, and click the ![]() button to create it.
button to create it.

Click ![]() to view the Utilities panel and select Level of Detail. Note that if you cannot find it, you can click
to view the Utilities panel and select Level of Detail. Note that if you cannot find it, you can click ![]() to show more options.
to show more options.
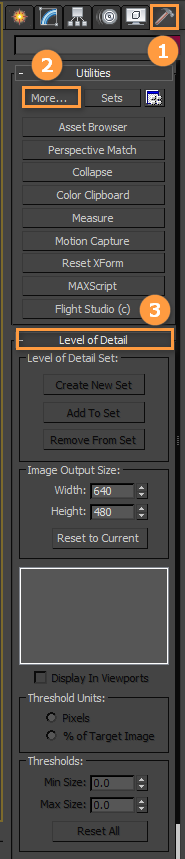
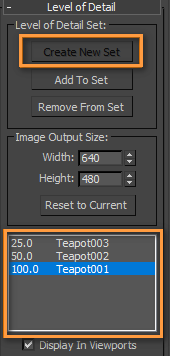
After selecting a group, click the ![]() button to create a new LOD set and add meshes from the selected group to it. Meshes will be sorted according to their complexity automatically.
button to create a new LOD set and add meshes from the selected group to it. Meshes will be sorted according to their complexity automatically.
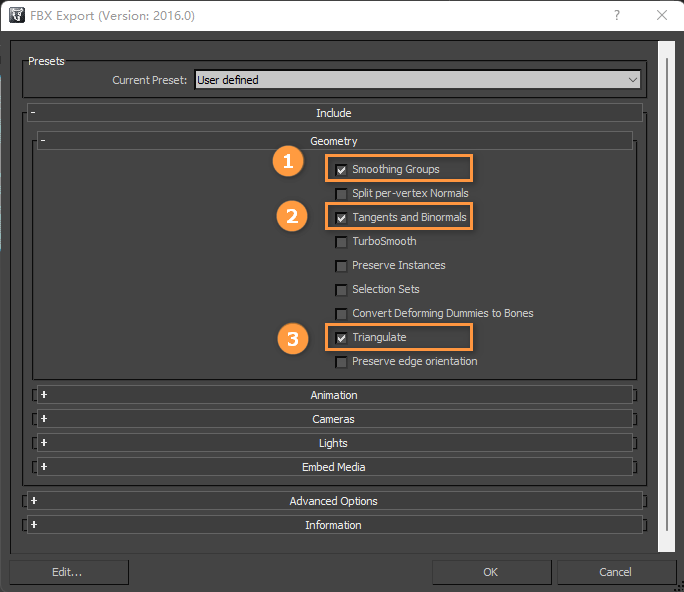
In 3Ds Max, select the Actor model that contain the LOD set and export them directly. When exporting, check Smoothing Groups, Tangents and Binormals and Triangulate.
Autodesk Maya:
Select all meshes in the order of their LODs (e.g. LOD0, LOD1, LOD2, LOD3, LOD4 ...). It is important to select them in order, as subsequent groups created need to be sorted according to the order. Then in the Edit menu, clickLOD (Level of Detail) -> Create LOD Group.
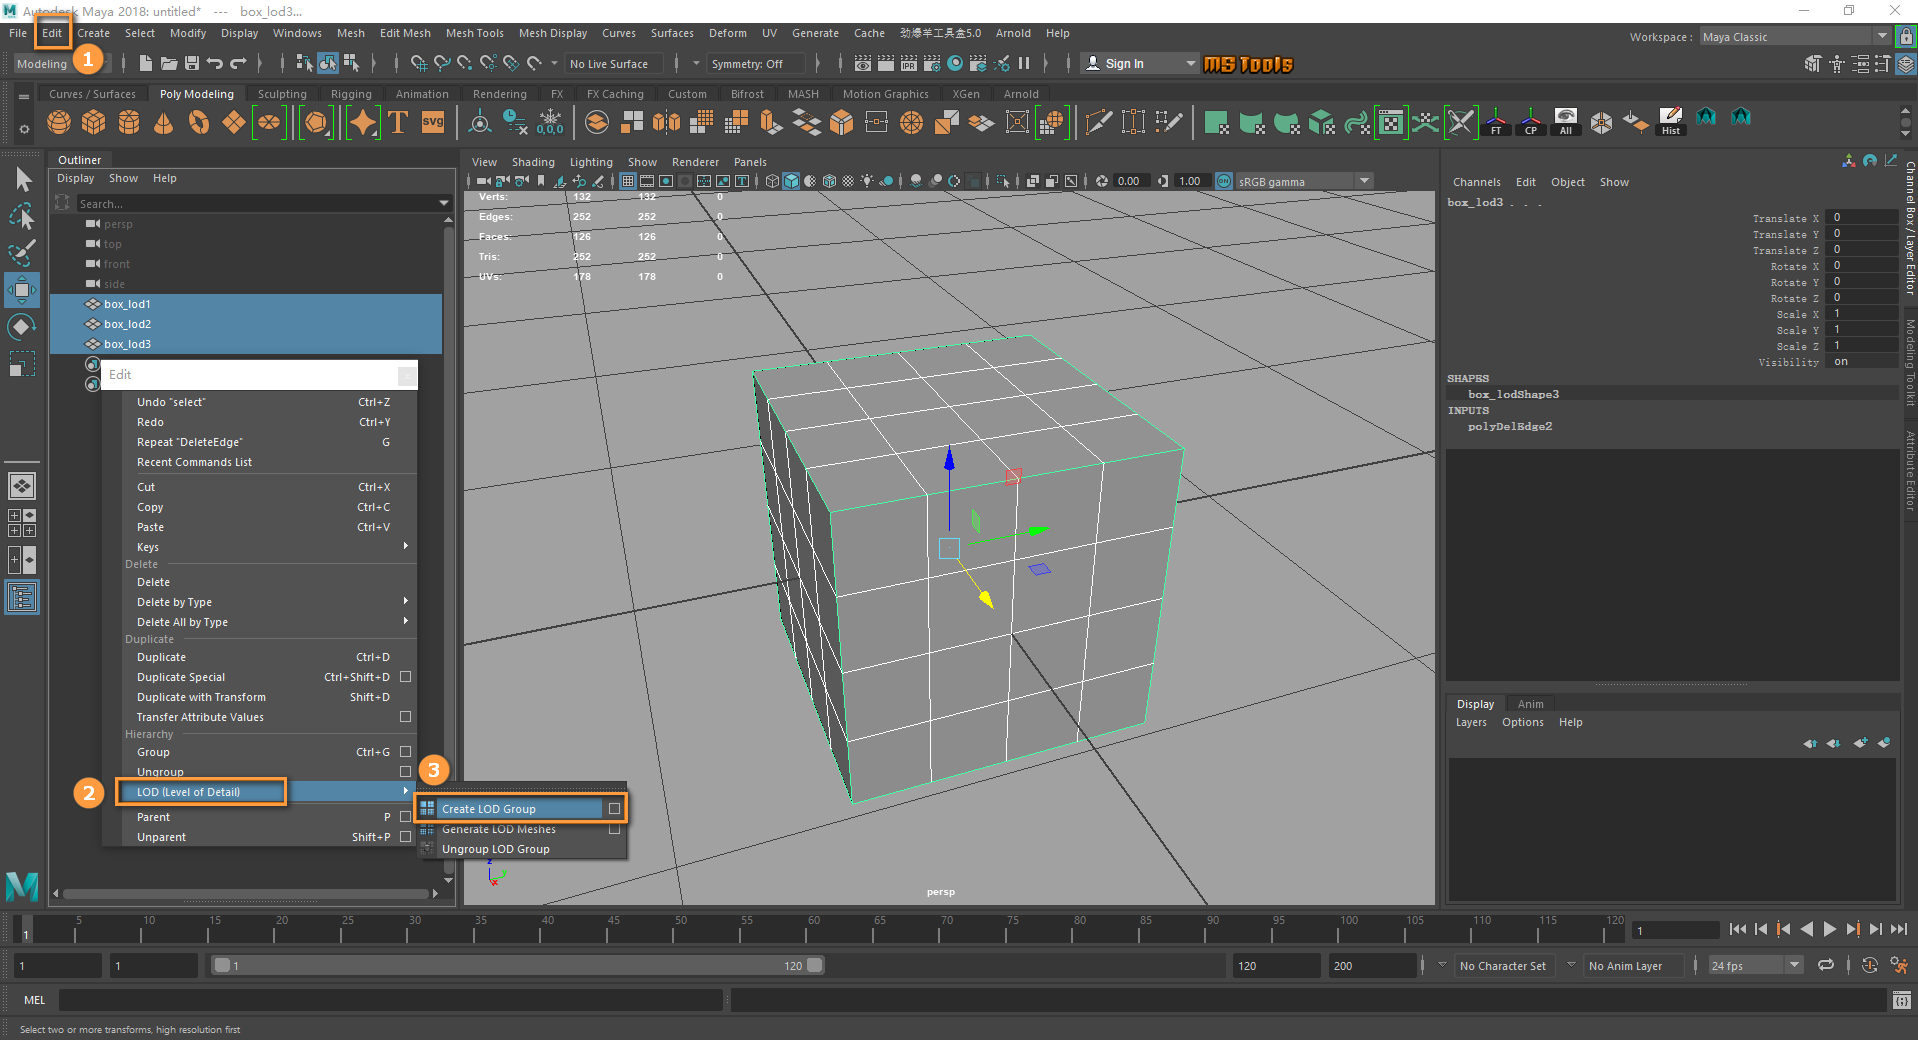
All meshes should now be grouped under the LOD group.
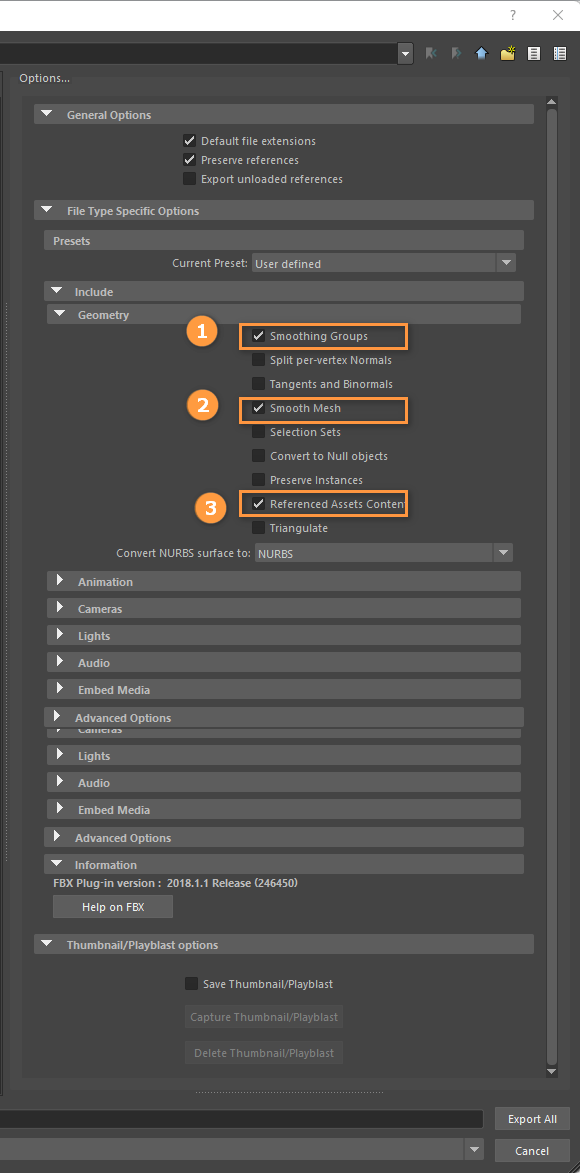
In Maya, select Actor models that contain LOD groups and export them directly. When exporting, check Smoothing Groups, Smooth Mesh and Referenced Assets Content.
Blender:
Creating Meshes
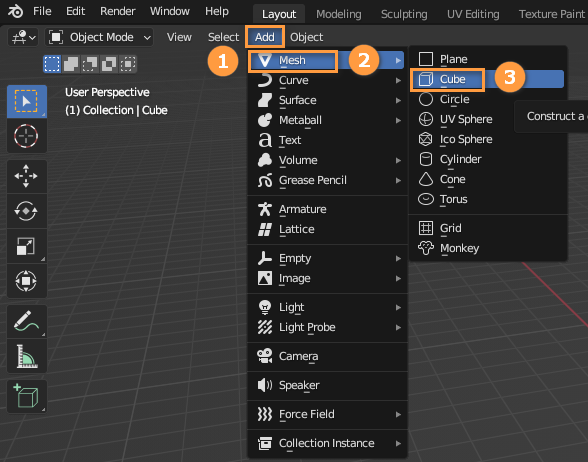
Click Add -> Mesh -> Cube in Blender to add a Cube model.
Add an Ico Sphere and a Cylinder in turn as above.
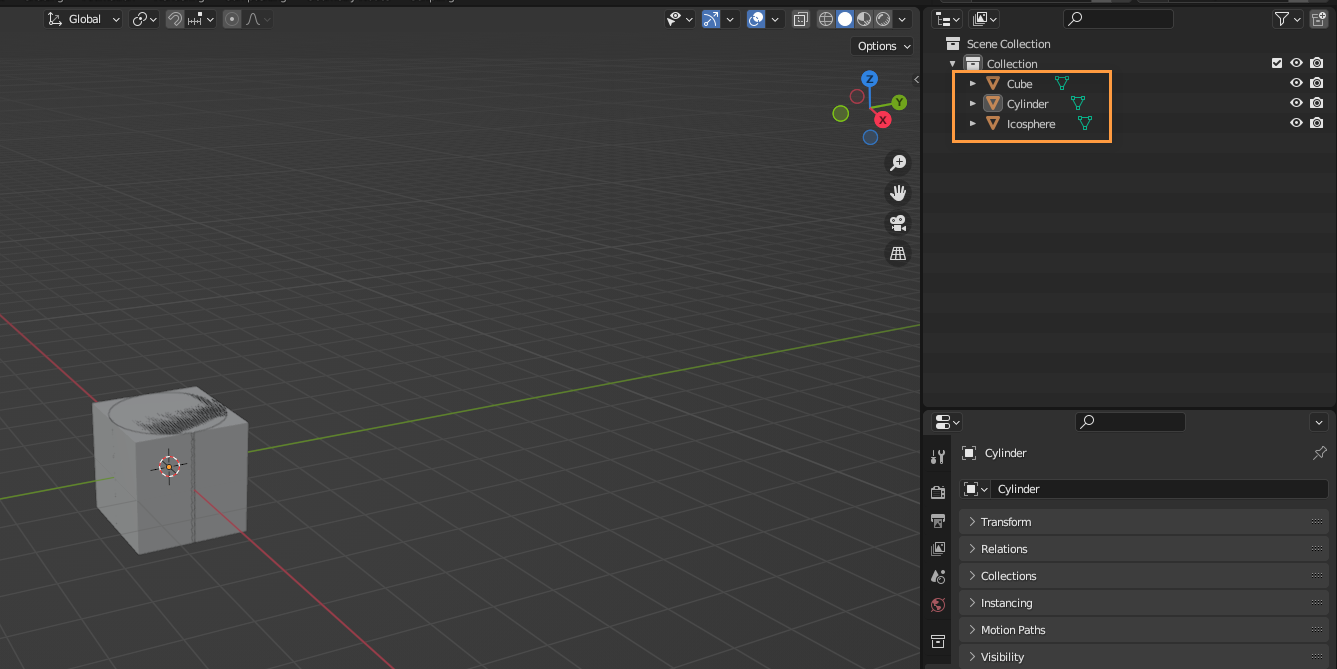
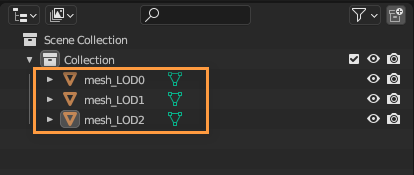
Modify the names of the Cube, Ico Sphere, and Cylinder to mesh_LOD0, mesh_LOD1, and mesh_LOD2 respectively.
Note:
The LOD level of the Actor is not determined by the naming, but only by the creation time order. The Mesh created first has the highest LOD level (LOD0). The later the Mesh is created, the lower the LOD level is. Therefore, the Cube has the highest LOD level (LOD0), and the Cylinder has the lowest LOD level (LOD2) here.
If the time order of Meshes created here is wrong, the easiest and direct way is to copy and paste them in time order and delete the original ones.
The Meshes created in this documentation are used for subsequent demonstration of the different LOD level effects.
Creating Empty Objects
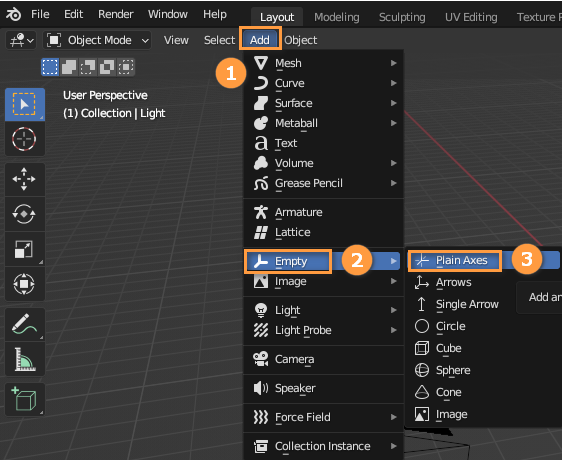
Click Add -> Empty -> Plain Axes in Blender, or press the shortcut key Shift + A to create a new Plain Axes empty object with no naming requirement.
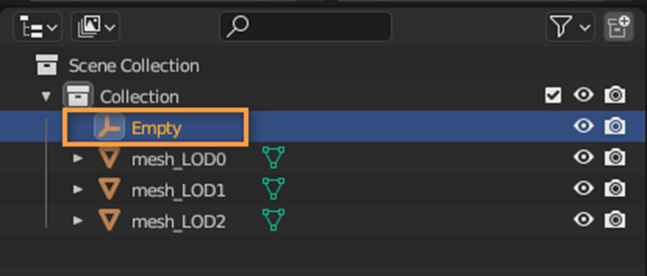
After creating:
Binding LOD Models with Empty Objects to Parent-child Relationship
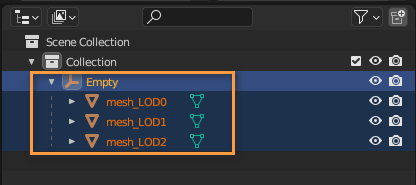
Select Empty in the Scene Collection panel first, then hold down Shift and click mesh_LOD2 to select all four items. Right-click in the operation interface to open the Shortcut Menu. Click Parent -> Object, or press the shortcut key Ctrl + P and select Obejct in the pop-up Shortcut Menu. Empty is the parent, while three Meshes are its children with the parent-child type as Object.

After Completing:
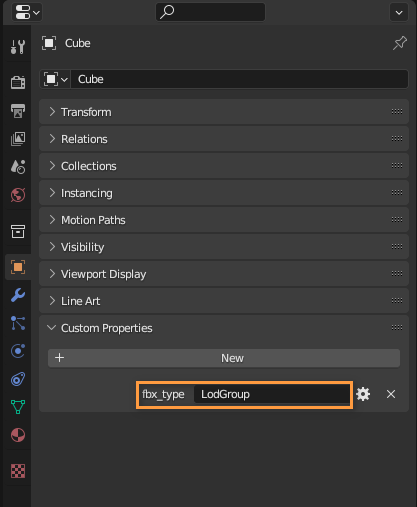
Adding Custom Properties
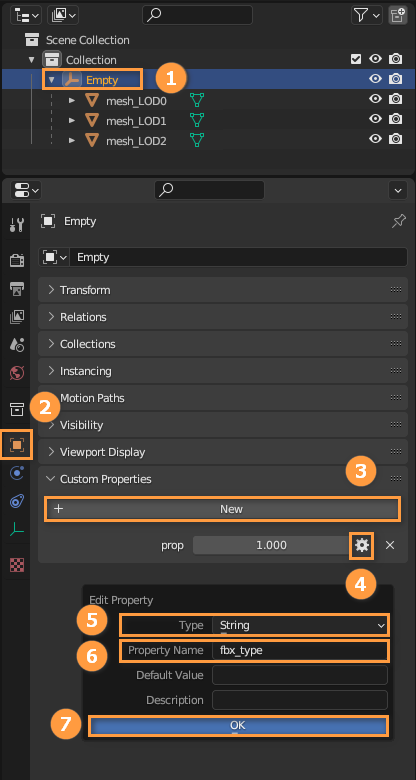
Select Empty in the Scene Collection panel. Click Object Properties -> Custom Properties -> New in the Property Bar below. Click the ![]() button on the right side of the prop to open the Edit Property window. Change the Float type to String in the Type column, and Property Name to fbx_type. Click OK.
button on the right side of the prop to open the Edit Property window. Change the Float type to String in the Type column, and Property Name to fbx_type. Click OK.
Change the fbx_type to LodGroup (Case should be standardized, otherwise errors may occur).
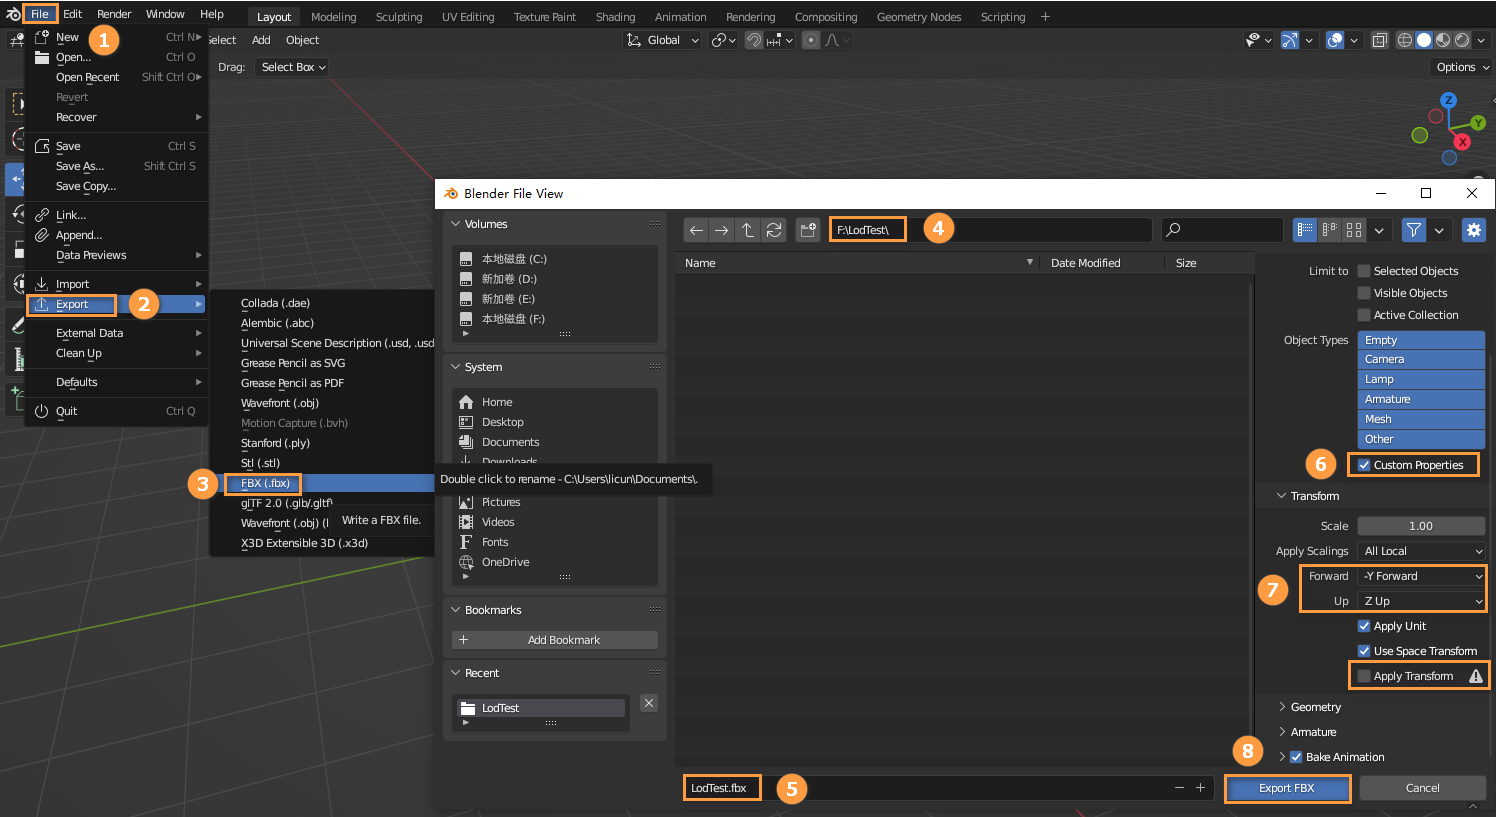
Exporting
Click File (Menu Bar) -> Export -> FBX (.fbx). Select the export path of the file, modify its name, and check Custom Properties. Change Forward to -Y Forward, Up to Z Up. Check Apply Transform as needed, then select Export FBX.
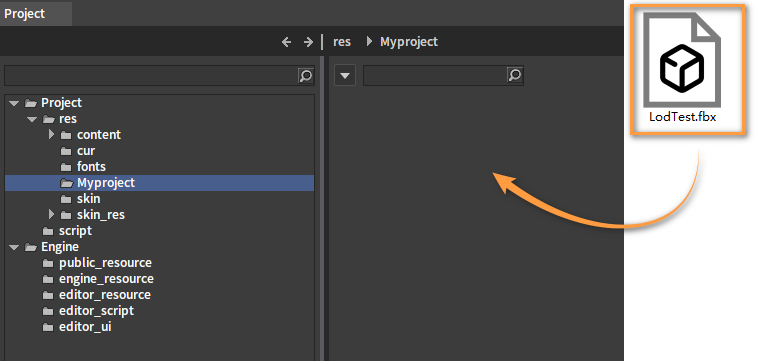
Importing Static Mesh LOD Files into Flexi
Drag the exported FBX file into the Resource Preview window of the Flexi Engine (You can first select the directory where the file is to be located in the Project panel).
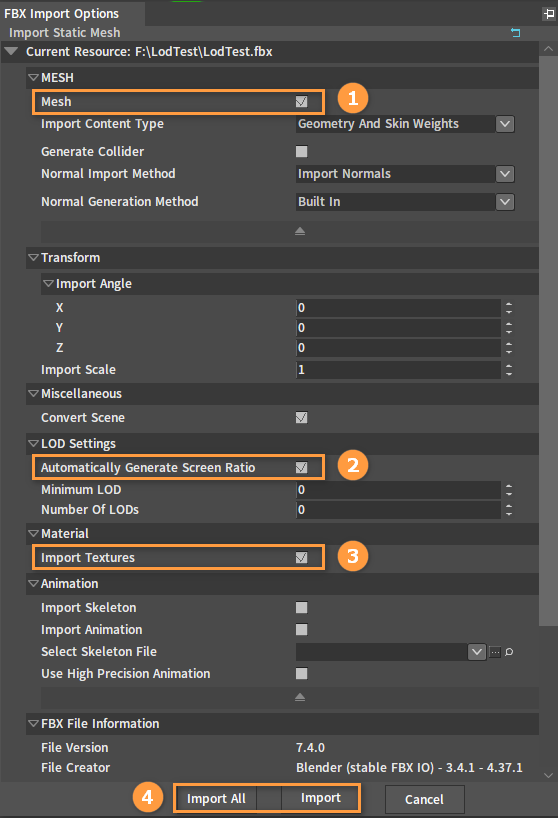
In the pop-up FBX Import Options window, check Mesh, Automatically Generate Screen Ratio, Import Textures, and click Import or Import All.
Double-click the generated XMOD file to enter the Model Preview window to check if the LOD is correct.
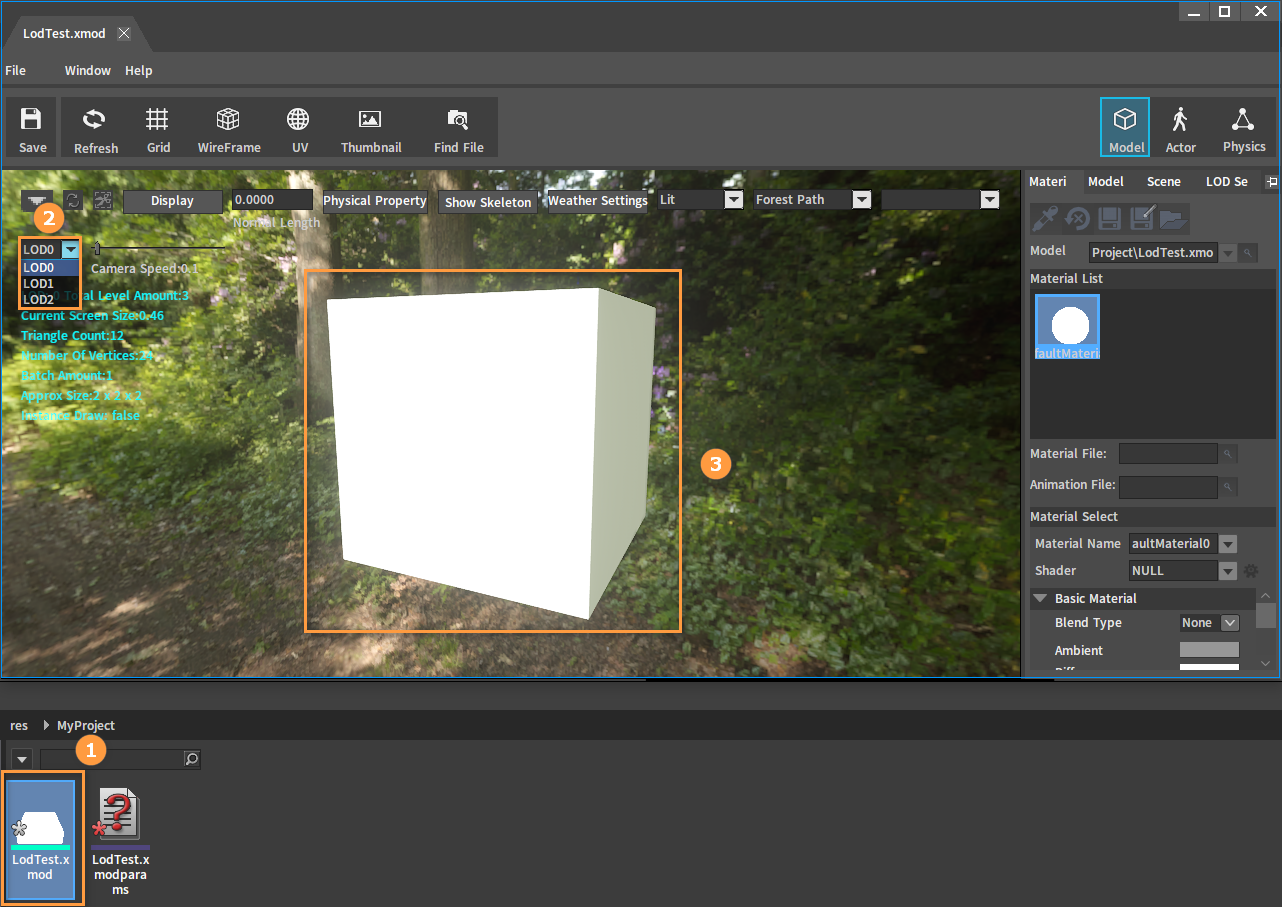
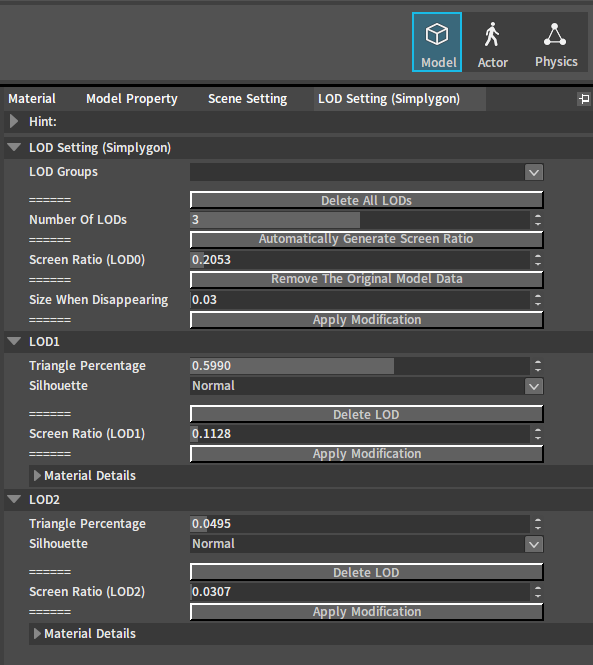
Simplygon LOD:
Create the LOD of the model by Simplygon.
Install the two necessary runtime libraries before using Simplygon for the first time.
Run and install the \tools\simplygon\vcredist_x64.exe.
Run and install the \tools\simplygon\vcredist_x86.exe.
Register before using. Note: Don’t need to register repeatedly.
Open the \tools\simplygon\LicenseApplication.exe.
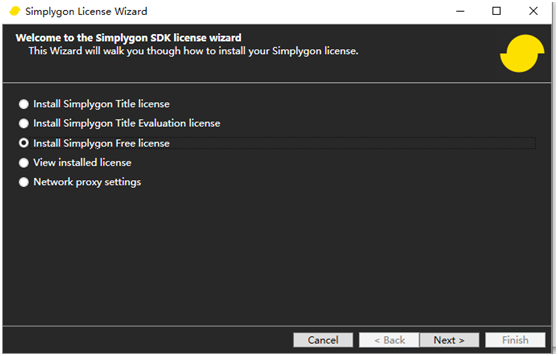
If you do not have a Microsoft account, click Create to register an account. It is recommended to pre-register a Microsoft account on the web page, which is much faster. Then you can directly log in here.
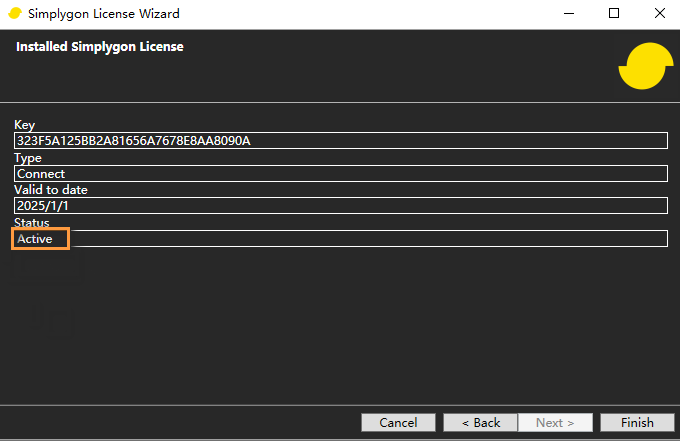
Active indicates that the account is activated. After activated, open the Model Editor and make LOD settings in the window.
Importing Skeletal Meshes
Export skeletal mesh from external 3D modeling softwares.
The skeletal mesh is formed by two parts:
A set of polygons that forms the surface of the skeletal mesh.
A hierarchical set of associated bones used to animate polygon vertices.
In the Flexi Engine, Actors are often used to represent characters or other Actors with animations. 3D models, bindings and animations are created in external modeling and animation softwares such as 3Ds Max, Maya, Blender, etc. Then import them to the Flexi Engine through settings in the Editor.
Drag the exported FBX file to the Resource Preview window.
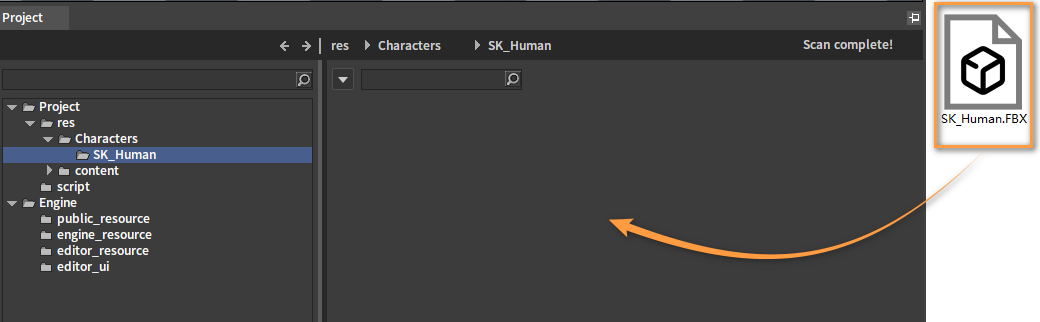
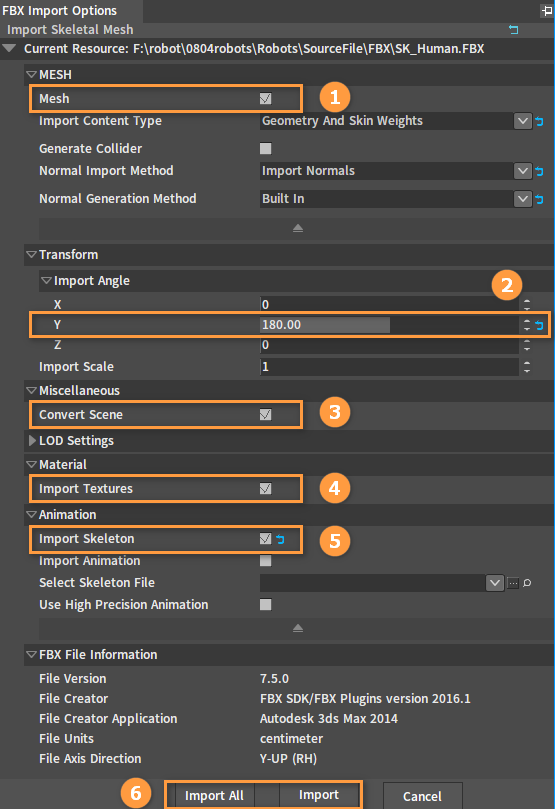
Make settings in the pop-up FBX Import Options window.
| NO. | Name | Description |
|---|---|---|
| 1 | Mesh | Whether to import mesh. |
| 2 | Y | Adjust the Actor's orientation. In general, we need to rotate the Y-axis by 180 degrees. |
| 3 | Convert Scene | Whether to convert the scene from the FBX coordinates to the Flexi Engine coordinates. The file units will also be matched. |
| 4 | Import Textures | Whether to import textures. |
| 5 | Import Skeleton | Whether to import the skeleton. The file suffix of the imported skeleton is _tpose.xskt. |
| 6 | Import All/Import | Whether to import all meshes or a single mesh. |
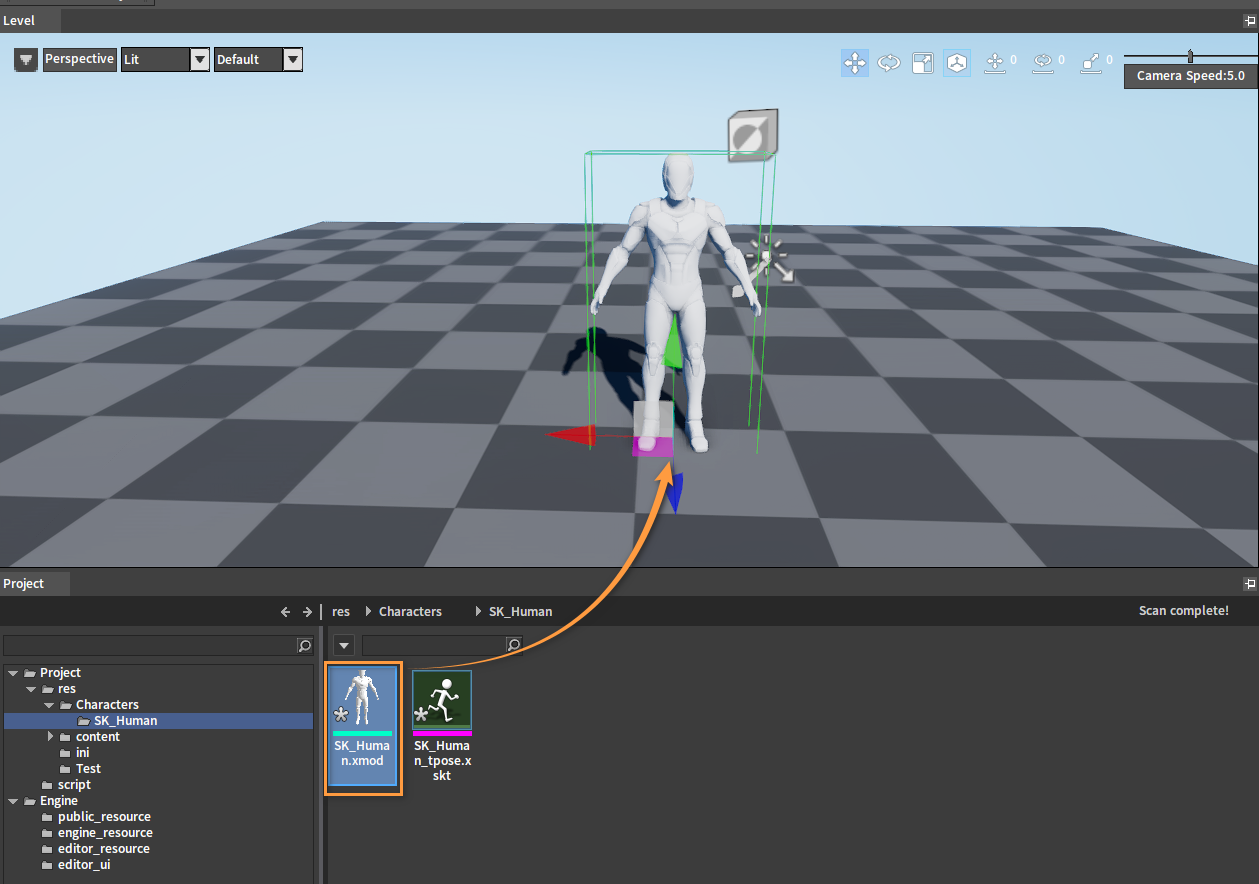
Check whether the resource has been imported correctly by viewing it in the Level panel.
Importing Animations
Drag the exported FBX file to the Resource Preview window.
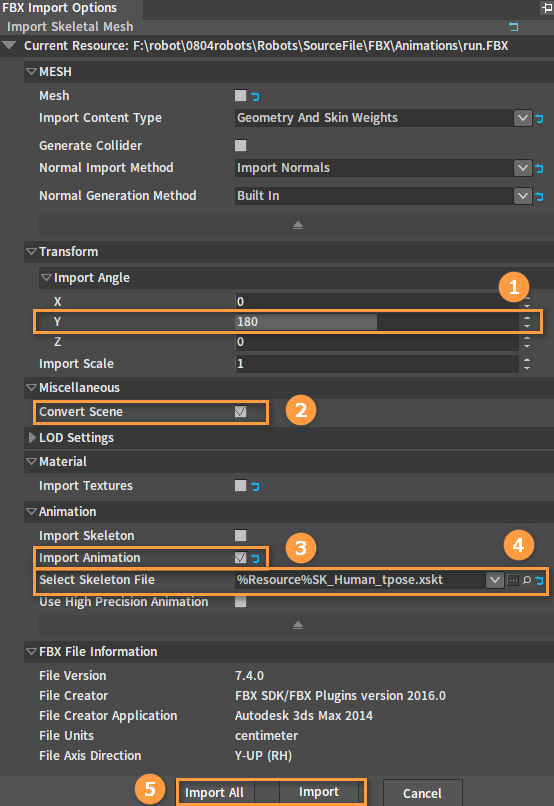
Make settings in the pop-up FBX Import Options window.
| NO. | Name | Description |
|---|---|---|
| 1 | Y | Rotation. This part needs to be consistent with the parameters when importing Skeletal Mesh and Skeleton are imported. |
| 2 | Convert Scene | Whether to convert the scene from the FBX coordinates to the Flexi Engine coordinates. The file units will also be matched. |
| 3 | Import Animation | Whether to import the animation. When importing an animation, a matching skeleton file must be selected. The animation file is suffixed with .xskt after being imported. |
| 4 | Select Skeleton File | You can drag and drop a skeleton file (.xskt file) from the Resource Preview window, or select a skeleton file from the drop-down box as matching skeleton data when importing an animation. Please refer to the Animation Import feature for details. (This is a Tpose for testing the imported skeletal mesh.) This operation is to judge whether the bone topology in the animation file is consistent with the skeleton. |
| 5 | Import All/Import | Import all animations or import a single animation. The Import All button allows you to import multiple FBX data at one time when dragging in several FBX files. |
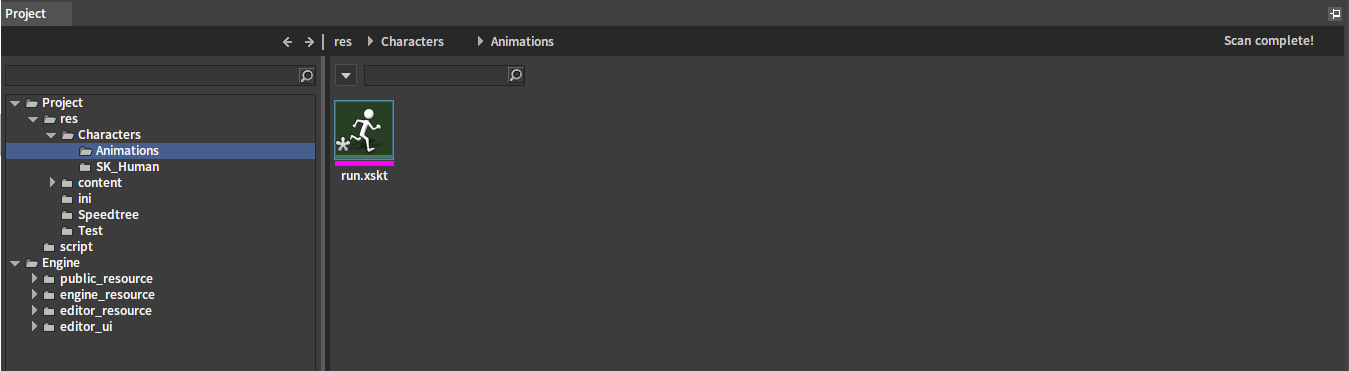
View the imported animation in the Resource Preview window.
Check whether the imported animation is correct:
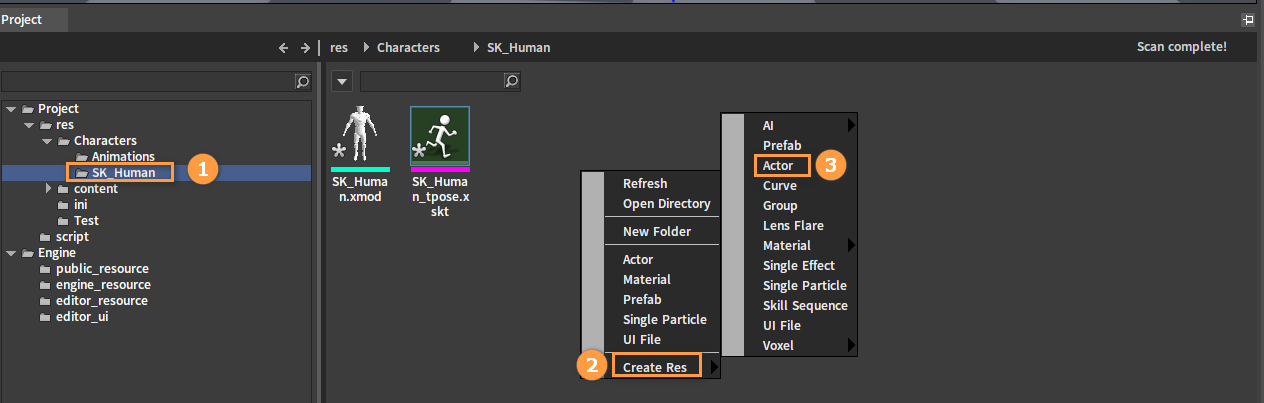
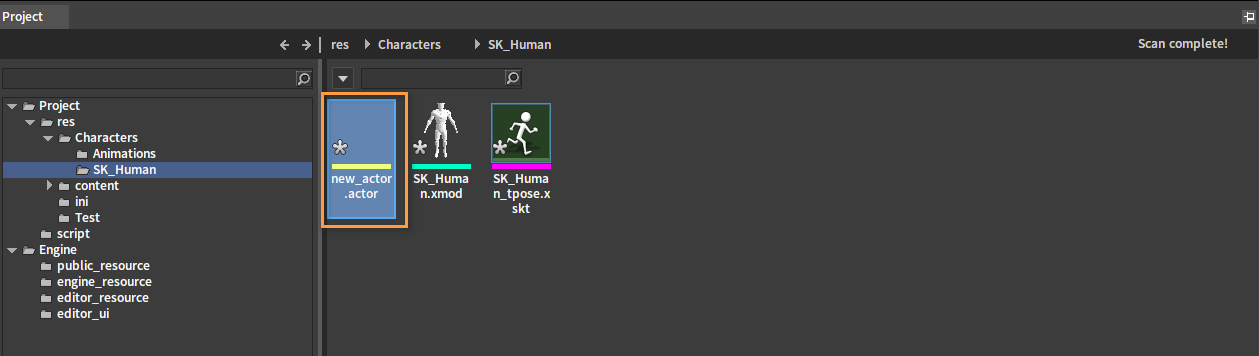
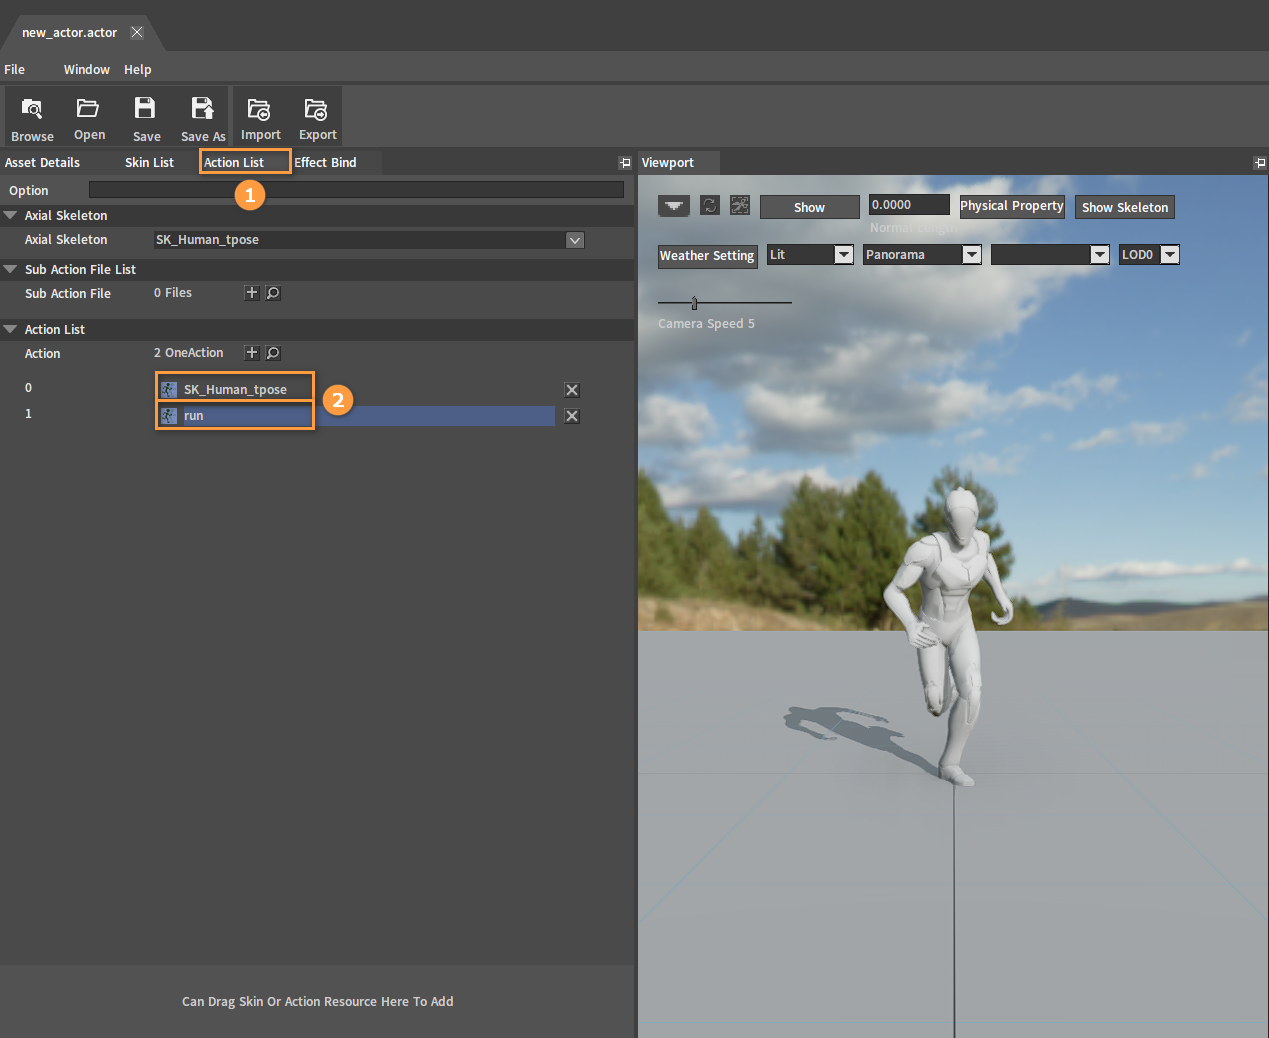
Select the folder to import the skeletal mesh. Right-click theResource Preview window and select Create Res -> Actor. View the new Actor in the Resource Preview window.
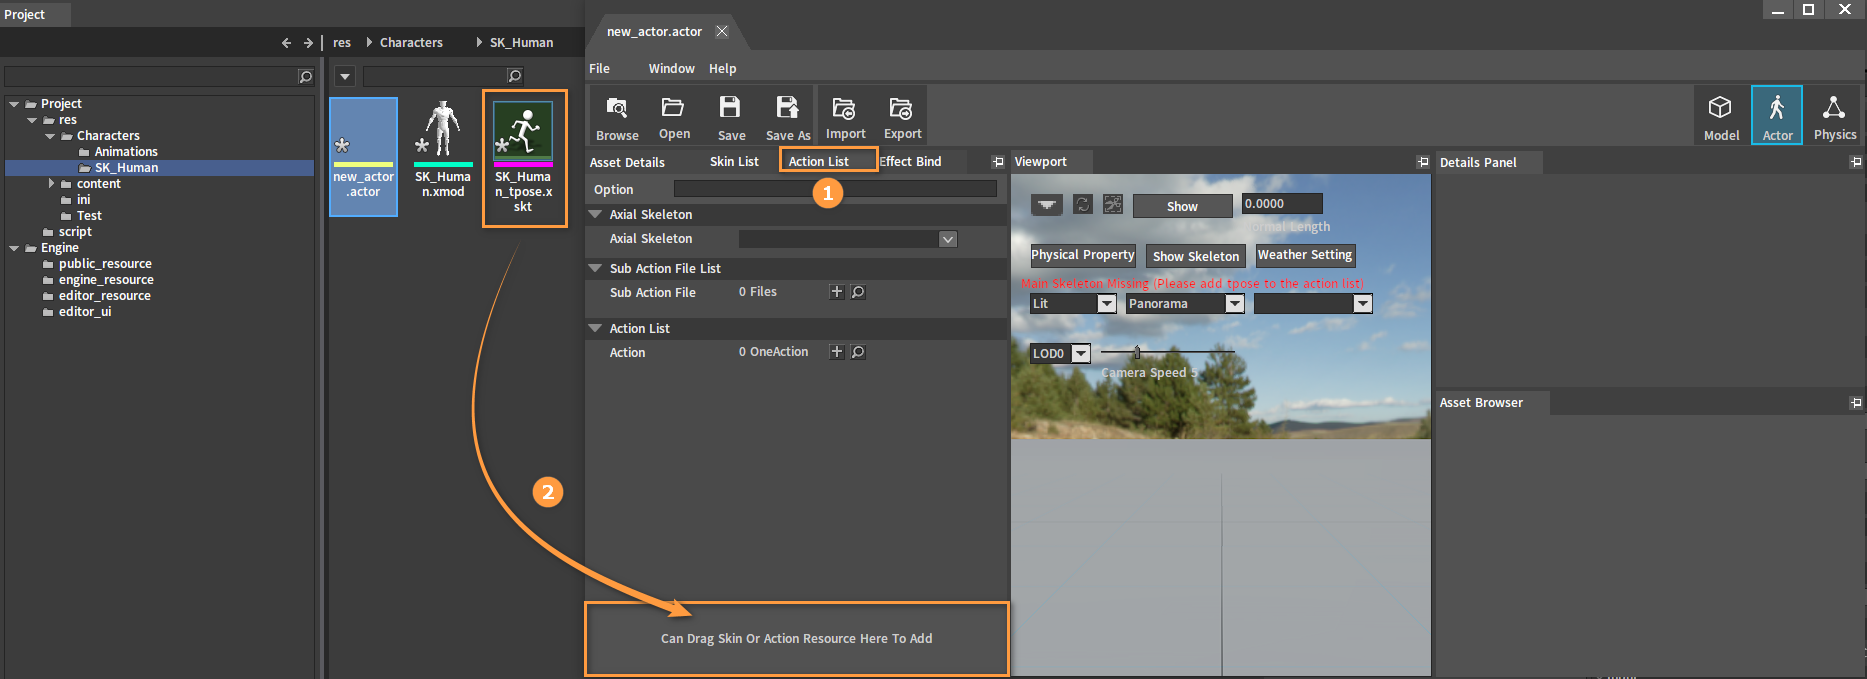
Double-click the new Actor to enter the editing window. Drag the action file into the area under the Action List and check whether it is imported correctly.

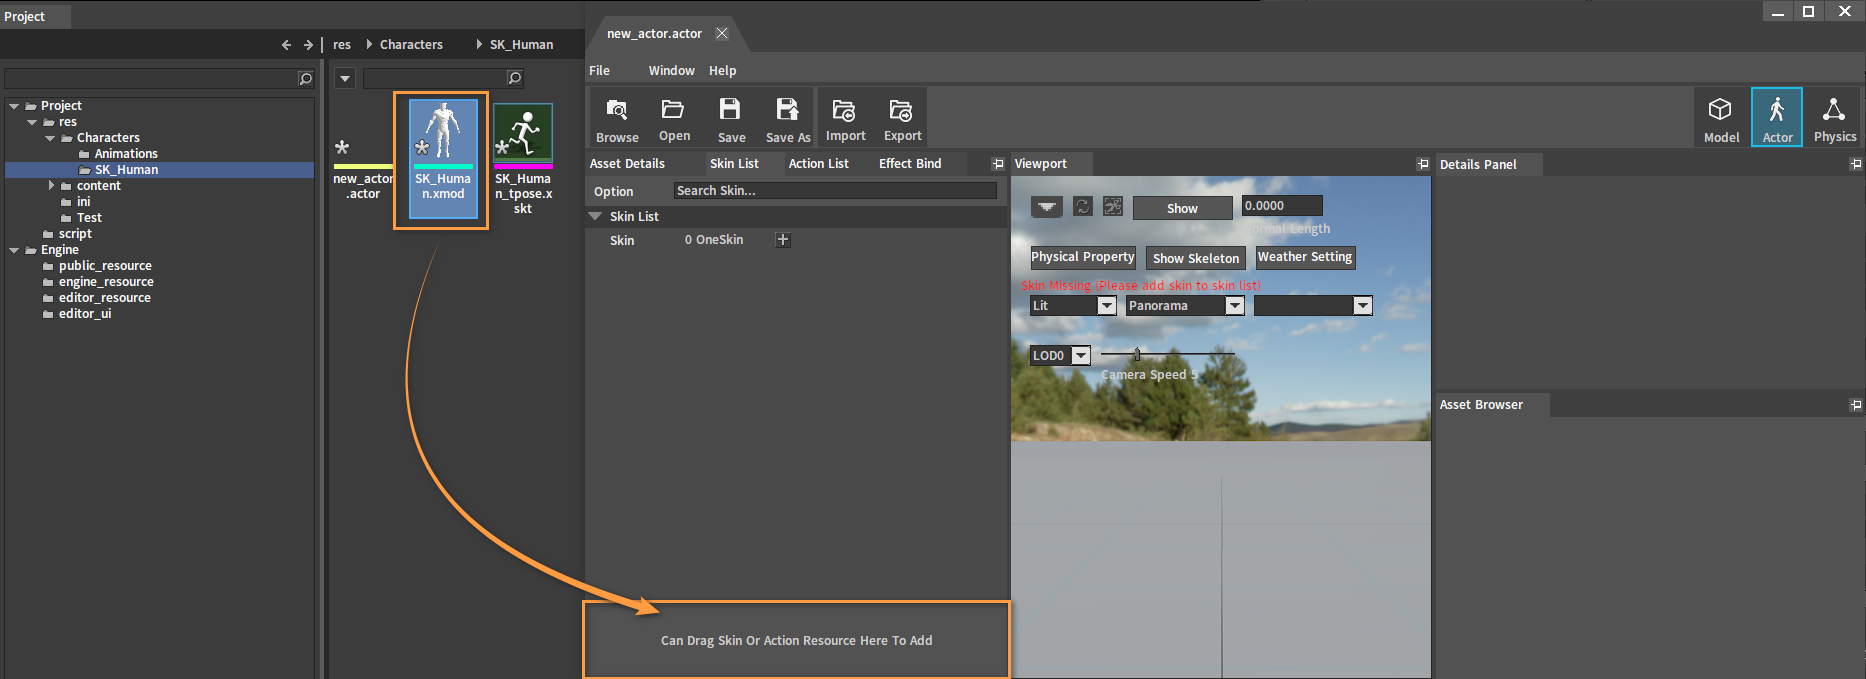
Click the Skin List and drag the file to the area under it. Check whether it is imported correctly.
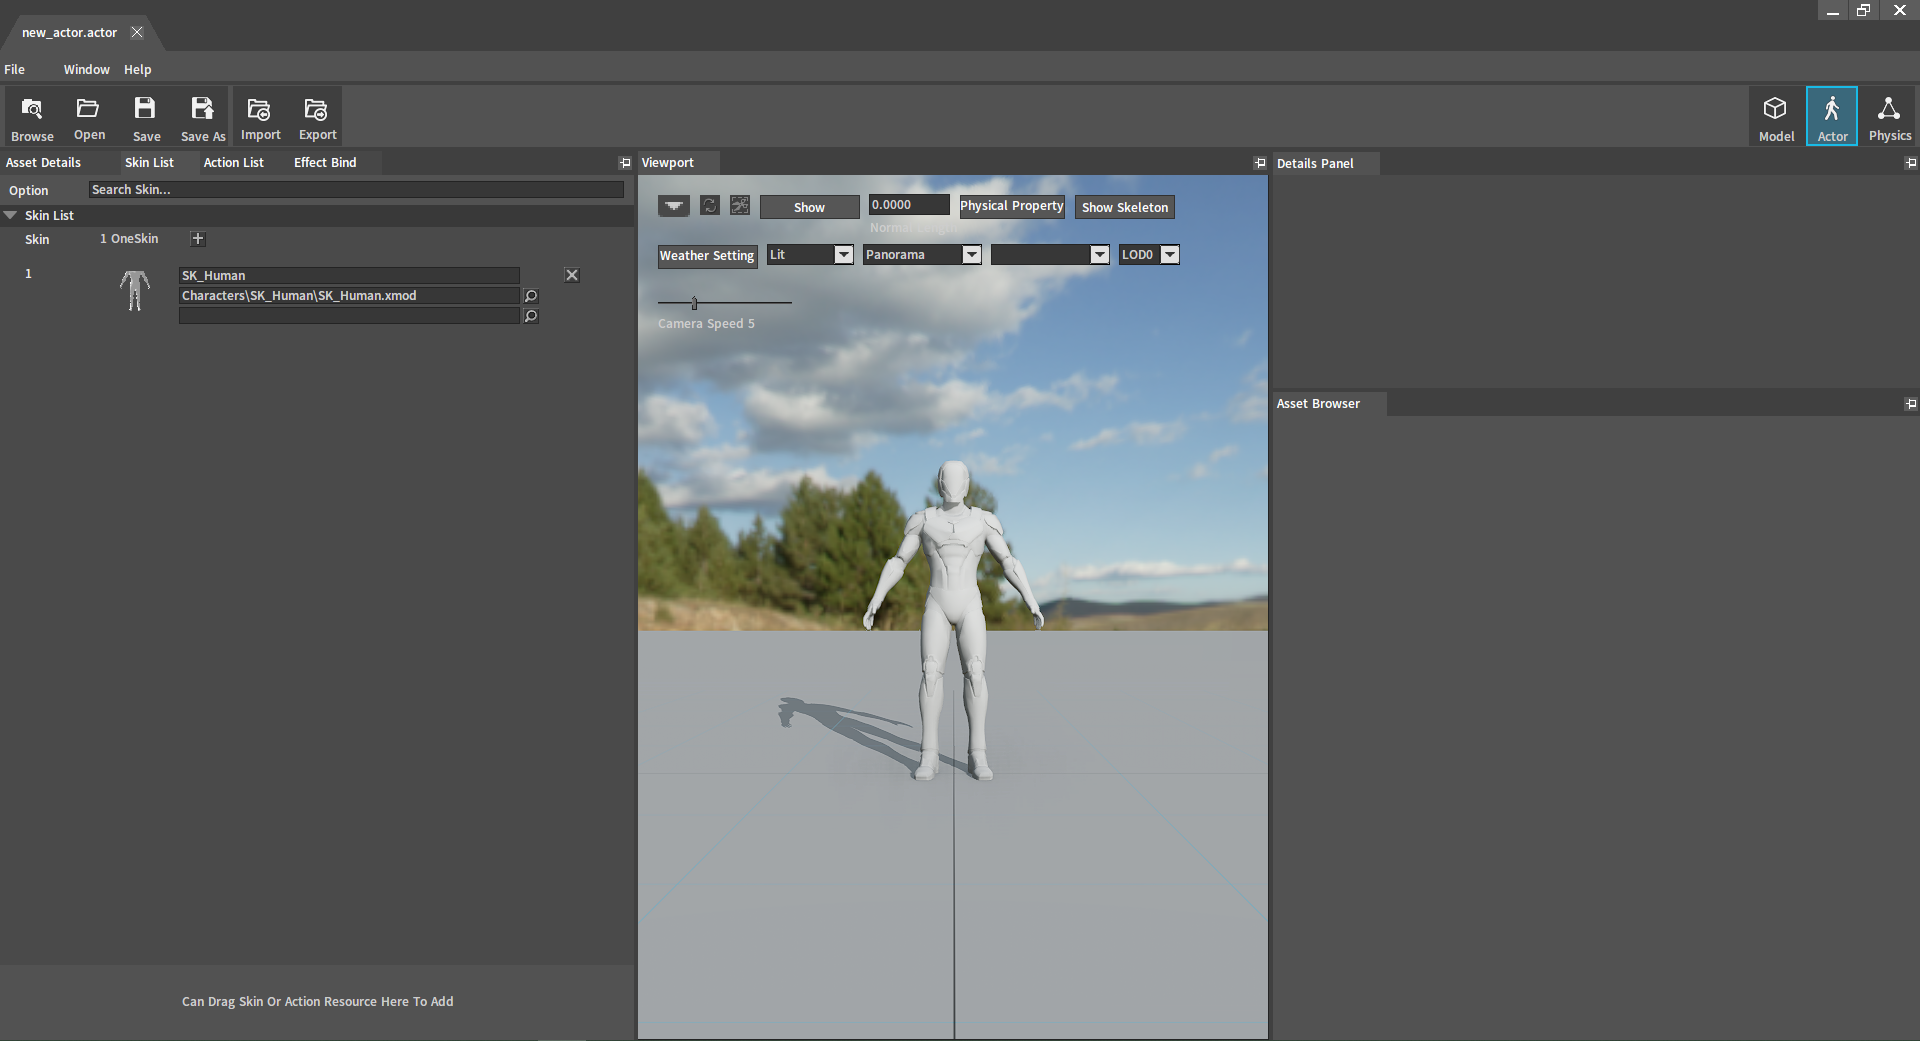
Under the Action List, click to switch between Tpose and the imported action to check whether it is correct.
Importing Speedtree Resources
Exporting Resources from Speedtree
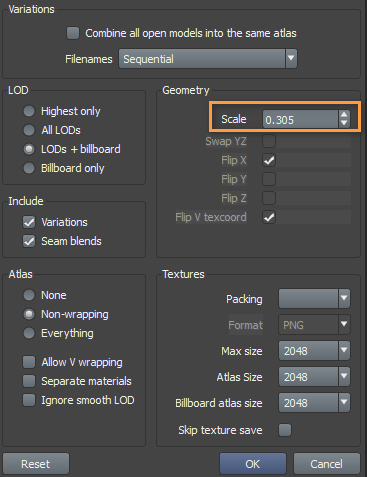
Pay attention to the settings of the Scale factor when exporting. The default unit in the Flexi Engine is meter (m), while that of Speedtree is foot (ft). For 1ft equals 0.3048m, the Scale factor of the model should be 0.3048(rounded to 0.305) when exporting.
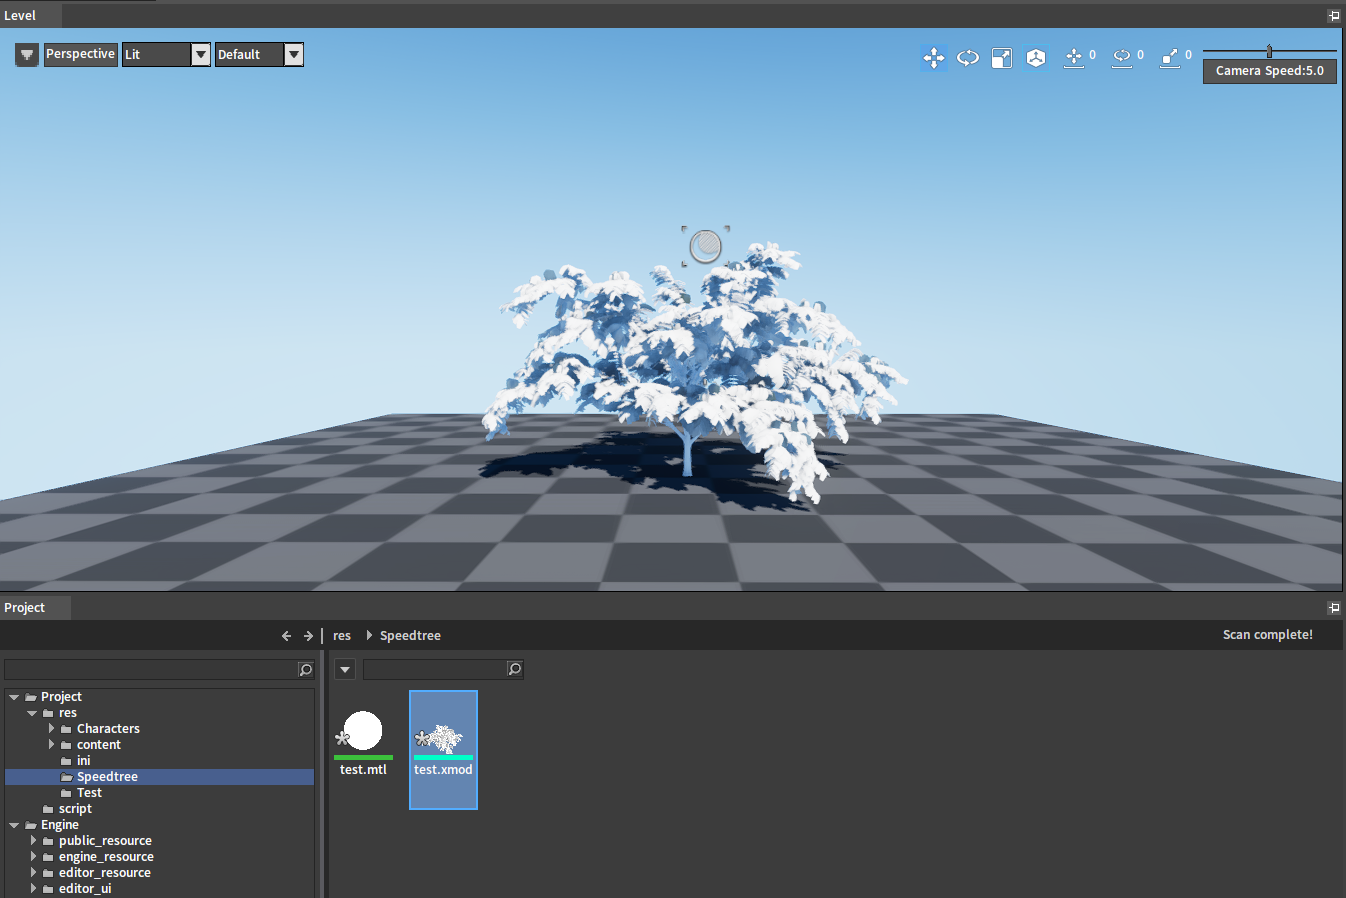
Importing Speedtree Resources to Flexi
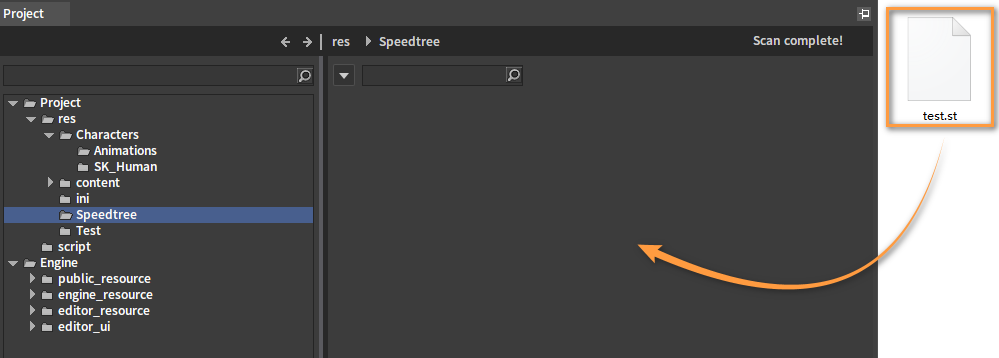
Create a folder in the Project panel directory and open it, for example, Speedtree. Drag the ST file to be imported to the Resource Preview window in the Engine (folders can be dragged).
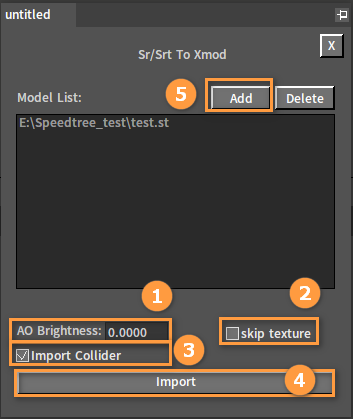
Properties of the panel importing .st files.
| NO. | Name | Description |
|---|---|---|
| 1 | AO Brightness | Adjust AO brightness. |
| 2 | Skip Texture | Whether to skip texture. Textures will not be dumped when checked. |
| 3 | Import Collider | Whether to import colliders. |
| 4 | Import | Import files. |
| 5 | Add | Add several .st files. |
Check whether the resource has been imported correctly by viewing it in the Level panel.
Other details will be processed automatically during the dumping:
- If the material in the original ST file contains subsurface scattering property and map, the material of the converted model will also automatically have the subsurface scattering property.
- Roughness maps stored in Channel Alpha of the normal maps in PNG files are automatically split into maps with an suffix "_m" when converted to TIF files. Roughness is stored in Channel B.
- AO in Speedtree is available in the Flexi Engine. It is stored in the RGB Channel of vertex. Note that AO can be adjusted in Speedtree.
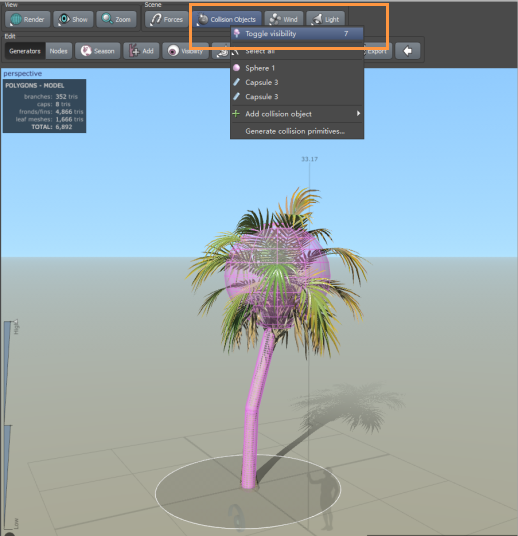
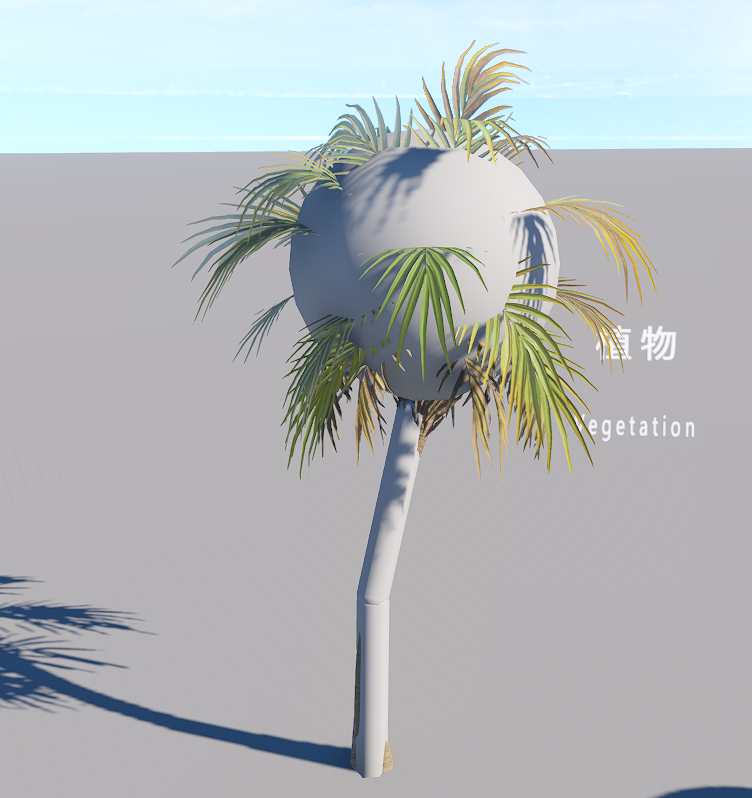
- Collider models in Speedtree are available in the Flexi Engine. See the picture below.
Map Resources
Map Standards
PBR is available in the Flexi Engine. We need to follow the mapping standards of PBR.
Rules for suffixing common maps are shown in the table below. Note: When the PS plug-in FlexiTIFPlugin exports in TIF format, the corresponding map type will be automatically selected according to the file suffix.
| Original Image (TIF) | Suffix | Description |
|---|---|---|
| Diffuse Map/Albedo Map/Base Color | _D | RGB/RGBA |
| Normal Map | _N | |
| Mix Map | _M | R: MetallicG: RoughnessB: Specular levelA: Ambient Occlusion |
| Height Map | _H | RGBA (From Channel A, initial color is 128) |
| Emissive Map | _E | RGB |
| SubSurface Strength | _SSS | |
| Flow Map | _FM | |
| Mask | _Mask | |
| ImageSequence | _Sequence | Only the first 5 levels of the MipMap are retained |
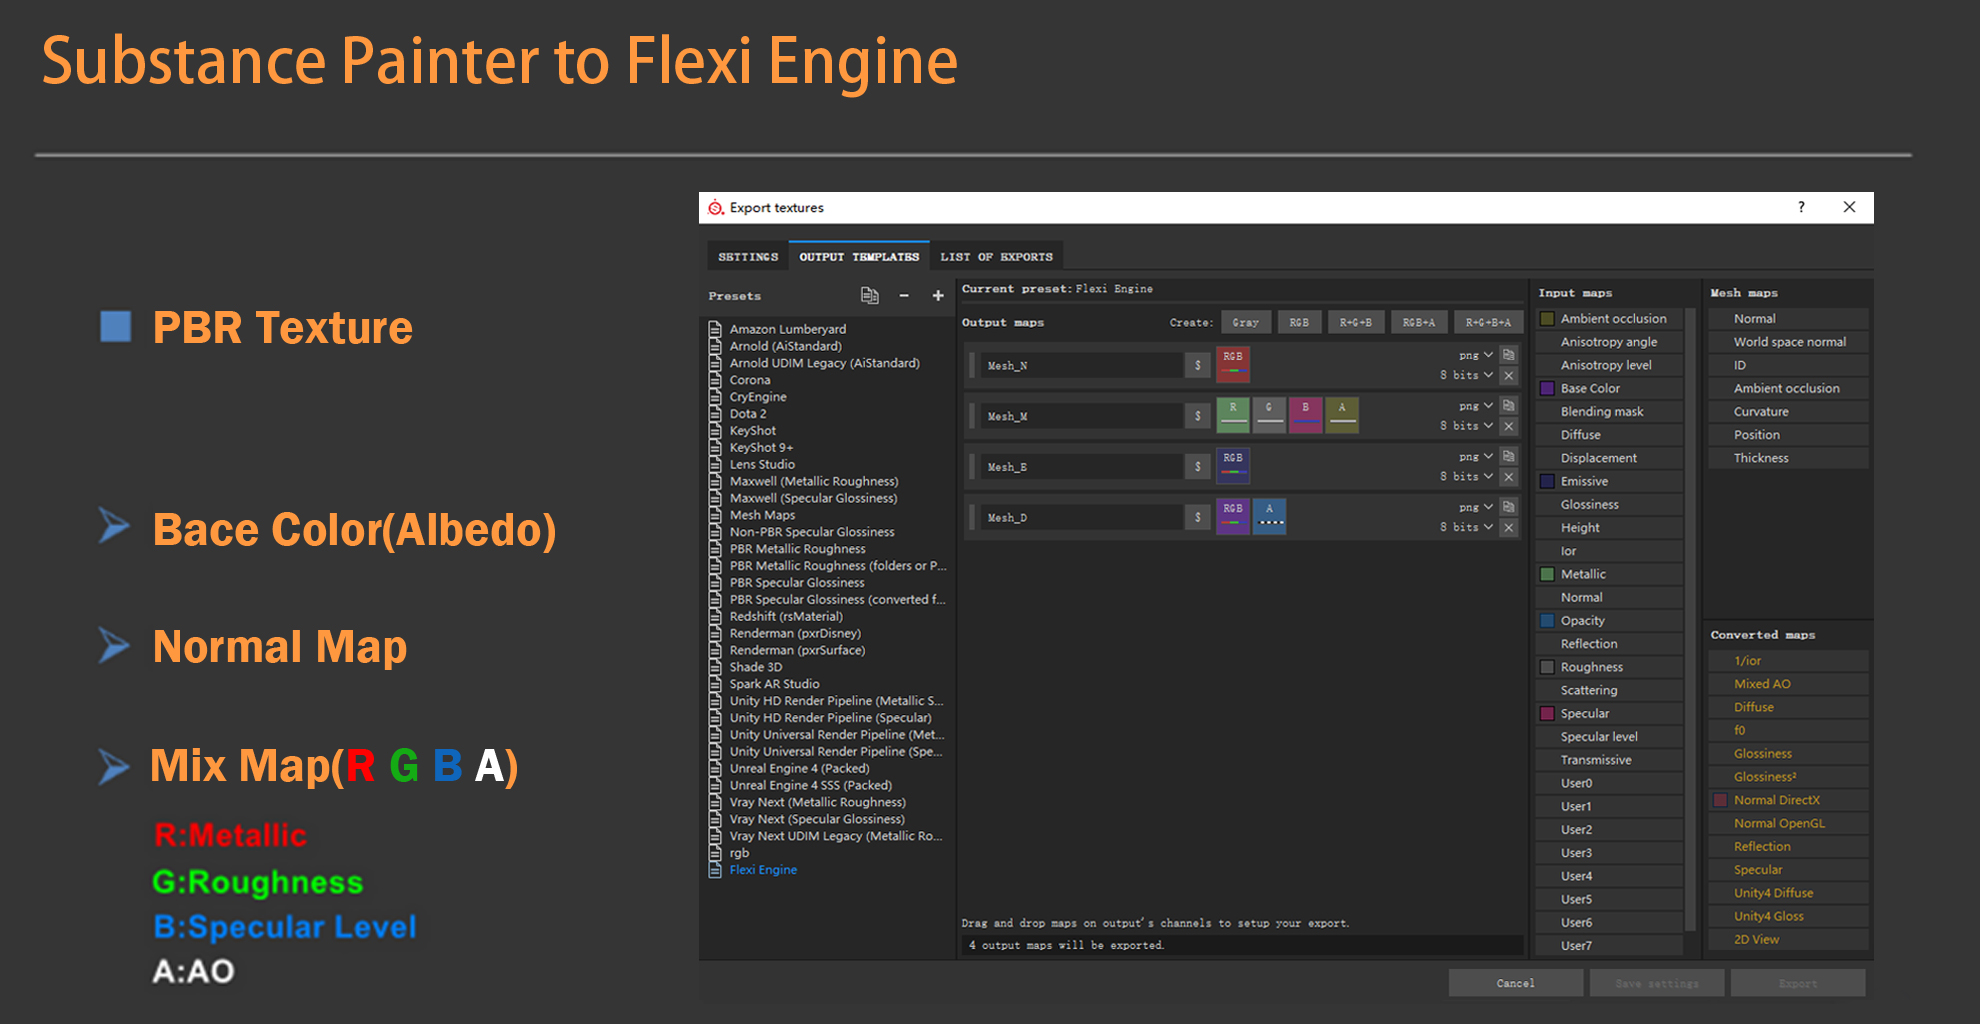
Exporting from Substance Painter
Substance Painter export settings:
Exporting from Photoshop
After you create the map resources in Photoshop, export them by the installed Photoshop plugin.
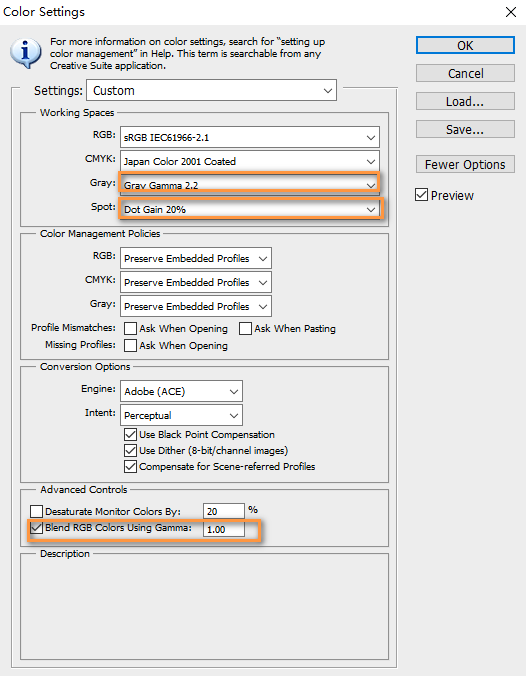
Color Settings:
Exporting maps:
Chinese is not allowed to appear in the export path and file name of the map.
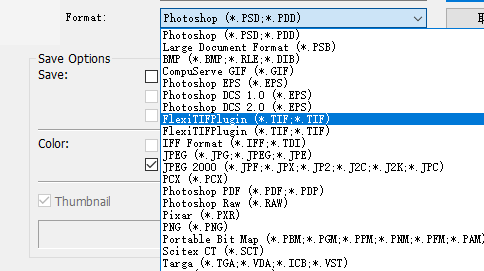
After mapping, the map will be saved in FlexiTIFPlugin (*.TIF, TIF) format.
Select the corresponding texture type and adjust its size in the pop-up panel.
Click File -> Save as. Select FlexiTIFPlugin (*.Tif), and save.
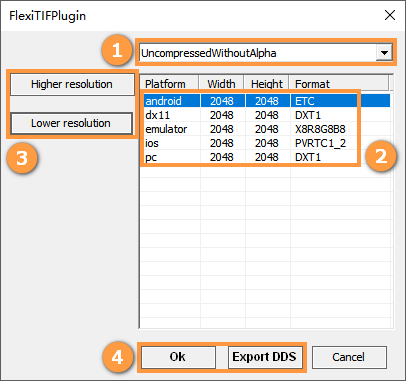
Photoshop FlexiTIFPlugin panel is shown as the picture below.
| NO. | Description |
|---|---|
| 1 | Select map type. |
| 2 | Select the corresponding platform for separate settings. |
| 3 | Modify texture size. |
| 4 | Select OK to export TIF files, select Export DDS to export DDS file |
Exporting Resources from Flexi
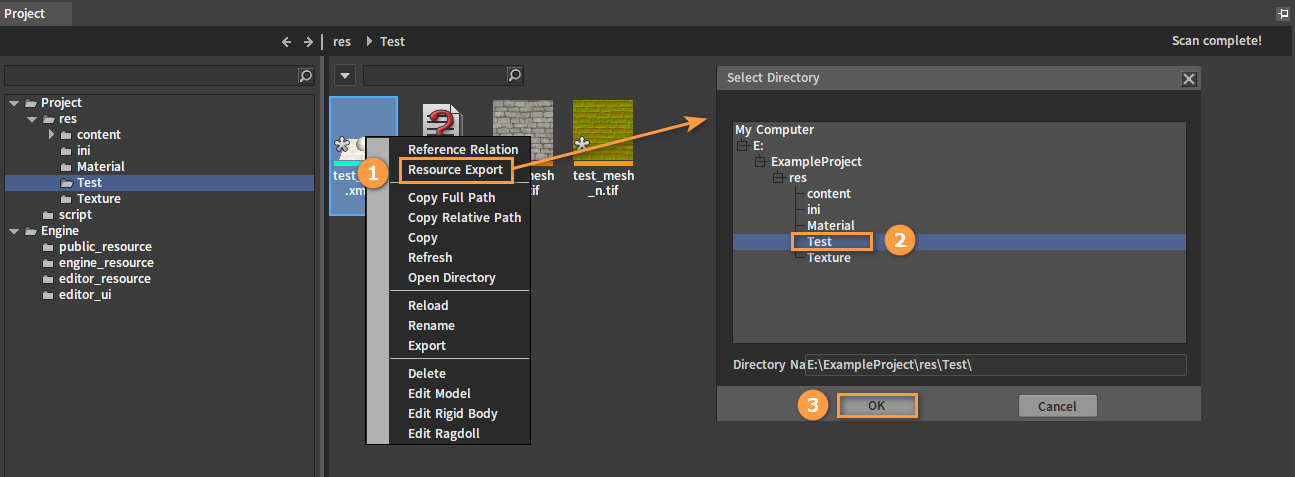
Exporting Resources to the Specified Folder by Reference Relationship
Select the resource file to be exported and right-click it. Click Resource Export and select export path in the Select Directory window. Click OK to export.