Movie Editor
Overview
As a built-in Editor for cinematics of the Flexi Engine, the Movie Editor can give full play to the unique characteristics of the Engine by controlling the properties of its current features, including global effects, character system, model animation, camera, adding tracks, etc. Through such an Editor, we can create professional game animation effects, which can be used in both in-game cinematics or game-related video products.
This manual will demonstrate the Movie Editor step by step, which will cover an introduction to its interface, quick start and detailed information of its editing features. It is hoped that users can learn to make movies and animations, know more details to operate the Editor, and start their creation quickly.
UI Description
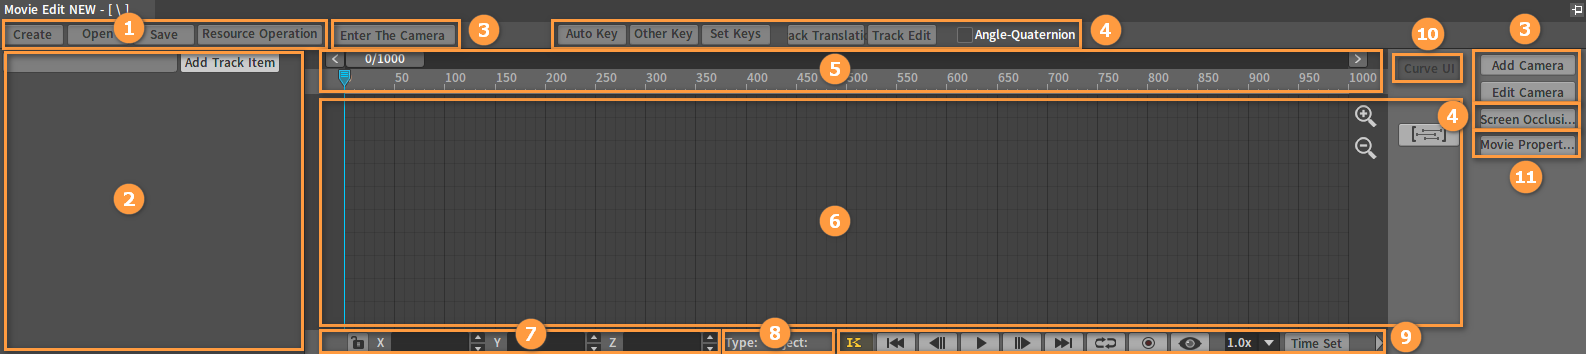
| No. | Name | Description |
|---|---|---|
| 1 | Project Menu Bar | Create, open and save movie project; Contain other operations related to resources. |
| 2 | Keyframe Object Tree | Display the Keyframes of all the Objects' properties in a movie project in a form of a tree. |
| 3 | Camera Operations | Select and enter a camera's POV in the scene, create and edit cameras. |
| 4 | Keyframe Operations | Perform different Keyframe operations on movie Actors, create and translate different tracks. |
| 5 | Timeline | Show the timeline of current movie project and the timing of current animation; Adjust the current frame of animation by dragging mouse. |
| 6 | Keyframe Working Area | Include the Track and Curve working areas, which can be shifted between each other; Show the Keyframe information or curve of current movie Actor; Adjust the Keyframe values or curve values and curve rates. |
| 7 | Operating Area For Current Actor's Coordinates | Show and edit current Actor's coordinate information. |
| 8 | Actor Information Area | Show the type and ID of current Actor. |
| 9 | Animation Playback Control Area | Animation playback, preview and export. |
| 10 | Working Area Shift Button | Shift between the Track and Curve working areas. |
| 11 | Movie Properties | Set properties of the animation. |
Project-related Features
![]()
 : Create a movie animation project.
 : Open a movie animation project.
 : Save a movie animation project.
 :
:Resource-related Operations:
Save As — Save the movie animation project as;
Import Movie Objects — Import the exported Keyframe data back to the movie project;
Export Movie Objects — Export the selected Keyframe data in the movie project as an XML file.
Keyframe Object Tree
 : Add Track Item to add different types of Keyframes;
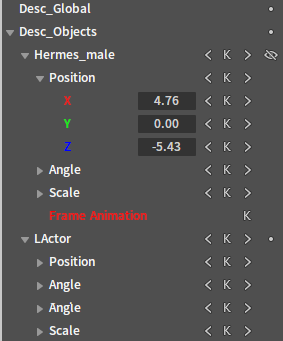 : Display the Keyframes of all the Objects' properties in a movie project in a form of a tree.
Camera-related Operations
 : Select and enter a camera's POV in the scene;
 : Pop up the Add Camera window;
 : Pop up the Edit Camera window.
Keyframe-related Operations
![]()
 : Open the Keyframe mode when enabled, and add Keyframes to the current timing on the timeline when the Position, Angle, Scale or other properties of an Actor/Model is changed;
 : Add different types of Keyframes
  ;
; : Click to set a Keyframe for a selected Actor's Position, Angle and Scale at the very position of the pointer on the timeline;
 : When it is enabled, drag to modify a track and it will translate as a whole; otherwise only a single node will be moved;
 : Create different types of tracks.
Timeline
Show the timeline of the current movie project and the timing of the current animation. You can adjust the current frame of animation by dragging mouse.![]()
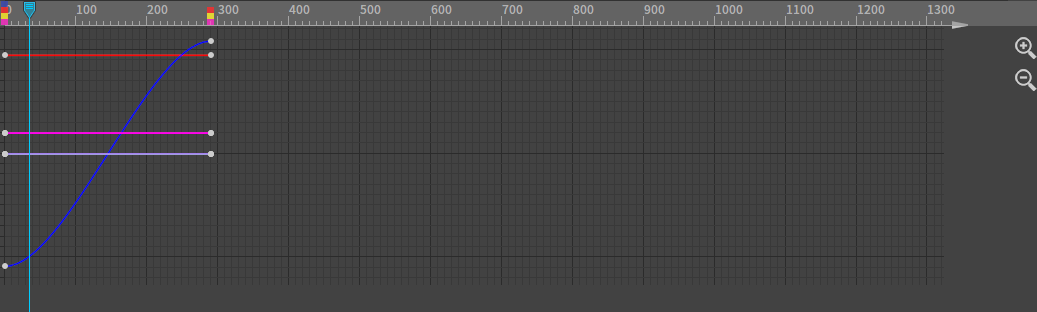
Keyframe Working Area
Include the Track and the Curve working areas, which can be shifted between each other.
Track working area: Show the detailed Keyframe info of the movie Actor selected on the Keyframe Actor Tree; Copy, move, delete and adjust Keyframe values.
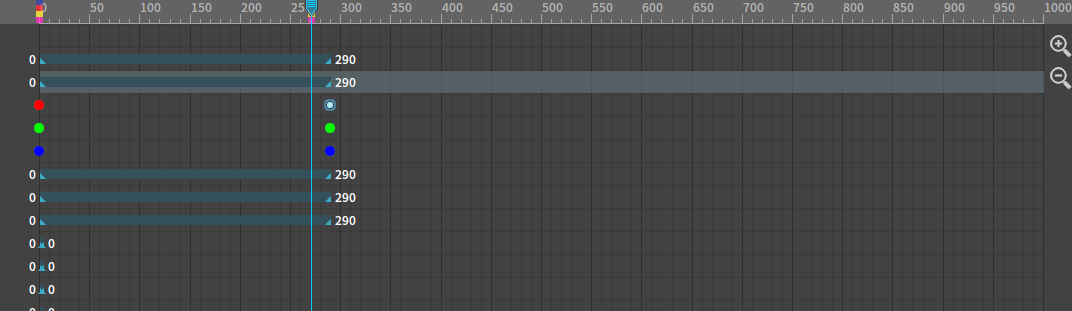
Curve working area: Show the Keyframe curve of the current movie Actor; Adjust curve values, curve rates, etc.
Operating Area for Current Actor's Coordinates
Show and edit the current Actor's coordinate information.
![]()
Actor Information Area
Show the type and ID of the current Object.
![]()
Animation Playback Control Area
![]()
| Icon | Name | Description |
|---|---|---|
| Keyframe Mode | Shift between Keyframe Mode and Frame-by-Frame Mode. | |
| Start Frame | Shift to the start frame. | |
| Previous Frame | Shift to the previous frame (Frame-by-Frame Mode) or the previous Keyframe (Keyframe Mode). | |
| Play | Play the movie from the pointer position. | |
| Pause | Pause the movie being played. | |
| Next Frame | Shift to the next frame (Frame-by-Frame Mode) or the next Keyframe (Keyframe Mode). | |
| End Frame | Shift to the end frame. | |
| Loop | Play the movie in a loop. | |
| Record Set | Export the movie as video or a series of images. | |
| Preview | Preview the movie animation effects. | |
| Playback Speed | Set the playback speed of the movie. | |
| Time Set | Set the duration, frame rate, frame gap, etc. of the movie. |
Working Area Shift Buttons
 : Shift to the Track working area;
 : Shift to the Curve working area.
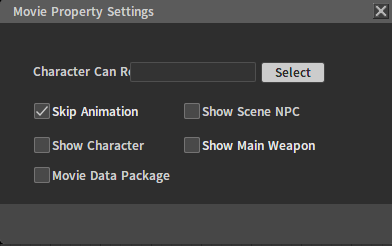
Movie Property Settings
![]()
Movie Property Settings: Set the properties of the movie animation edited, such as Skip Animation and Show Character, etc.
Quick Start
This chapter will illustrate the detailed steps to make a simple movie animation project with the Movie Editor. In this process, it is hoped that users can learn to create, save, open, and play a movie project, to add Keyframes to the Actor's properties and actions, to perform Keyframe operations on global properties, to add and control POV of cameras, to test and modify animation effects, etc.
Opening the Movie Editor
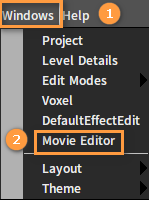
Click Windows -> Movie Editor to open the Movie Editor interface.
Creating Movie Projects
Click the ![]() button to clear the current interface and add a new project (When we open the Movie Editor for the first time, the project created will be blank by default).
button to clear the current interface and add a new project (When we open the Movie Editor for the first time, the project created will be blank by default).
Adding Actors to the Timeline of the Movie Editor
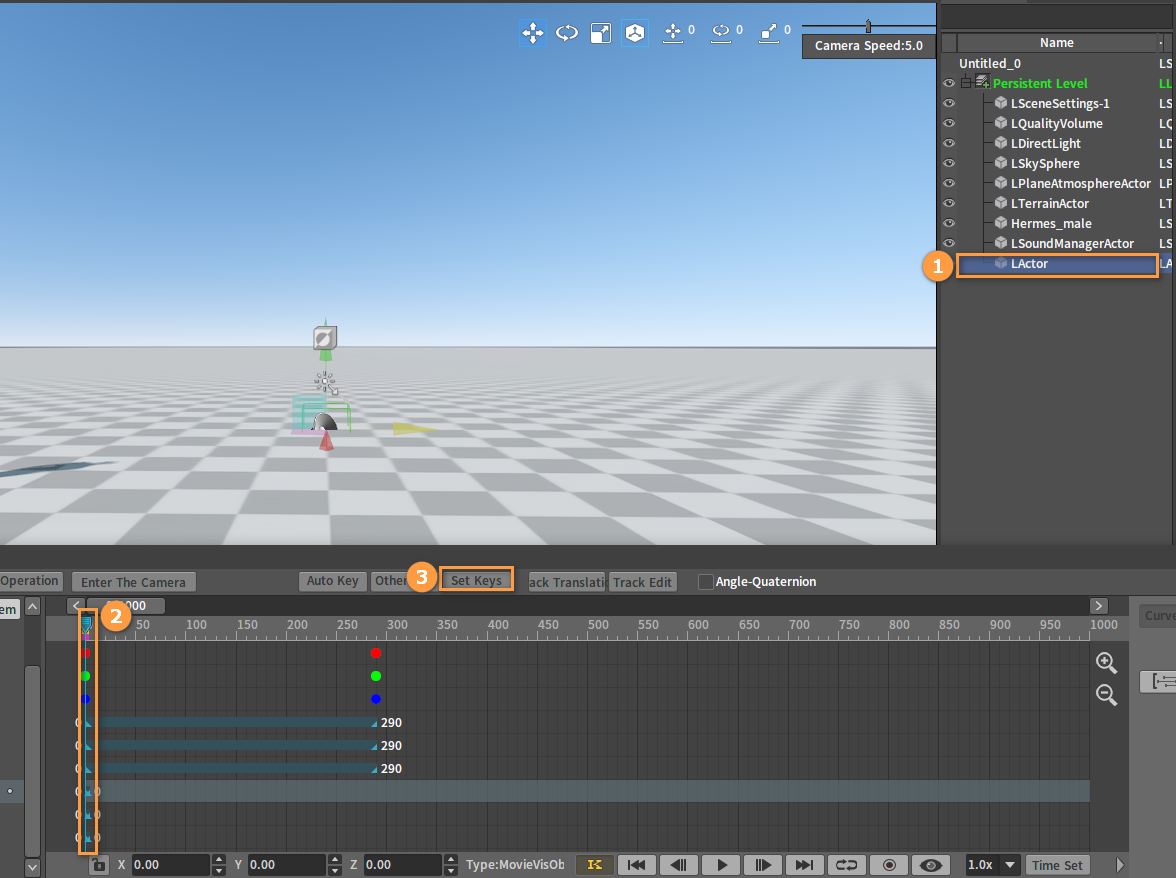
Select an Actor, click Set Keys, and the Position, Angle and Scale tracks will be added automatically to the timeline for the selected Actor.
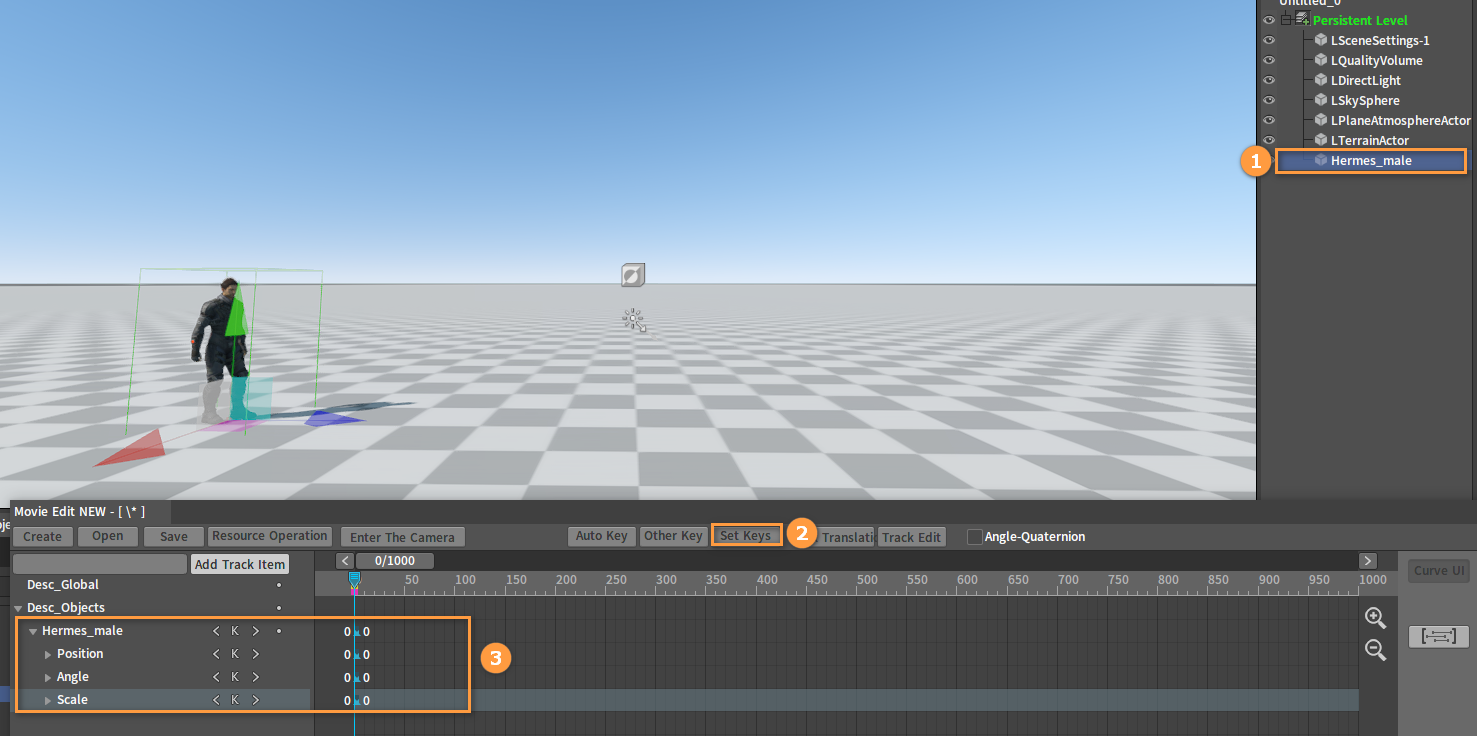
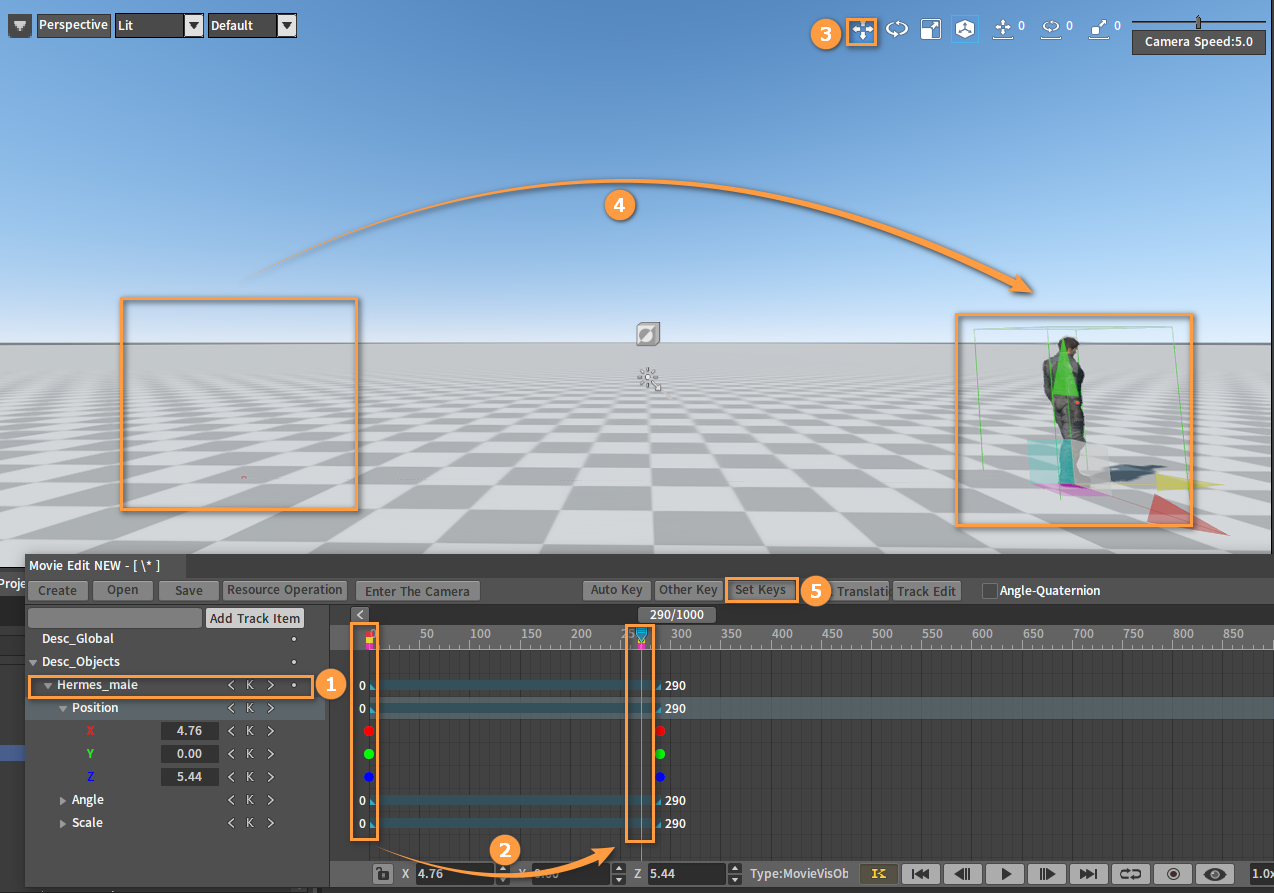
Select the Actor, move the pointer, select the move mode in the Level, and move the Actor. Click Set Keys to mark the Position, Angle, and Scale states of the Actor. We can see some changes in the unfolded Keyframe Actor Tree and some property Keyframes appear in the Keyframe working area.
Setting Action Keyframes
Select the Actor in the Movie Editor, move the pointer to the start frame, and click Add Track Item -> Others -> Action Key.
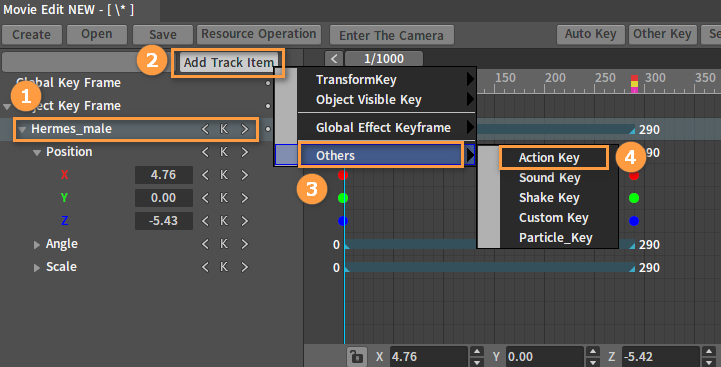
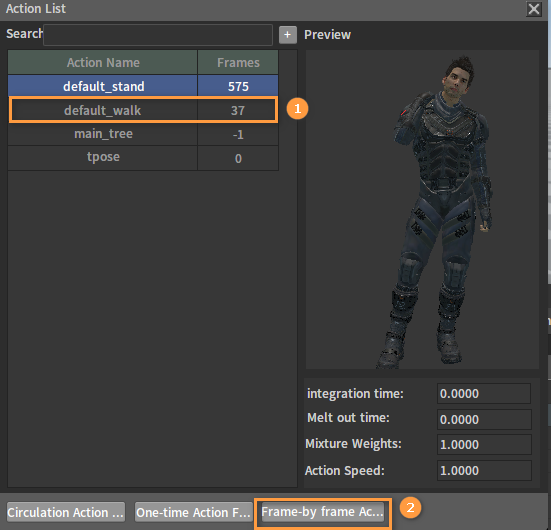
In the pop-up action selection window, the left column shows an Action List set for the Actor before, and we can preview the action effects in the right column. Select a walking action, click Frame-by-Frame Action at the bottom, close the window and a Frame-by-Frame Action will be added to the Actor Tree on the left of the Movie Editor.
Action keyframe added to the Actor Tree:
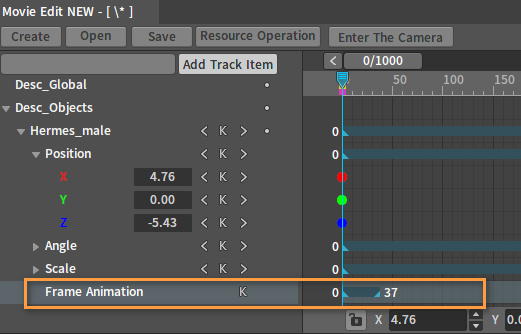
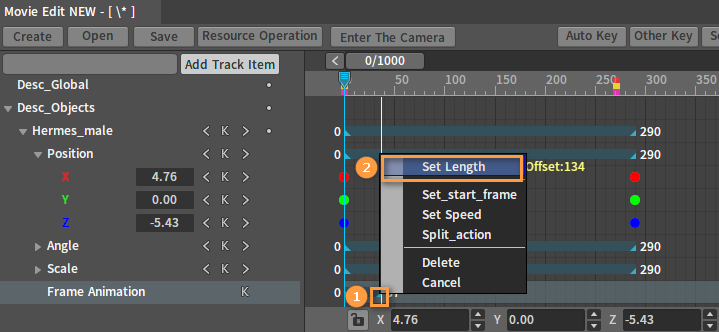
Click the triangular button at the bottom right of the action track, click Set Length and set its length the same as that of the Position track.

Setting Sound Keyframes
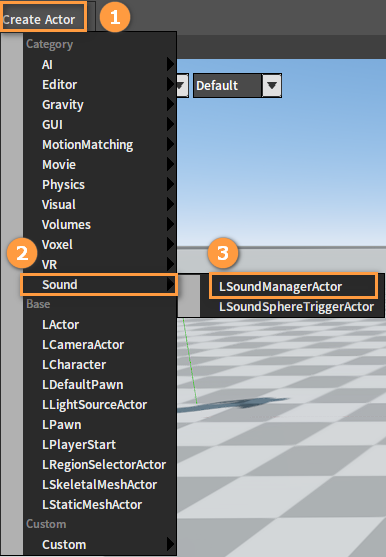
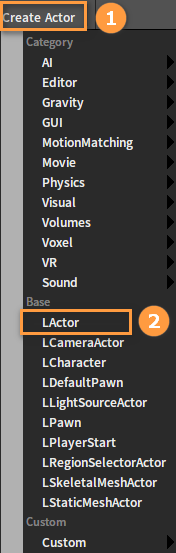
Click Create Actor -> Sound -> LSoundManagerActor.
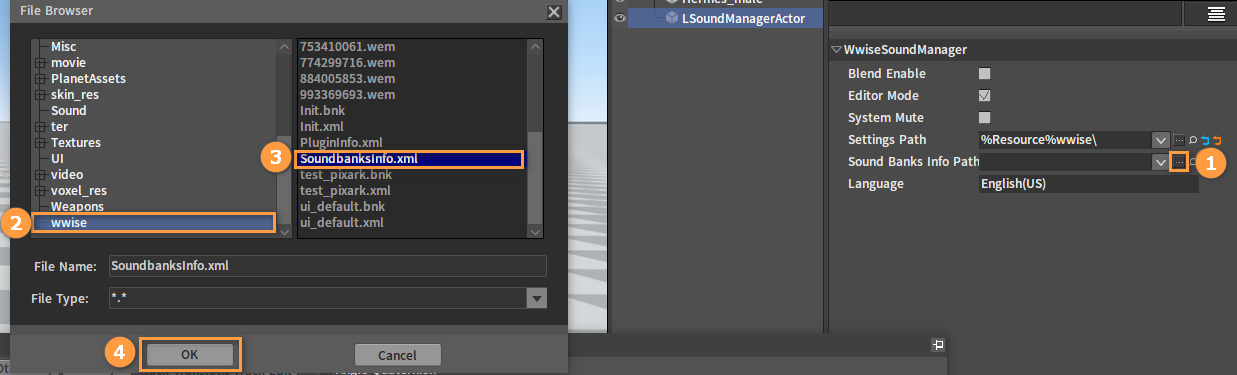
Select LSoundManagerComponent(Inherited), and select wwise in Settings Path.

Select wwise -> SoundbanksInfo.xml in Sound Banks Info Path.
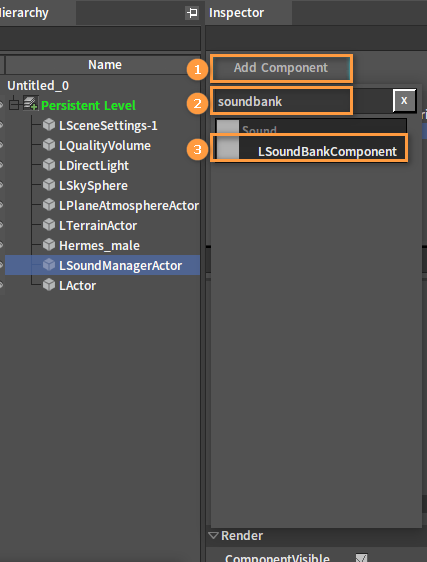
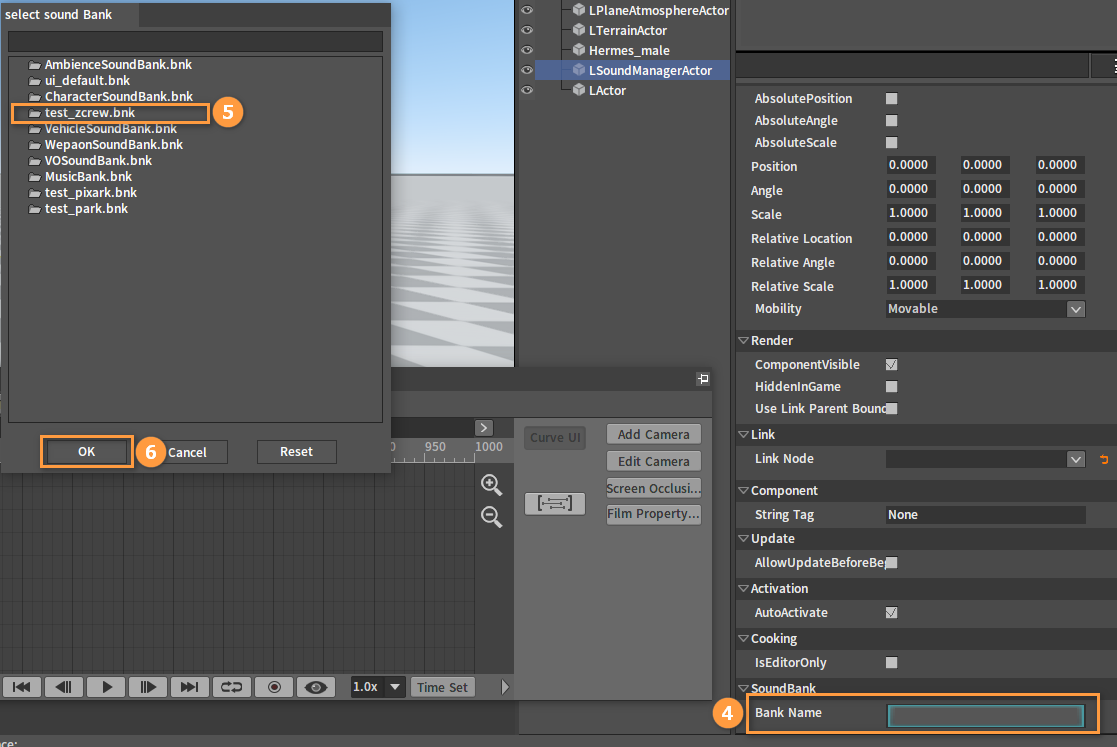
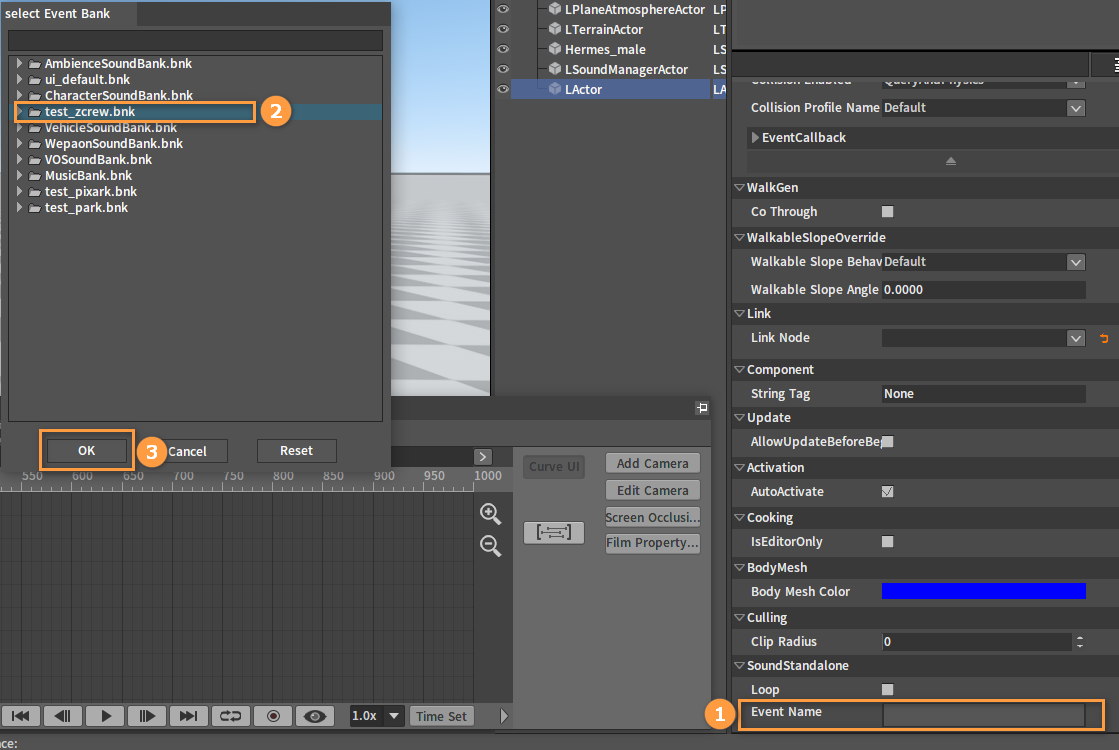
Click Add Component to add the LSoundBankComponent, and select a BNK file in Bank Name of SoundBank at the bottom of the property column.
Click Create Actor -> LActor, and click Add Component to add an LSoundaloneComponent to the LActor.
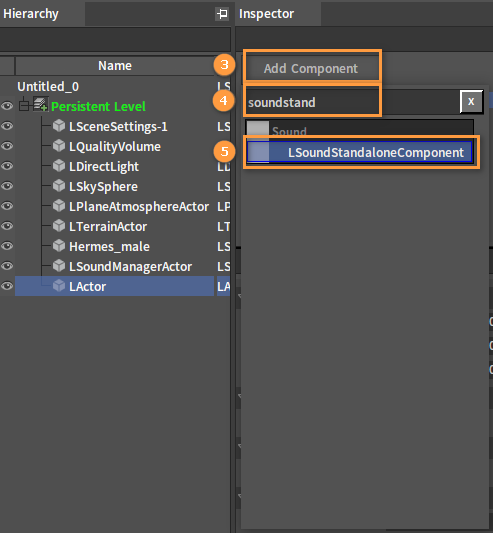
Select the BNK file just selected in Event Name at the bottom of the component property column.
Select LActor, move the pointer to the start frame, and click Set Keys.
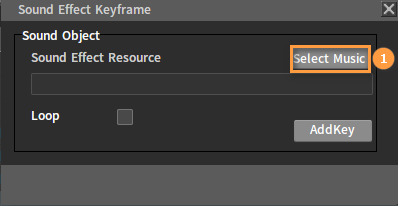
Select LActor in the Movie Editor, and click Add Track Item -> Others -> Sound Key.

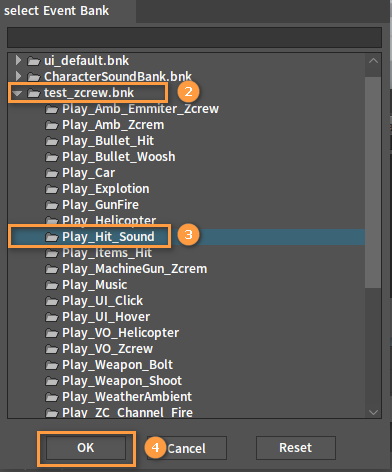
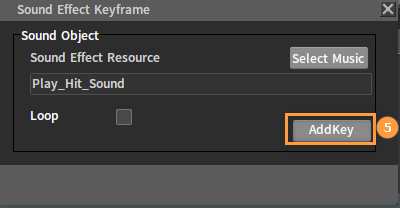
Click Select Music in the pop-up Sound Effect Keyframe window, open the test_zcrew.bnk we just selected, select a sound and click AddKey.
Playing Test Movie Effect
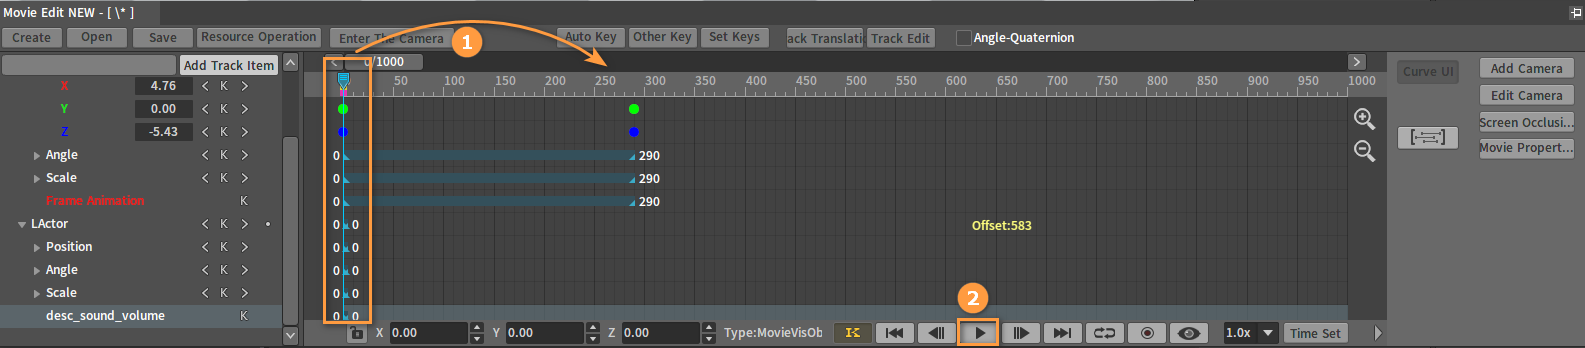
To determine whether the playback effect is satisfactory, move the pointer slider on the timeline again, move it to the beginning of the animation or the position you want to start, and then click the Play button in the play control area at the bottom right of the film editing interface to start preview the animation playback effect.
Adding and Switching Between Cameras
The viewpoint is fixed when playing the animation. Sometimes, we can show more diverse camera change effects by moving the Point of Views. At this time, we need to add a camera Actor and see the effect from the camera's viewpoint while playing.
Move the pointer to Frame 0, click Add Camera, adjust the settings in the pop-up window, click Current Location to add.
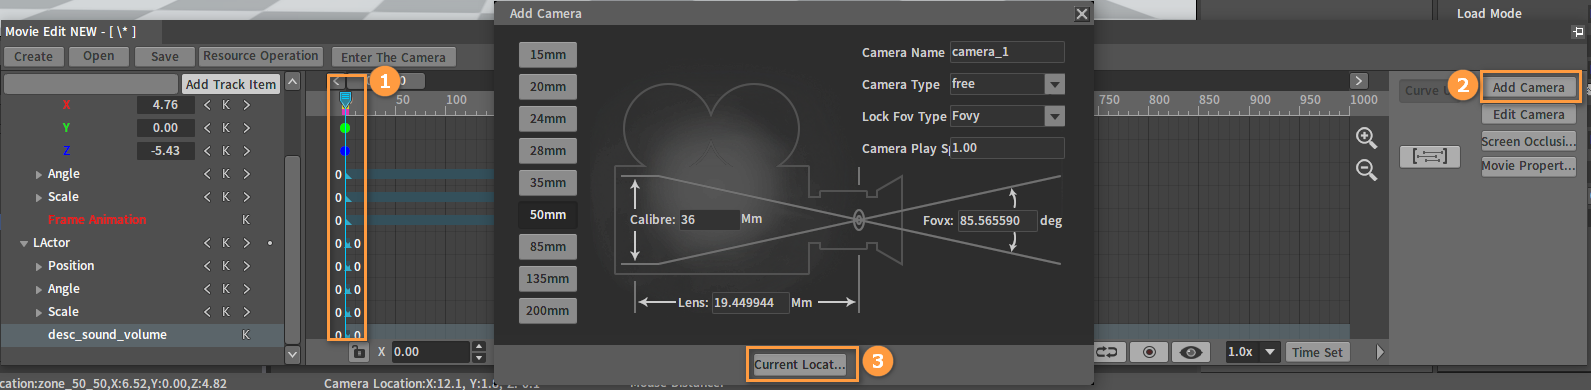
An LCameraWrapperActor will be added to the object tree on the left and we will enter the camera's viewpoint by default. At this time, we can see that the ![]() button here turns red, and the name changes to the current camera's name, which means that we are in the POV of the current camera.
button here turns red, and the name changes to the current camera's name, which means that we are in the POV of the current camera.
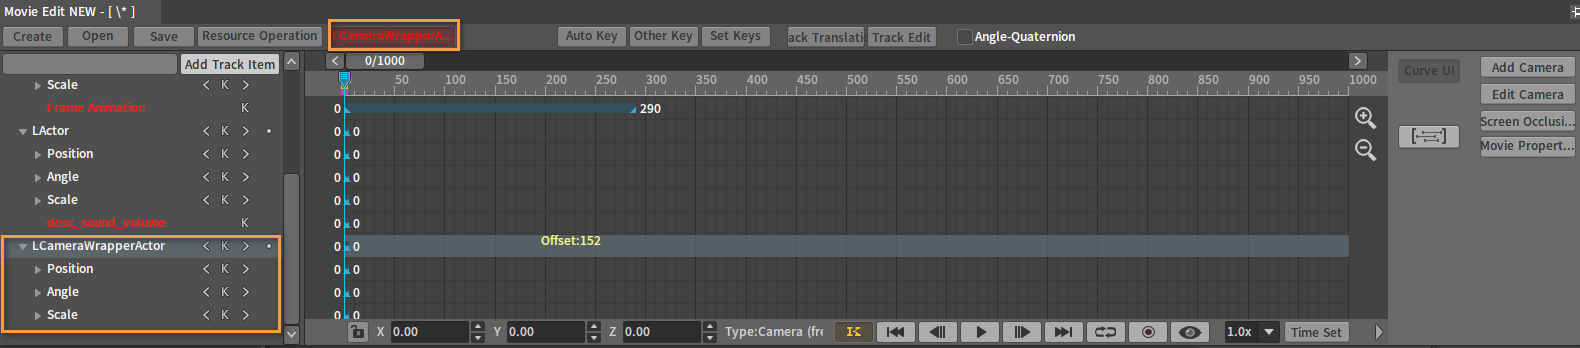
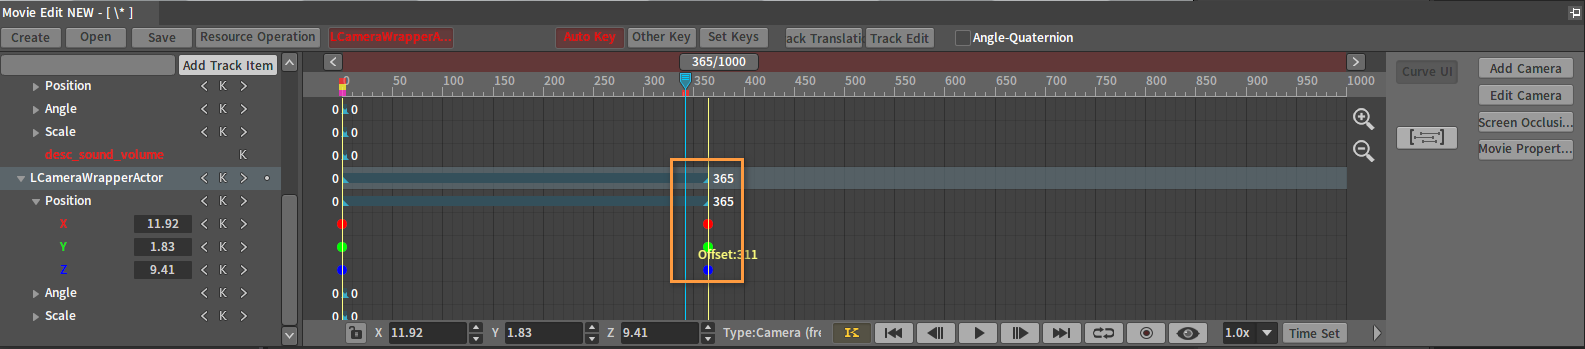
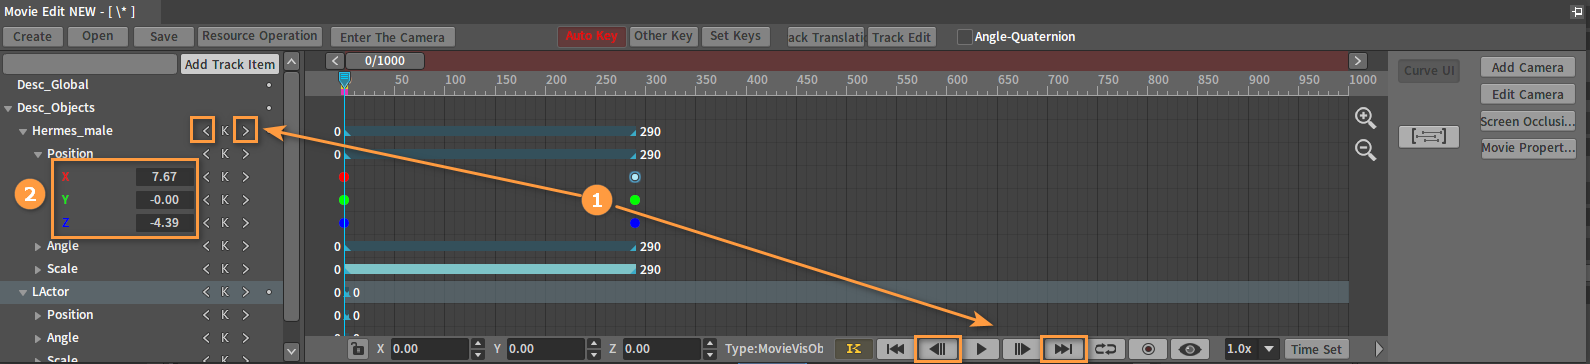
Select the Camera Actor to enter the camera's current viewpoint, move the mouse pointer slider to a new position, then click Auto Key, the red button indicates that we have turned on the Automatic Keyframe Setting, when the basic properties of the Actor are modified, the changed properties such as Translation, Rotation and Scaling will be automatically recorded.
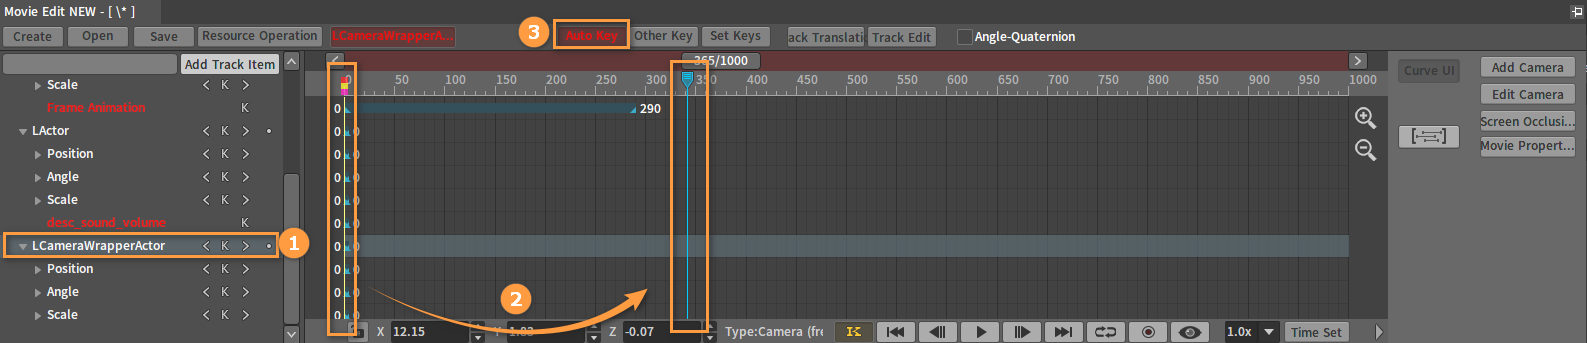
Move the position of the current viewport of the camera, the Camera Actor in the Keyframe area of the right of the Movie Editor will be Keyframed automatically, and the camera will set a new keyframe.
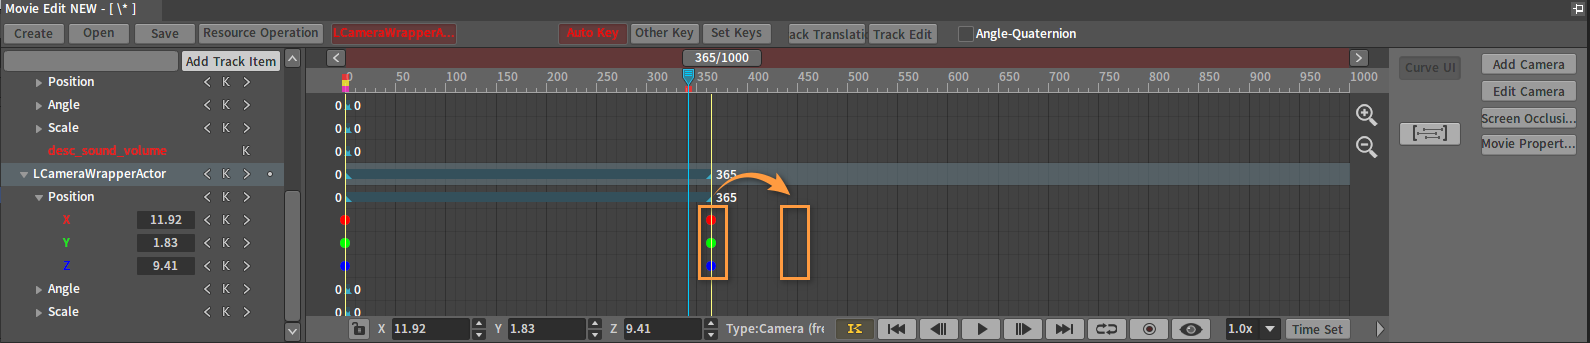
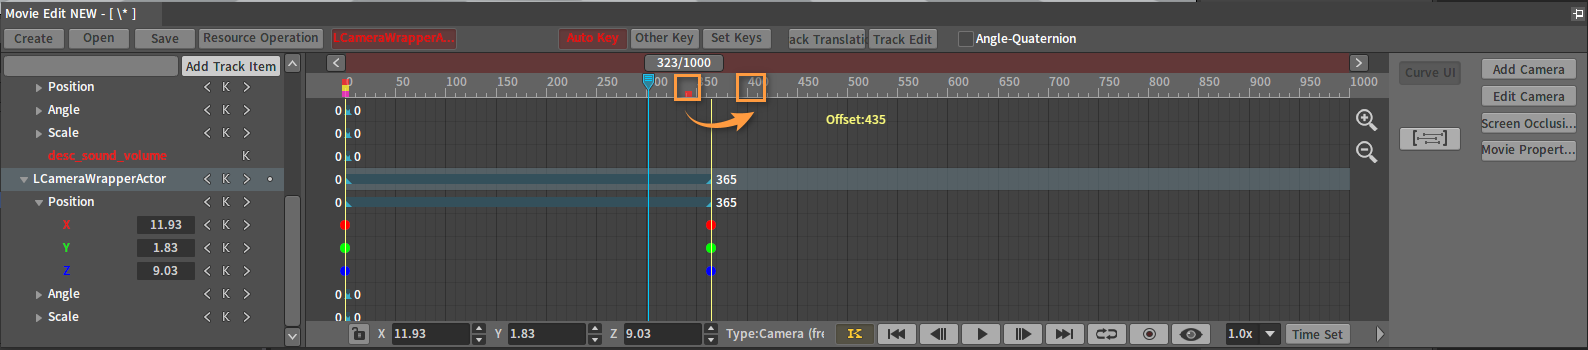
Modifying the Keyframe Properties
If you are not satisfied with the Keyframe setting before, you can adjust it by dragging the three Keyframe dots in different colors as shown in the pic below. Or select the small box on the timeline, and move it to a new position. At this time, the Keyframe dots under the time point will move together.
Drag the keyframe dots:
Drag the small box:
Drag the slider to see the effect. Use the left and right arrows to adjust Keyframes and change the property value of the set Keyframe. The position and orientation of the current camera can be modified until satisfied. The Keyframe property will be updated automatically after a few second. At the end of the adjustment, you can click the red Auto Key to restore the unpressed state and turn off the automatic Keyframe activation mode. Changing camera position and orientation now will not affect the Keyframe property value.
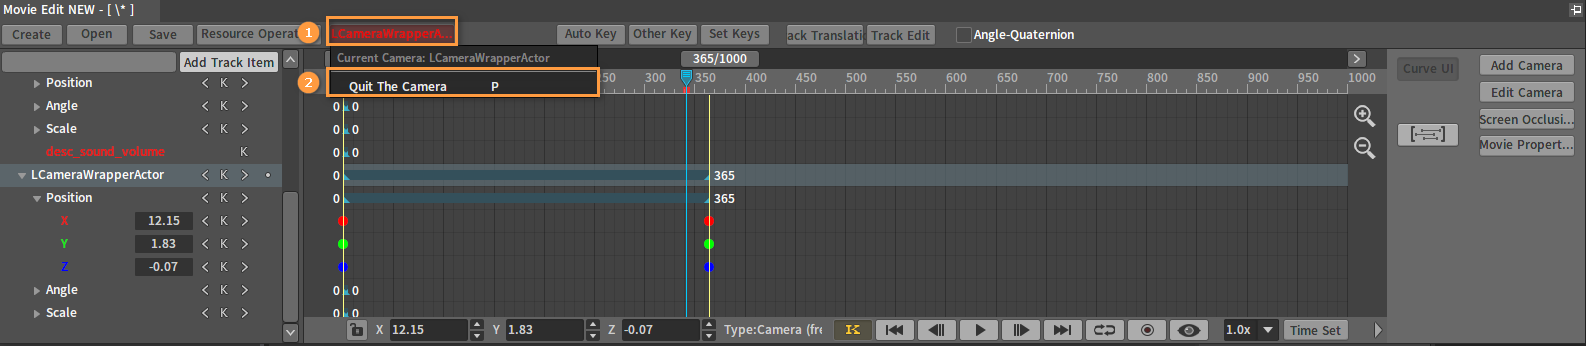
Quitting the Camera
After that, if we want to add or modify the Keyframe properties of other Actors, we need quit the current camera. Click the red Current Camera button, there will be a Quit The Camera option. We can click it or use the shortcut key P to exit and restore to the free view.
Switching Between Different Cameras‘ POV
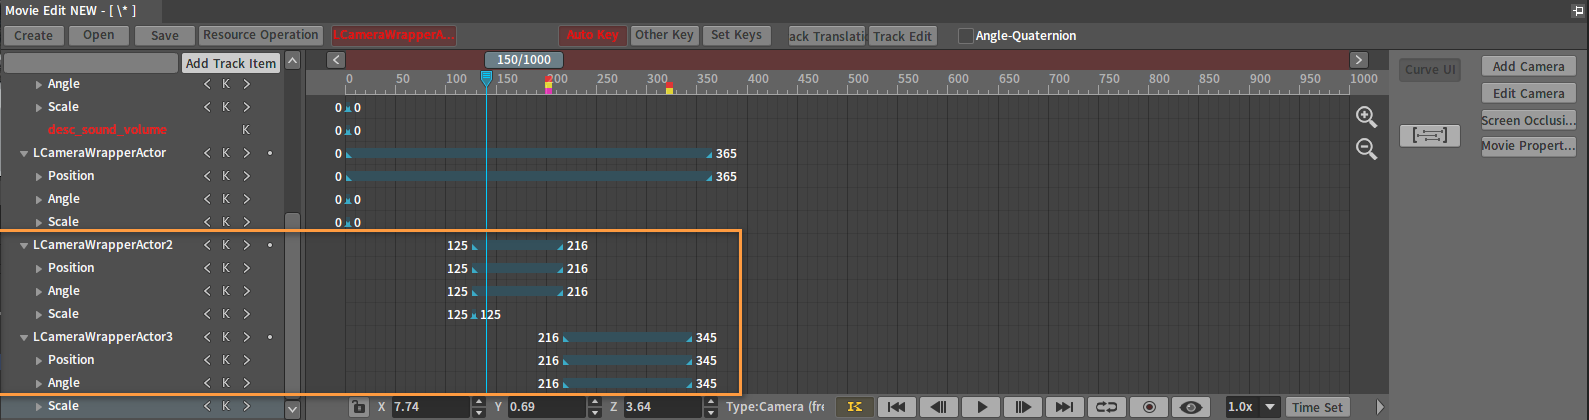
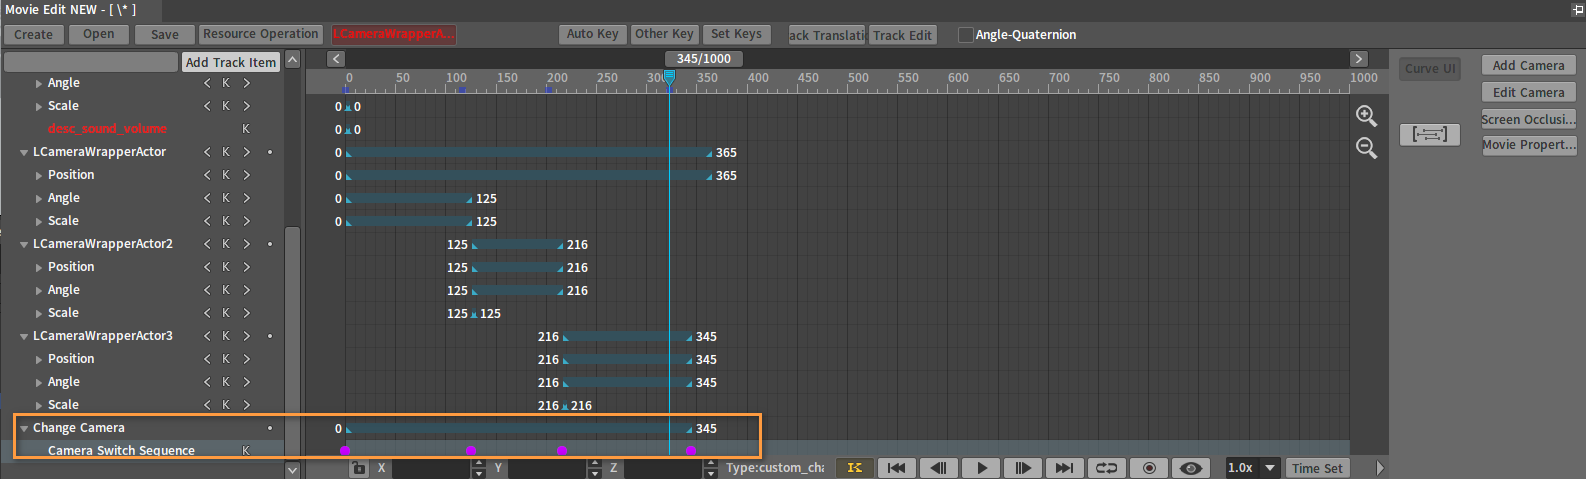
The coherent and smooth changing effect can be done with only one camera, but there will be certain moment that we want to show more diverse animation effects from different point of views. In this case, you need to create multiple camera animations, and then switch to the specified camera’s POV at a specific time to continue playing the animation. We can do it in following steps:
Use the method we mentioned above to create multiple camera animations on different part of the timeline, and change the position and orientation of each animation respectively.
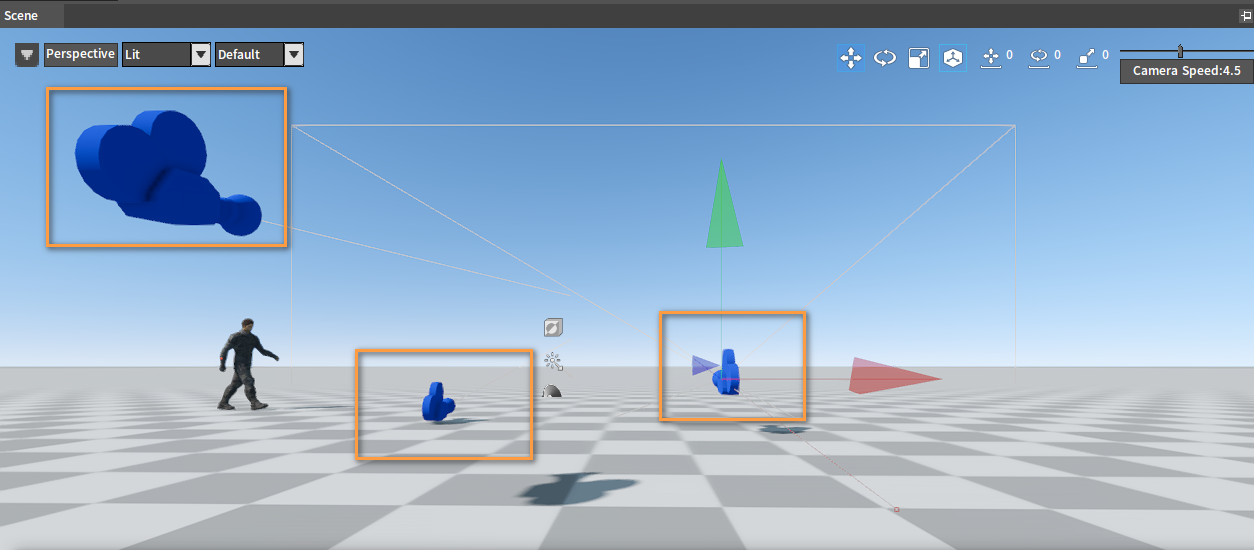
Cameras in the scene as shown below:
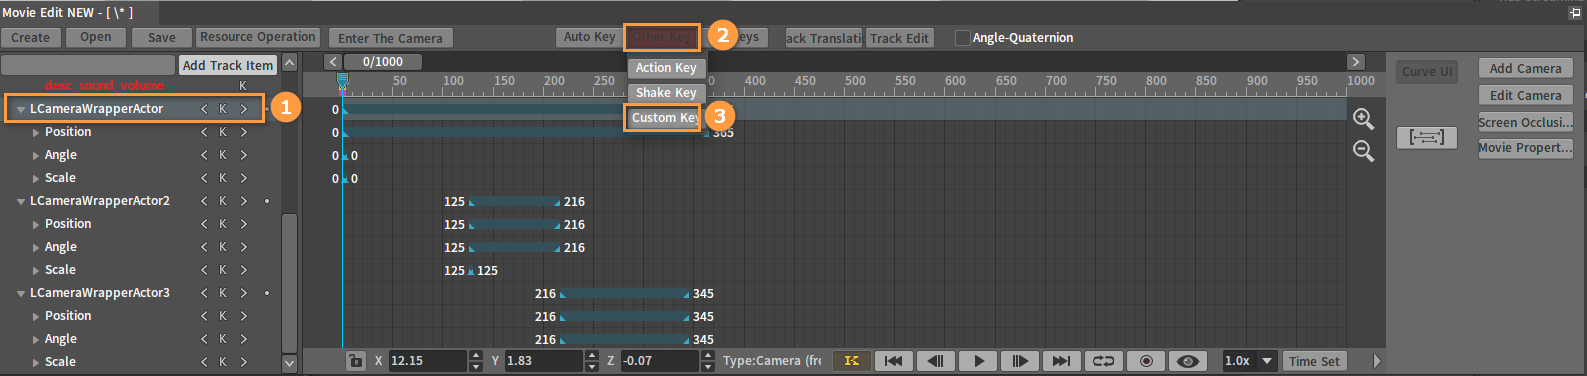
Turn off the Auto Key mode, select LCameraWrapperActor, then click Other Key -> Custom Key, in the pop-up Custom Keyframe Setting window, click the Switch Camera Keyframe on the left. Use the drop-down box under the Switch to menu, select LCameraWrapperActor, click AddKey, now we can see a new Keyframe appearing here, it will also appear in the component tree on the right.
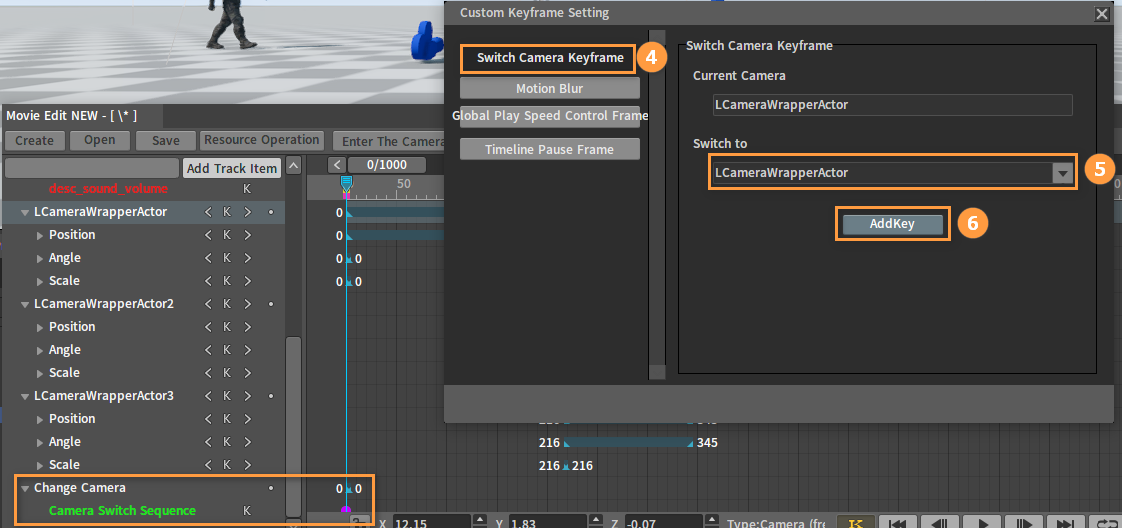
Move the pointer slider to the first frame of the second Animation, select the LCameraWrapperActor, use the same method we used before, select LCameraWrapperActor2 in drop-down box under the Switch to menu, click Add Key; Similarly, slide the pointer to the last frame of the second Camera Animation, select LCameraWrapperActor2, select LCameraWrapperActor3 in drop-down box under the Switch to menu and click Add key; Finally slide the pointer to the last frame of the third Camera Animation, select LCameraWrapperActor3, and select LCameraWrapperActor in drop-down box under the Switch to menu and click Add key.
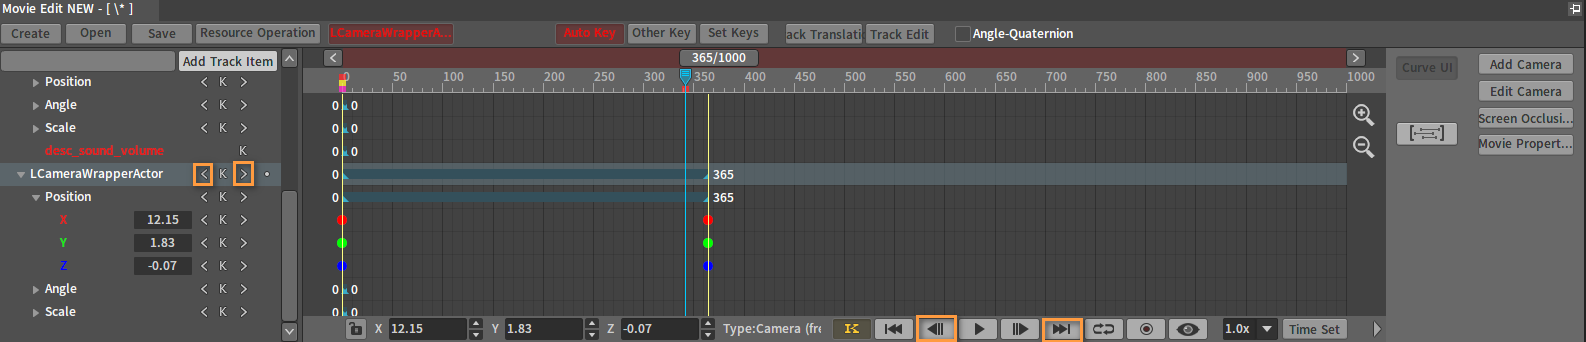
Value Changes: Switching Keyframes, Modifying Values
If you want to change the property value of the set Keyframe, you can use the Keyframe switching button to adjust the Keyframe position, both the ![]() and
and ![]() button behind Actors and properties and the left
button behind Actors and properties and the left ![]() and right
and right ![]() Keyframe control buttons in the bottom can be used to change the Keyframe node position. After the adjustment, you can adjust the property values on the left by typing in specified values, or by clicking the input box and dragging the mouse to change the value. One thing worth mentioning is that, if you are not in the Auto Keyframe mode, it is necessary to click
Keyframe control buttons in the bottom can be used to change the Keyframe node position. After the adjustment, you can adjust the property values on the left by typing in specified values, or by clicking the input box and dragging the mouse to change the value. One thing worth mentioning is that, if you are not in the Auto Keyframe mode, it is necessary to click ![]() button after modifying the value, so that the Keyframe node will be complete.
button after modifying the value, so that the Keyframe node will be complete.
Auto Key mode on:
Auto Key mode off:

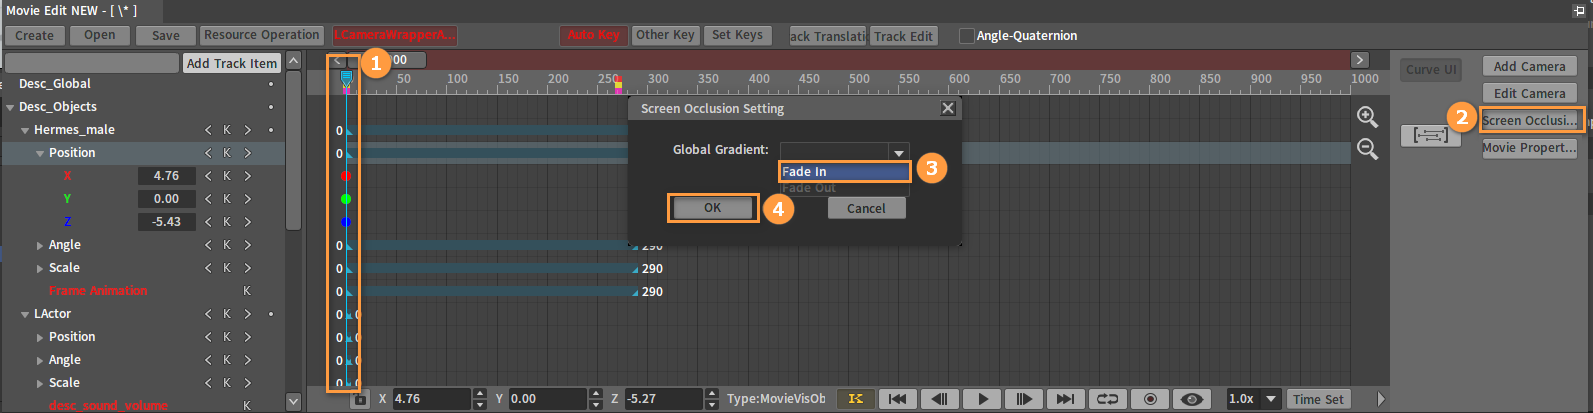
Screen Occlusion Keyframes
The movie animation will be played in the game, so switching to it directly will be relatively abrupt. Usually, we can add a Fade to black transition between the animations to smooth it out.
First drag the timeline pointer to frame 0 at the beginning of the animation, click ![]() on the right, select Fade In under the drop-down menu of Global Gradient, and click OK.
on the right, select Fade In under the drop-down menu of Global Gradient, and click OK.
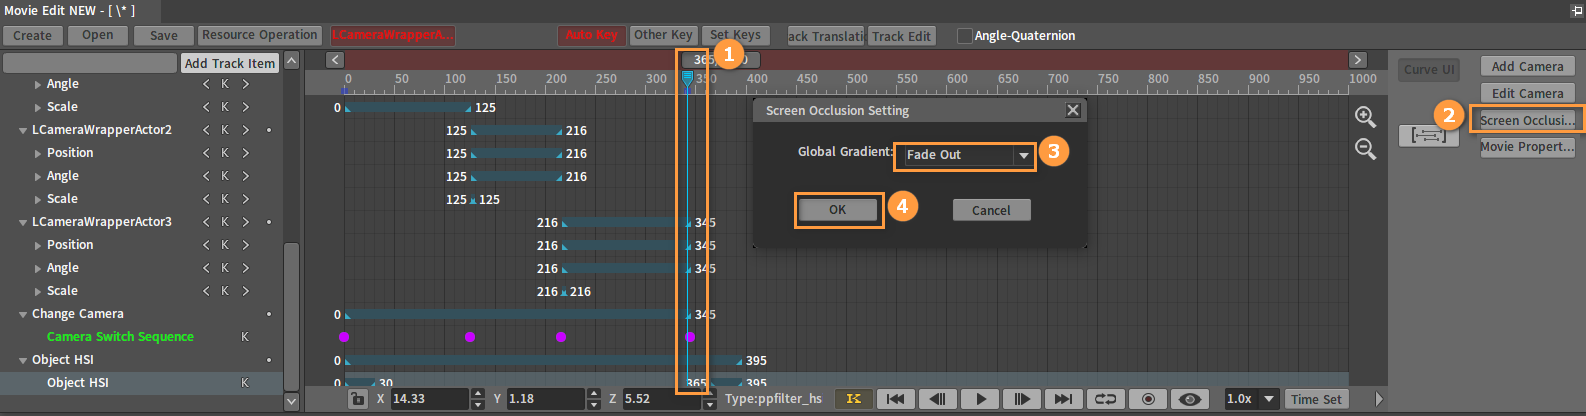
Then slide the pointer to the last frame of the animation, click ![]() on the right, select Fade Out under the drop-down menu of Global Gradient, click OK.
on the right, select Fade Out under the drop-down menu of Global Gradient, click OK.
Playing the Animation, Effect Switches
After creating the animation, we can adjust the effect by repeating playback, switching POVs, hiding Actors, fine-tuning timeline and value, etc.
Play Control is in the play control area at the bottom. For details, please refer to the UI description.
![]()
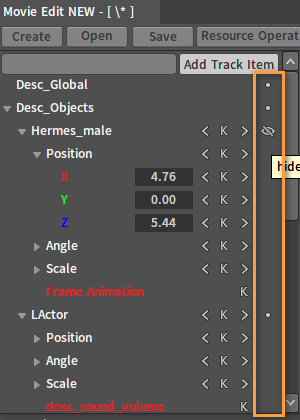
The Hide object feature can temporarily hide the current object or turn on/off the current global effect.
Saving Animation Projects
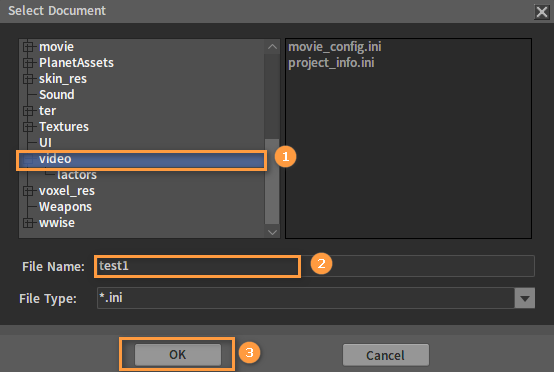
After finishing editing, click the ![]() button on the upper left corner of the Editor. When we use it for the first time, the Select Document window will pop up. Select an appropriate path. Here we select the movie folder, enter the project name, and click OK. Once the Animation has been saved, the Title Bar here will be changed to the project name we just entered.
button on the upper left corner of the Editor. When we use it for the first time, the Select Document window will pop up. Select an appropriate path. Here we select the movie folder, enter the project name, and click OK. Once the Animation has been saved, the Title Bar here will be changed to the project name we just entered.
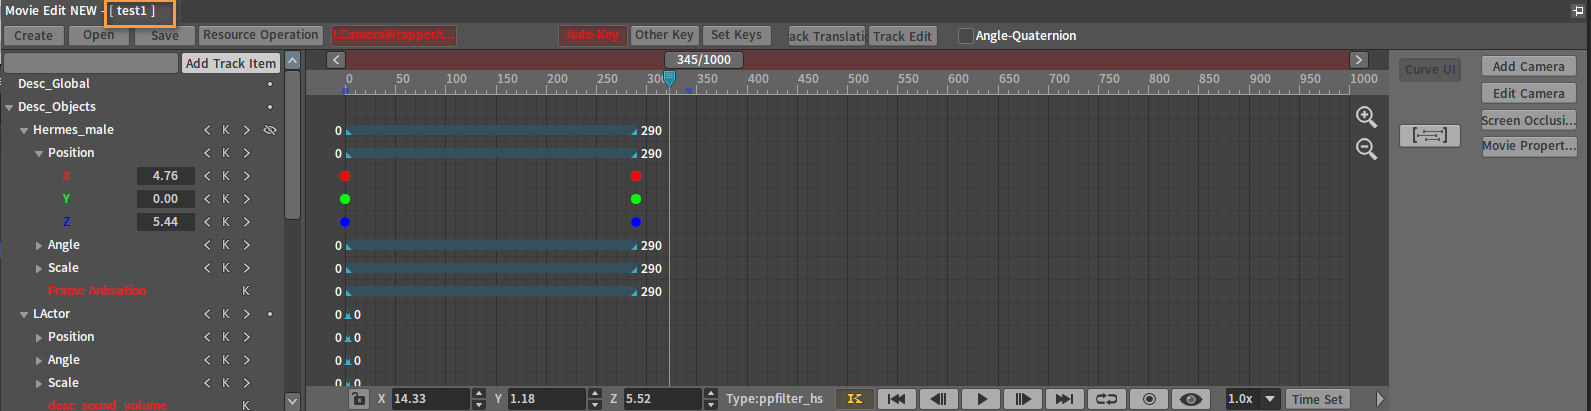
Title Bar name changed as below:
Opening Movie Projects
After saving the Movie Project, if you want to watch it again or modify the previous effect, you need to reopen the Movie Project.
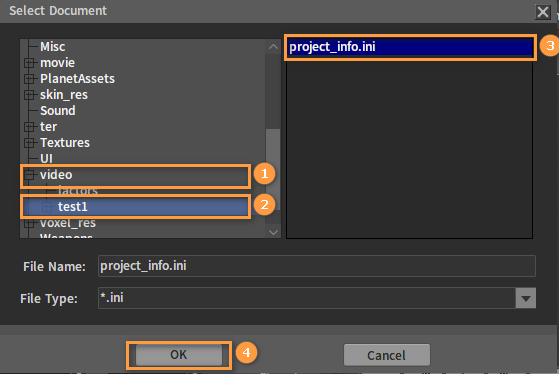
Click ![]() , select the movie project resources as needed in the pop-up window, and click OK to close the window and open the Project.
, select the movie project resources as needed in the pop-up window, and click OK to close the window and open the Project.
Summary
This chapter shows the creation process of a simple but fully functional movie animation built from the ground up, so that we can have a basic understanding of the movie animation production process. With the gradual improvement of the related features, the Movie Editor can be used to make richer and more diverse animations.